Are you looking for a simple and effective way to manage data for your mobile app? Google Sheets can be your solution. With Appery.io, a powerful no-code app-building platform, you can easily integrate Google Sheets into your app development process, turning your data into dynamic and interactive elements in your mobile app.
In the video tutorial, you’ll see how to use Google Sheets as a database for your mobile app without writing any code. Whether you need to store product information, customer data, or any other kind of content, Google Sheets serves as a flexible and user-friendly database. With Appery.io, integrating this data into your app becomes seamless and straightforward.
Want to see how it works in action?
Check the video below to learn how to connect Google Sheets to an app, manage data, and build a working system—all without coding! This step-by-step YouTube guide walks you through setting up the Google Sheets API, integrating it into Appery.io apps by using the List Details and the Server Code GoogleSheetCRUD plugins, and making a real-time app with CRUD operations.
This combination of Google Sheets and Appery.io gives you a simple yet powerful toolset for mobile app development.
If you’re ready, start building now and take your app to the next level!
PS If you found this helpful, don’t forget to like, comment, and subscribe for more tech tutorials!
Have you ever wondered how apps send updates in real-time? The magic happens with WebSockets. Today, we’ll show you how to add WebSockets to your apps using Appery.io. This low-code app-building platform makes it easy to create complex apps quickly. Note that this post supports our comprehensive video tutorial and if you are interested in details, you are welcome to watch it.
By following the steps below, you can easily enhance your app with real-time communication features using WebSockets and Appery.io. Exciting, right? Let’s get started!
Before importing it, you can click the link to open its documentation page. You’ll see it contains the code for the WebSocket server. This server needs to be run somewhere. While real applications may use Amazon or Azure, we’ll use CodeSandbox for testing.
Using CodeSandbox
1. Create a new Devbox.
2. Select Node.js Server from the list of backend frameworks.
3. Name your Devbox and set its visibility to “Public”.
4. Install two npm modules: `express` and `socket.io`.
Now, let’s move to the next step.
Setting Up Your WebSocket Server
Copy the server code from the documentation page and paste it into your `index.js` file in CodeSandbox. If everything is correct, the server should start successfully.
Back to Appery.io
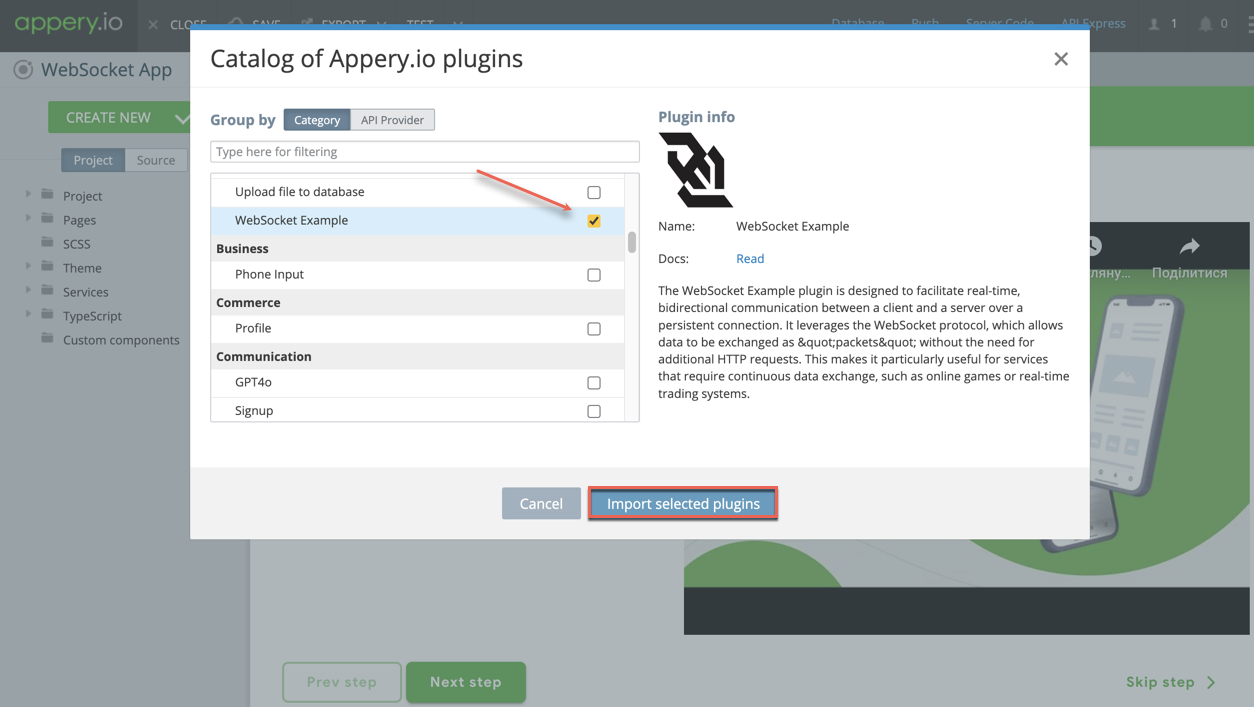
Return to the Appery.io project and click Import selected plugins with the WebSocket Example plugin checked. This plugin helps you integrate WebSockets into your app. But first, let’s test it.
Testing Your App
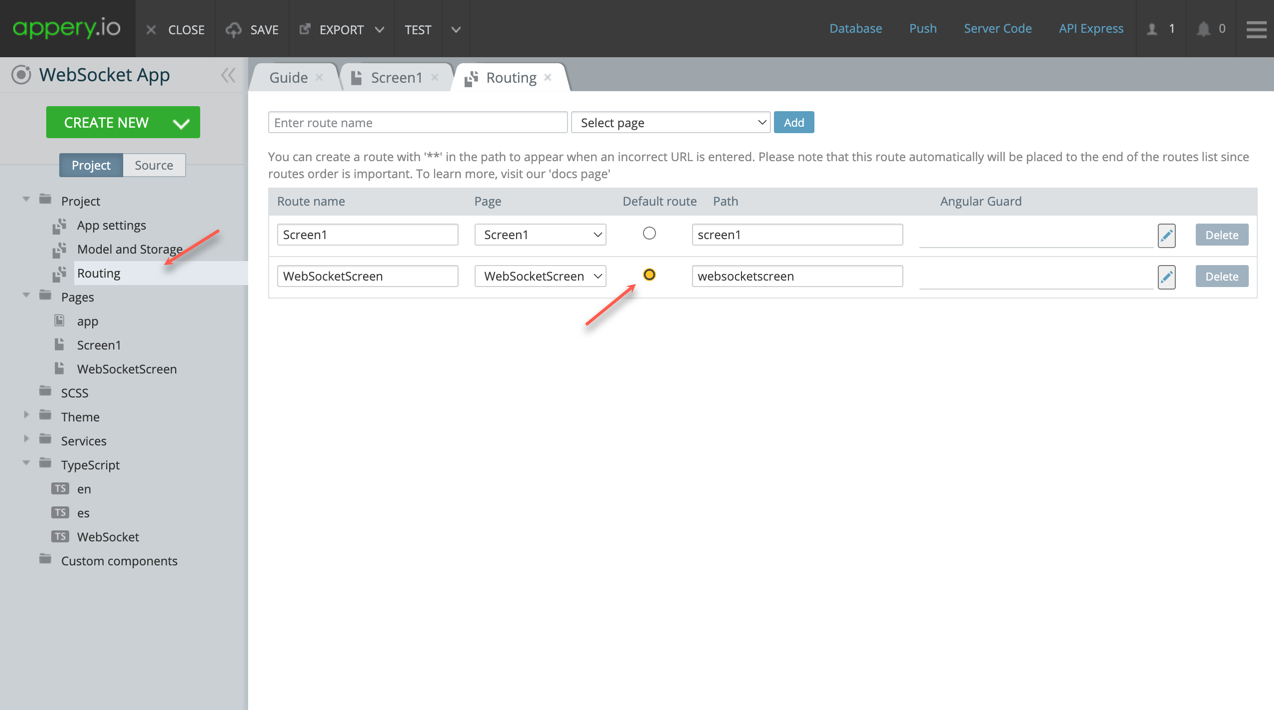
Go to the Project > Routing section and set “WebSocketScreen” as the default page.
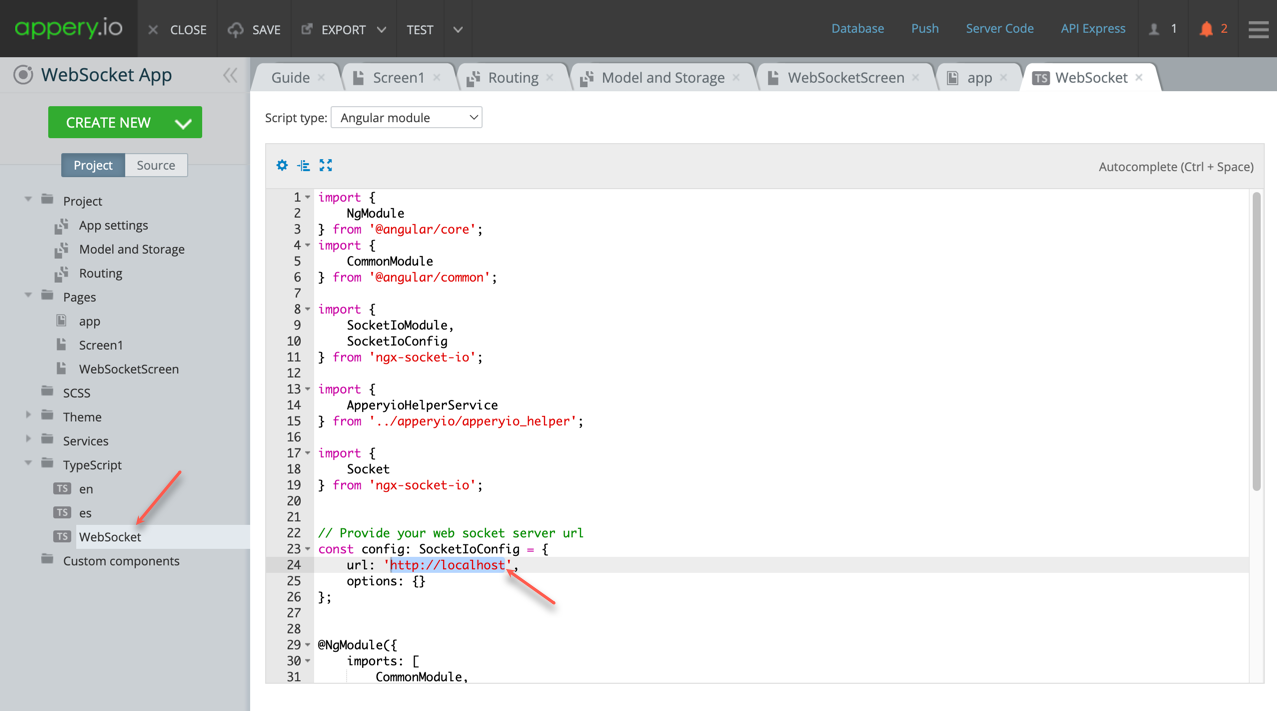
Next, navigate to TypeScript > WebSocket and specify the URL of your WebSocket server obtained from CodeSandbox.
Now, run your app in different browsers like Google Chrome, Firefox, and Edge. Enter a test message and click the “Send” button.
Ready! The message should be delivered to all clients in real-time.
Conclusion
Now you’ve seen how to add Websockets to your apps using Appery.io. This post is a companion piece to our detailed video tutorial. The demo app isn’t a finished product but provides a solid template for building your own real-time communication features. Give it a try and unlock powerful networking capabilities in your applications!
Hey everyone! The Appery.io team is excited to announce our latest video tutorial on integrating push notifications into your mobile app by using Server Code. 🎉
Push notifications are a powerful tool for engaging app users. With Appery.io, integrating these notifications is simple, even if you’re not tech-savvy. In this video, we are showing you how to add push notifications to your mobile app using Appery.io , a low-code platform that makes app development accessible for everyone.
Our new how-to video covers:
– Setting Up Push Notifications: Learn how to configure notifications before sending.
– Triggering Custom Actions: See how to trigger popups or other actions when a notification is delivered.
– Sending Technical Data: Discover how to pass custom data, like navigation instructions, via push notifications.
– Automating Notifications with Server Code: Understand how to send notifications programmatically for real-world use cases.
– Targeting Specific Devices and Users: Master the art of sending notifications to individual devices and users.
Highlights from the Video
1. Real-Time Updates: With Live debug, any changes you make in Appery.io are instantly reflected on your mobile device.
2. Custom Alerts: Trigger TypeScript code when a notification is delivered, showing custom alerts or actions.
3. Server Code Integration: Learn to automate push notifications using server-side code.
4. User Targeting: Send notifications to specific users across all their devices by linking user IDs.
Watch Now
Don’t miss out! Watch the full video tutorial and elevate your app’s user engagement effortlessly. Click below to watch the video.
Want more insights? Check out our YouTube channel for more videos and tutorials.
Don’t forget to like and subscribe. Your support keeps us going!
Welcome, developers! Today, we’re thrilled to walk you through the seamless integration of one of the most popular payment systems into your app using our Stripe Shop template. Follow us along as we break down the process into easy-to-follow steps, empowering you to enhance your app’s functionality and user experience.
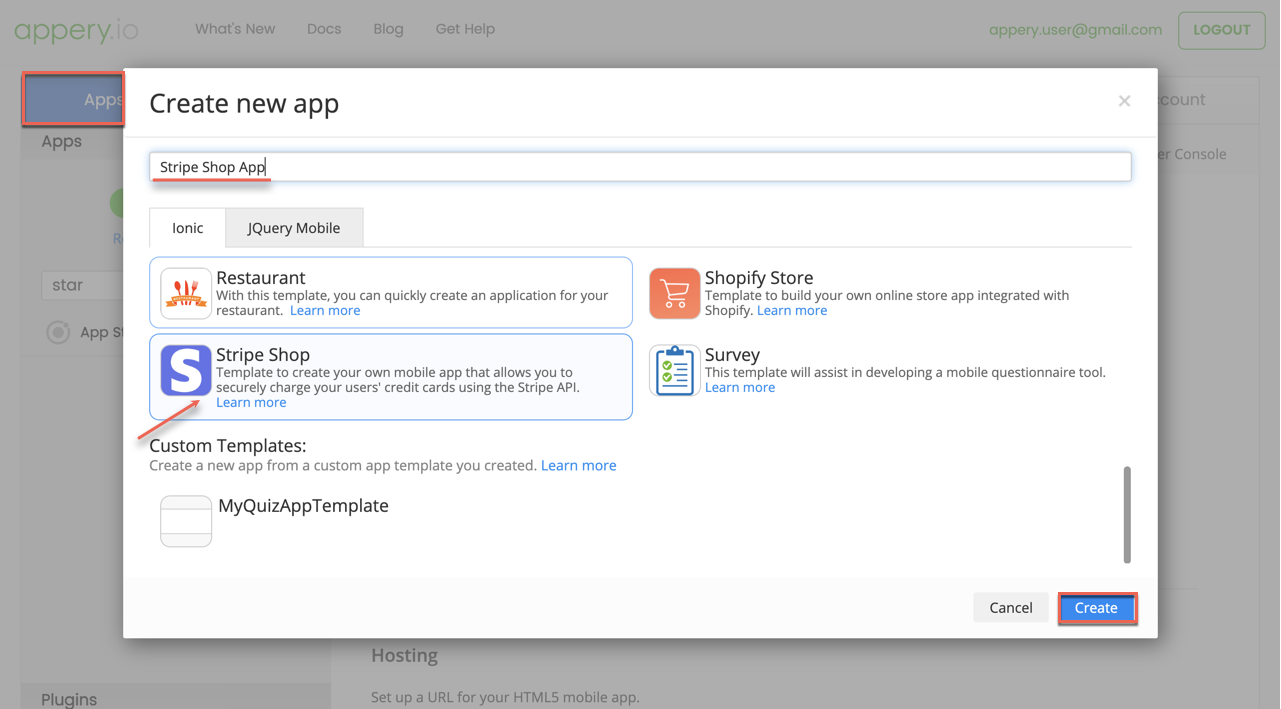
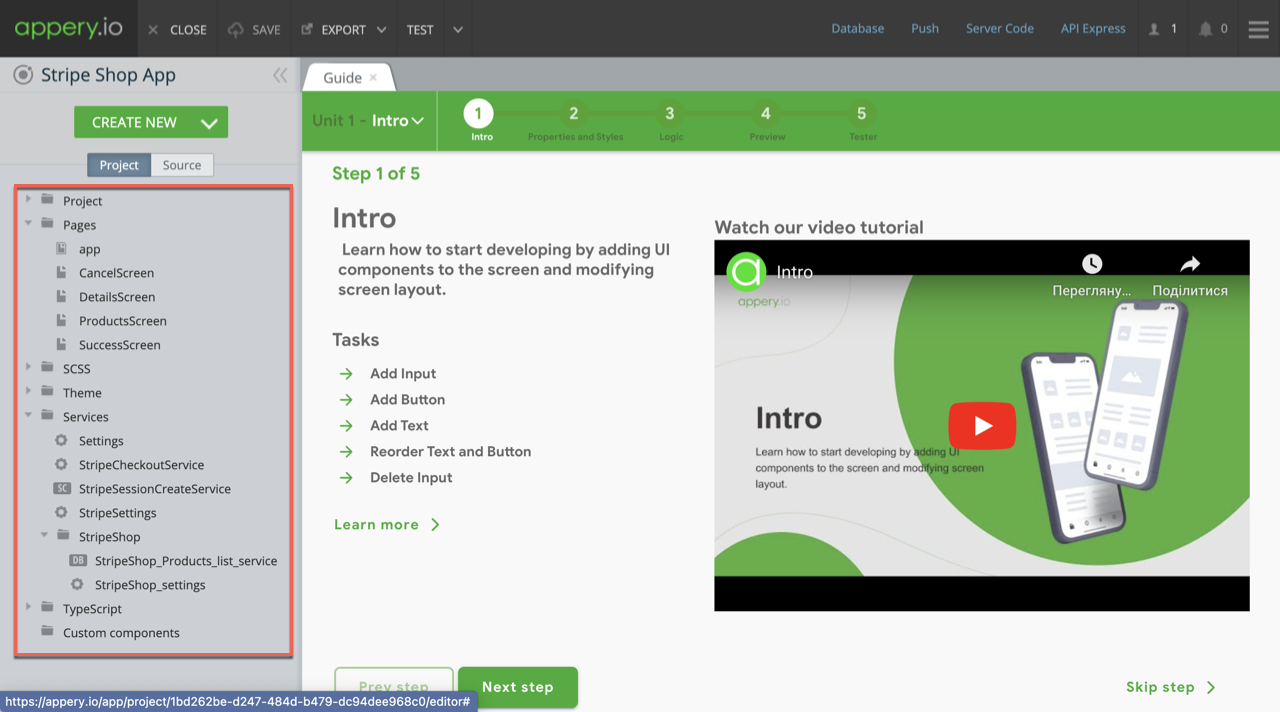
Step 1: Accessing the Appery.io App Builder To begin, head over to the Appery.io platform and access the App Builder. Here, you’ll find a range of templates to choose from. Select the Stripe Shop template to kickstart your journey towards integrating Stripe payments into your app effortlessly.
Step 2: Exploring Predefined App Pages and Services Upon selecting the Stripe Shop template, take a moment to familiarize yourself with the predefined app pages and services it offers. These include the Products, Details, Success, and Cancel screens, designed to streamline the shopping experience for your users.
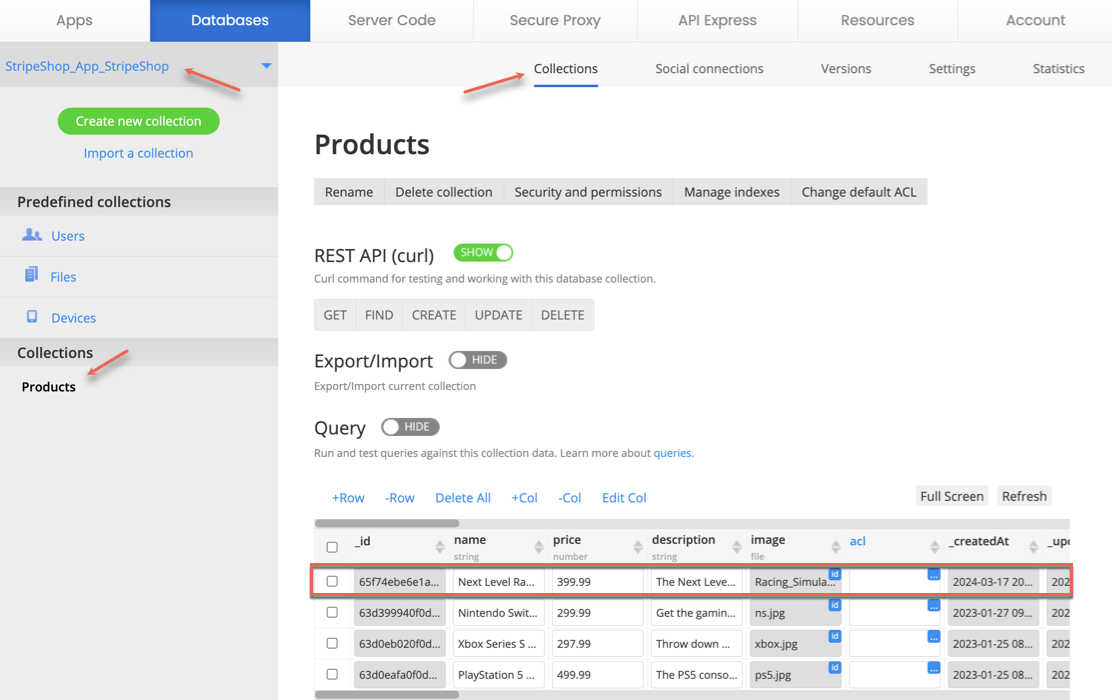
Step 3: Leveraging Linked Backend Services Our Stripe Shop template comes equipped with linked backend services, including a database and server code, preloaded with test data. This allows you to test your app’s functionality immediately, providing a solid foundation for further customization.
Step 4: Customizing Your App Now it’s time to make the template your own. Utilize the App Builder’s intuitive interface to customize your app according to your unique requirements. Add new products, update existing ones, and tweak the design to align with your brand’s identity seamlessly.
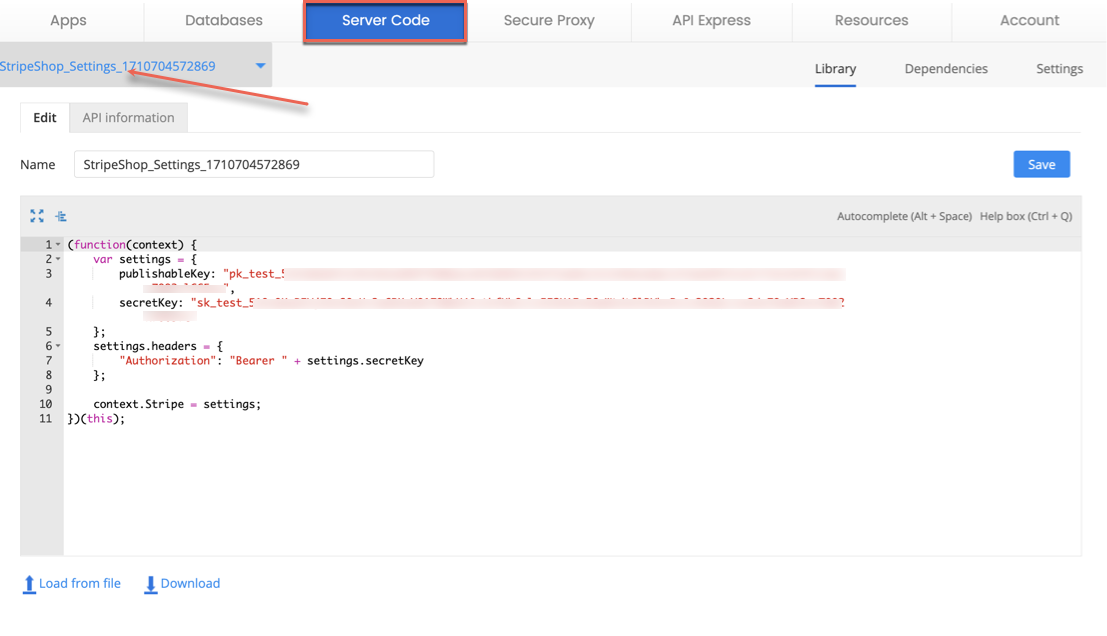
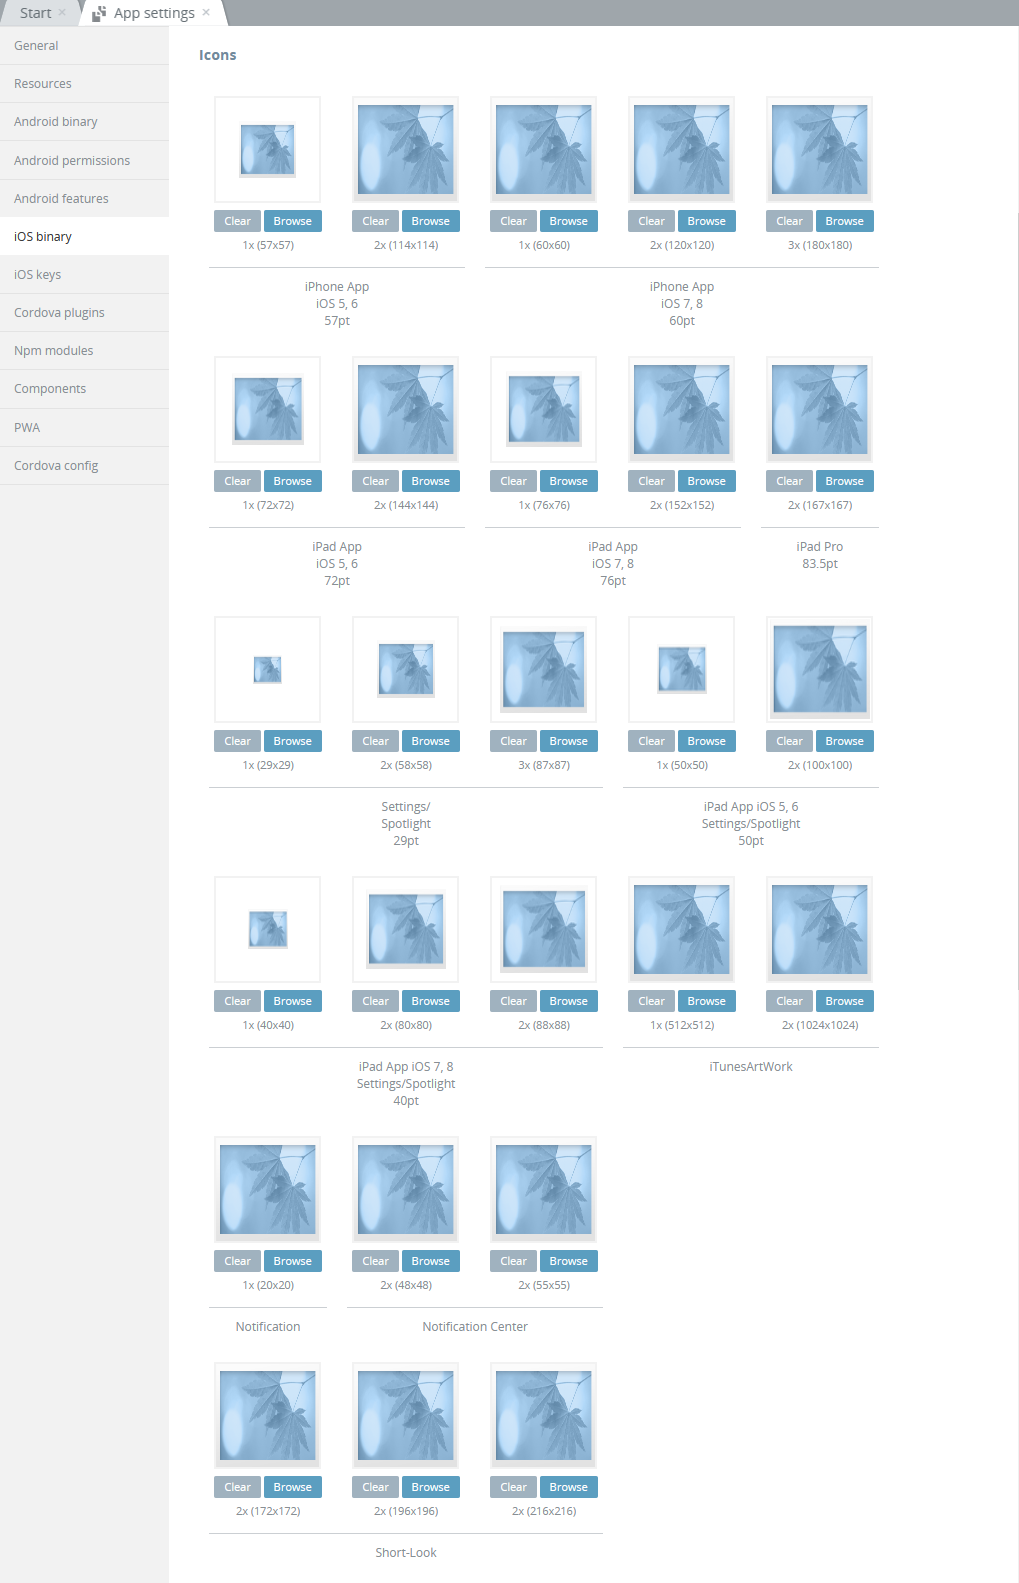
Step 5: Integrating with Stripe API The heart of your app lies in its ability to process payments securely. With Appery.io’s Stripe Shop template, integrating the Stripe API is a straightforward process. Follow our clear instructions to replace the default Server Code keys with your own, ensuring seamless payment processing for your users.
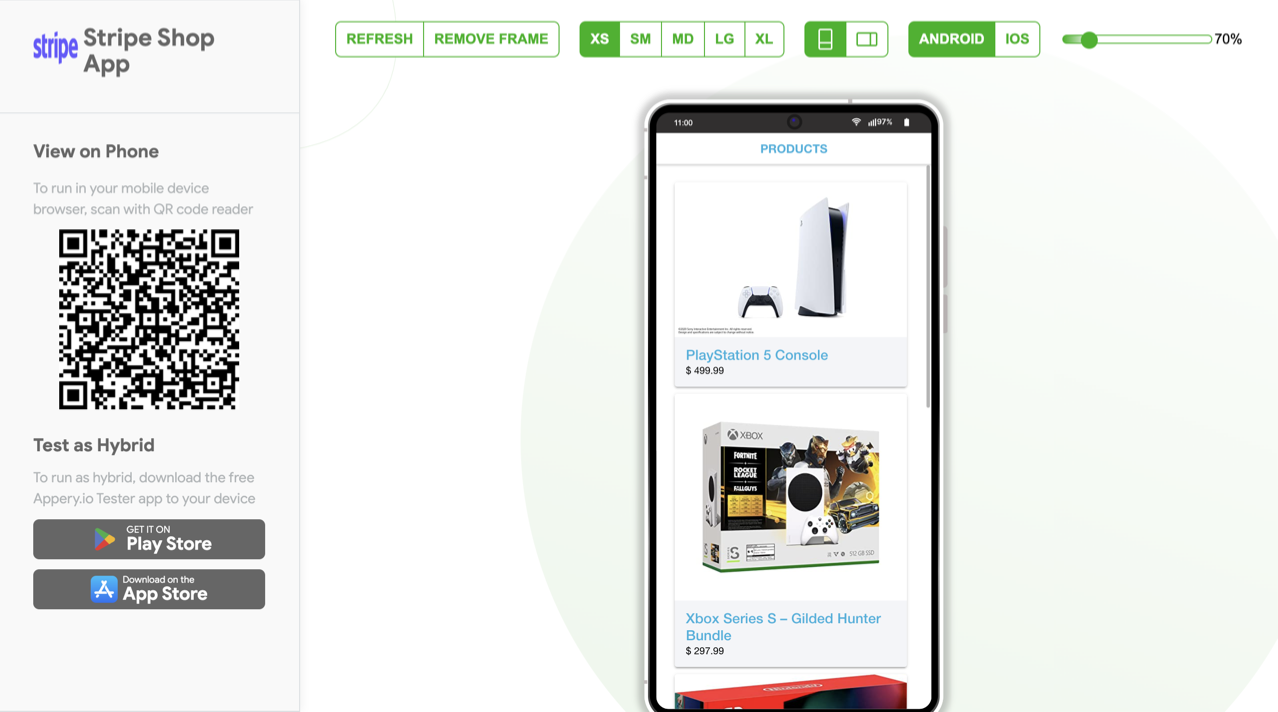
Step 6: Testing Your App Before deploying your app to the masses, it’s crucial to thoroughly test its functionality. With Appery.io’s Tester app, you can easily test your app on your own device. Simply scan the generated code from the TEST menu, and you’re ready to put your app through its paces.
Ready to take your app to the next level? Dive into Appery.io’s Stripe Shop template today with our free trial period. Experience firsthand the power of low-code app development combined with seamless payment integration.
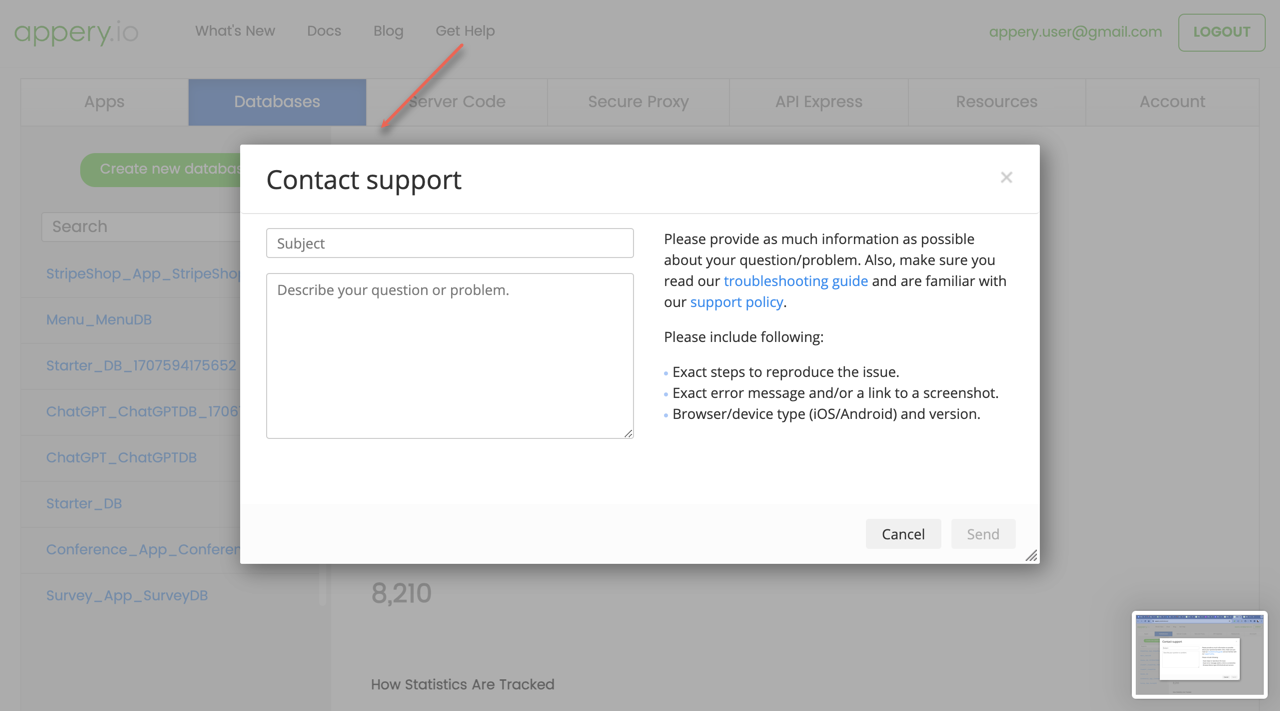
Need Assistance? If you encounter any roadblocks along the way, fear not! Appery.io offers comprehensive support, including step-by-step tutorials and direct assistance through the Get Help link in the App Builder. We’re here to ensure your success every step of the way.
Stay Informed Stay up-to-date with the latest tips, tricks, and tutorials by subscribing to our YouTube channel. Join our community of developers and unlock your app development potential with Appery.io.
Conclusion: With Appery.io’s Stripe Shop template, mastering Stripe integration has never been easier. Follow these steps, and you’ll be well on your way to building a feature-rich shopping app that delights users and drives business success. Happy coding!
We are here once again, this time with an easy-to-follow, stress-free tutorial on setting up SMS confirmation using Twilio. And exciting news – we also have a video tutorial for you to follow along with!
How to configure SMS verification for the app registration feature
Remember how we learned to set up SMTP server settings for email confirmations? Today, we’re switching gears to play with Twilio, allowing us to securely verify sign-up attempts via SMS. Cool, right? Let’s jump in!
Step 1: Getting to Know Twilio
Our journey starts with Twilio. Never heard of them? They are experts in sending out SMS verification codes.
Head over to the Twilio website and sign up for their free trial account. Once you’re registered and logged in, you can start personalizing your setup. You can either use an existing account or create a new one. I whipped up a new account I like to call SMS Confirmation.
Don’t forget to verify your phone number within Twilio. Just drop your number in, await the verification code via SMS, and then pop the received code into the website.
You’ll find a few more easy-peasy questions to answer and then hit Get started with Twilio. Congrats, you’re now ready for action!
Your Twilio dashboard will display a special phone number. This number is outgoing only and will be used to send confirmation messages to your own app users.
While you’re there, note down your Account SID, Auth Token, and your new Twilio phone number.
Lastly, ensure that you’ve listed the phone number you are using for testing in the ‘Active Numbers’ list (Phone Numbers > Manage), and that your Verified Caller IDs tab has the verified number ready to receive the authentication codes.
Step 2: Bring On the App Builder
Now that Twilio is all set, let’s put the App Builder to work.
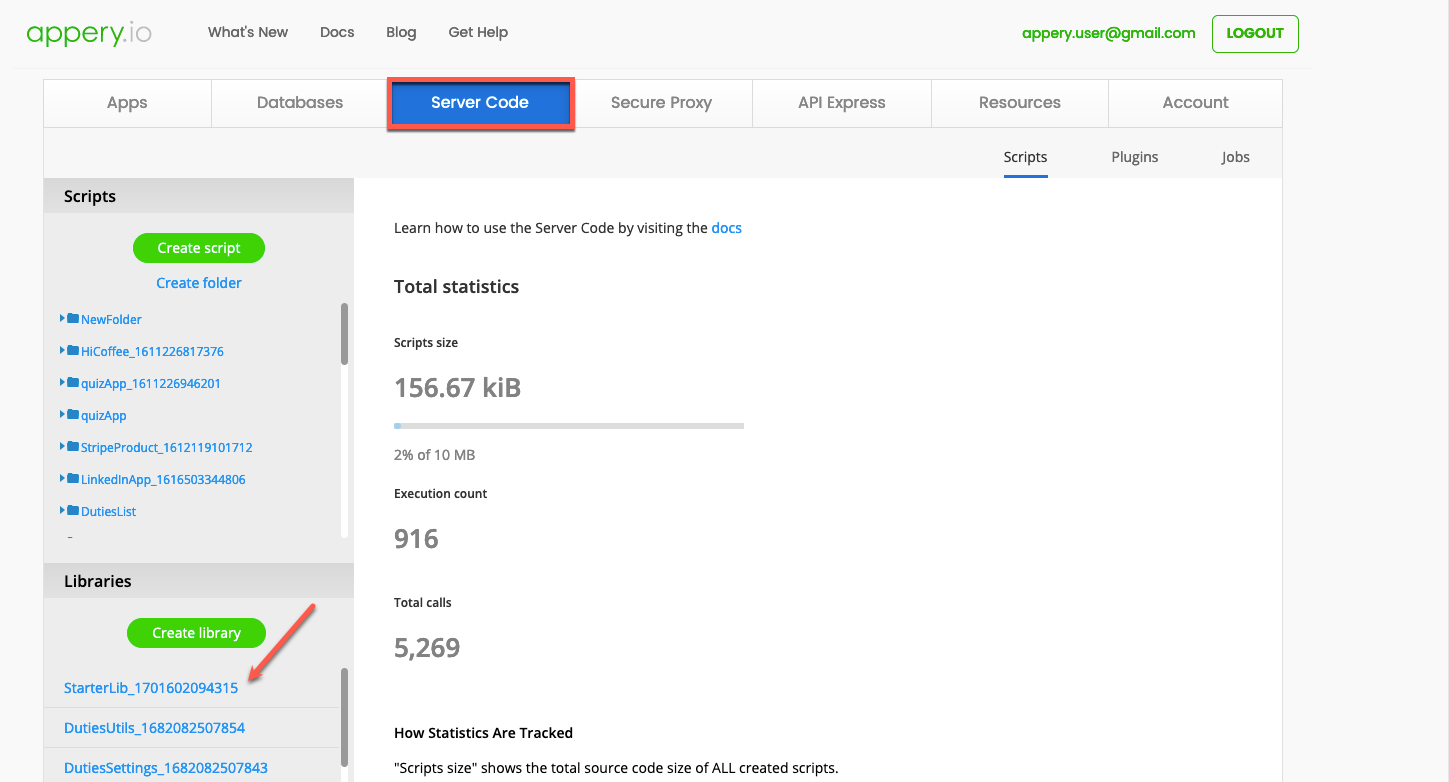
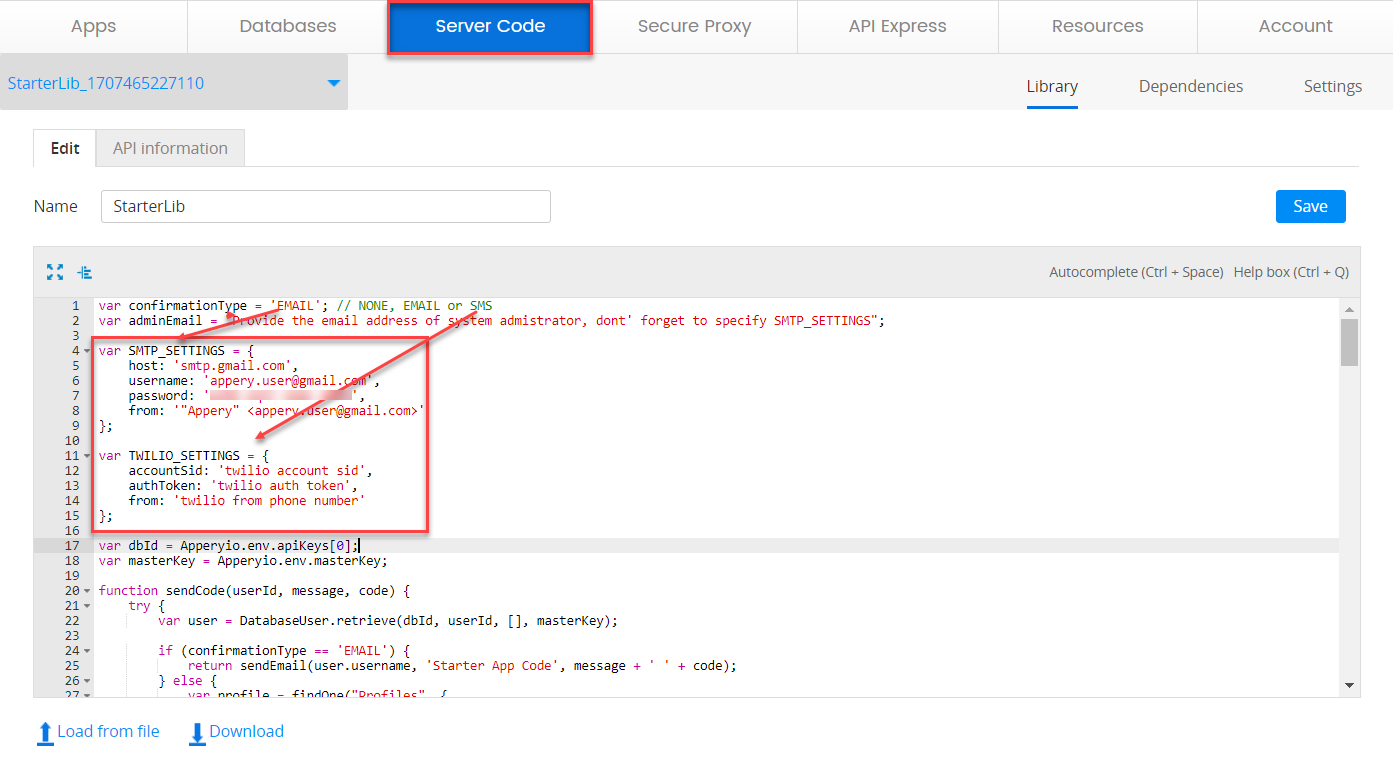
Go to the Server Code tab then open the StarterLib library, which was created just for us. We’re planning to send out confirmation SMS, so we’ll need to replace EMAIL with SMS for the confirmation type in the StarterLib script.
Next, hop back over to the Twilio console and one by one, copy your Account SID, Auth Token, and Twilio phone number into the corresponding variables on the script in the StarterLib section. Hit ‘Save’ and voila — you’re all set!
The moment of truth has arrived. Click TEST on the App Builder page, fill in the sign-up page details, and then wait for the verification code on your mobile device. Once received, drop it into the app, and bingo! Your user is registered.
As you can see, setting up SMS confirmation using Twilio is easier than a walk in the park.
We hope that this short guide will make your app development experience even better.
Remember, we provide a handy two-week trial giving you plenty of time to experiment with our Starter App Template. Plus, you can subscribe to our YouTube channel for even more handy tips.
Thanks for coming aboard this guide, and see you again very soon!
Recently, we released a video introducing our latest Starter App template, sparking numerous inquiries about configuring SMTP server settings for sending confirmation emails. We’re thrilled to announce that we’ve created a comprehensive YouTube tutorial demonstrating the process. For illustration, we’ll utilize the app built from the beloved Appery.io‘s Starter App template:
Below, for your convenience, we’ll additionally walk you through the process step by step for easy understanding.
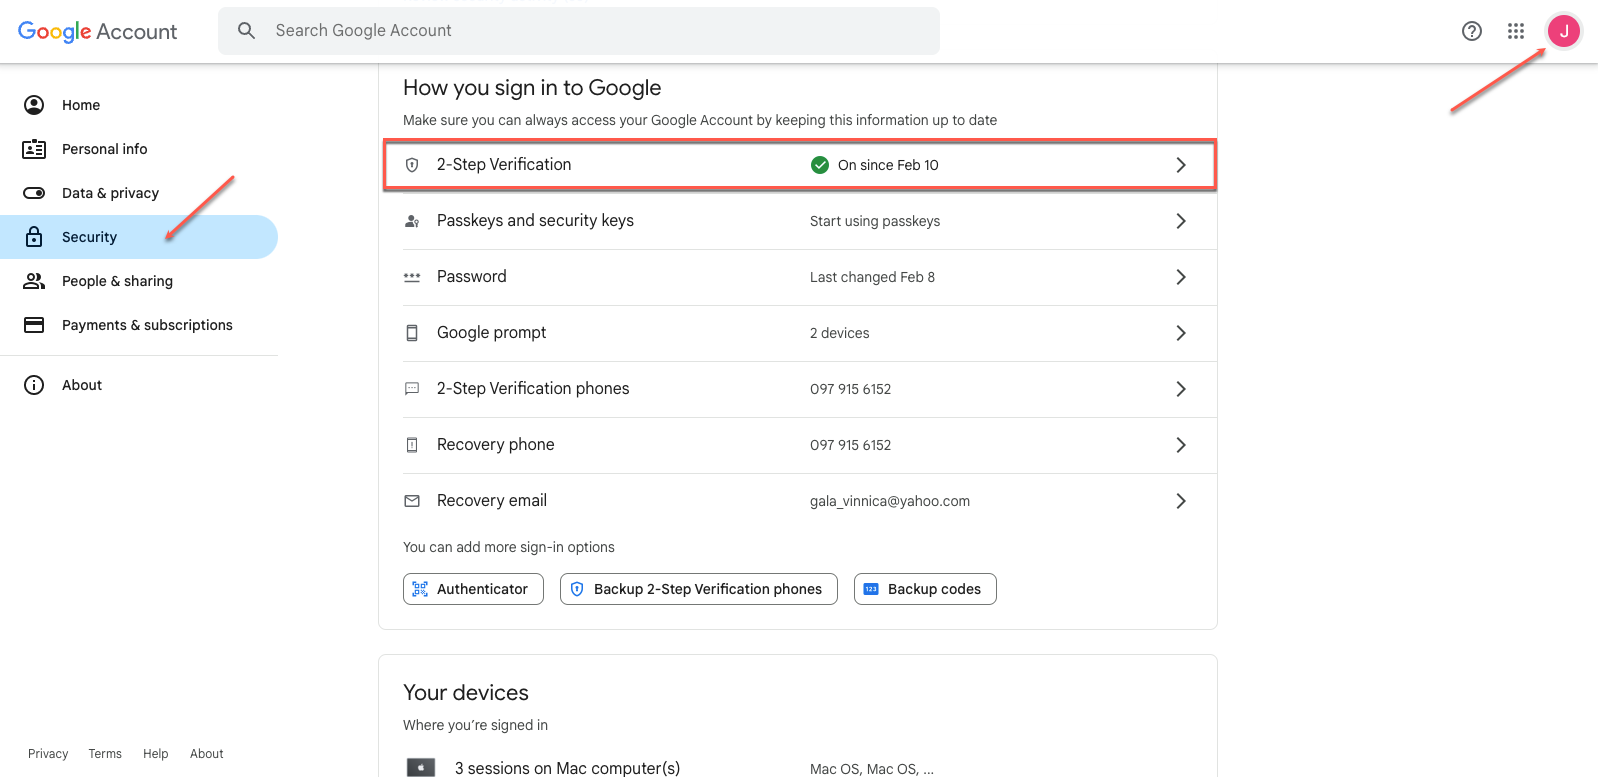
Step 1. Configuring SMTP Settings: Set up SMTP server settings by enabling 2-step verification in your Google account settings. Then, generate an app-specific password.
Step 2. Accessing App Builder: Head over to the Appery.io App Builder and create a new app using the Starter App template. Go to the Server Code tab and open the StarterLib library.
Step 3. Defining Email Confirmation: In the library, define email as the confirmation type. Enter your email address, paste the app-specific password you just generated, and fill in the from values. Save the changes.
Step 4. Testing the Configuration: Click TEST in the App Builder to ensure everything works smoothly. Fill in the registration details in the app, check your inbox for the verification code, and copy it.
Step 5. Confirming Registration: Paste the verification code into the app to complete registration. Verify the user record has been added to the app database to ensure accuracy.
Step 6. Final: Log into the app to verify successful registration and explore its features. You’ve now configured SMTP settings for confirmation emails!
Conclusion: That’s it for our guide on configuring SMTP server settings with Appery.io. Stay tuned for our next video where we will show how to set up Twilio for confirmation messages.
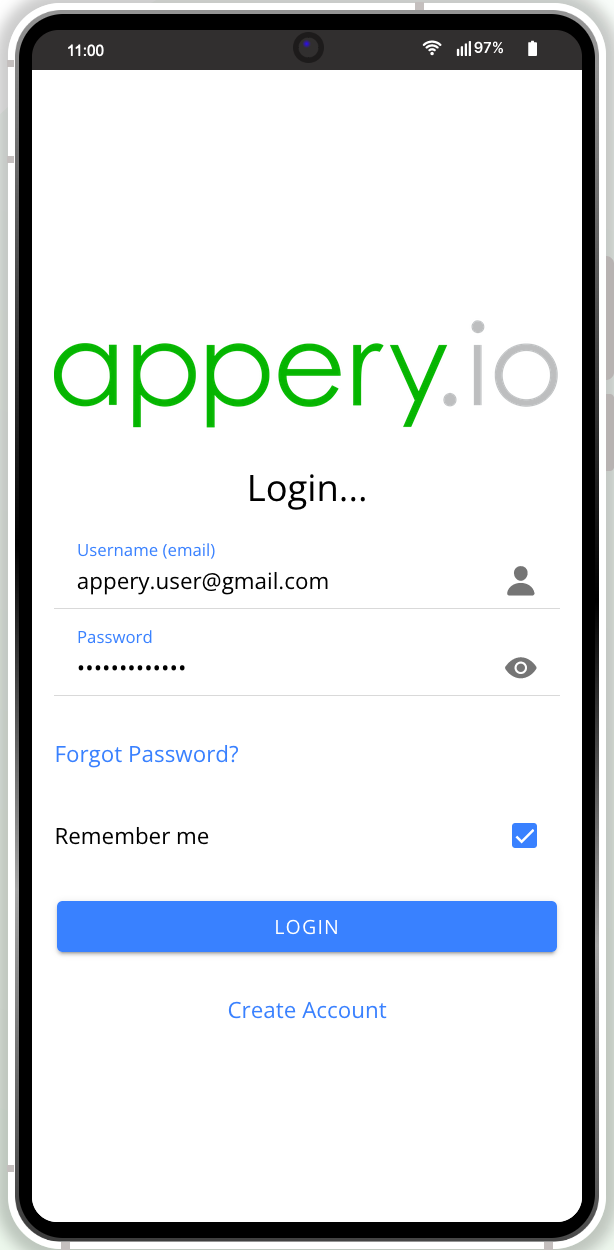
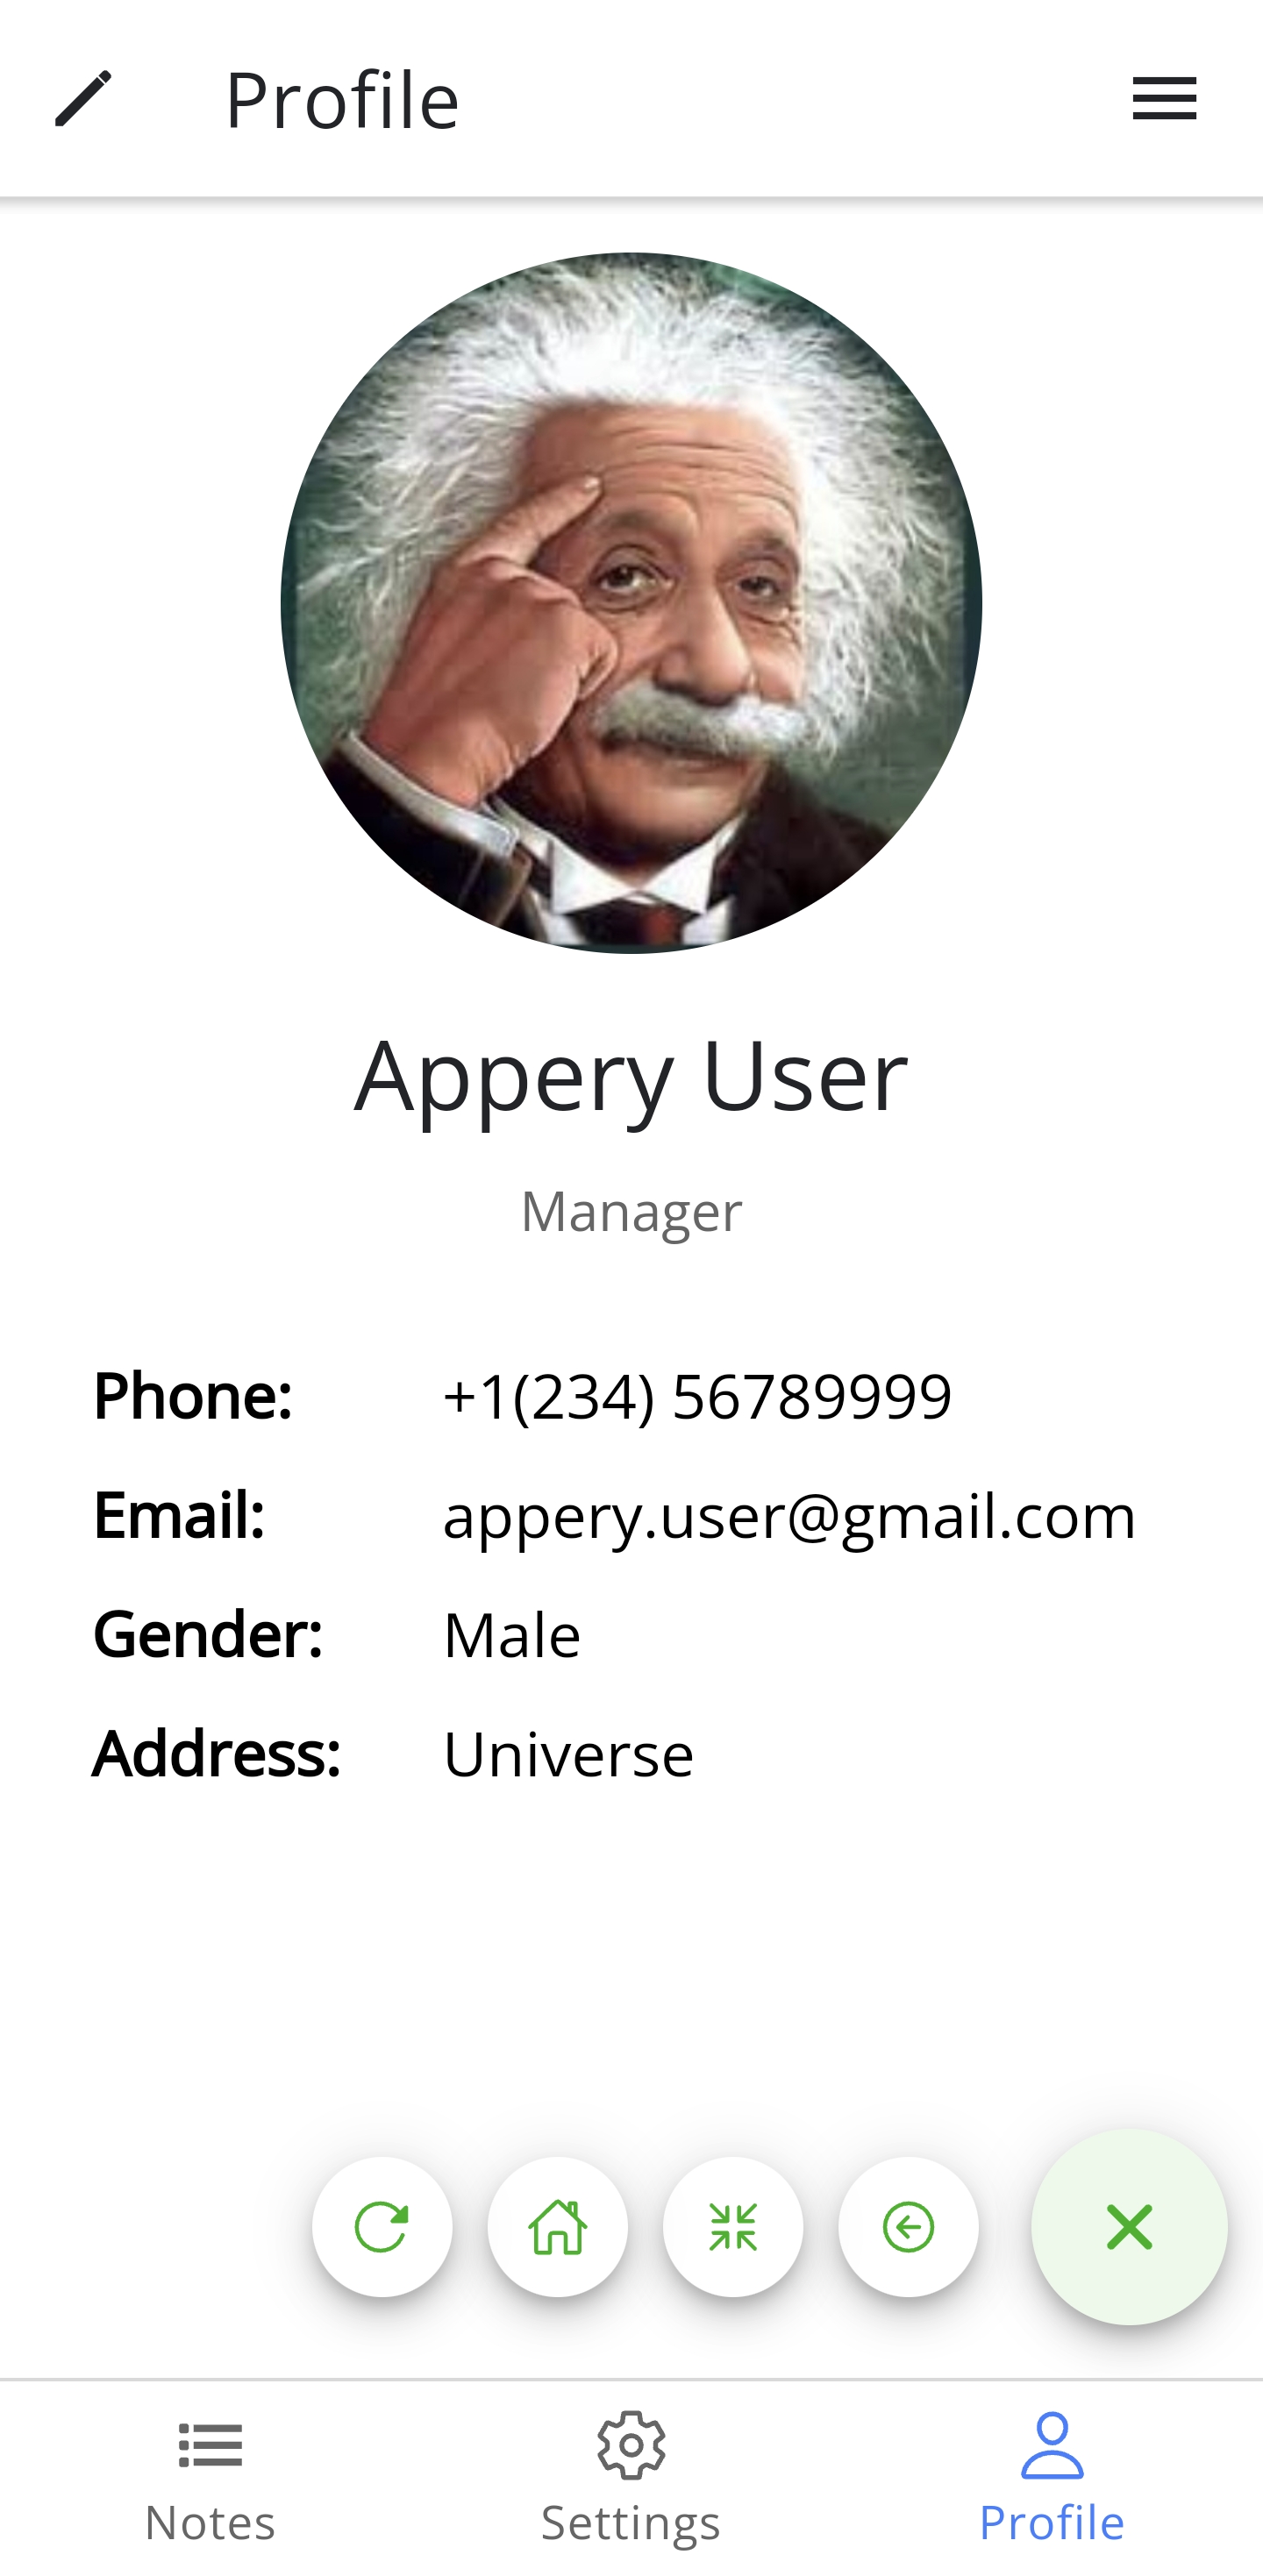
We’re excited to present our latest creation: the Starter App Template. It’s built to be the strong base for making modern mobile apps that users will love.
Starter App Template: Main Features
Flexible Design: Works smoothly on all devices for a great user experience.
Easy Logins: Choose between traditional or FaceID/Fingerprint logins for security and convenience.
Simple Sign-Up: Quick feedback on usernames and passwords to get started easily.
Password Recovery: Easy steps to recover access if needed.
User Control: Customize settings and privacy to match individual preferences.
Language Choices: Supports multiple languages for a global audience.
Personalized Profiles: Users can create and edit profiles for a tailored experience.
Dark Mode: A comfortable theme option for low-light settings.
Secure Confirmation: Double verification via email or SMS for added security.
Who Can Benefit?
This template suits startups and businesses in social networking, e-commerce, health & fitness, education, and more. It’s perfect whether you’re starting big or testing ideas.
Start Building Today
Ready to transform your app development? Explore the Starter App Template now! Create a strong foundation and focus on what users need most.
Don’t miss out—embrace innovation and enhance your mobile app experience with our Starter App templatetutorial.
Stay tuned for updates and added features as we continue to improve this template!
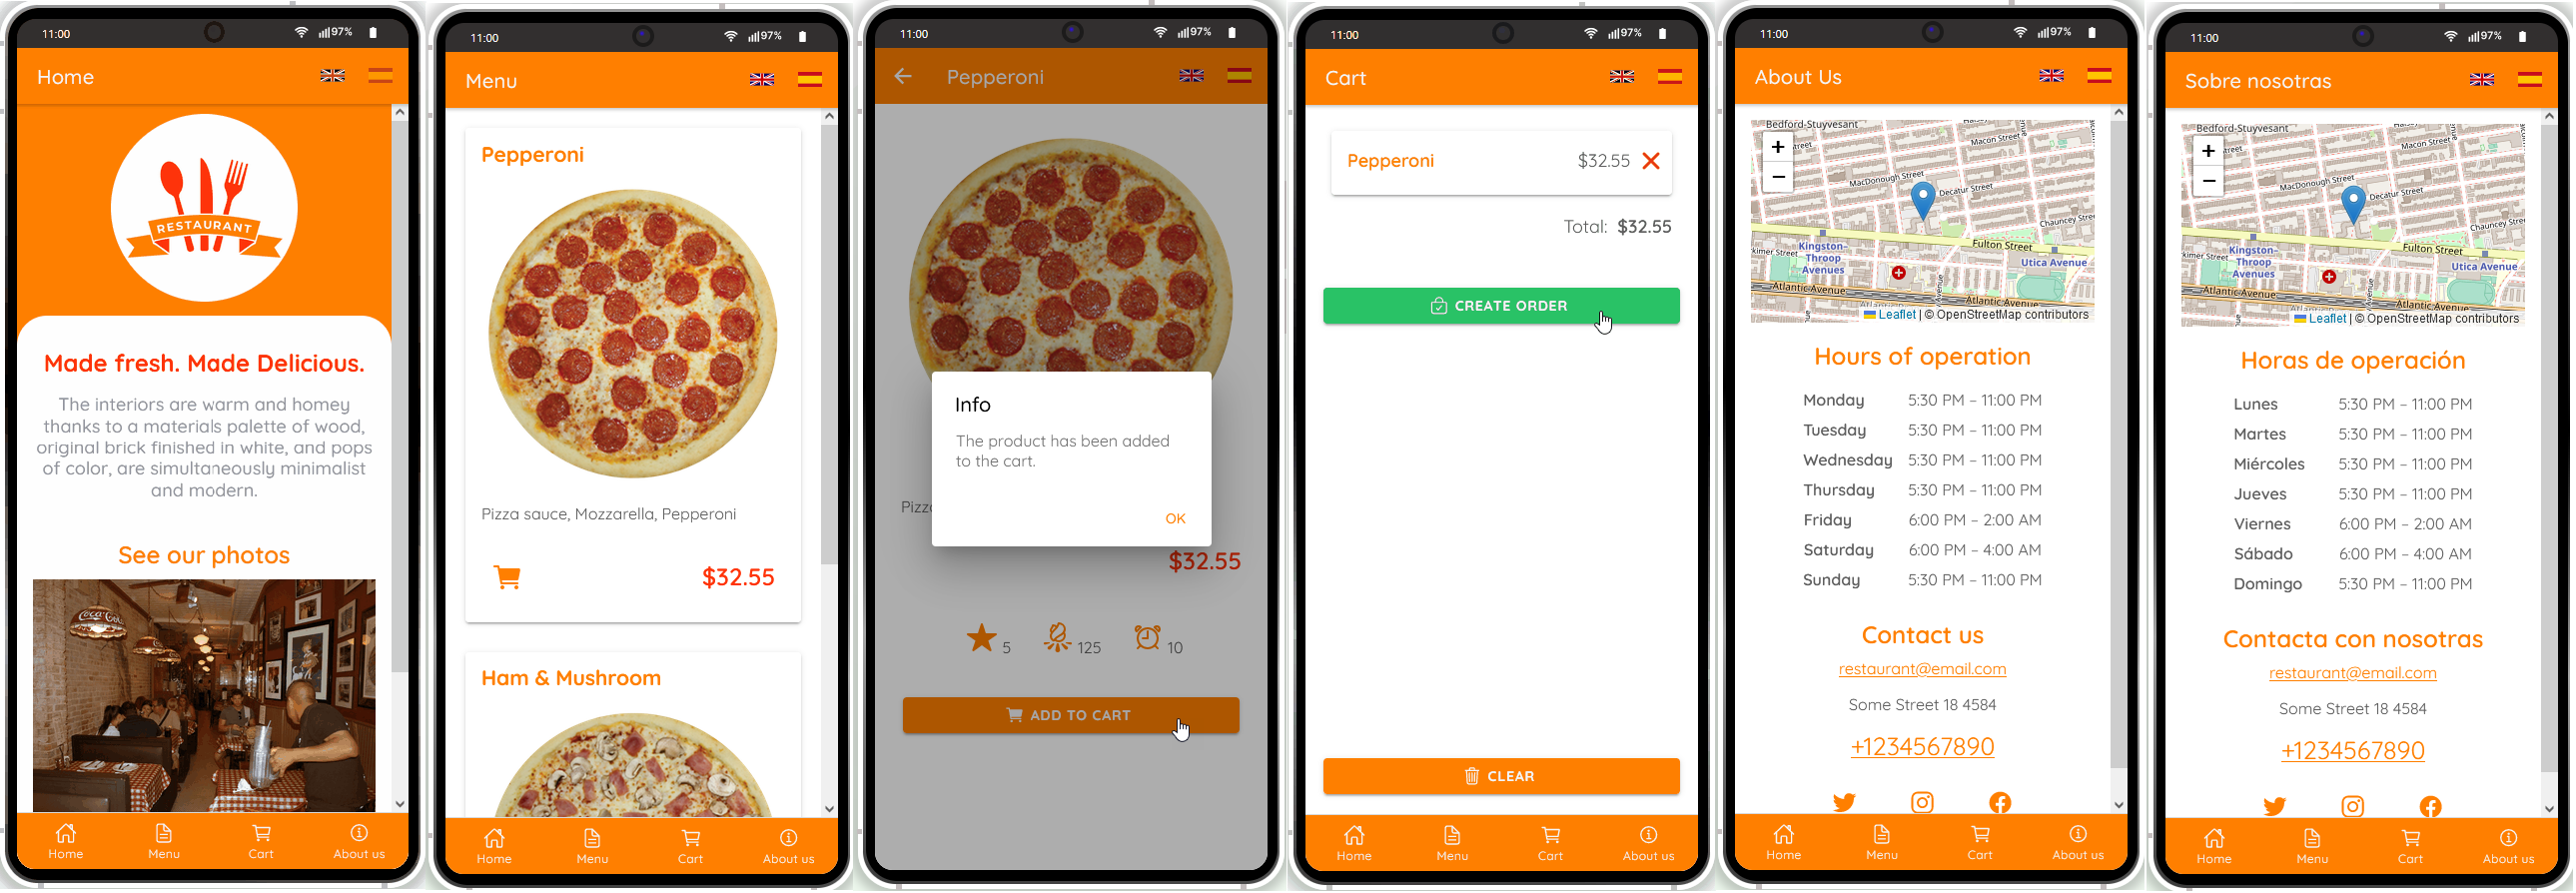
Last October, we released the Restaurant App, which proved to be a huge success. We, therefore, decided to improve and enhance it so that our users were able to get the best results out of a combination of low-code development and a professionally-looking restaurant app. Here’s your chance to see for yourself.
Our updated Restaurant App template includes ready-to-use services and an easy-to-use UI. The template can be recreated within your Appery.io account in just a few simple steps:
Log in to your account, open the Apps tab, and click Create new app.
Select Templates > Restaurant App and hit the Create button:
In a moment, you can start testing the app that now features a new stunning UI, the cart, and the internationalization option:
The template uses and demonstrates Ionic, Appery.ioDatabase,and Appery.ioServer Code. Also, being a template, it offers a great number of customization options so that any small restaurant business owner could adapt it to his business needs and personal preferences.
Those who are only beginning their Appery.io journey and are unfamiliar with our platform can find detailed instructions in an accompanying document.
Please rest assured that you are the creator and you are the only owner of this application (actually, like any other app created with Appery.io). For more details, you can check our Copyright, Trademark, and Content Ownership section here.
The article also explains how to export your custom restaurant application and publish it so that it can be accessed from any browser on any mobile device.
Please check this link to see what your customized published app can look like.
Please take a moment to try our updated template out and…
SendGrid and MailgunServer Code plugins updates. We have also provided you with sample apps instructions for both SendGrid and Mailgun as well as with other relating documents so that you could start testing them yourself;
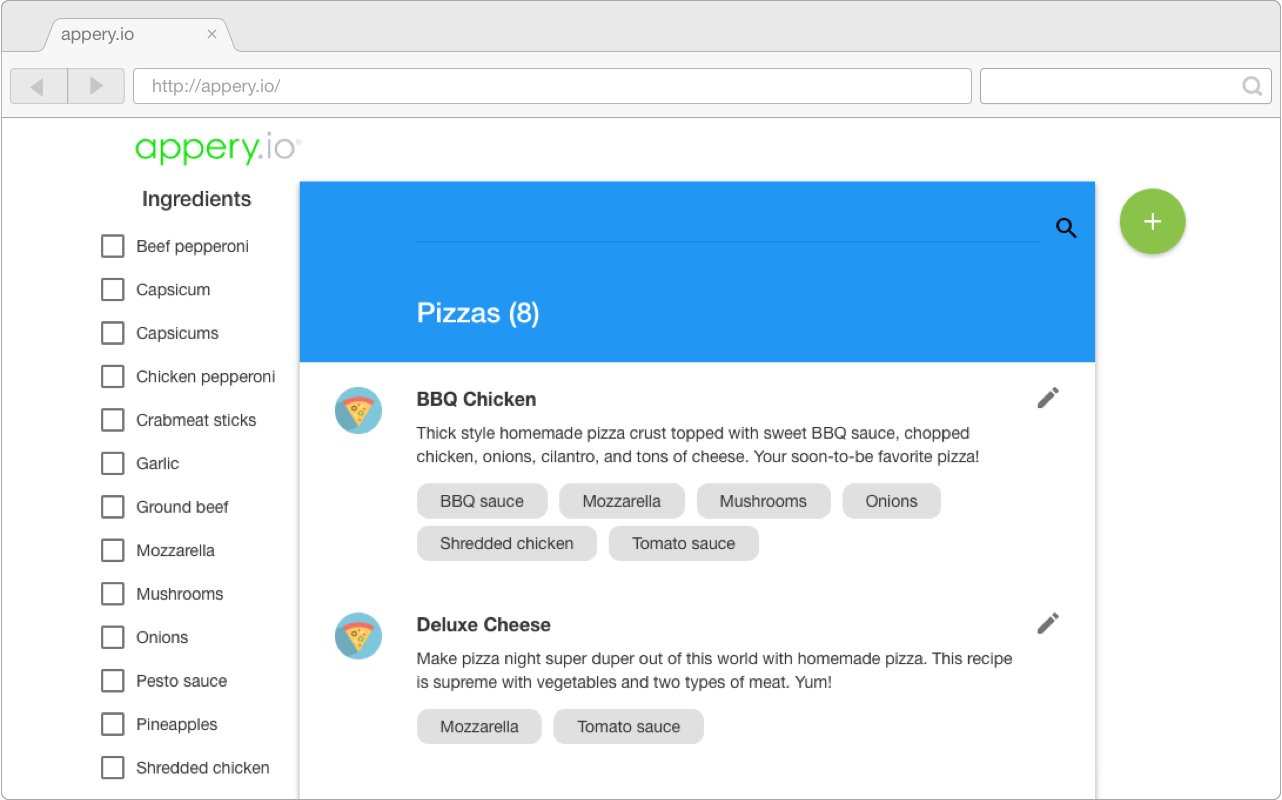
In software development, the four basic functions are represented by the acronym CRUD: Create, Read, Update, and Delete. These facilitate viewing, searching, and changing information. Every application requires the presence of such functions.
If you are up to building a responsive web application in the most cost-effective way, using the Appery.io Pizza sample can be very handy. The sample is a fully functional responsive application—based on Google’s Material Design—to present pizza recipes along with ingredients. It includes create, read, update and delete functions as well as searching and filtering. In terms of components, the application consists of: