Find the Sports News You Want with the ESPN API Plug-in

We’ve just made the ESPN Headlines API and Sample App plug-in available. The API allows you to interact with ESPN’s various news stories. ESPN publishes hundreds of unique pieces of text content each day, covering dozens of sports and hundreds of athletes and teams. To make it easier to use the API to make mobile apps in Appery.io, we created a plug-in with some ready-made services (interfaces) to use the ESPN API.
To add this plug-in to an app, you just need to follow these steps in Appery.io:
- From the Appery.io Builder, select Create New and then From Plug-in.
- Click the check box for Sports/ESPN Headlines API and Sample App, and then click on the “Import selected plugins” button.
- Open Services/ESPN_Settings file and set your API key. If you don’t have one, get one from http://developer.espn.com/.
- Go to App setting and change Start Page to ESPN_Home.
Once you’ve created a new app based on this plug-in, you actually have a simple ready-to-run demo app. Just click the “Test” button in the right upper corner of the screen to see it work. In this tutorial, we’ll first walk through the sample app included with the plug-in. Then, we’ll show you, “under the hood,” some of how to the API is used in developing the app.
The App
To find news you are interested in via the app, follow these steps:
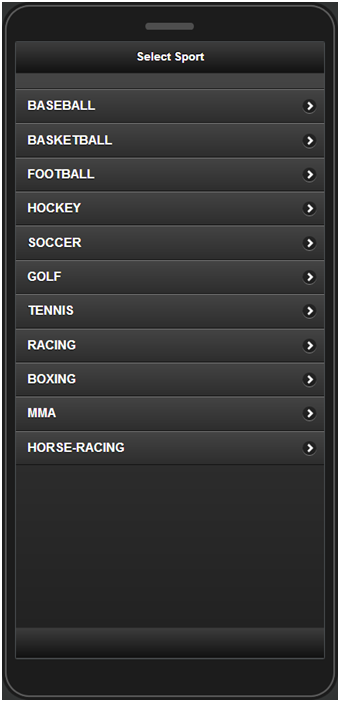
- On the start page, select a sport (e.g., Golf) from the available sports displayed in the list:
- You will then be sent to the Leagues page, which contains the list of existing leagues (if applicable). Select the Professional Golf Association league:

- The Headlines page shows. The headlines are listed by titles and preview images. Select one of the headlines.
- The Details page will display a short description of the news with the cover photo (if available). At the end, the URL of the original article on the ESPN web site is displayed.
- Use the Back button to return to the previous pages and search for other news.
Under the Hood
Now that we’ve walked through the app, let’s take a peek under the hood.
Services
Services from the plug-in are linked to UI components as part of the design of the app. The following REST services that are defined in the ESPN API plug-in are used in the app.
ESPN_SportsList service
The ESPN_SportsList service is used for getting the list of available sports. REST Service Properties displays the URL, main settings, and whether a proxy is used, as shown below:

Request parameters contains the parameter sent to the ESPN service:

The service can be instantly tested and the response created automatically based on the returned response (JSON):

Response parameters:

The other services are set in the same way with their own parameters.
ESPN_SportByName service
This service is used to get a list of leagues for a given sport:

The {sportName} value is substituted in mapping when the service is running based on the selected sport:
ESPN_LeagueHeadlinesByAbbreviation service
This service is used to get the headlines for that sports league.

{sportName}, and {abbreveationName} are set when the service is running:

ESPN_GetNewsById service
This service is used for getting the details for each news item:

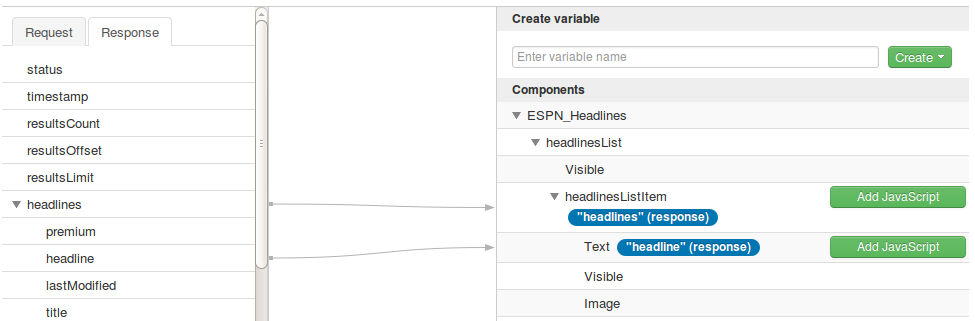
Mapping the UI to the Services
The final part in the app design is mapping the service parameters to the UI components. Here’s an example of this in action, showing the response parameters being mapped to output components:
Known issue
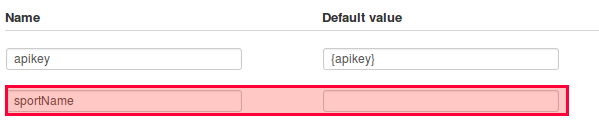
There is a known issue where the apikey parameter isn’t accepted, even if it’s specified:
![]()
This parameter is stored in ESPN_Settings. To resolve this problem, go to ESPN_Settings and create a new parameter apikey (now you have two identical parameters):

Remove the first one parameter (that was generated automatically) and launch the app. apikey should now be taken into account.


