Appery.io platform adds speed, server jobs, Google Analytics, Windows Phone build, Customer Console, more Webhooks, and many more features

The Appery.io team released a number of really cool features over the weekend. Here is what’s new.

It’s faster

We made a lot of things go faster. You will see a big app builder speed improvement (and we are still not done, more speed is coming).

Easily schedule server-side jobs

You are building an app that needs to check for inventory once every hour or once a day? Now you can easily do this with new Server Code scheduler feature. Because this is a server-side script, the actual device can even be offline, but the script will still run. You pick a script and just set the schedule to run:

server_code_jobs_tab

Manage app data and send push messages with Customer Console

Built a restaurant app for a client and would like the restaurant owner to manage the menu or send push message for special promotions? Now you can easily create a special Customer  Console for an app and let the client manage the app data and push messages. With the just launched Customer Console, the client can edit app data (data from database), and send push notifications, all from a user-friendly console (and you don’t need to be involved). You can even publish the Customer Console to a custom domain.

customer_console

Get app insight with Google Analytics

Now you can easily collect statistics from you app by using the Google Analytics. Watch how many users use the app, or analyze data for certain periods. All the power of the Google Analytics is in your Appery.io app:

google_analytics

Styling the app with CSS is easier and faster

Earlier, when working with CSS  you have to test your app every time you want to see the changes. Now, you can see all the changes based on your CSS files directly inside the Appery.io app builder without the need to launch the app in the browser. Just write or edit the CSS and switch back to page to see the result:

css

Manage binary certificates in one place

New and convenient certificate management tool helps keep all certificates in one place. Mark certificate as default to be used by all apps, or choose a specific certificate for an app in Project > App settings. As before, you can auto-generate Android certificates inside the Appery.io platform:

certificates

Quickly build and deploy for Windows Phone

Need to build a binary for Windows Phone? It’s now as simple and fast as building for iOS and Android:

exportin_the_app

Customize and integrate more with additional Webhooks

We launched Webhooks in January to allow easy integration with other systems. In addition to app specific events (right screen shot), we just added account-wide Webhooks (left screen shot) such as App created, App removed and App renamed. With new Webhooks, you get more options to integrate with other systems:

webhooks

Custom domain HTTPS hosting

Appery.io apps can be hosted on custom domain, and now the custom domain options also supports https.

As always, if you have any questions, feedback or comments, feel free to contact us at support@appery.io, post something on our forum or ping us on Twitter.

Using Google Maps API in Appery.io App

Google Maps is probably the most popular map widget used in the mobile apps today. Working with Google Maps in Appery.io app builder is very easy but as the same time is not very different than using other dev. tools. To add a Map component, simply drag and drop it from the palette onto the page:

google_maps_api

Rename the Map component to google_map. This is done so it’s simpler to reference the component from code.

Next you can create your own JavaScript class and define map variable as following:

var map;
function initialize() {
    map = Apperyio("google_map").gmap;
    if (!map)
    {
        setDelay();
    }
    else
    {
        directionsDisplay = new google.maps.DirectionsRenderer();
    }
}

function setDelay()
{
    setTimeout(initialize, 50);
}

Google Maps is usually loaded asynchronously, so the approach with delay (as mentioned in code above) can be handy. This will ensure the map is completely loaded before you try to use it.

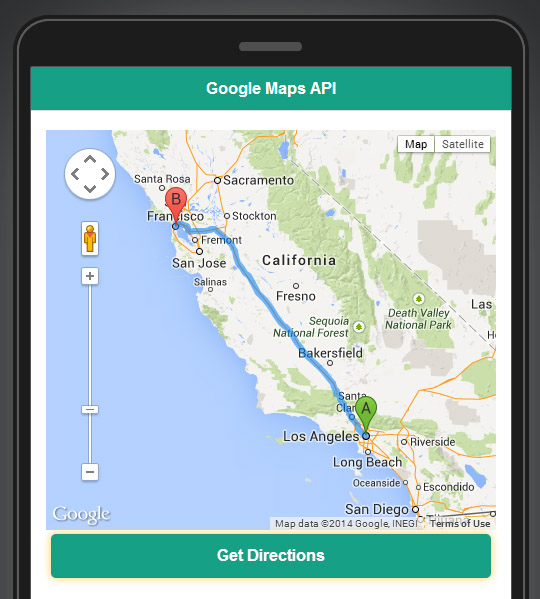
Generally that’s all you need to use Google Maps JavaScript API. All the actions you want to do next you can make based on Google Maps JavaScript API. Lets say you want to show direction from point A to point B. Place the button on the page and run following JavaScript by clicking on it:

var directionsDisplay = new google.maps.DirectionsRenderer();
var directionsService = new google.maps.DirectionsService();

var request = {
origin: 'Los Angeles',
destination: 'San Francisco',
travelMode: google.maps.DirectionsTravelMode.DRIVING
};
directionsService.route(request, function(response, status) {
directionsDisplay.setMap(map);
if (status == google.maps.DirectionsStatus.OK) {
directionsDisplay.setDirections(response);
}
else
{
alert("Directions query unsuccessful. Response status: " + status);
}
});

The directions will be shown on the map:

google_map_directions

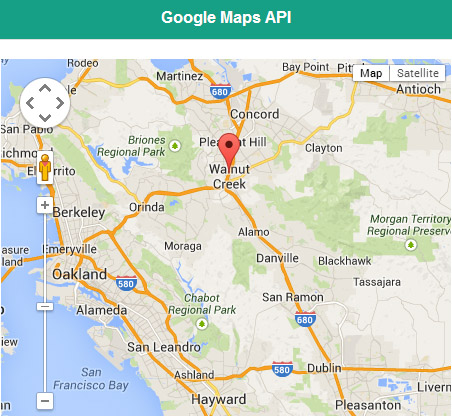
To place the marker on the map you should provide latitude and longitude values of a certain point. Try to run following JavaScript code and you’ll see how the marker drop on the map:

var markerLatLng = new google.maps.LatLng(37.913597,-122.066059);

var marker = new google.maps.Marker({
    position: markerLatLng,
    map: map,
    title: "Walnut Creek, CA",
    animation: google.maps.Animation.DROP
});

added_marker

You can also place markers based on geographical names, not latitude and longitude. In this case you should use Google Geocoding services, to convert user-friendly names to latitude and longitude values. Create a REST service in the app builder with the following URL:

https://maps.googleapis.com/maps/api/geocode/json

You’ll get a coordinates (latitude/longitude) as a response of this service, and you of course can use them to add markers.

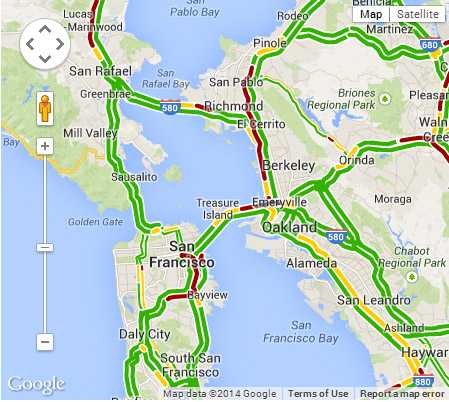
Any layers provided by Google Maps can be added too. Here is an example for Traffic layer, just run this code by clicking on the button:

var trafficLayer = new google.maps.TrafficLayer();
trafficLayer.setMap(map);

Traffic layer in action:
traffic_layer

As you can see using Google Maps and its API is very straightforward in Appery.io app builder. Check out our Google Maps section for more detailed tutorials.

Connect With API Providers in Appery.io App Using OAuth.io

OAuth is an open protocol to allow secure authorization from web, mobile, and desktop apps. However, making  OAuth work in your mobile app is not a simple task and often takes a lot of time and effort. Using the OAuth.io service is a great and simple way to save time, and make the authentication pretty much work out-of-the-box.

oauth-io-logo

OAuth.io service can be easily integrated in Appery.io app. There are two ways to setup the OAuth.io plug-in in Appery.io app:

Include OAuth.js as JavaScript asset

This approach can be helpful when developing a mobile web app. Apps with OAuth.js included as JavaScript asset work from browser and can be quickly tested by clicking the Test button. Such approach saves development time because you don’t need to install the app on the device every time after making changes. These are the steps:

  1. Go to OAuth.io web site and download the latest JavaScript library.
  2. Upload this library to your Appery.io app by choosing Create New -> JavaScript -> Create from file.
  3. You have to remove or comment the if statement on line 193 in that file because the Appery.io app already contains some methods with “OAuth” name.

Include as PhoneGap plugin

Apps with OAuth.io service included as PhoneGap plugin will not work from the browser. Such apps should be built as binary and installed directly on the device. Steps for adding OAuth.io as PhoneGap plugin are almost identical to adding any 3rd party PhoneGap plug-in:

  1. Download repository from github plug-in page.
  2. Create new folder for this plugin in the Appery.io app and upload oauth.js:
  3. Add the following line of code to the very beginning of this file:
    • cordova.define(“com.phonegap.plugins.oauthio”, function (require, exports, module) {
      and the closing bracket to end of file “}”.
    • Edit the cordova_plugins.js file by adding plug-in description.

Once the OAuth.io included in Appery.io app the same code can be used to initialize and authenticate. See the OAuth.io documentation for code examples.

Examples

Adding Oauth.io service to your app is pretty simple.  See our detailed tutorial where we describe how to authenticate with Google and how to post to Facebook.

Dialing number and sending SMS via JavaScript

Being able to launch the native dialer app or SMS app from the app you are building might be a very useful feature. For instance, the app you are building might display a list of restaurants in the area with a phone number. You want to be able to click the number and call the restaurant. This functionality can be easily done with calling the “tel:” or “sms:” and passing the needed values. Here is the simple Appery.io app that contains just a two buttons:

buttons

Here is the JavaScript code for the “Send SMS” button:

window.location.href = "sms:+375292771265?body=Hello from Appery.io!";

Such code will open the SMS typing window with predefined text and phone number as following:

2014-03-12 14.42.34

Second button has the following JavaScript code:

window.location.href = "tel:+375292771265";

Clicking on that button will open the dialer with pre-populated phone number:

2014-03-12 14.42.15

It is not possible to programmatically call or send SMS without opening the appropriate window due to the security reasons.

iOS has some nuances when dialer or SMS window should be opened. Try to use such code for iOS platform:

window.open('tel:+375292771265', '_system');

Or for SMS:
window.open('sms:+375292771265?body=Hello from Appery.io!', '_system');

Please also note that these protocols (tel: and sms:) might work differently depending on OS/browser versions. On Android, you might get different functionally depending what app is selected for sending SMS messages.

Instead of using the native SMS app, a number of services such as AT&T and Twilio provide APIs to send SMS messages. Appery.io has plugins for AT&T and Twilio SMS API.

Build a multi-language app in Appery.io

An app that has multi-language support is always better than the same app that supports just one language.  Appery.io app can be easily upgraded with multi-language support by using the i18next plug-in. This post will show you how to do it.

i18n_blog_en_de_app

There are few steps to add the multi-language support:

  1. Download i18next.js from the i18next web-site and upload it to WEB_RESOURCES folder in Appery.io app builder.
  2. Create folder structure that corresponds to i18next structure and upload translation files in JSON format:
    i18n_translation_files
  3. UI components that should be translated must be marked with special attributes: data-i18n, and data-i18n-target. Read more about it in our detailed tutorial.
  4. Initialize the plug-in via JavaScript specifying needed options as initialize language (can be retrieved from the browser or device language) and fallback language. Fallback language is very handy feature and it’s define what language should be used in case of missing language or translation.

Downloading of translation files will take some time on initial app start up. There is no need to create any preloaders as all the files will be loaded automatically. It’s a good idea to use launch images to show that the app launching/loading. Once the translation files are loaded, properly marked components will be automatically translated accordingly to the initialized language.

To build an app with multi-language support, try the multi-language tutorial and read the i18next documentation.

Extending app logic with Appery.io Server Code

Screen Shot 2014-02-27 at 3.57.36 PM

Every modern app consists of two parts: front-end UI and backend. Backend services can greatly extend your app logic and help implement many useful features.  Appery.io provides a possibility to create your own server scripts without the need to maintain servers yourself.  Server code scripts (that’s how this feature is called in Appery.io) can be invoked from the app via a REST API and will  run on the Appery.io servers.

Using server code scripts provides the following advantages:

  • Broader app logic
    Use server code services to extend your app logic. You can implement various backend features such as Restore password and others.  Some code logically belongs on the server.  For example, if you need to process data retrieved from multiple sources before presenting the results to the user, its more efficient to perform that logic in the server.
  • Reusable code base
    Appery.io server scripts can be self-contained app modules which can be used from different apps. You can implement one handy feature and re-use it from all of your apps instantly and without any additional coding.
  • Code accessibility 
    As Appery.io provides powerful a collaboration feature, server code can be shared with other users too. This makes team development much easier and faster.
  • Extend with powerful 3rd party libraries 
    Server code supports several predefined libraries such as Underscore.js, moment.js, handlebar.js and others. You can also upload your own or other 3-rd party library and use it from the Appery.io. Libraries can be shared too!
  • Keep your users on the latest version of the code.  Another important advantage of server code is the ability to modify your app without having to redistribute your app to your users.  If you make changes on the client side, that requires an update in the app store, and an update by all your users.  But if your logic is server based, you can be sure that all your users always have the latest version of your app.

The server code console can help test and debug your scripts from one place without the need to run REST API services. Want to add custom app logic to your app? Start with Server Code by trying this tutorial! And, to learn more about Appery.io Server Code, visit the documentation.

Building a GPS tracking app with Appery.io

Many mobile apps use GPS sensors to track a user’s current location. For example, it could be a ride sharing app, fitness app, or a delivery app. This post shows how to build such an app in Appery.io. The app tracks your current location via  the device’s GPS sensor and stores the location into a database.

This is the app UI:

gps_app_view


The GPS location is determined every 15 seconds (you can change the interval). The location is shown in the app and also saved into a cloud database. Because this is a native app (with PhoneGap), the app will continue tracking the location even if in the background or with the phone screen locked.

To try this app, download the app backup and create a new app from it. Keep in mind that you do need to build a binary file and install it on the device for testing.

Now you just need to configure the settings service with the correct database ID. This app uses a pretty simple database; it contains one collection with name Locations. This collection contains one column location with type of Geo point:

gps_app_collection_structure

Open the GPSLocationTracking_settings file and change the database_id to your own.

Once the database ID is changed in the settings file, the application is ready to go.

Let’s take a quick look how the app works:

1. The GPS service starts initially after the Device ready event and runs every 15 seconds.

Here is the JavaScript code:

gps_app_device_ready

2. You can also change how often the GPS will run. To apply a new interval, first stop tracking, and then start it again:

gps_app_new_interval

3. In the case that the GPS fails to determine the location, an error message will be shown:

gps_app_save_failed

4. Every time a new GPS location is retrieved, the location is saved into a cloud database:

gps_app_store_location

This is a starter app that uses the GPS sensor to track your current location. It’s very easy to add more features. For instance, you can add Google Reverse Geocoding service to get the address of a place. Or, you could also show all locations on a map.

If you want more practice, try the Building a mobile app with Google Maps and Geolocation tutorial.

Check Out the 2014Q1 Developer Economics State of the Developer Nation Report

Developer Economics Q1 2014 - Developer Economics 2014-02-13 16-40-36

Last November, we partnered with VisionMobile to help them reach out for their Developer Economics survey. Now the data for VisionMobile’s well-known reports on the state of the developer nation is out. The report features in-depth analysis and insights into the key issues in the app economy, including platform prioritization, going beyond tablets, trending revenue models, and making the right choices in developer tools.

Download the full report for free.

Quickly send push notifications with Appery.io backend services

Push notifications. It is a great way to inform app users about cool offers, important events or any updates. It’s an important feature for enterprise mobile apps. For instance, a sales manager can be instantly notified when an existing customer upgrades his/her plan.  Push notifications are a powerful tool to ensure your message is received and read by the user, even when they are not using your app.

push_notification

Appery.io provides fast and easy way to send the push notifications for both platforms – iOS and Android. Sending can be done in just a few steps:

  1. Enable push notifications in the application settings.
  2. Register the application with Apple or Google services.
  3. Install the app on the device. When it’s done, device information will be automatically added to your predefined devices collection.
  4. Send notifications from the console. That it!

You can send these alerts:

  1. Instantly
  2. Schedule
  3. Deliver in device’s time zone

The first two options, all the users will receive the message simultaneously. For instance, for some users it could be 8 AM, and for other users it could be 1 PM.

In the third case of the device time zone sending, users will receive the notifications in a different time – someone later and someone sooner.

Having all three options — is what makes Appery.io push easy to use, yet very powerful, and customizable.

You are not limited to sending push notifications from the push console. With push REST API, you can enable sending messages from any app.

Want to learn more? Head to our push docs or try the quick start push tutorial.

Appery.io Tops List for Building Mobile Apps

Mashable_Logo-e1291682364798

Mashable recently compiled a list of the best mobile app builders, and Appery.io topped the list of 10 contenders. While we’re quite pleased to be considered #1 as just an app builder, we like to remind people that we are a full mobile app platform with a great suite of seamlessly integrable back-end services. So, with Appery.io, you get the best building tool—and much more.

Read the whole article.