Build a Super Bowl Party Countdown App with Appery.io

Are you ready for the ultimate Super Bowl party? What better way to get the excitement going than with a custom app that shows exactly how many days, hours, minutes, and seconds are left until the big game?

In this new YouTube tutorial, we show you how to quickly build a Super Bowl party countdown app using Appery.io, a no-code mobile app development platform. Whether you’re a developer or a beginner, Appery.io makes app creation simple, without writing a single line of code. And the best part? You don’t need any technical skills to get started!

Create a Countdown for Any Event

While this tutorial focuses on the Super Bowl, the app can be used for any special event, from birthdays to New Year’s celebrations. Using Appery.io’s Flip Down plugin, you can easily integrate countdown timers and make your app visually appealing, all while showcasing how to use JavaScript libraries to enhance its functionality.

Why Appery.io?

Appery.io is a powerful, hybrid app builder that lets you use JavaScript libraries in your mobile apps. With a huge selection of pre-built components, Appery.io saves you time and effort by offering plug-and-play solutions. In the video, you’ll see how to use libraries like moment.js for accurate time tracking and a simple yet effective countdown.

Watch and Learn

In this tutorial, we walk you through the process of creating a countdown app from scratch. You’ll learn how to:

  • Set up your app with one simple screen
  • Add a countdown timer to track the Super Bowl (or any event)
  • Use third-party HTML and JavaScript code
  • Export your app for iOS and Android

It’s all about making the process as simple and user-friendly as possible. And for those who want even more convenience, Appery.io’s plugin library offers easy-to-integrate solutions to save even more time.

Ready to Start?

Watch the full YouTube tutorial for all the details, and get inspired to create your own Super Bowl party app. Don’t forget to like and subscribe for more tutorials on app development with Appery.io.

Start building your countdown today—and let the Super Bowl excitement begin!

How Events & Scripts Work with InAppBrowser in Appery.io

Below is a practical solution on how we can use customer external sites in Appery.io apps where events & scripts are defined with InAppBrowser Cordova plug-in.

Let’s say your client has a mobile site with lots of pages and different features, but lacks some mobile features like push notifications and he decides to give Appery.io a try. But to migrate all pages and all codes, the effort can be quite large. Perhaps this can be done, but at a later stage. So we made a decision to render the client’s site through the  InAppBrowser component, which is a kind of a browser that can be used inside Appery.io apps. But the control over this component is quite limited, much less than what you have for pages in an Appery.io project.

Of course, the client’s site is protected by login and password. This solution will describe the case where a user logs into an Appery.io app with the same credentials  used to bypass the site’s login screen.

The Appery.io project described in this article can be downloaded under this link.

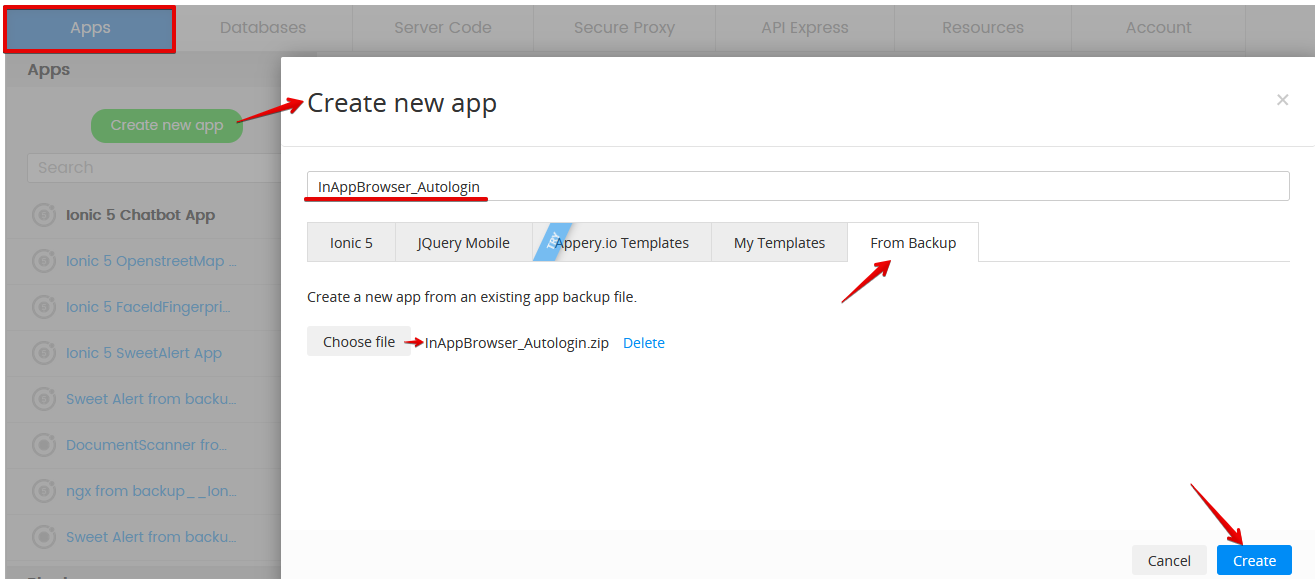
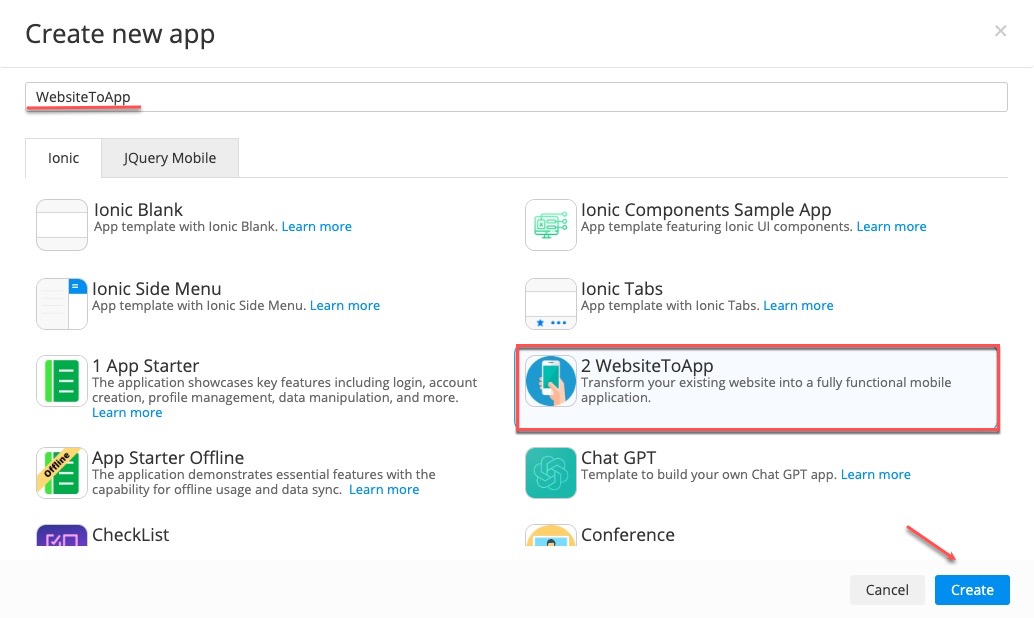
To open it in Appery, choose Create new app > From Backup, then select the downloaded zip file, click Create, and wait a moment while Appery creates the project for you from the backup.


When finished, you’ll have the InAppBrowser_Autologin project created in your Appery workspace. Assuming you can already do basic operations in Appery, such as creating pages and dragging and dropping UI components from the palette, we’ll just walk you through the highlights of how this project was built, focusing on issues related to InAppBrowser.

To demonstrate these techniques, we have created a multi-page site on Heroku.com. Please click here to visit it. All the site pages except for the Login page are protected by login/password.

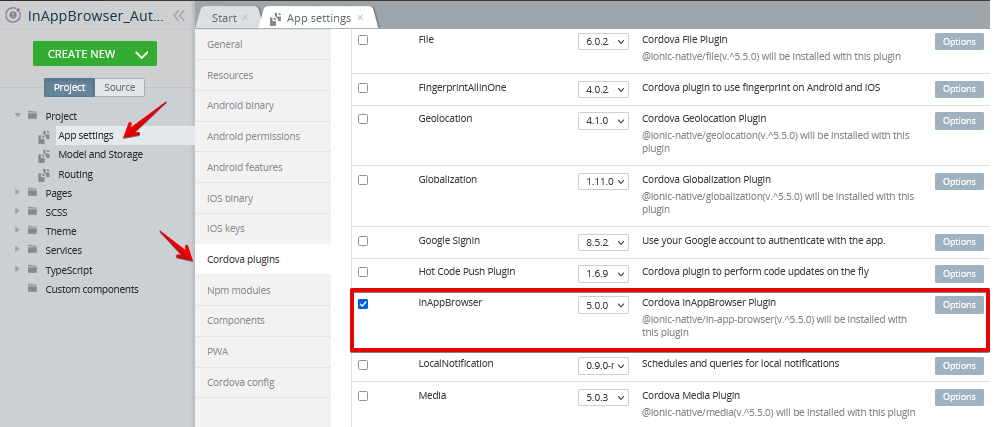
We will be accessing this site using InAppBrowser, so we need to have this Cordova plug-in enabled in App settings > Cordova plugins:

Let’s review how all of our InAppBrowser related activities are wrapped in an Angular service that can be used to share variables and code between the app pages. (To create this service in Appery, we performed Create New > TypeScript and named it BrowserService, with the type set to Angular service.) You can check that now we have an initial template ready to be gradually replaced with our functions:

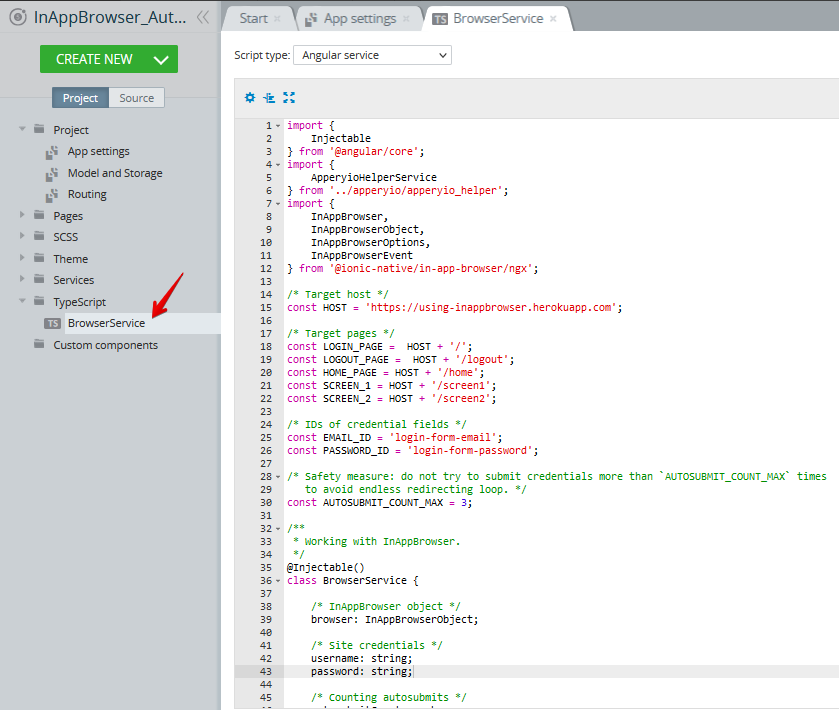
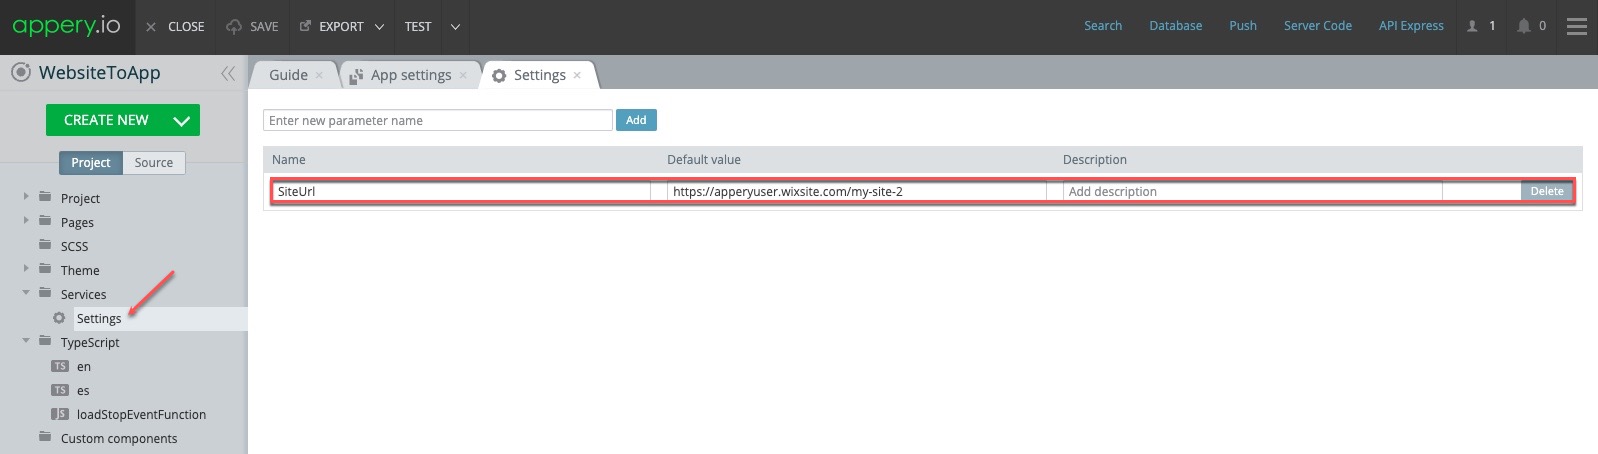
Let’s first check how the constants are defined for our site; these are: the target host, target pages, and IDs of the credential fields on the login page:

/* Target host */

const HOST = 'https://using-inappbrowser.herokuapp.com';


/* Target pages */

const LOGIN_PAGE =  HOST + '/';

const LOGOUT_PAGE =  HOST + '/logout';

const HOME_PAGE = HOST + '/home';

const SCREEN_1 = HOST + '/screen1';

const SCREEN_2 = HOST + '/screen2';


/* IDs of credential fields */

const EMAIL_ID = 'login-form-email';

const PASSWORD_ID = 'login-form-password';

We would like to access Screen1 and Screen2 directly, bypassing the credentials on the Login page. To do this, we use the InAppBrowser ability to track the loaded pages and insert scripts into them.

To see how BrowserService is used on he Menu page of the app, go to the CODE panel and switch to Includes at the top of the page. Here, we added BrowserService to the Internal includes section. We then switched to the Variables section at the top of the page and added the browser variable of type Browser; also, we enabled the Add DI checkbox. This checkbox stands for “dependency injection”, which means that all Angular services in the app are called “dependencies” and can be “injected” into pages:

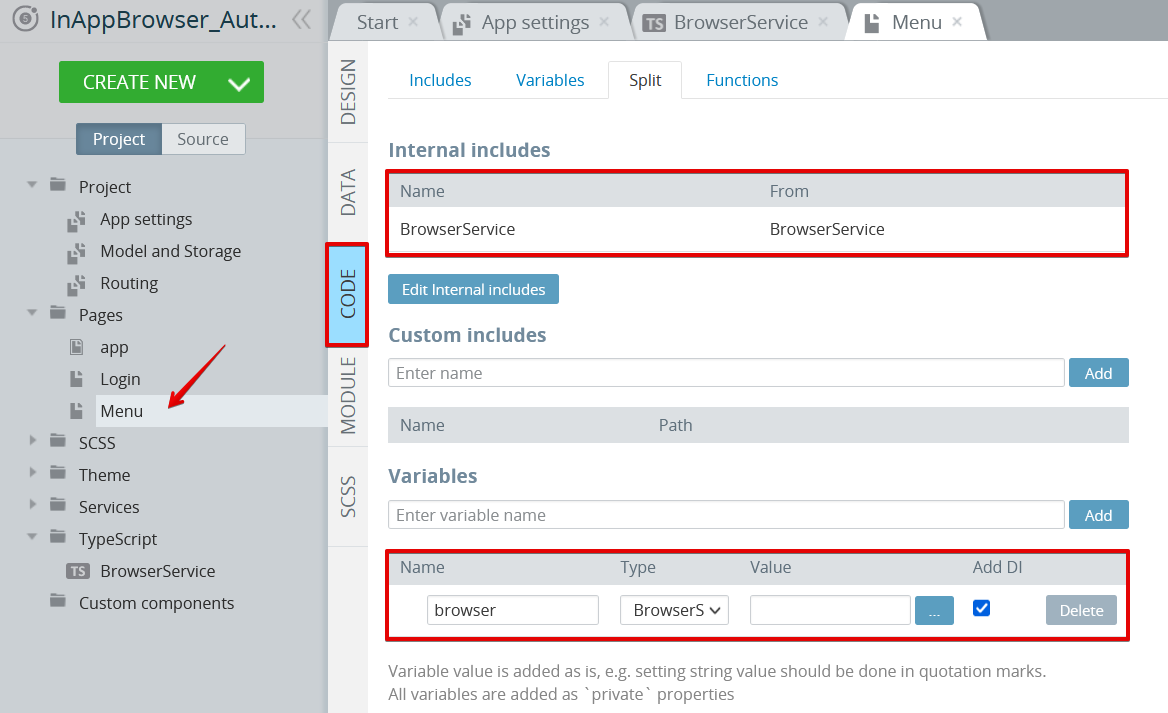
Everything looks good as we now have a browser variable on the Menu page for our BrowserService, so it can be called by binding TypeScript events to the buttons on the page:

  • this.browser.openFirstPage();
  • this.browser.openSecondPage();

These functions are implemented in BrowserService as:

public openFirstPage() {

    this.open(SCREEN_1);

}


public openSecondPage() {

    this.open(SCREEN_2);

}

It points us to the open(targetURL: string) method, where we created the InAppBrowser object:

this.browser = this.iab.create(targetURL, '_blank', this.getBrowserOptions());

Next, we subscribed to the following InAppBrowser events:

  • loadstart when our browser starts to load a URL.
  • loadstop when our browser finishes loading a URL.
  • loaderror when there is an error when loading a URL.

We get notified of these events as the user navigates through the pages on the site, so that we could take the needed action. One thing that we can do when we are on the Login page is to fill in the username and password fields on the site to automatically submit the form:

this.browser.executeScript({

    code: `

        document.getElementById('${EMAIL_ID}').value = '${this.username}';

        document.getElementById('${PASSWORD_ID}').value = '${this.password}';

        document.forms[0].submit();

    `

});

Here, we are using the InAppBrowser’s executeScript() function, which allows us to call JavaScript on an already loaded page.

Let’s go back to the options we used to create InAppBrowser.

private getBrowserOptions(): InAppBrowserOptions {

    return {

        'location': 'no',

        'hidden': 'yes',

        'beforeload': 'get'

    }

}

Here, we selected to hide the location bar with the URL of the page. We also set the browser to a hidden state to be shown only when the page is loaded.

Note the beforeload event: it is a bit special here. This is a pretty useful event to prevent certain pages from loading or replace the current URL with a different one. This can be useful, for example, if your site contains PDF documentation on the page. iOS devices have no problem opening PDFs, but this is not the case on Android devices with no direct PDF support. So, we can use a workaround to display PDF using a 3rd party service:

this.iab.create("https://docs.google.com/gview?embedded=true&url=" + event.url, "_system");

Also, one should be careful with the beforeload event, as the beforeload=yes option causes POST requests to stop working in InAppBrowser on iOS due to some existing issue, see here for more details. So we are setting beforeload=get to check only GET requests.

Basically that’s all. We took a look at the InAppBrowser events like loadstart, loadstop, loaderror and beforeload and added an autologin script to the site.

Check out the code in the attached Appery.io project and let us know if you have any questions, and happy coding in Appery.io!

Have Appery-related questions? Ask them on Stackoverflow!

Dear Appery.io Users,

Since recently, our customers have started complaining about issues with registration/login into our forum. Therefore, we have decided to introduce yet another open channel where you are free to ask any Appery.io-related question(s) you might have: Stackoverflow. 

Stackoverflow is one of the most popular and renown platforms where anybody can ask for an advice on any programming issue. Where hundreds of users find answers to their questions daily and thousands of experts are happy to provide their colleagues with useful recommendations and examples.

Is is truly a huge community and from now on, we encourage you to post your questions (like those on Appery.io Platform, App Builder, Appery.io plug-ins, etc.) there instead of using forum.

Please make sure you use the tag <Appery> or <appery.io> while posting so that our experts from Support Team (as well as other users that can be of help) could answer them ASAP to our mutual satisfaction:


We hope this will help to remove any barriers to effective communication and make getting professional help as easy and productive as possible.

And as usual, we offer more ways for you to get help. Please check this link to learn how to reach to our Support Team for help.

Lots of love on St. Valentine’s Day!

Your Appery.io Team


How to Generate a New PDF File Using JavaScript

Wondering how to generate a PDF file in your mobile application? Check out our new tutorial and learn how to add the jsPDF library to your project.

Hacking a Hackathon with Appery.io

A hackathon is usually an all day long coding competition where a motley team of software programmers, developers, and designers sit together to design and develop something quickly. The goal of a hackathon is to create usable software in the least amount of time. In order to avoid the burden of building infrastructure and steep learning curve issues, many hackathon attendees (“hackathonees”) search for a Swiss army knife to use.

Luckily, with Appery.io, a cloud-based rapid software development platform, hackathonees satisfy all of these goals. Among them are top-notch companies such as a the largest bank in the Middle East, a worldwide healthcare company, and a global hackathon organization that has already fueled many internal and public codefests with Appery.io.

Concentrate on Innovation Not Infrastructure

Appery.io has integrated mobile back-end services, including database, push, and server code. In addition, it can be used to easily and securely integrate apps with any back-end system. Offline synchronization is included, too. And, dozens of free out-of-the-box plugins are available.

Smooth Learning Curve

According to the Appery.io community members, it takes just 2 to 3 days for a novice to master the platform and start building functional hybrid apps. (Of course, some basic knowledge of JavaScript, HTML, CSS, and databases are nice to have to make the learning curve shorter.) In addition, the platform has tons of well-organized DIY videos and manuals as well as free downloadable sample apps.

Easy to Start

Here is a five-minute video showing how to build a mobile app with a cloud database from A to Z.

Are you a hackathonee? Start using Appery.io for FREE!

How to Validate an Email Field in a jQuery Mobile App Using a Regular Expression

pablo (45)

Validating an email entered on a form is one of the most fundamental requirements in any mobile app. In this blog post, we are going to show you how to validate an email input field using a regular expression. This blog post is a follow-up to How to Add JavaScript Form Validation to a Mobile App post.

Validating an email input field using a regular expression is very simple. Here is the code to perform email validation.

// Read a value from the email input component.
// Apperyio() is a quick wrapper for a jQuery select
// emailInput is the name of the UI component
// It's possible to use jQuery directly as well
var emailInput = Apperyio("emailInput").val();

// Regular expression to validate email input value
var re = /^(([^()[\]\\.,;:\s@\"]+(\.[^()[\]\\.,;:\s@\"]+)*)|(\".+\"))@((\[[0-9]{1,3}\.[0-9]{1,3}\.[0-9]{1,3}\.[0-9]{1,3}\])|(([a-zA-Z\-0-9]+\.)+[a-zA-Z]{2,}))$/;
var test = re.test(emailInput);

// condition check part
if(test) {
    alert ("Everything is good.");
}
else {
    alert("Invalid email entered. Please try again.");
}

You can quickly add this code to any app inside a JavaScript file and reuse. Looking for more examples and how-tos? Check out YouTube channel for large number of short videos.

How to Add JavaScript Form Validation to a Mobile App

Validating user input is one of the most important requirements in a mobile app. The most common approach of form validation requires that you check the form fields before the form is submitted; this is to make sure that the required information is supplied. Today we will show you how you can validate the input fields in your app before submitting the information to the Appery.io Database.

In this example the app will have following simple design:

Form App design

Form app design

Read the rest of this entry »

Development Tip: Quick Android App Debugging On The Device With Chrome

chrome-debuggingDebugging your JavaScript apps that are made with Appery.io can be performed in a several ways, but today we would like to share with you another method. This approach has been available before, but for a some reason not many people know about it. The flow is looks really simple:

  1. Connect the device to a PC with a cable.
  2. Export the Appery.io app as an Android binary (.apk).
  3. Scan the QR code to install the app.
  4. Launch Chrome and open the app on the device.
  5. That’s all! Now you have a really quick debugging tool to test your app with.

You should do a few steps to makes it work, but luckily they are not complicated and you can be ready-to-go in a few minutes.  A detailed guide about this feature and how to set it up you can found here.

Read more about the testing and debugging options here and make sure to check out all of our mobile development tips.

Do you want to build apps fast? Start developing with our trial plan!

How to Play a Custom Sound in Your Mobile App

Audio_with_JS

To make your app more interactive and stand out from the competition, one nice option is to play a nice sound file in the background when an event occurs.

You can easily add a custom sound to an app you are building in Appery.io and play it using the standard HTML5 Audio component. As you can always customize any app with custom JavaScript, you can start and stop playing the sound via JavaScript. I’m going to show you how to do this in your Appery.io app.
Read the rest of this entry »

Learn How to Quickly Upload, Display, and Customize Images from the Database with the Built-in Files Collection

Upload image files

Virtually any mobile app needs to store data. The Appery.io platform offers an integrated cloud-based database for storing any app data. Every database that you create comes with a number of collections predefined. The collections are:

  • Users – for user management.
  • Files – for storing binary data such as images and other files.
  • Devices – for sending targeted push messages.
  • Customer collection – any number of custom collections that you need in your app.

Read the rest of this entry »