Easy GPT-4o Mobile and Web App Integration with Appery.io

In the digital age, integrating advanced technology into your applications can set you apart from the competition. One of the most groundbreaking technologies today is GPT-4o, a version of the AI model developed by OpenAI that can transform how we interact with software. For those who are not developers, the thought of adding such advanced capabilities to an application might seem daunting. However, with platforms like Appery.io, it’s not only possible; it’s also straightforward.

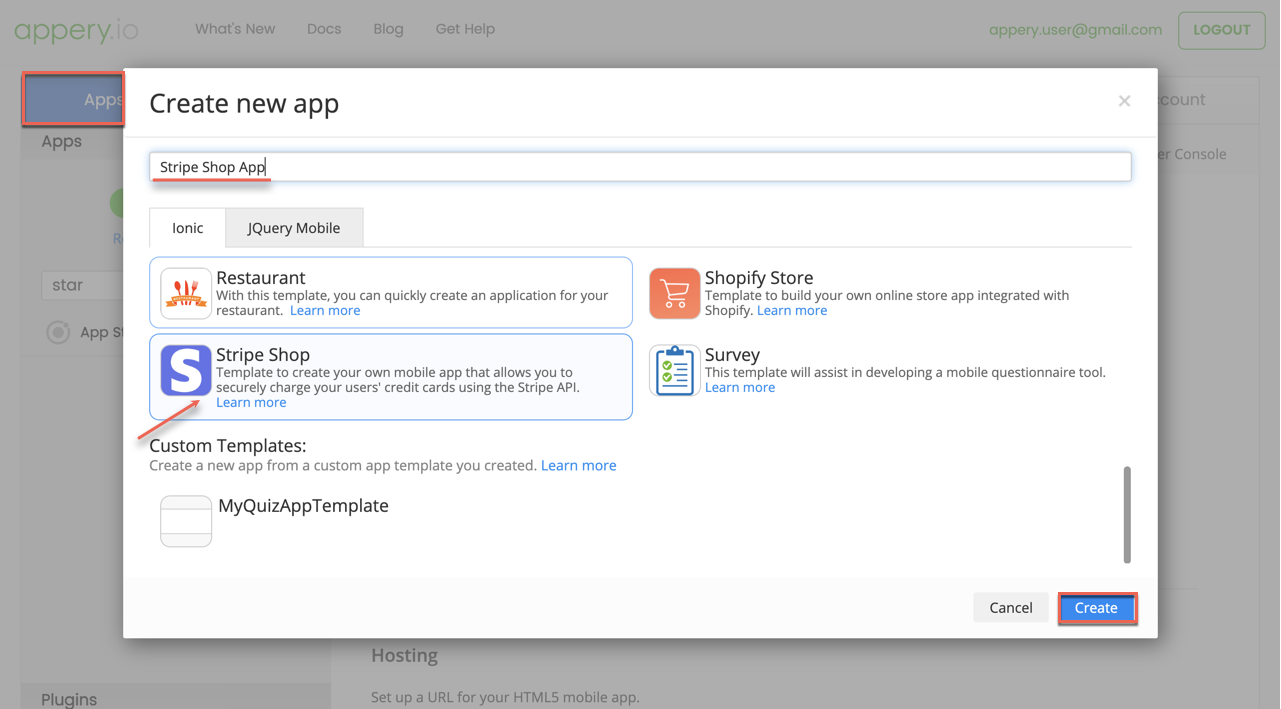
Appery.io is the first mobile building platform that offers even two options to integrate the GPT-4o model into your app:

  1. By using the GPT-4o app template for easy building your own Chat GPT app based on the GPT-4o model
  2. By adding a ready-to-go-with GPT-4o screen layout.

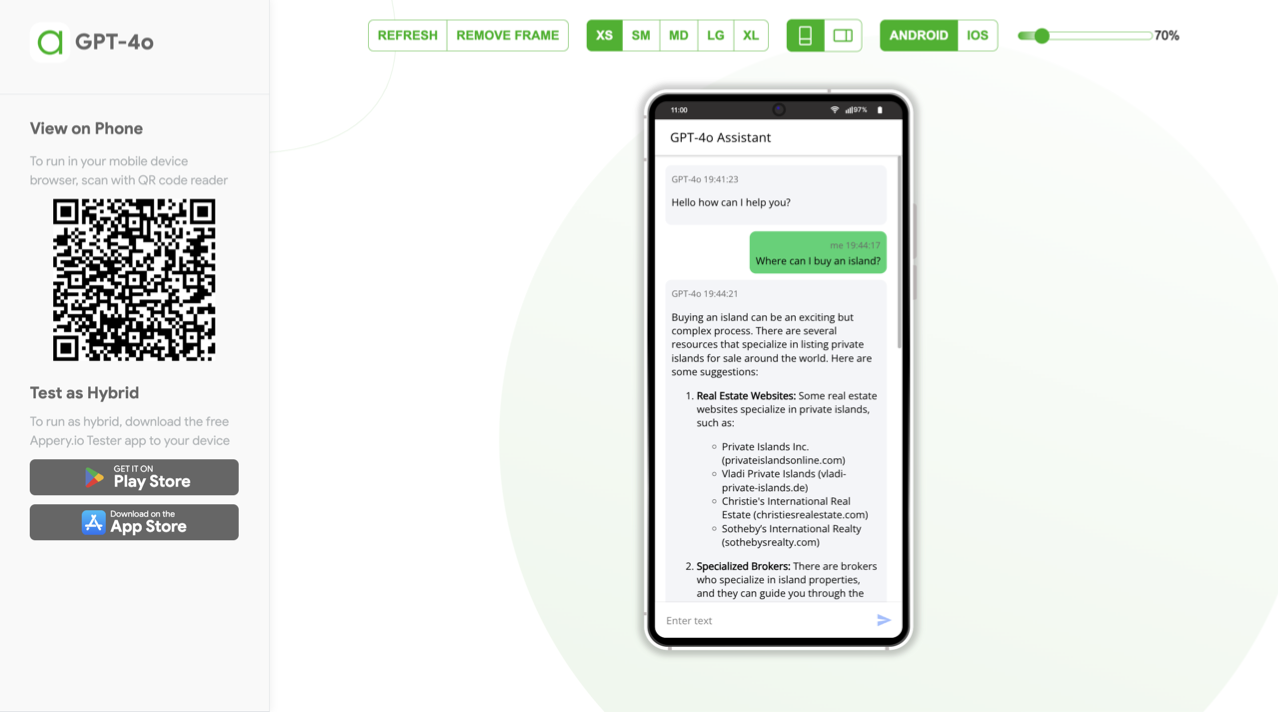
On top of it, our latest YouTube tutorial offers a user-friendly guide on how to either create a new mobile or web application with GPT-4o support or add it to an existing app using Appery.io, a powerful yet easy-to-use, low-code app-building platform. This video is ideal for anyone interested in stepping into the world of app development without needing to dive deep into complex programming languages. Appery.io provides a seamless environment where you can visually develop your application, integrate backend services, and include sophisticated features like GPT-4o without writing extensive code.

Whether you are looking to enhance a personal project or elevate a professional application, incorporating GPT-4o could significantly improve functionalities such as natural language understanding, automated reasoning, and personalized user interactions. This tutorial isn’t just about integrating AI; it’s about making cutting-edge technology accessible to everyone. By the end of the video, you’ll not only understand what GPT-4o can do for your apps but also how to incorporate it using Appery.io seamlessly. Embrace the future of app development – start integrating GPT-4o today and see your applications do more than they ever could before. Watch our tutorial now and take the first step towards unlocking new possibilities.

Tips and Tricks Video Guide: Text in Editor

Hello, everyone! In our new video, we’re exploring a fantastic feature of Appery.io called “Text In Editor”, which can significantly enhance your mobile app development. This tool allows you to modify and fine-tune your app’s user interface (UI) directly within the editor, making the development process more efficient.

Quick Guide to Using Text In Editor

Suppose you’re working on an app that needs to display an array of objects. Here’s how you can set this up efficiently:

1. Go to the DESIGN tab: Drag the List component onto your workspace. If there’s an extra item, delete it by clicking the red cross.

2. Configure Properties: Select the first list item and add the `*ngFor` directive with `let item of items` in the PROPERTIES panel for dynamic display.

3. Manage Item Labels: Use the ‘Item Label Text’ property to link names or other necessary data dynamically from your array.

Addressing Common UI Challenges

During your preview, you might encounter issues like unappealing editor frames or disrupted layouts due to long expressions. However, with the “Text In Editor” feature, you can:

– Enter simpler text, such as “Yes” or “No,” to help visualize how content will appear, enhancing the mobile frame’s neatness.

– Use placeholder text in the “Text In Editor” for labels to distinguish between different data types (e.g., person names vs. product names).

These adjustments allow for a smoother design process and reduce the need for constant back-and-forth testing.

Learn More in Our Video

For a more detailed demonstration of how to utilize the “Text In Editor” feature effectively, check out our comprehensive video. We delve deeper into managing design issues and optimizing your app development workflow using Appery.io.

Thank you for tuning in, and don’t forget to subscribe for more insights! Catch you in the next video!

Unlock Game-Changing QR and Barcode Features in Your App with Appery.io

App development continually evolves, and integrating QR and barcode scanning has become a game-changer for many apps. Appery.io, a low-code platform, has simplified the integration process significantly. In our recent YouTube video, we share how you can easily build a mobile app with robust scanning functionality using Appery.io.

Watch this detailed video guide for a visual and interactive learning experience:

The steps below aim to supplement the video instructions and provide additional clarity as you work through the integration process.

Getting Started with Appery.io

First, create an account on Appery.io; it’s free. Once logged in, you begin by creating a new project. Click on ‘Create new app’, name it, and you are ready to begin.

Approach 1: Using Predefined Page Layout

Appery.io offers predefined layouts that simplify your work. To integrate a QR Code Scanner:

  1. From the main menu, select CREATE NEW,  then Page, and choose QR Code Scanner from the available page layouts.
  2. Confirm the selection, and just like that, you add a fully functional scan page to your app.

Testing is straightforward. Set the newly created page as the home page from the Project > Routing settings. This setup ensures it loads first upon opening the app. Use the Appery.io Tester app available on both iOS and Android to simulate real-device testing. Instantly, your app can handle QR codes and barcodes, making it incredibly versatile.

Approach 2: Adding Plugins to Existing Apps

If you wish to add scanning functions to an existing app without disrupting its structure:

  1. Start by creating a new app and under CREATE NEW, select From Plugin.
  2. Import the QR and Barcode Scanner service.
  3. Enable the necessary plugins like BarcodeScanner under Project > App settings > Cordova Plugins.
  4. On your app’s page, add a Button and a Text. The button triggers the scanner, and the text field displays the scanned data.
  5. Set an event for the button that invokes the scanner service when clicked.

This method embeds the scanning function into your app just as seamlessly, providing a web scanning option during preview and flawless operation on devices.

Approach 3: Low-Code Method

Perhaps the most innovative approach is adding scanning functionality without any server-side actions:

  1. Simply remove any services from your page.
  2. In the CODE panel, create a variable, for instance, ‘text‘.
  3. In the DESIGN panel, link this variable to display in a Text field.
  4. Add a new attribute to the Button component to trigger a ‘scan()‘ function when clicked.

Define this `scan()` function to handle the scanning operation. This method is not only straightforward but also modular, allowing adjustments and additions without deep dives into complex coding.

Why Choose Appery.io?

What makes Appery.io stand out is its simplicity and efficiency. Whether you are a novice or an expert, these tools are designed to streamline the creation process. Additionally, the platform supports a wide range of functionalities that can be integrated with just a few clicks.

We have plenty of detailed video guides available to walk you through each step, ensuring you have all the support you need. These resources are perfect for both visual learners and those who prefer to follow along at their own pace.

Wrap-Up

Embracing Appery.io for your mobile app development not only simplifies the entire development process but also opens up a realm of possibilities with QR and barcode scanning functionalities. Start experimenting today by signing up for a free two-week trial on Appery.io and join us on this innovative journey to transforming your applications.

Enjoy the journey, and here’s to developing apps that truly stand out! If you’ve enjoyed this tutorial, don’t forget to subscribe to our YouTube channel for more updates and tips. Thank you for reading, and see you in our next post!

Enhance Your App Now: Simplify Powerful Cloud Database Integration!

Diving into mobile app development? Enhance your app’s capacity effortlessly by integrating it with a cloud database. In our new video guide, we take you through an easy-to-follow guide on setting this up using Appery.io, making your app more dynamic and robust.

Why Cloud Databases?

Cloud databases provide a scalable, secure, and efficient way to manage app data. Whether it’s Amazon RDS, SQL Server, or PostgreSQL, these platforms help you handle large volumes of data without compromising on performance. The best part? Appery.io supports various databases, opening a realm of possibilities for your applications.

Getting Started with Database Connection

First, log into the Appery.io App Builder. Go to the API Express tab and create a new database connection. This process is user-friendly and supports different database types. For instance, connecting to a PostgreSQL database is as straightforward as inputting credentials and testing the connection for viability.

Exposing Database Data via REST Service

Once your database is connected, the next step is to expose your data. This involves creating an API Express project that allows your app to communicate with the database via RESTful services. You’ll find this feature particularly useful as it forms the backbone for data interaction within your app.

Building and Testing Your Mobile App

The final step is the most exciting—building your mobile app. Appery.io simplifies this with features that accommodate both no-code and low-code development approaches. Start by creating a new app and dragging the necessary components like Lists or Buttons onto your app’s screens. Then, integrate the services you’ve created to fetch or input data into your cloud database.

Real-World Application: Dynamic Data Handling

To illustrate, imagine your app displays a list of data entries from a cloud PostgreSQL database. You can enhance this by adding functionalities like creating new data entries through the app. This not only makes your app interactive but also practical for real-world use. Testing these functions within Appery.io is straightforward and gives you a firsthand look at your app’s performance.

Conclusion: Embrace the Power of Integration

By integrating cloud databases into your mobile apps, you unlock new layers of functionality and efficiency. As demonstrated in our video guide, the process can be surprisingly simple yet incredibly impactful. Whether you want to improve an existing app or start a new project, cloud database integration is a gateway to more sophisticated and responsive app solutions.

Ready to enhance your mobile app? Dive into cloud database integration and watch your app’s potential unfold!

API Express: Transforming Mobile App Development Made Simple

In today’s fast-paced digital era, the essence of mobile applications is not just in their functionality but in the seamless integration with dynamic data sources. API Express, an integral feature of Appery.io, a leading low-code app-building platform, simplifies this aspect by connecting your app with relational databases effortlessly. For a deeper dive, we’ve crafted a comprehensive video that walks you through every step of this transformative process.

Bringing API Express and Relational Databases Together

API Express acts as the bridge between your mobile app and a relational database. But what’s a relational database, you ask? Imagine a vast warehouse of tables filled with connected data. With API Express, accessing this warehouse becomes as simple as tapping a button on your app. Our video tutorial, available on Appery.io, showcases this with clarity and detail, ensuring you grasp every aspect of the process.

A Video Guide That Makes Integration Easy

Why sift through complicated documents when you can watch a step-by-step video? Our tutorial breaks down everything from setting up PostgreSQL on Amazon Web Services (AWS) to crafting data services within your app through API Express. Here’s a sneak peek at what the video covers:

  1. Starting Your Database: Create and configure a PostgreSQL database on AWS. It’s the first step towards building a data-driven app.

  2. Managing Data with Ease: Use pgAdmin to manage your database—creating tables, organizing data, and preparing everything for your app.

  3. Seamless Connection via Appery.io: Step into the world of Appery.io and begin a new API Express project. This part of the video vividly shows how you can connect your database to your app without breaking a sweat.

  4. Customizing Your Data Service: Our video tutorial goes beyond basics, teaching you how to design a data service that tailors your app to utilize database information efficiently.

  5. Live Testing: The final step involves testing your setup within Appery.io, providing live feedback on how your app interacts with the database, all demonstrated in the video.

Why Watch the Video?

While this article outlines the steps, the video brings them to life. Visual learners will appreciate the detailed walkthrough, and even experienced developers might discover a tip or two. It emphasizes practical steps, visual cues, and expert advice to ensure your path from a database newbie to a mobile app developer is as smooth as possible.

Dive Deep with Our Video Tutorial

We invite you to watch our video on API Express and Appery.io. Whether you’re developing an app that captures user input, displays real-time data, or manages inventory, integrating with a relational database has never been easier. This video isn’t just a tutorial; it’s your gateway to mastering mobile app development.

Curious about building an app with this setup? Stay tuned. The next video will guide you through creating an app using the service we just crafted.

Ultimate Blueprint: Unlocking the Magic of Appery.io Themes with Ease

Creating an app that stands out in the vast sea of mobile apps can seem daunting. However, with Appery.io‘s versatile theme management features, customizing your app’s look and feel becomes not just effortless but exciting. Here’s a straightforward guide on how to work with themes in Appery.io, ensuring your app not only functions perfectly but also visually captivates your audience.

Step 1: Explore the Default Theme

  • Navigate to the Themes folder under the Project tab.
  • Inspect the Main Colors section to understand the color palette, including the primary color, of the default theme. This serves as a solid foundation for your app’s aesthetic.

Step 2: Customize Your Theme

  • Leverage the Theme Generator editor within Appery.io to adjust the main colors of your theme. This intuitive tool allows for easy selection and configuration through a color picker tool.
  • Directly input color codes if you’re matching a specific palette, enabling quick alignment with your brand or desired look.

Step 3: Expanding Your Theme Collection

  • To add more diversity or support different user interfaces, like a dark mode, create new themes. Choose CREATE NEW > Theme and select your base design.
  • Embrace modern trends, such as the dark mode, by selecting it during your new theme creation. This addition caters to user preferences and system settings.

Step 4: Implement Dynamic Theme Changes

  • Elevate user interaction by incorporating dynamic theme changes through actionable elements like buttons.
  • Navigate to the button’s EVENTS tab, select the Run TypeScript action, and input the following code to change themes dynamically upon a button Click action: this.$a.setTheme("Default");.

Step 5: Personalization with CSS Classes

  • Customize themes to cater to various user groups or corporate identities using CSS classes. Assign thematic behaviors to UI components for a tailored user experience.
  • Utilize the Extra SCSS section within a theme to apply unique classes or data, offering a versatile approach to app personalization.

  • When done, assign this class to the needed UI component.

Testing and Application

  • Remember to preview your app under different themes using the Theme Preview selector to ensure your design aligns with your vision.

  • Apply your global theme across all app pages for consistency or set condition-based themes for varied experiences.

Discover More on YouTube

For a more in-depth exploration of each step and visual guidance, our YouTube channel offers the detailed video tutorial. Witness firsthand the power of theme customization in Appery.io by watching our dedicated video on how to work with themes. This resource is invaluable for grasping the practical aspects and unlocking advanced techniques to elevate your app’s design.


Why Choose Appery.io?

Appery.io isn’t just a tool; it’s a gateway to realizing your most ambitious app ideas. With its user-friendly interface, extensive customization options, and robust support system including our YouTube channel, you’re equipped to create visually stunning apps that resonate with users and stand the test of time. Let Appery.io be your partner in the journey from concept to creation, and transform your app vision into reality with themes that express the essence of your idea.

Unlock the full potential of your mobile app with Appery.io – where innovative design meets functionality. Subscribe to our YouTube channel today and stay updated with the latest tips, tricks, and insights in app development with Appery.io. Your dream app is just a theme away!

Magic of Responsive Design: Your Step-by-Step Guide to Appery.io Masterpiece

In the digital era, making your app not just functional but flawlessly adaptable across devices is the holy grail of app development. Your app’s ability to greet each user with the same elegance, regardless of the device, is not an added bonus—it’s a critical mission. Here’s your golden ticket to an enthralling journey into the world of Responsive App UI using the enchanting platform of Appery.io.

And for those ready to embark on this adventure, we highly recommend watching our detailed video guide. It’s your visual companion through each step, ensuring a captivating and successful journey into responsive app design:

Step 1: Initiate Your Adventure

Commence your quest by creating an app from scratch within Appery.io. This mystical platform doesn’t require you to be a coding wizard. It merely asks for your vision. Choose the CREATE NEW option, select Page, and embark on an exciting ride, choosing among various screen layouts that spare you tons of development time.

Step 2: Fine-Tune Your Craft

Now, dive into the heart of your design, where you will encounter multiple UI components, ready to be shaped according to your will. Quick tip for starters: head straight to the Styles tab once you select a component. Adjusting the width to 100% and setting a Max Width property ensures your app element enjoys the flexibility of a yogi, stretching comfortably across screens of all sizes.

Step 3: Play with Grids Like a Pro

The Grid component in Appery.io is nothing short of a magic canvas, allowing your creative ideas to take flight. Imagine it as your spellbook where setting the Grid property to ‘Fixed’ anchors your design firmly across realms (or screen sizes, in mere mortal terms).

Step 4: Manipulate the Grid Cells

Your quest for responsive mastery leads you next to the Grid Cell. Here lies the secret to balancing content across the screen landscapes. From the snug confines of a cellphone to the expanse of a desktop, adjusting the default sizes can transform your app’s presence dramatically. A tweak here, a nudge there, and behold—the perfect alignment!

Step 5: The Alchemy of Visibility 

Delving deeper, you encounter the power of visibility. Through the Classes option, conjure spells to show or conceal elements with a finesse that leaves users bewitched. Marvel as components appear and vanish, guided purely by the size of the screen that summons them.

Step 6: Empower Through Customization 

Before you, lies an array of customization options, your arsenal to combat monotony. Applying the sacred code of CSS, change colors as one would potions, ensuring your app’s interface remains vibrant and inviting across all screens.

Step 7: Navigating the Terrain 

Your final test of mastery beckons with the application of navigation menus. In the realm of smaller screens, the mobile navigation menu reigns supreme. However, as the landscape expands, so should your menu, transitioning smoothly to a split menu for larger vistas.

By following these sacred steps within Appery.io, you not only unlock the mysteries of responsive app UI but also ensure your creation’s journey across devices is nothing short of legendary. Embrace this guide as your torchlight in the enchanting world of app design, where every screen, no matter how big or small, becomes a window to your masterpiece.

Fortify your skills, brave developer, for the path to app enlightenment through the power of Appery.io awaits. Rise, embrace the challenge, and transform your vision into a responsive reality that dazzles and delights across the digital cosmos.

Globalize Your App: 5 Simple Steps to Internationalization with Appery.io!

Hey there! Ready to take your app global? In this video guide, we’ll walk you through five straightforward steps to internationalize your mobile app using the powerful platform, Appery.io. Whether you’re a seasoned developer or new to app building, these steps will make global expansion a breeze. Let’s dive in!


Below is a short review of what is in the video:

Step 1: Log in and Create Your App

  1. Log in to the App Builder on Appery.io.
  2. Create a new app or open an existing one.

Step 2: Set Up Multi-Language Support

  1. Explore your app’s pages to identify UI components containing text.
  2. Easily set the i18n property to True for components using the PROPERTIES panel.

BTW, with Appery.io, you do not need to enable the feature for every text containing component. This can be done with a handy one-click button in the Project > App settings > Components tab that will automate the flow for the entire project:

Step 3: Add New Languages

  1. Create a new script for the desired language (e.g., German):

2. Click Create script to generate the script.

3. Utilize the “Find string keys” feature to identify all text values in your app.

4. Replace English text values with translations using ChatGPT or your preferred translation method.

5. Update app buttons to switch between languages.

Step 4: Customize Your App

  1. Enhance your app’s internationalization with custom components, such as the Searchable select, using the From Plugin option.

2. Add internationalization to JavaScript alerts to support multi-language messages.

Step 5: Test and Deploy

  1. Preview your app in different languages to ensure accuracy and consistency.
  2. Test language-switching functionality to confirm seamless user experience.
  3. Deploy your internationalized app to reach a global audience.

Conclusion: Congratulations! You’ve successfully internationalized your app using Appery.io. By following these five simple steps, you’ve made your app accessible to users worldwide. Say goodbye to language barriers and hello to global success. Keep exploring Appery.io‘s features to further optimize and customize your app for diverse audiences. The world is yours to conquer—happy coding!

Stay tuned for more tips and tricks on mobile app development. Until next time, keep innovating and reaching new heights with your apps! 🚀🌎


Easily Integrate Stripe Payments: Step-by-Step Guide

Welcome, developers! Today, we’re thrilled to walk you through the seamless integration of one of the most popular payment systems into your app using our Stripe Shop template. Follow us along as we break down the process into easy-to-follow steps, empowering you to enhance your app’s functionality and user experience.

Step 1: Accessing the Appery.io App Builder To begin, head over to the Appery.io platform and access the App Builder. Here, you’ll find a range of templates to choose from. Select the Stripe Shop template to kickstart your journey towards integrating Stripe payments into your app effortlessly.

Step 2: Exploring Predefined App Pages and Services Upon selecting the Stripe Shop template, take a moment to familiarize yourself with the predefined app pages and services it offers. These include the Products, Details, Success, and Cancel screens, designed to streamline the shopping experience for your users.

Step 3: Leveraging Linked Backend Services Our Stripe Shop template comes equipped with linked backend services, including a database and server code, preloaded with test data. This allows you to test your app’s functionality immediately, providing a solid foundation for further customization.

Step 4: Customizing Your App Now it’s time to make the template your own. Utilize the App Builder’s intuitive interface to customize your app according to your unique requirements. Add new products, update existing ones, and tweak the design to align with your brand’s identity seamlessly.

Step 5: Integrating with Stripe API The heart of your app lies in its ability to process payments securely. With Appery.io’s Stripe Shop template, integrating the Stripe API is a straightforward process. Follow our clear instructions to replace the default Server Code keys with your own, ensuring seamless payment processing for your users.

Step 6: Testing Your App Before deploying your app to the masses, it’s crucial to thoroughly test its functionality. With Appery.io’s Tester app, you can easily test your app on your own device. Simply scan the generated code from the TEST menu, and you’re ready to put your app through its paces.

Ready to take your app to the next level? Dive into Appery.io’s Stripe Shop template today with our free trial period. Experience firsthand the power of low-code app development combined with seamless payment integration.

Need Assistance? If you encounter any roadblocks along the way, fear not! Appery.io offers comprehensive support, including step-by-step tutorials and direct assistance through the Get Help link in the App Builder. We’re here to ensure your success every step of the way.

Stay Informed Stay up-to-date with the latest tips, tricks, and tutorials by subscribing to our YouTube channel. Join our community of developers and unlock your app development potential with Appery.io.

Conclusion: With Appery.io’s Stripe Shop template, mastering Stripe integration has never been easier. Follow these steps, and you’ll be well on your way to building a feature-rich shopping app that delights users and drives business success. Happy coding!

Effortless App Mastery: Unveiling Appery.io’s Admin Secrets

Hey there, app enthusiasts!

Welcome back to another insightful journey into the world of app development with Appery.io. In our previous video, we took a deep dive into customizing our Menu app template (You can check here if you missed the post). Today, we’re stepping up the game with a focus on a particularly handy feature for admins.

Imagine being able to tweak your app’s content or adjust prices without the hassle of logging into complex interfaces. Well, with Appery.io, that’s not just a dream—it’s a reality. Let’s explore how you can wield this power right from your device.

Accessing Database User Records:

Before diving in, we need to set up a few things. Head over to the App Builder and navigate to the Database link. Within the Menu_DB database, locate the Collections tab and access the Users collection. Here, you’ll set your password or email address for easy access.

Routing for Admin Convenience:

Next, let’s streamline the admin experience. Within the App Builder, navigate to Project > Routing. Set the default route to the Login page, ensuring swift access for admins. Don’t forget to save your changes—it’s the small steps that lead to big convenience gains!

Testing Made Easy:

Now, for the exciting part—testing your app. Sure, you could export it for Android or iOS, but why not take a quicker route? Enter the Tester app, a free gem available for both platforms. Fire it up, scan the generated code, and voila! You’re in.

Admin Delight:

Once logged in, you’re greeted with the Menu management page, your gateway to culinary control. Edit, reorder, or add new meals with a few taps. It’s intuitive, it’s efficient—it’s a game-changer.

Smooth Sailing:

With edits made and changes applied seamlessly, your app is ready for prime time. Hide the Controls menu for a clutter-free interface, ensuring a seamless user experience.

The Finishing Touch:

With everything in place, it’s time to share your masterpiece with the world. Save your app, click Close, and head over to the Hosting section. Name your project, hit Publish, and watch as your app goes live. It’s that simple.


Bon Appétit!

Print that QR code, place it on your tables, and let your guests indulge in the convenience of browsing your menu in their preferred language. With Appery.io, satisfying appetites has never been easier.

If you found this guide helpful, don’t forget to subscribe to Appery.io to try more handy tips and tricks. And hey, if you’re loving what we’re doing, why not join us on our YouTube channel?

Until next time, happy app building!