Easily import any Cordova plugin
You can now easily add any 3rd party Cordova plugin to your app. This has been one of the most requested features. No more sources digging and long step-by-step guides. This is how quickly you can add any Cordova plugin to your app:
- Go to the Github page of the plugin and download the latest stable version by clicking “Download ZIP”. It’s important to download the stable or Release version.
- Go to
Resources > Cordova pluginsand click Import Cordova plugin, then: Choose file, locate the downloaded file and click Import plug-in The plug-in will appear under Cordova plug-ins
And you are done — it’s that’s easy.

Quickly add any Cordova plugin
To manage all Cordova plugins for a particular app go to Project > App settings > Cordova plugins and you’ll set the list. On this page you will also see the Core Cordova plugins – these plugins are automatically available in your app. From this page you can easily manage the plugins. You can quickly enable or disable any plugin.
We think it’s a very nice capability that you will like. To learn more, please read the documentation for more details.
API Express enhancements
API Express allows quickly exposing a relational database via REST APIs. In this update we have added a number of important features.
New service builder components
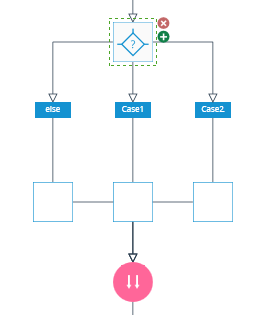
The API Express Service Builder – a visual tool to build your custom services has a number of new components. These components simplify building your service logic.

Easily build custom services with new logic components
You can learn more about the new components here.
Comparison query operators
A set of comparison query operators were added to Find operation to make your requests more effective. Here is the operators list:
- $eq – Matches values that are equal to a specified value.
- $gt – Matches values that are greater than a specified value.
- $gte – Matches values that are greater than or equal to a specified value.
- $lt – Matches values that are less than a specified value.
- $lte – Matches values that are less than or equal to a specified value.
- $ne – Matches all values that are not equal to a specified value.
- $in – Matches any of the values specified in an array.
- $nin – Matches none of the values specified in an array.
Learn how to use these operators in examples.
API Express project import & export
Now it’s possible to save your API Express project locally by backing it up.The project can be restored from the exported backup as well. It’s really simple, so you have to go to API Express > Settings and click “Export Backup” to save your API Express project locally. Click “From backup” when creating new API Express project and choose previously stored backup to create a project from the backup. A little bit more about these features is here.
Quickly add a REST API to a controller with drag and drop

A faster way to add a REST API to an AngularJS app
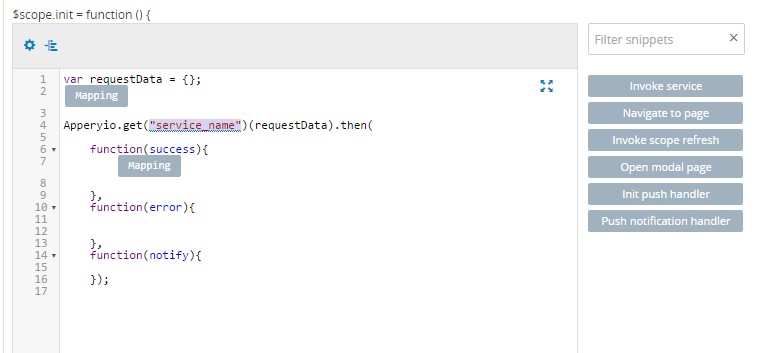
When building an AngularJS app, there are useful snippet called “Invoke service”. The code to execute a REST API service will be added to your scope function when clicking on it. All you have to do is change “service_name” to your actual service name:

Drag and drop a service into an AngularJS controller
We now made it even simpler to add a REST API to a function. Just drag and drop the needed service from Services folder (to the left of the screen, where project tree is located) to your function and you’re done! Even the service name will be automatically substituted:
Edit scheduled pushes for faster development
You can now easily edit scheduled pushes. This means you no longer need to delete a scheduled push in order to make a change. There are few ways in Appery.io to send a Push Notification:
- By sending the REST request using the Push Notifications API.
- By calling the appropriate methods in Server Code.
- By using the web console.
All three methods support scheduling pushes. From now, Server Code and Push Notifications API’s were complemented with new methods to get the list of scheduled notifications and to remove them.
By using the web console you can achieve more functionality when editing scheduled pushes. You can remove them as well, but you can also change notifications content and lot of other options including push message, its sound and devices. Read the doc for details.
Push Notifications API changes
If you built an AngularJS app or jQuery Mobile app (library version 3.0), please make sure you are aware of these API changes:
New version of Appery.io Push Notification plugin has different way to read the message. The changes only concerns AngularJS apps and jQuery Mobile app with libraries version 3.0. If you ever wrote the event.notification.aps.alert code, you should replace it with new variant. So, find your code that looks like:
event.notification.aps.alert
And replace it with the next string:
event.detail.message
That’s all if your making the jQuery Mobile app, but for AngularJS one more step should done. Find PushRegisterDeviceImpl JavaScript file (under JavaScript folder) and replace the entire file with the code provided here.
Happy app building with better Appery.io!
 When implementing logic with a push notification function it is a good idea to understand how it works under the hood, so when you send a push notification using a REST API, Server Code, or via the web console, the flow should look like this:


