Ultimate Guide: Set Up Push Notifications for iOS with Appery.io

Push Notifications for iOS are essential for keeping your app users engaged and informed. Imagine seamlessly integrating this vital feature into your mobile app without coding headaches. That’s exactly what you can do with Appery.io, a user-friendly, low-code app-building platform. Let’s take a closer look at how you can set up push notifications for iOS using Appery.io.

Why Use Push Notifications for iOS?

Push notifications are a powerful way to communicate with your users. They ensure timely updates, promote re-engagement, and improve overall user experience. For iOS apps, configuring push notifications can often seem complex. But with Appery.io, even those without deep technical expertise can accomplish this task with ease. For details, you can watch our how-to video or follow the steps below.

Getting Started with Appery.io

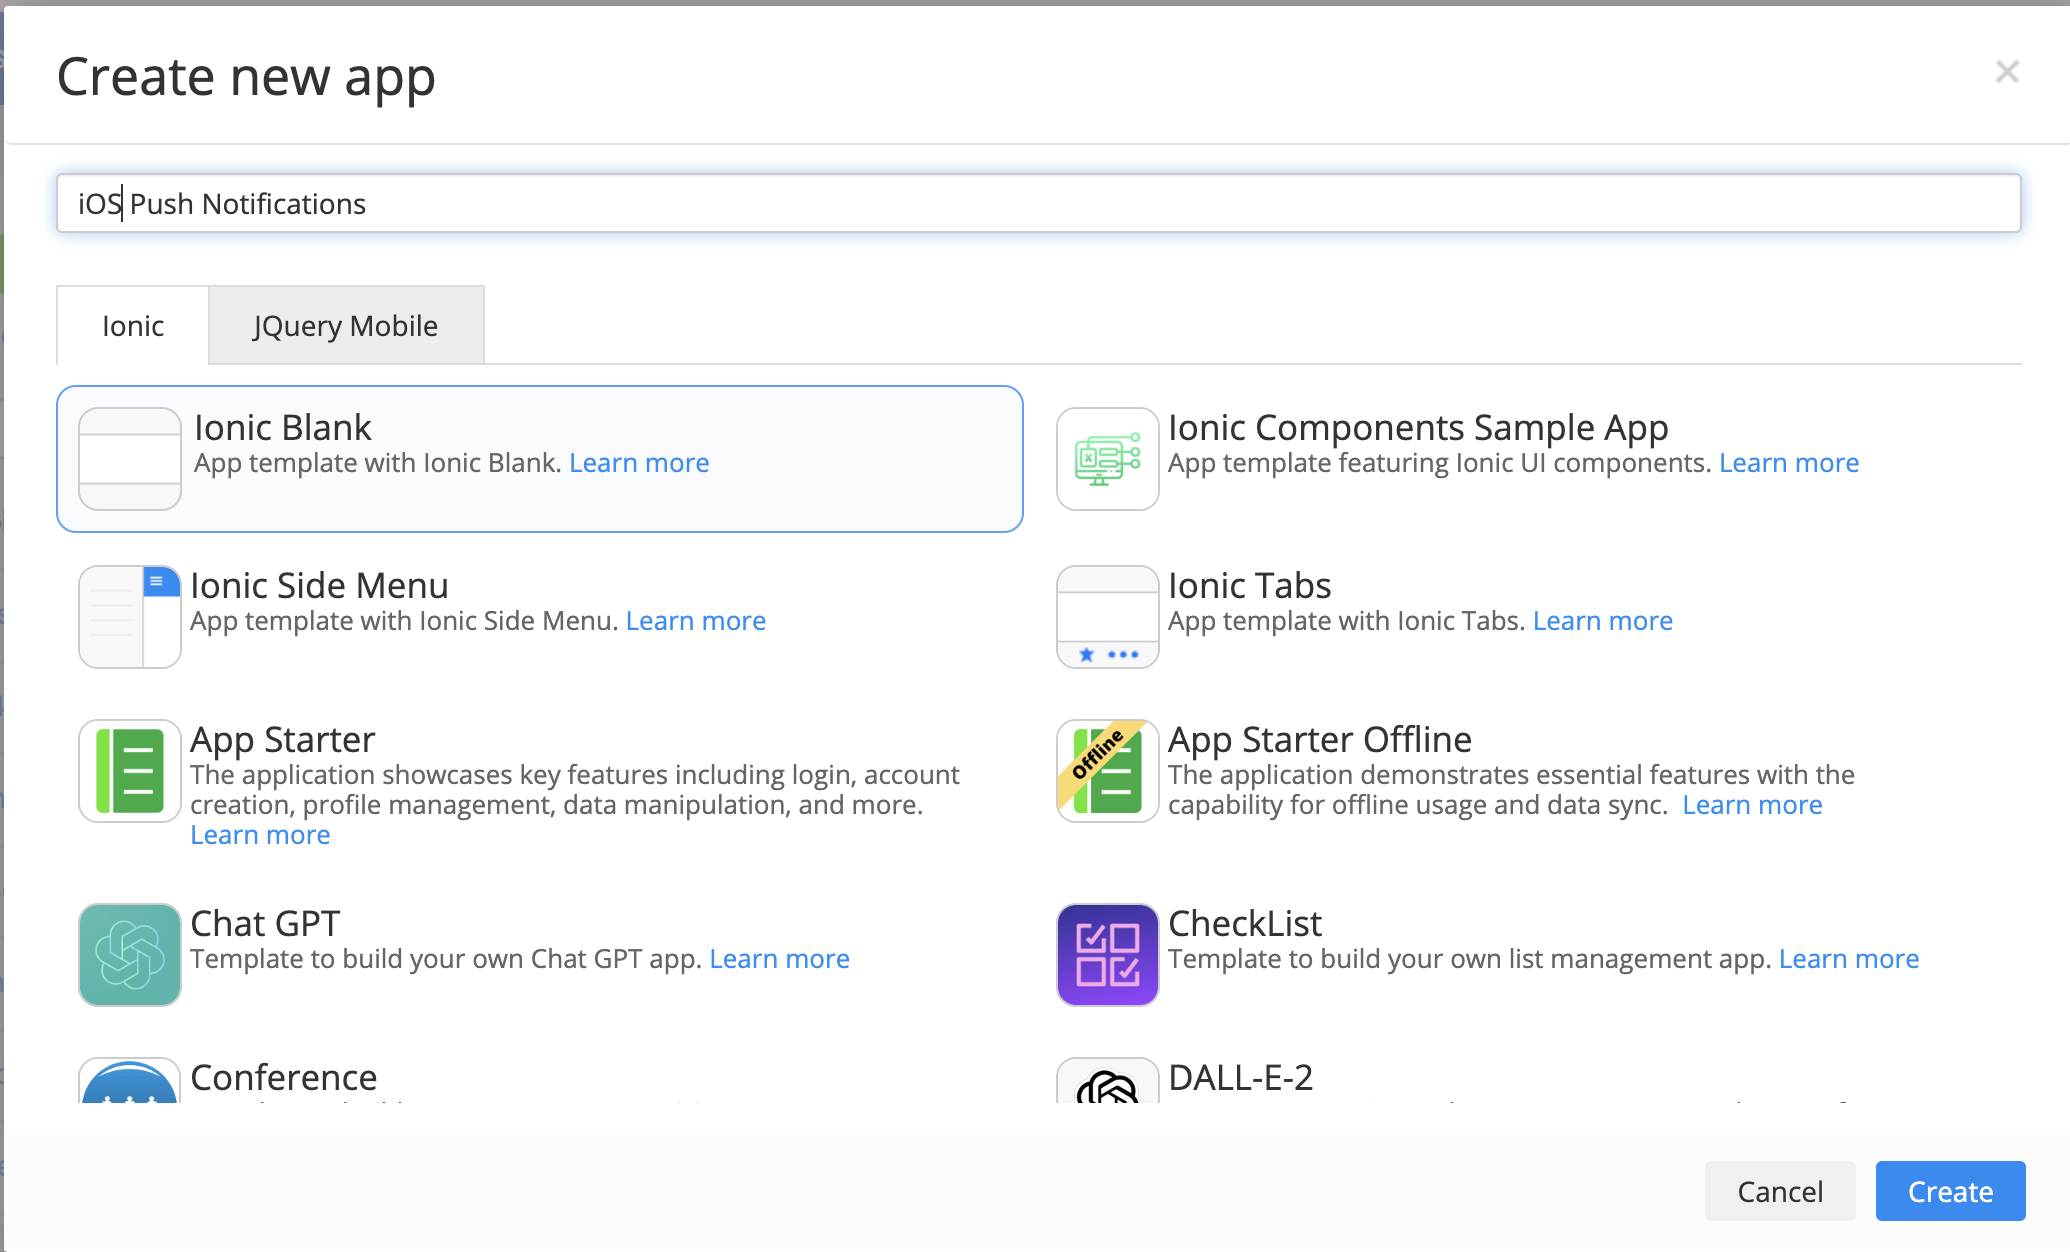
Before diving into the configuration process, you need to create your app on Appery.io:

1. Create Your App:

– Log into Appery.io.

– Start a new project by selecting the template that suits your requirements.

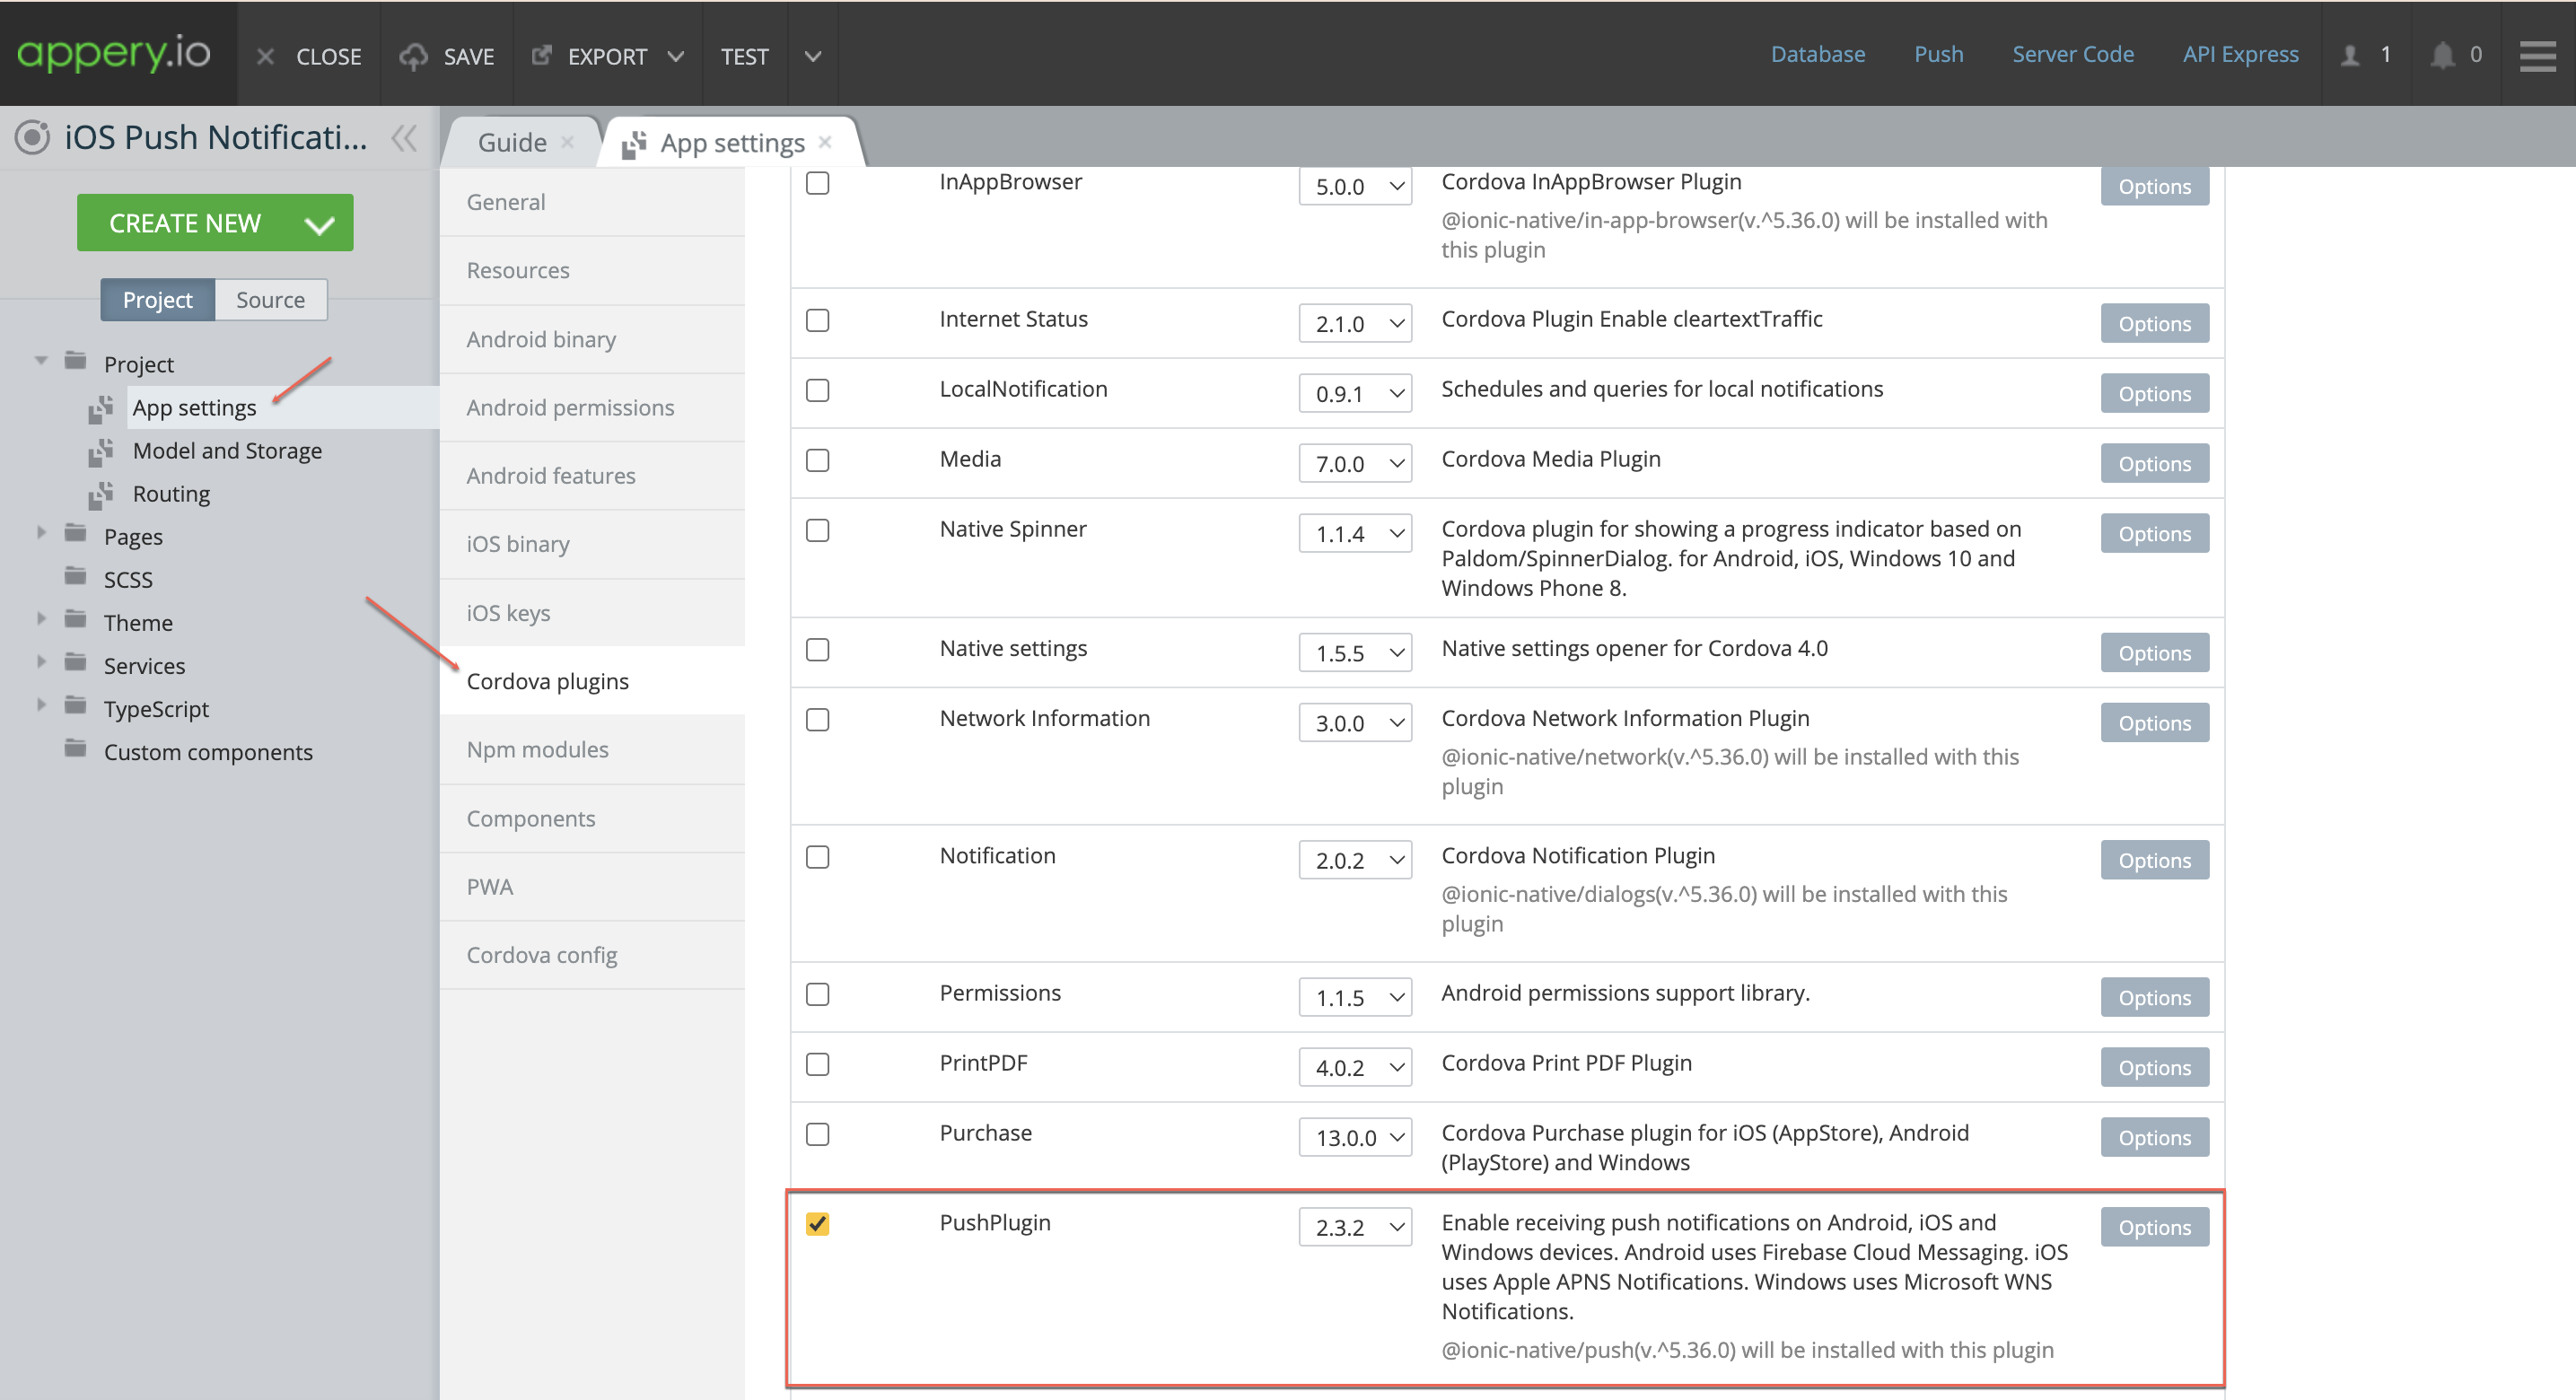
2. Enable Push Cordova Plugin:

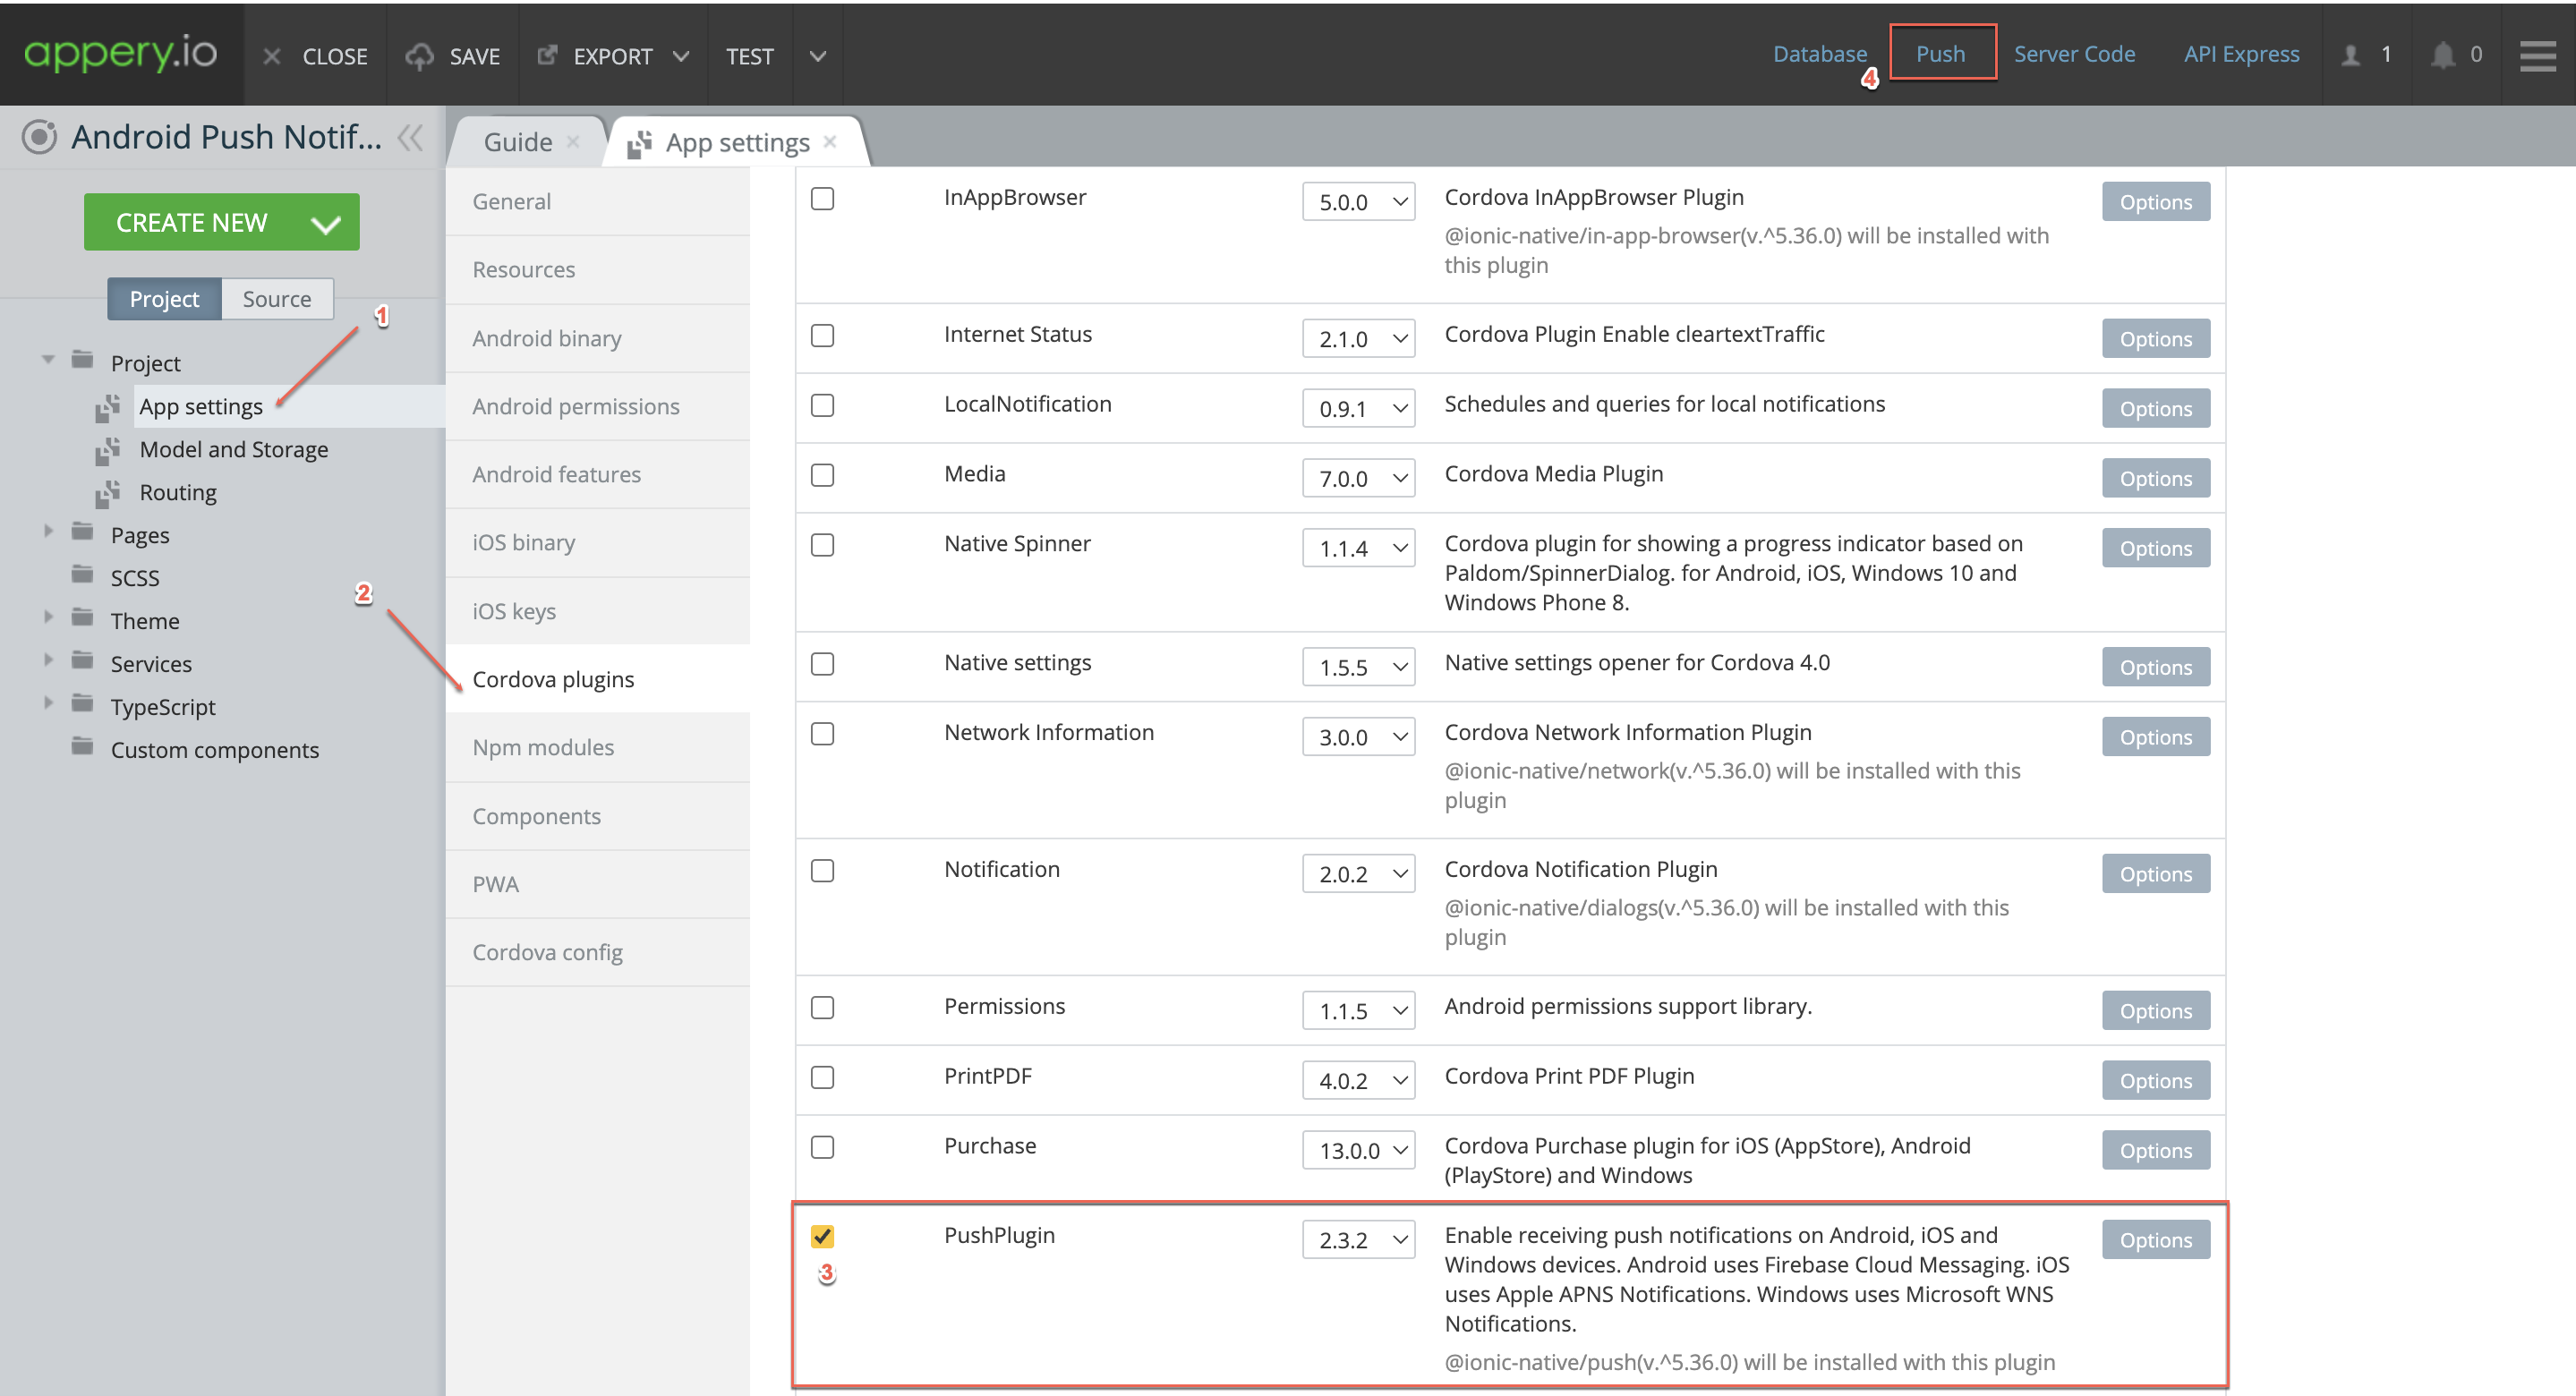
– Navigate to the App settings > Cordova plugins section.

– Enable the Push Cordova plugin to add push notification capabilities.

3. Configure iOS Binary:

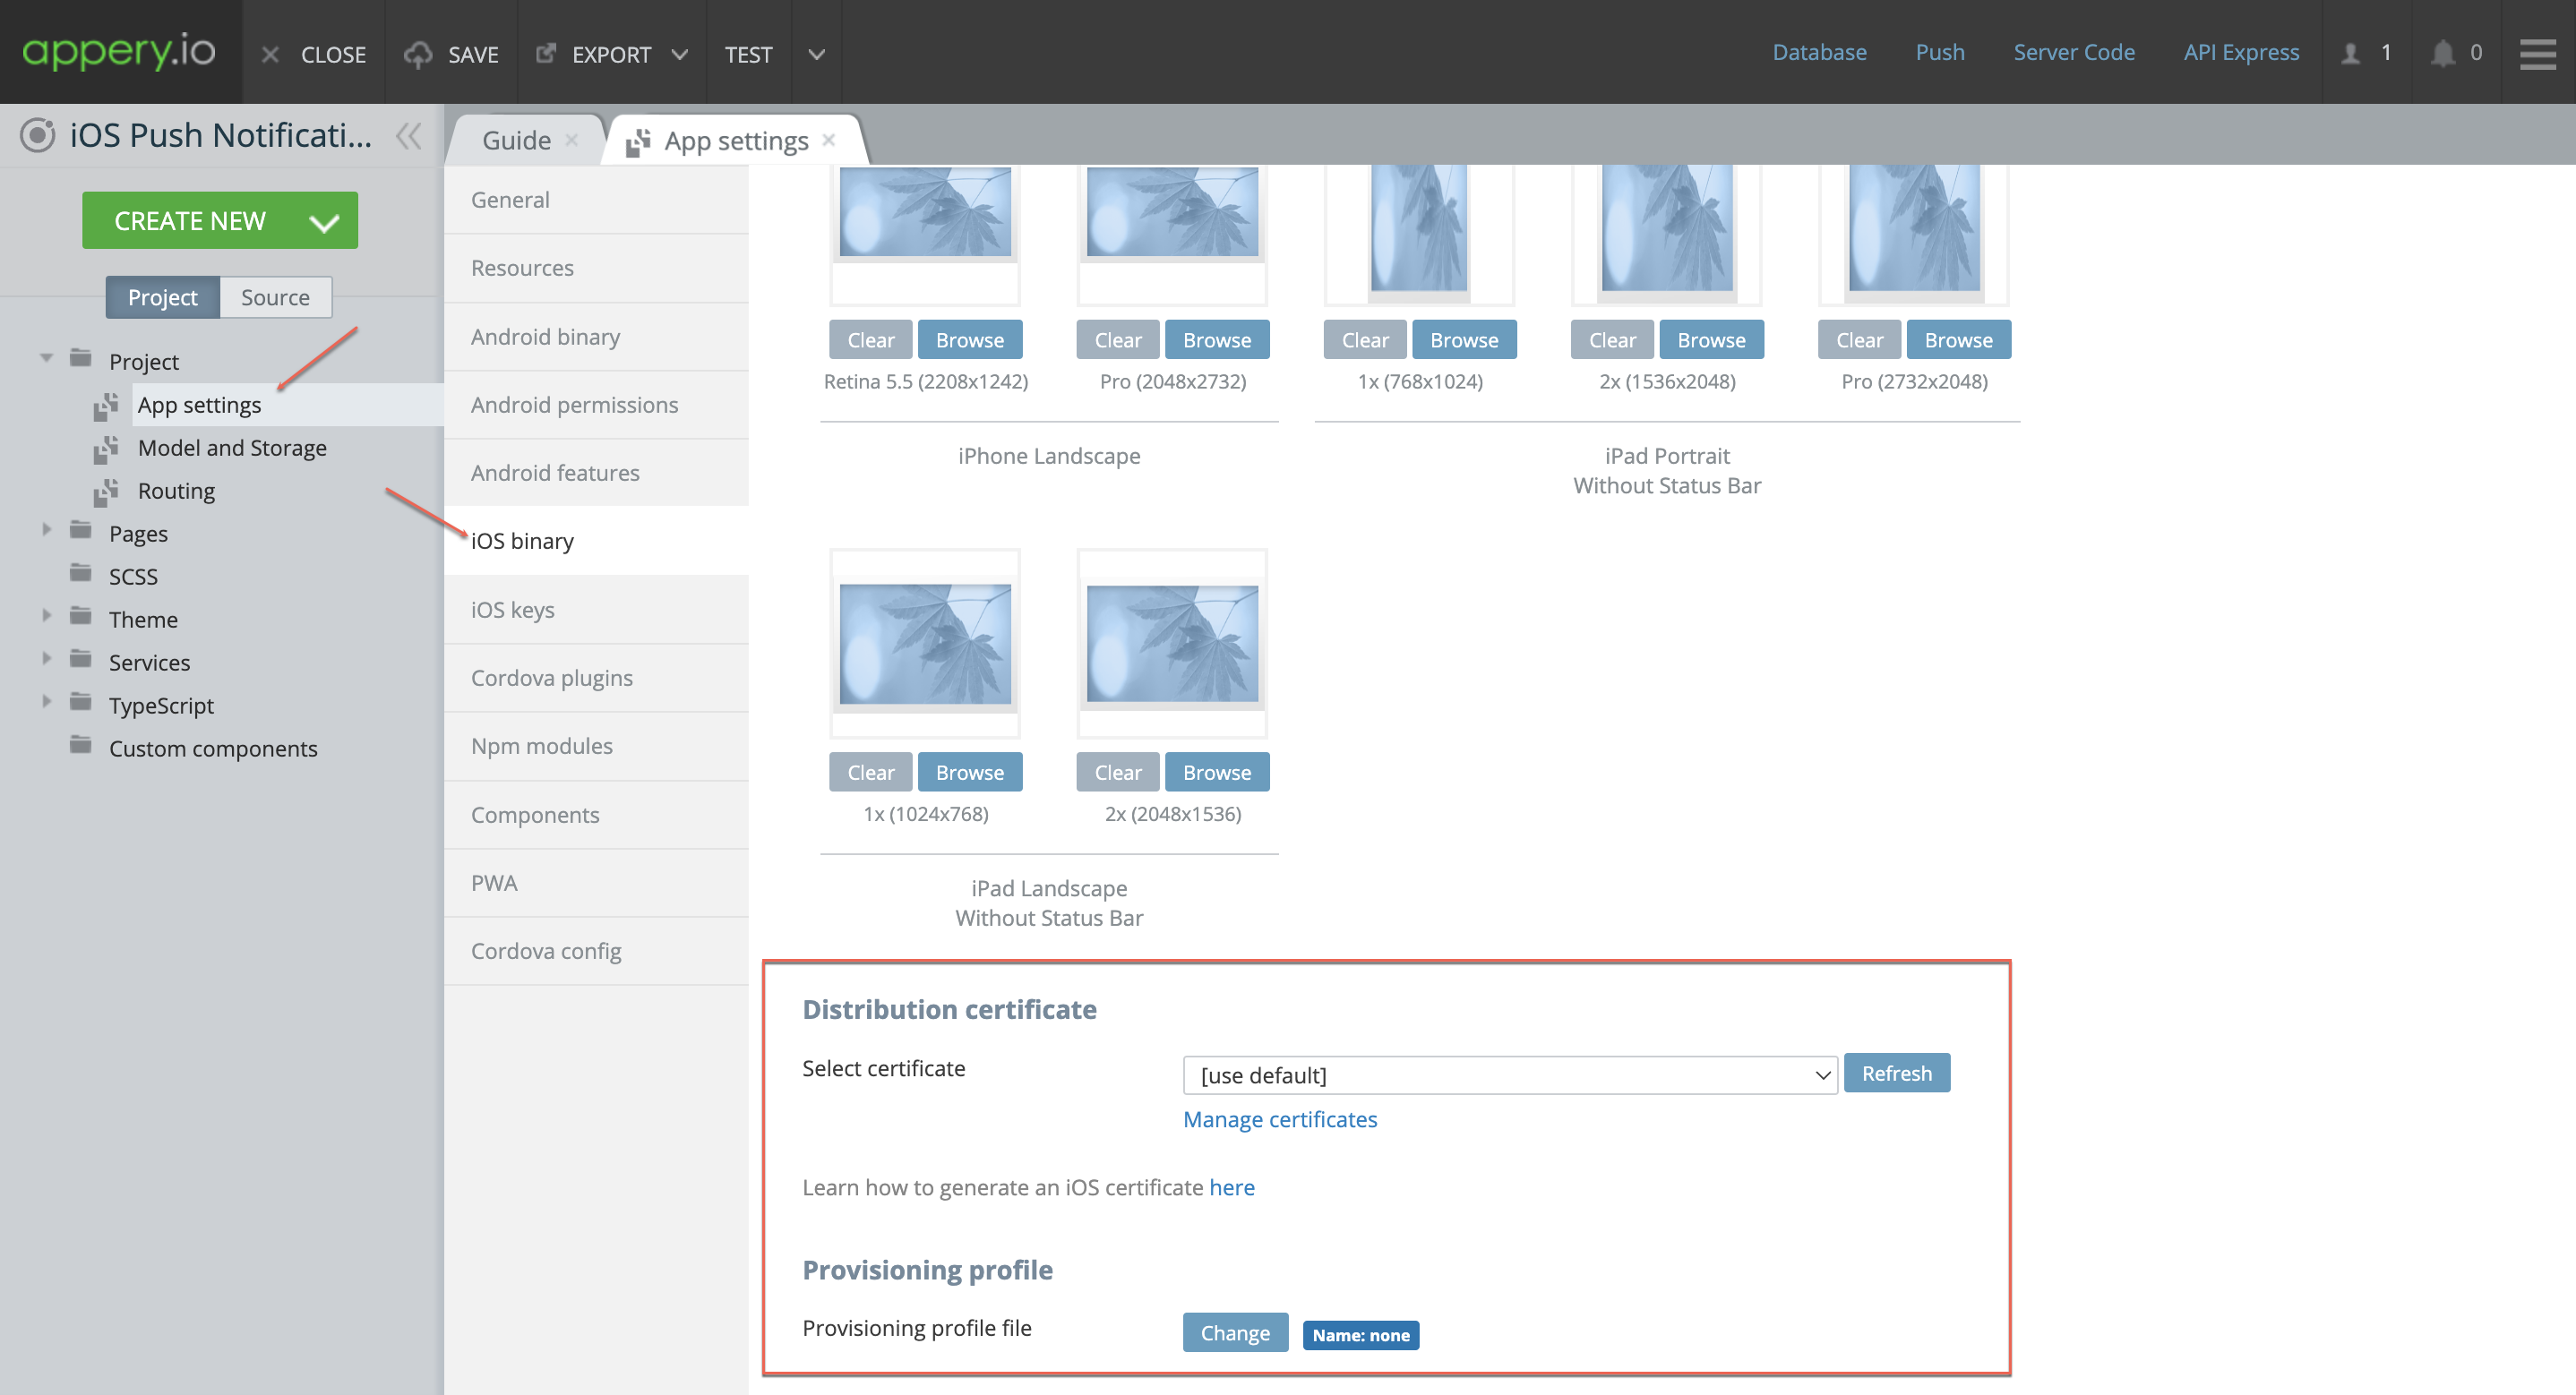
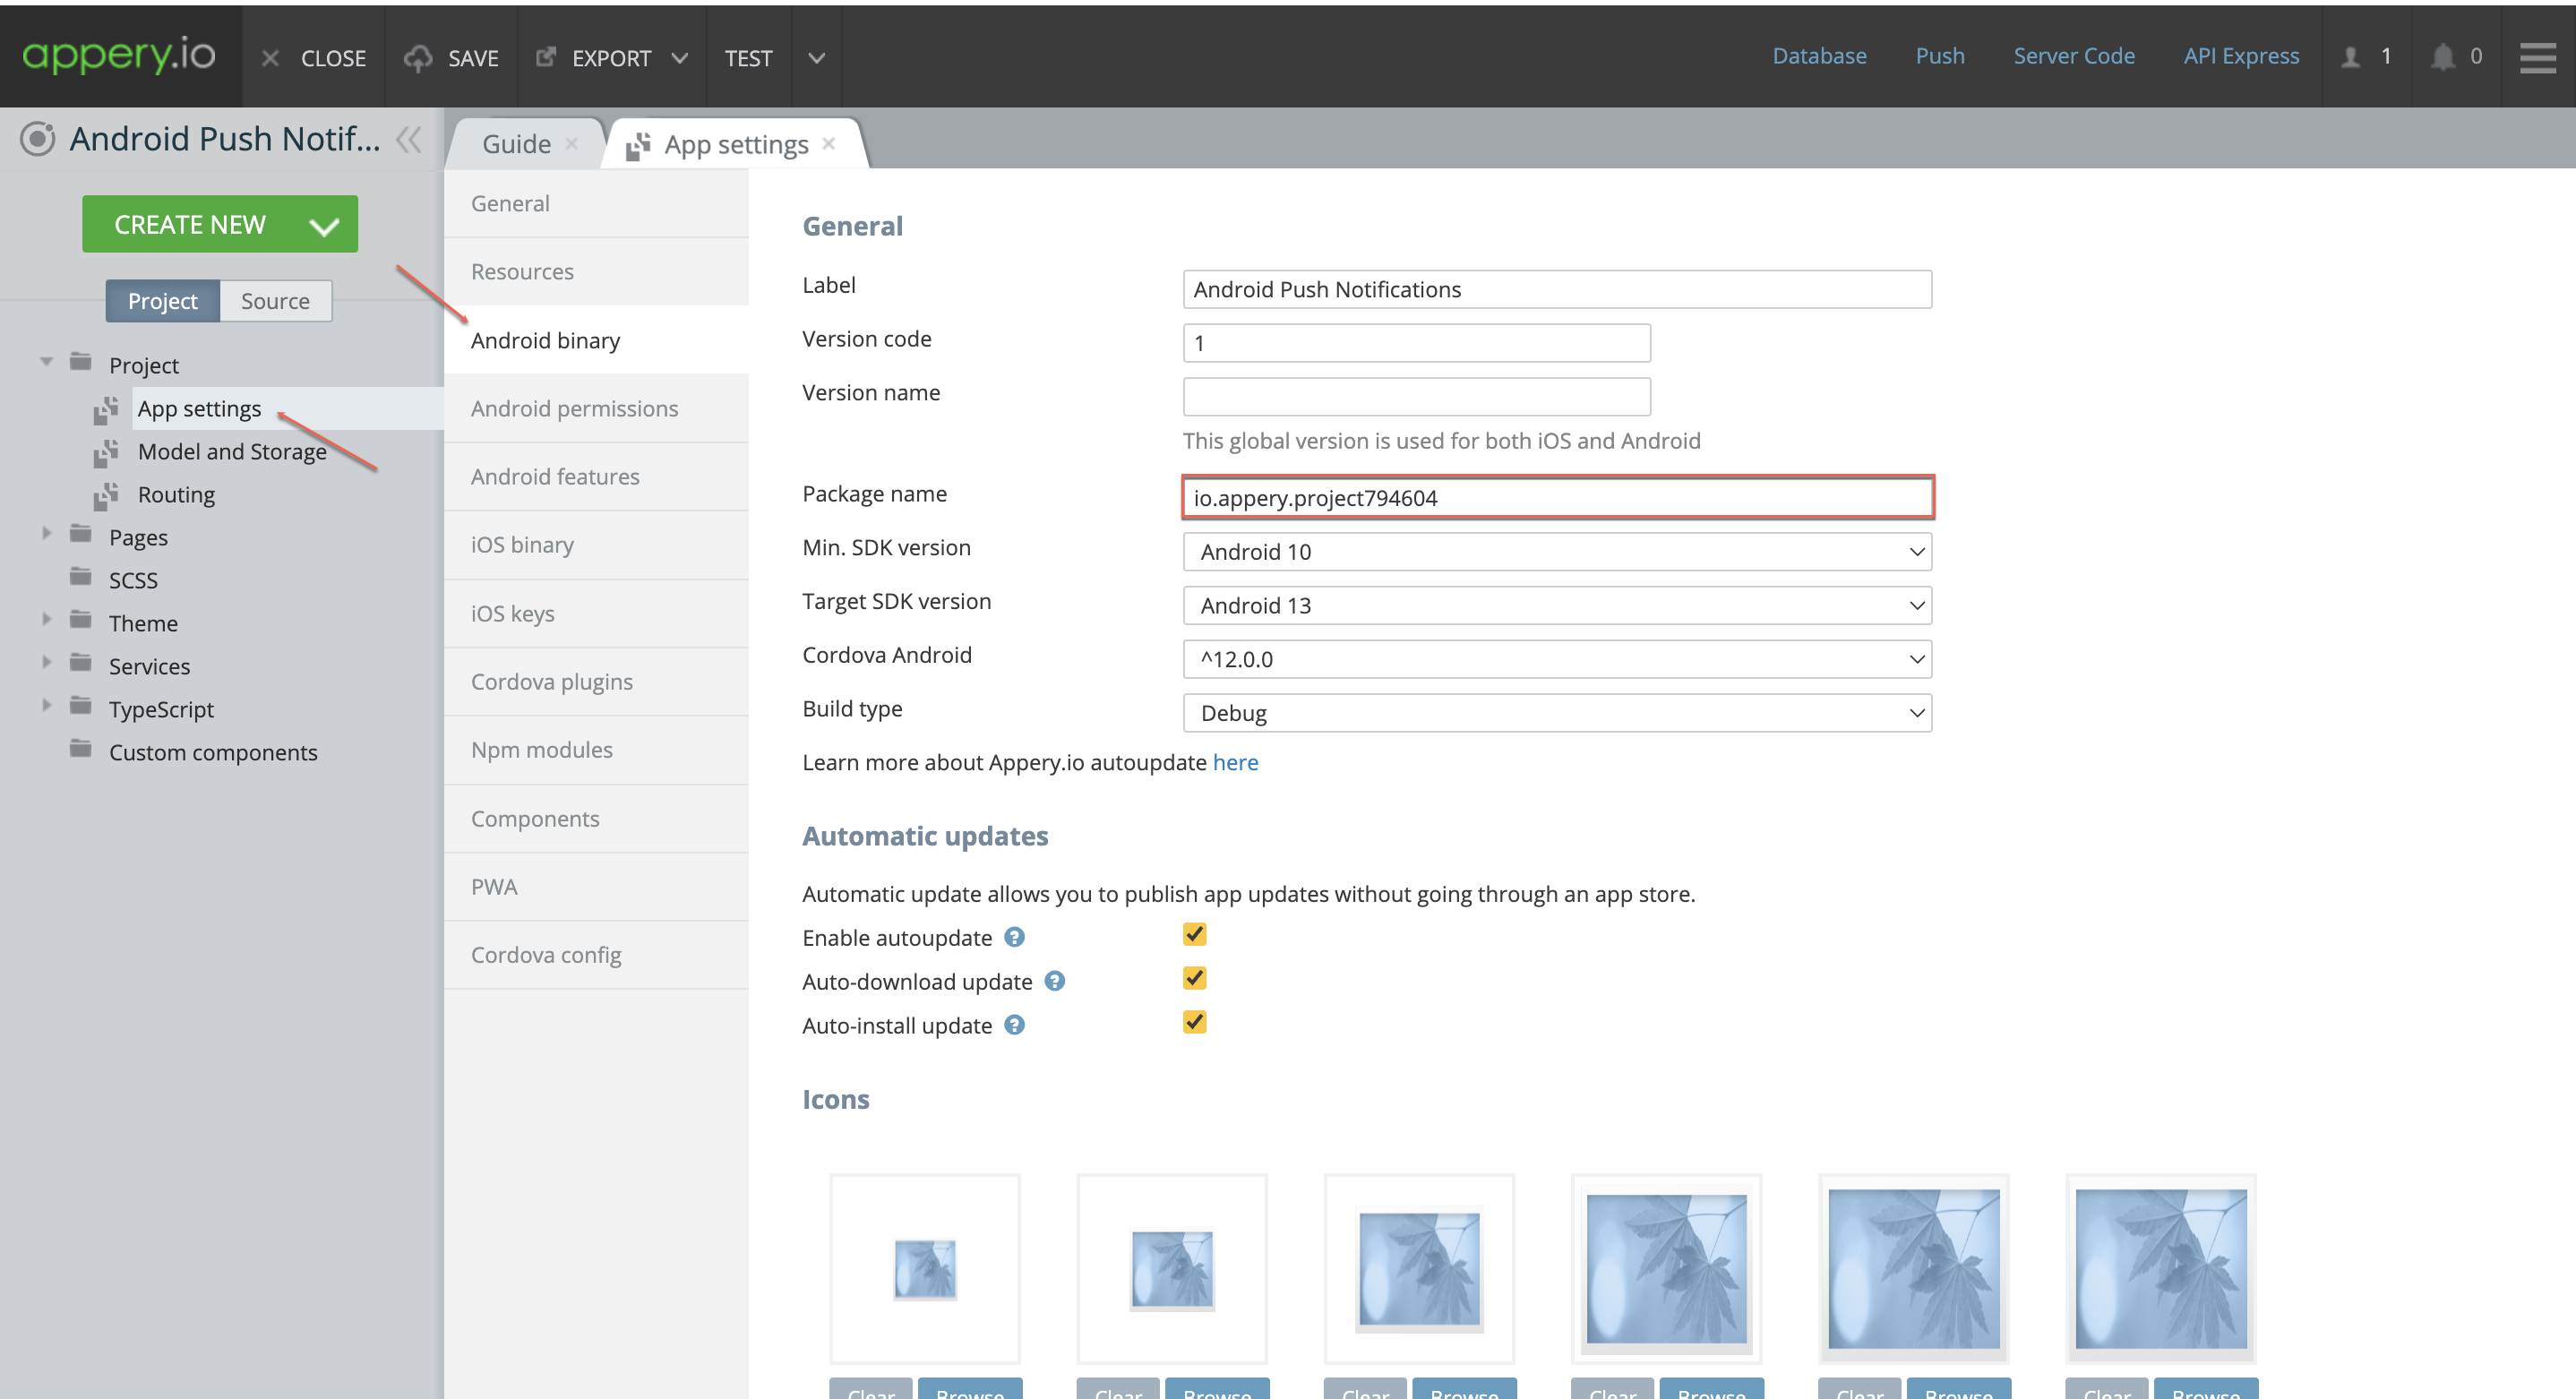
– Go to the iOS binary section and note that the app already has a bundle ID that is required for setting an app for iOS.
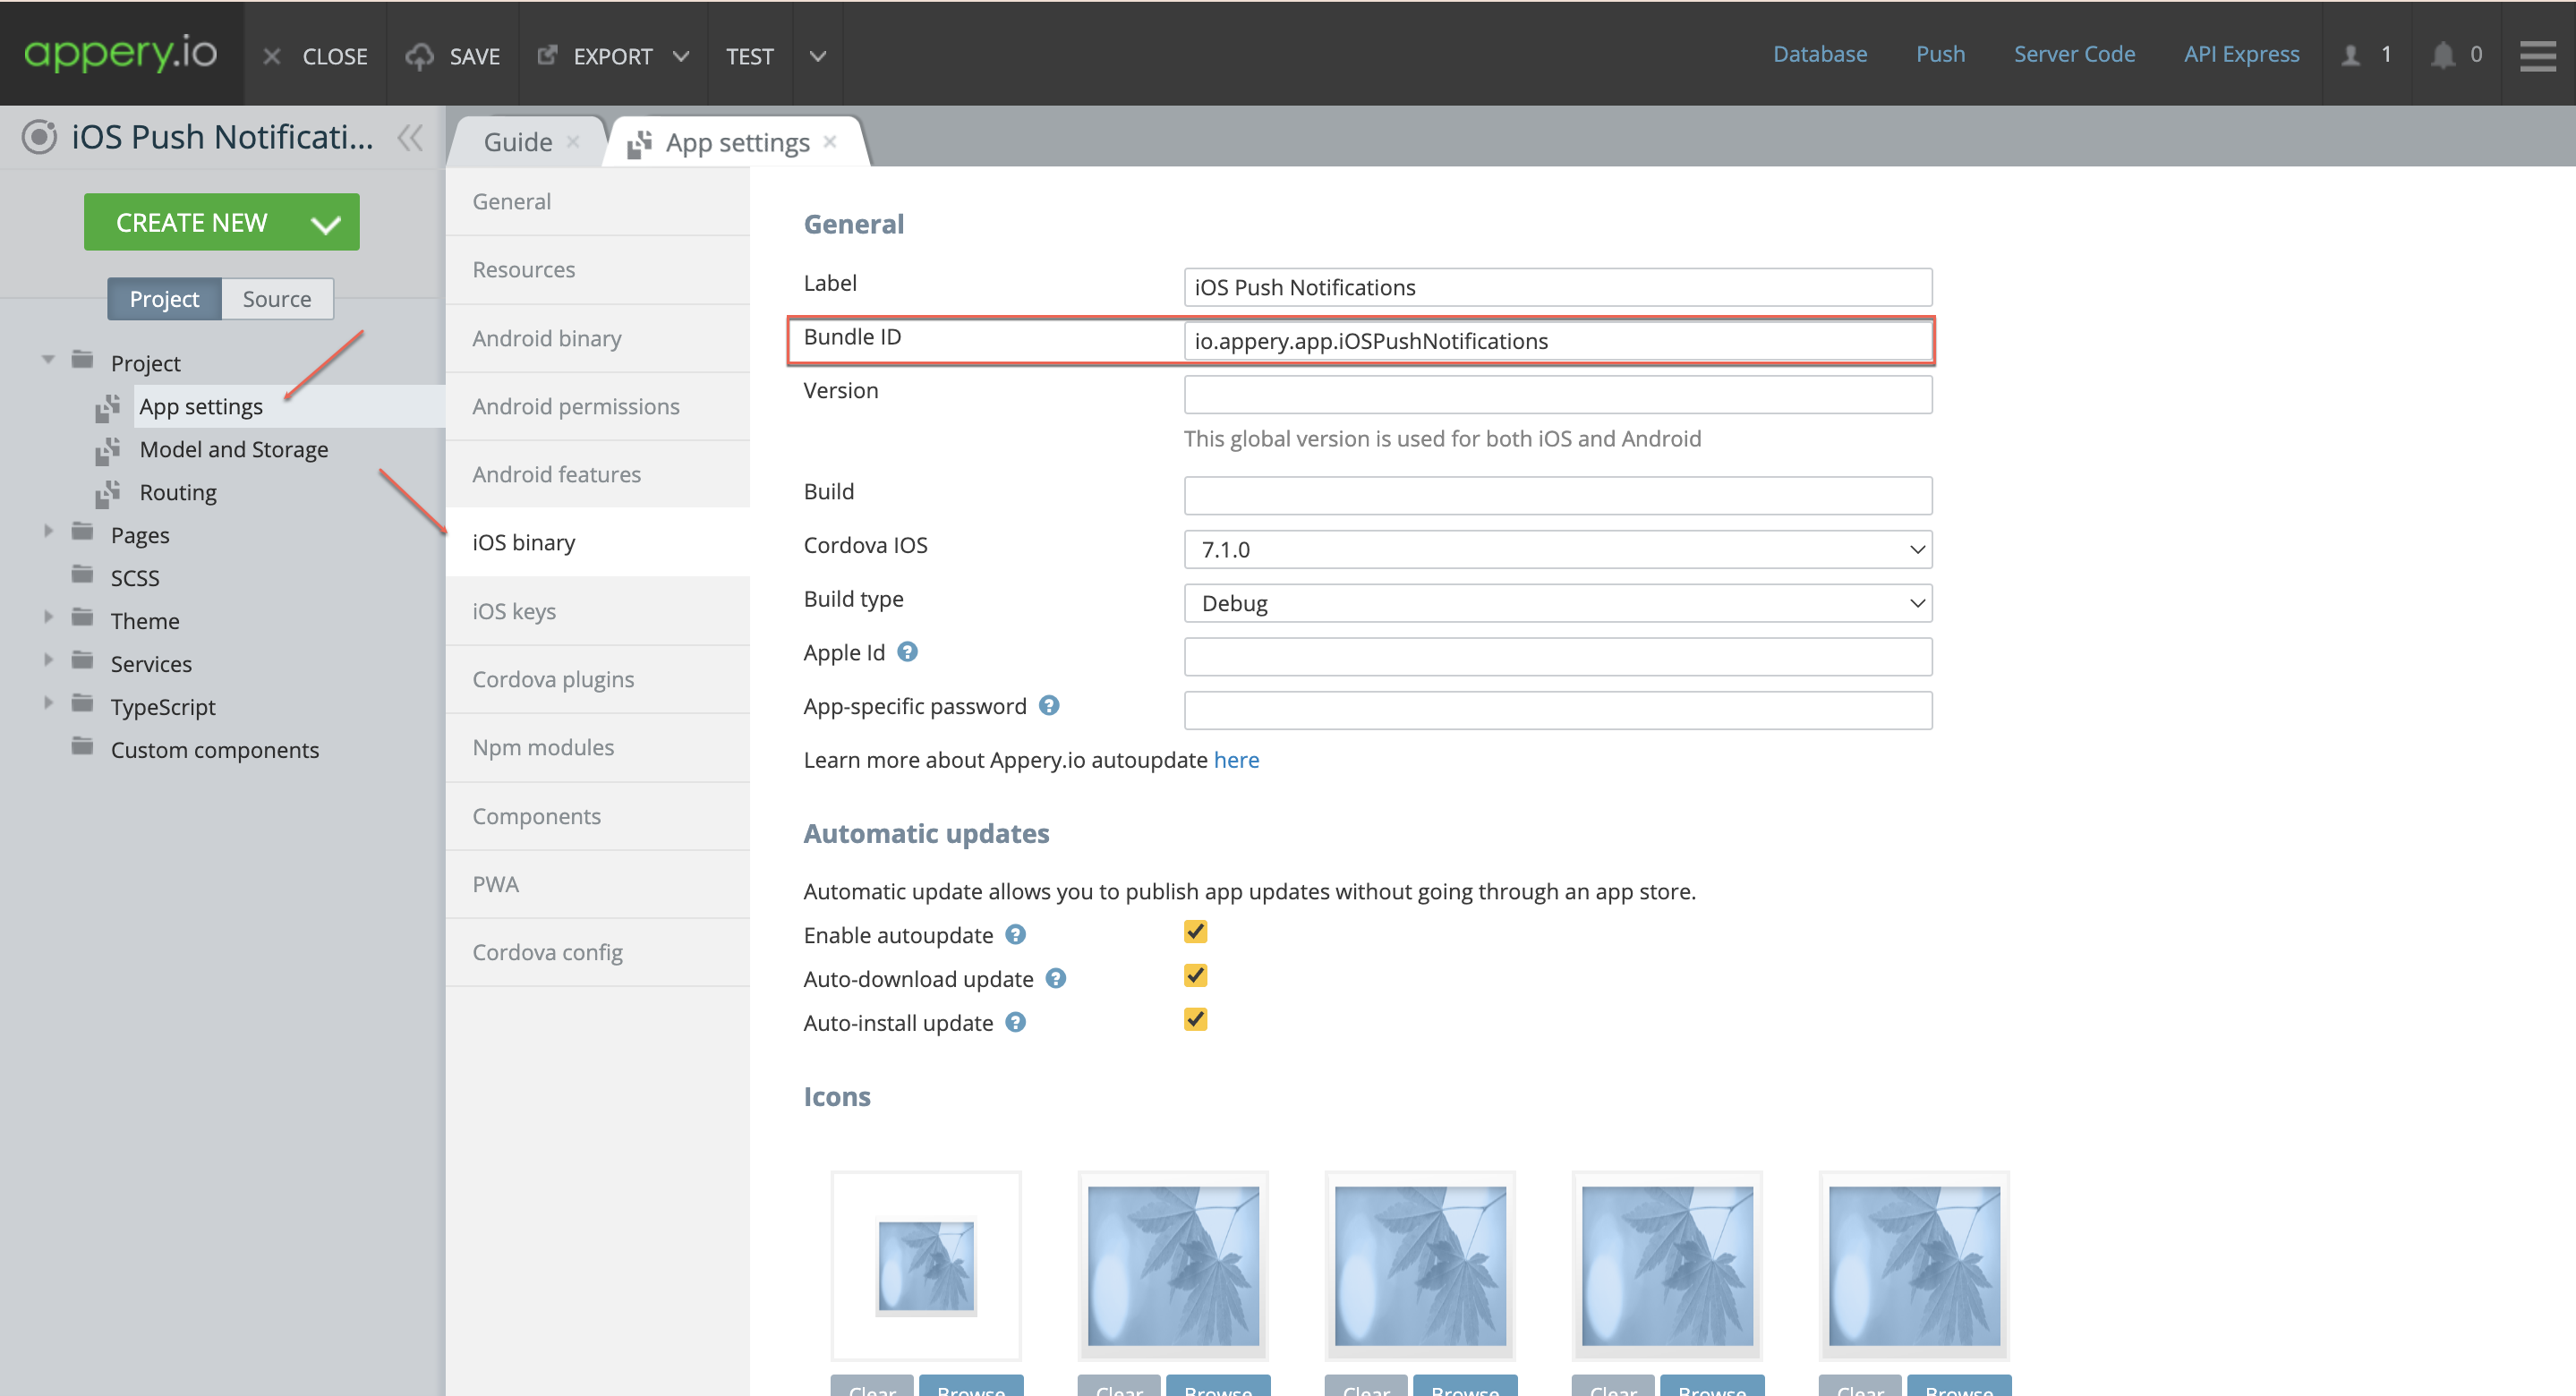
Note that the build type indicated is Debug which means the app is created for testing purposes. When building an app to be uploaded to the App Store, select the Release option instead.

– However, due to Apple’s policies, you need a a distribution certificate and provisioning profile to install apps on iOS devices.

Setting Up Your Apple Developer Account

Setting up your Apple Developer account is a must if you plan to develop for iOS. So, if you have no account, you need to create it. When done, you are ready to start with configuring your Apple Developer Console.

1. Create a Certificate:

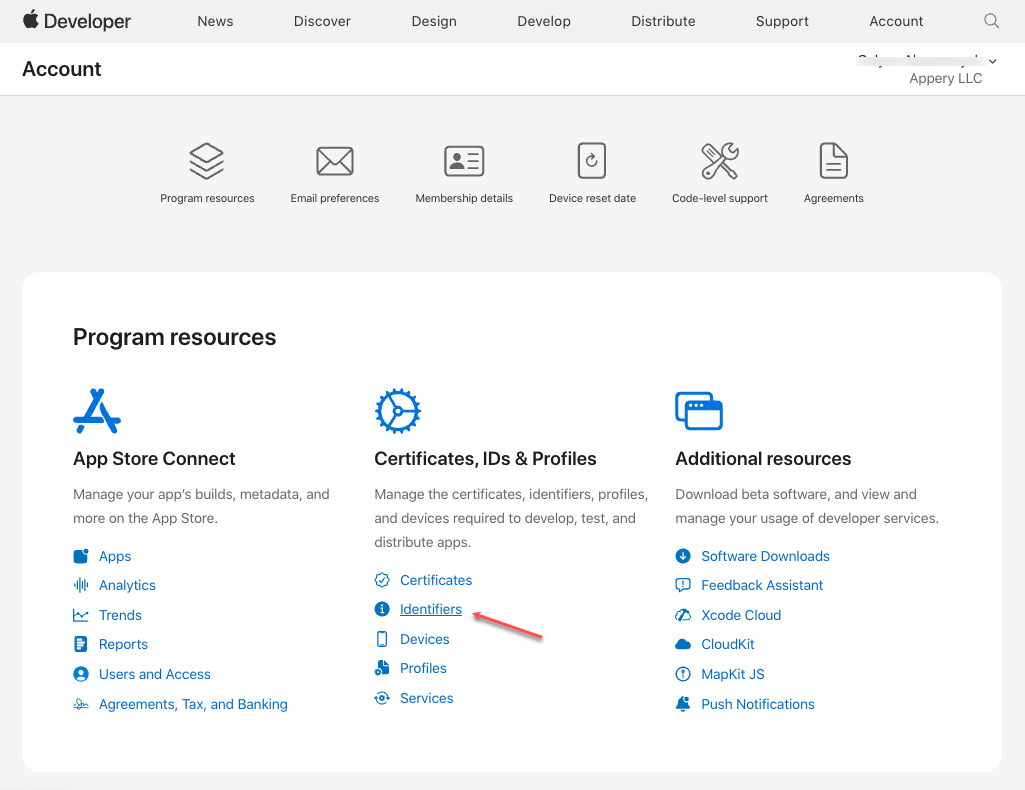
– Log into the Apple Developer Console, click the Identifiers link.

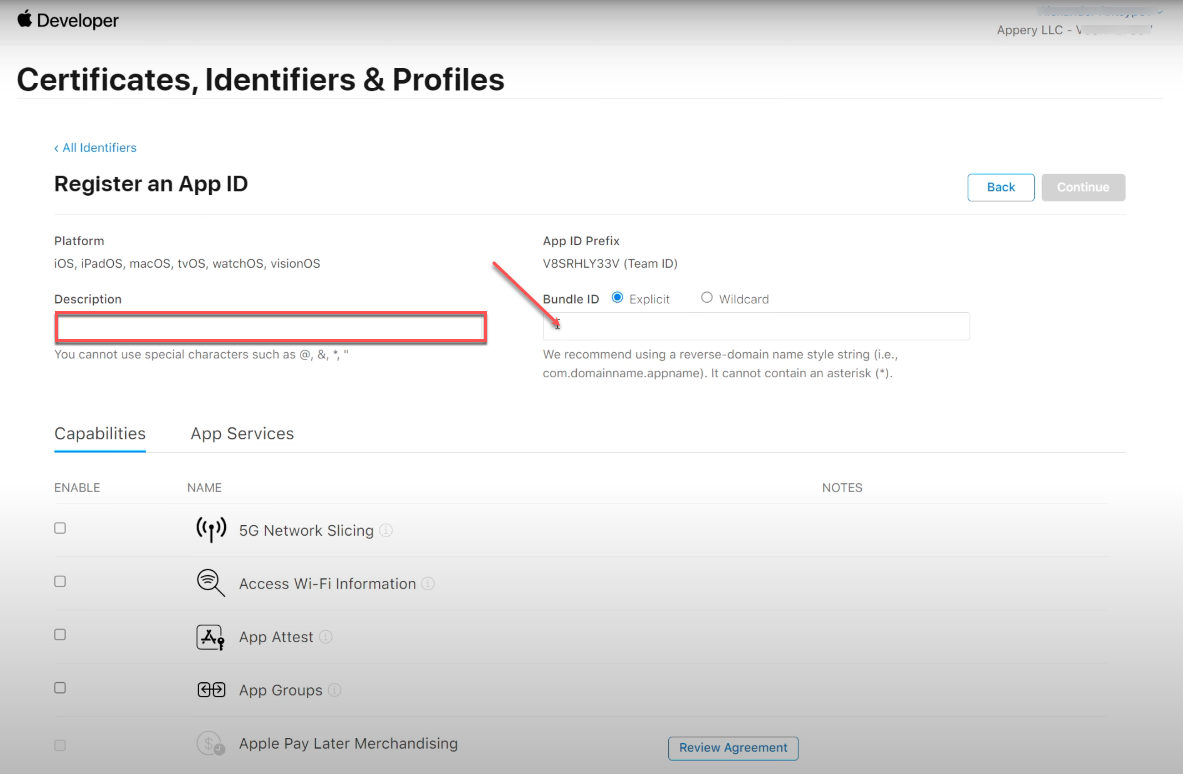
– Create an identifier for your app by clicking the button, specifying it as an App ID (paste the Bundle ID you copied before) and adding the description.

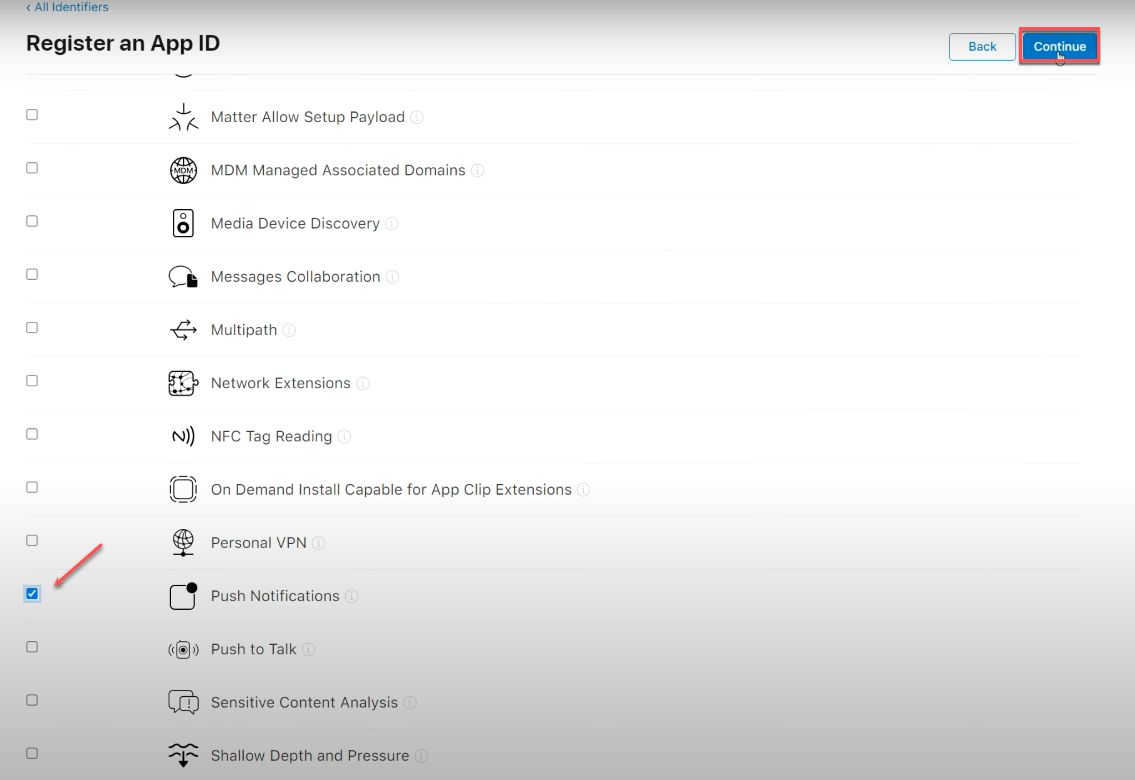
– Scroll down to enable the push notifications capability and register your new app.

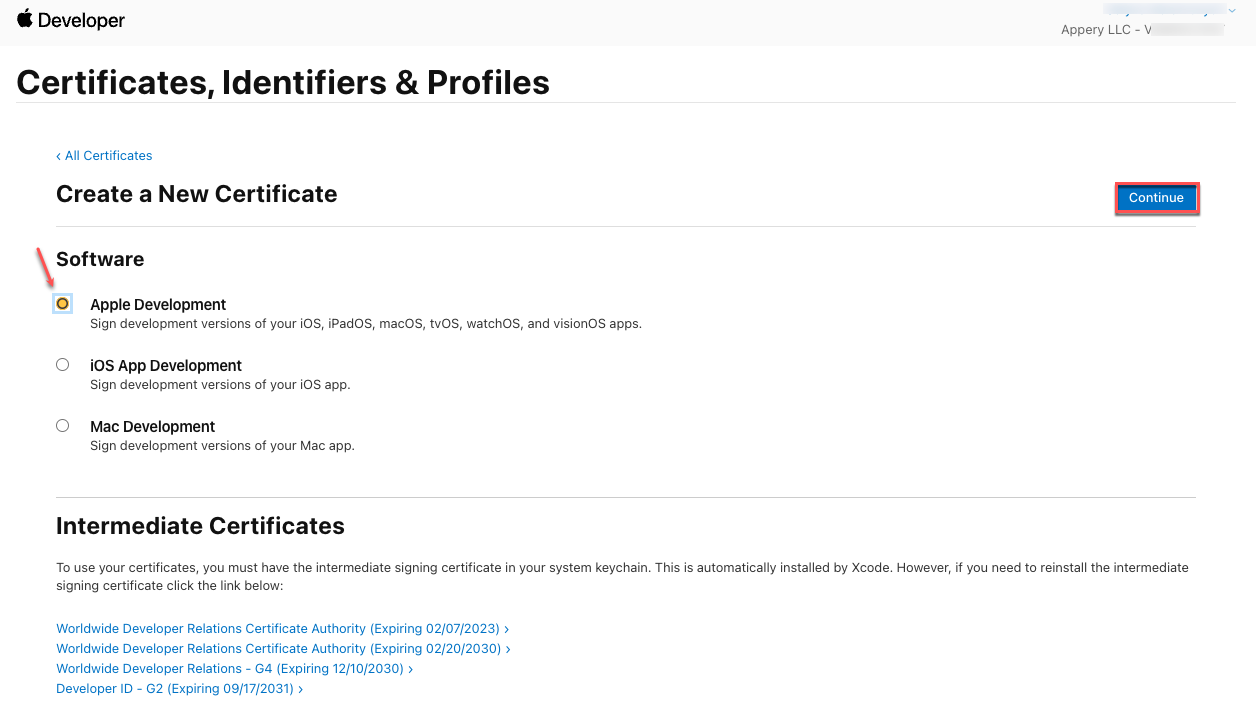
– Switch to the Certificates section and click + to create a new Apple Development certificate, then click Continue.

Note that the Apple Development certificate type can be used for development purposes only! If you are planning to publish your app with the App Store, the build type iOS Distribution is required!

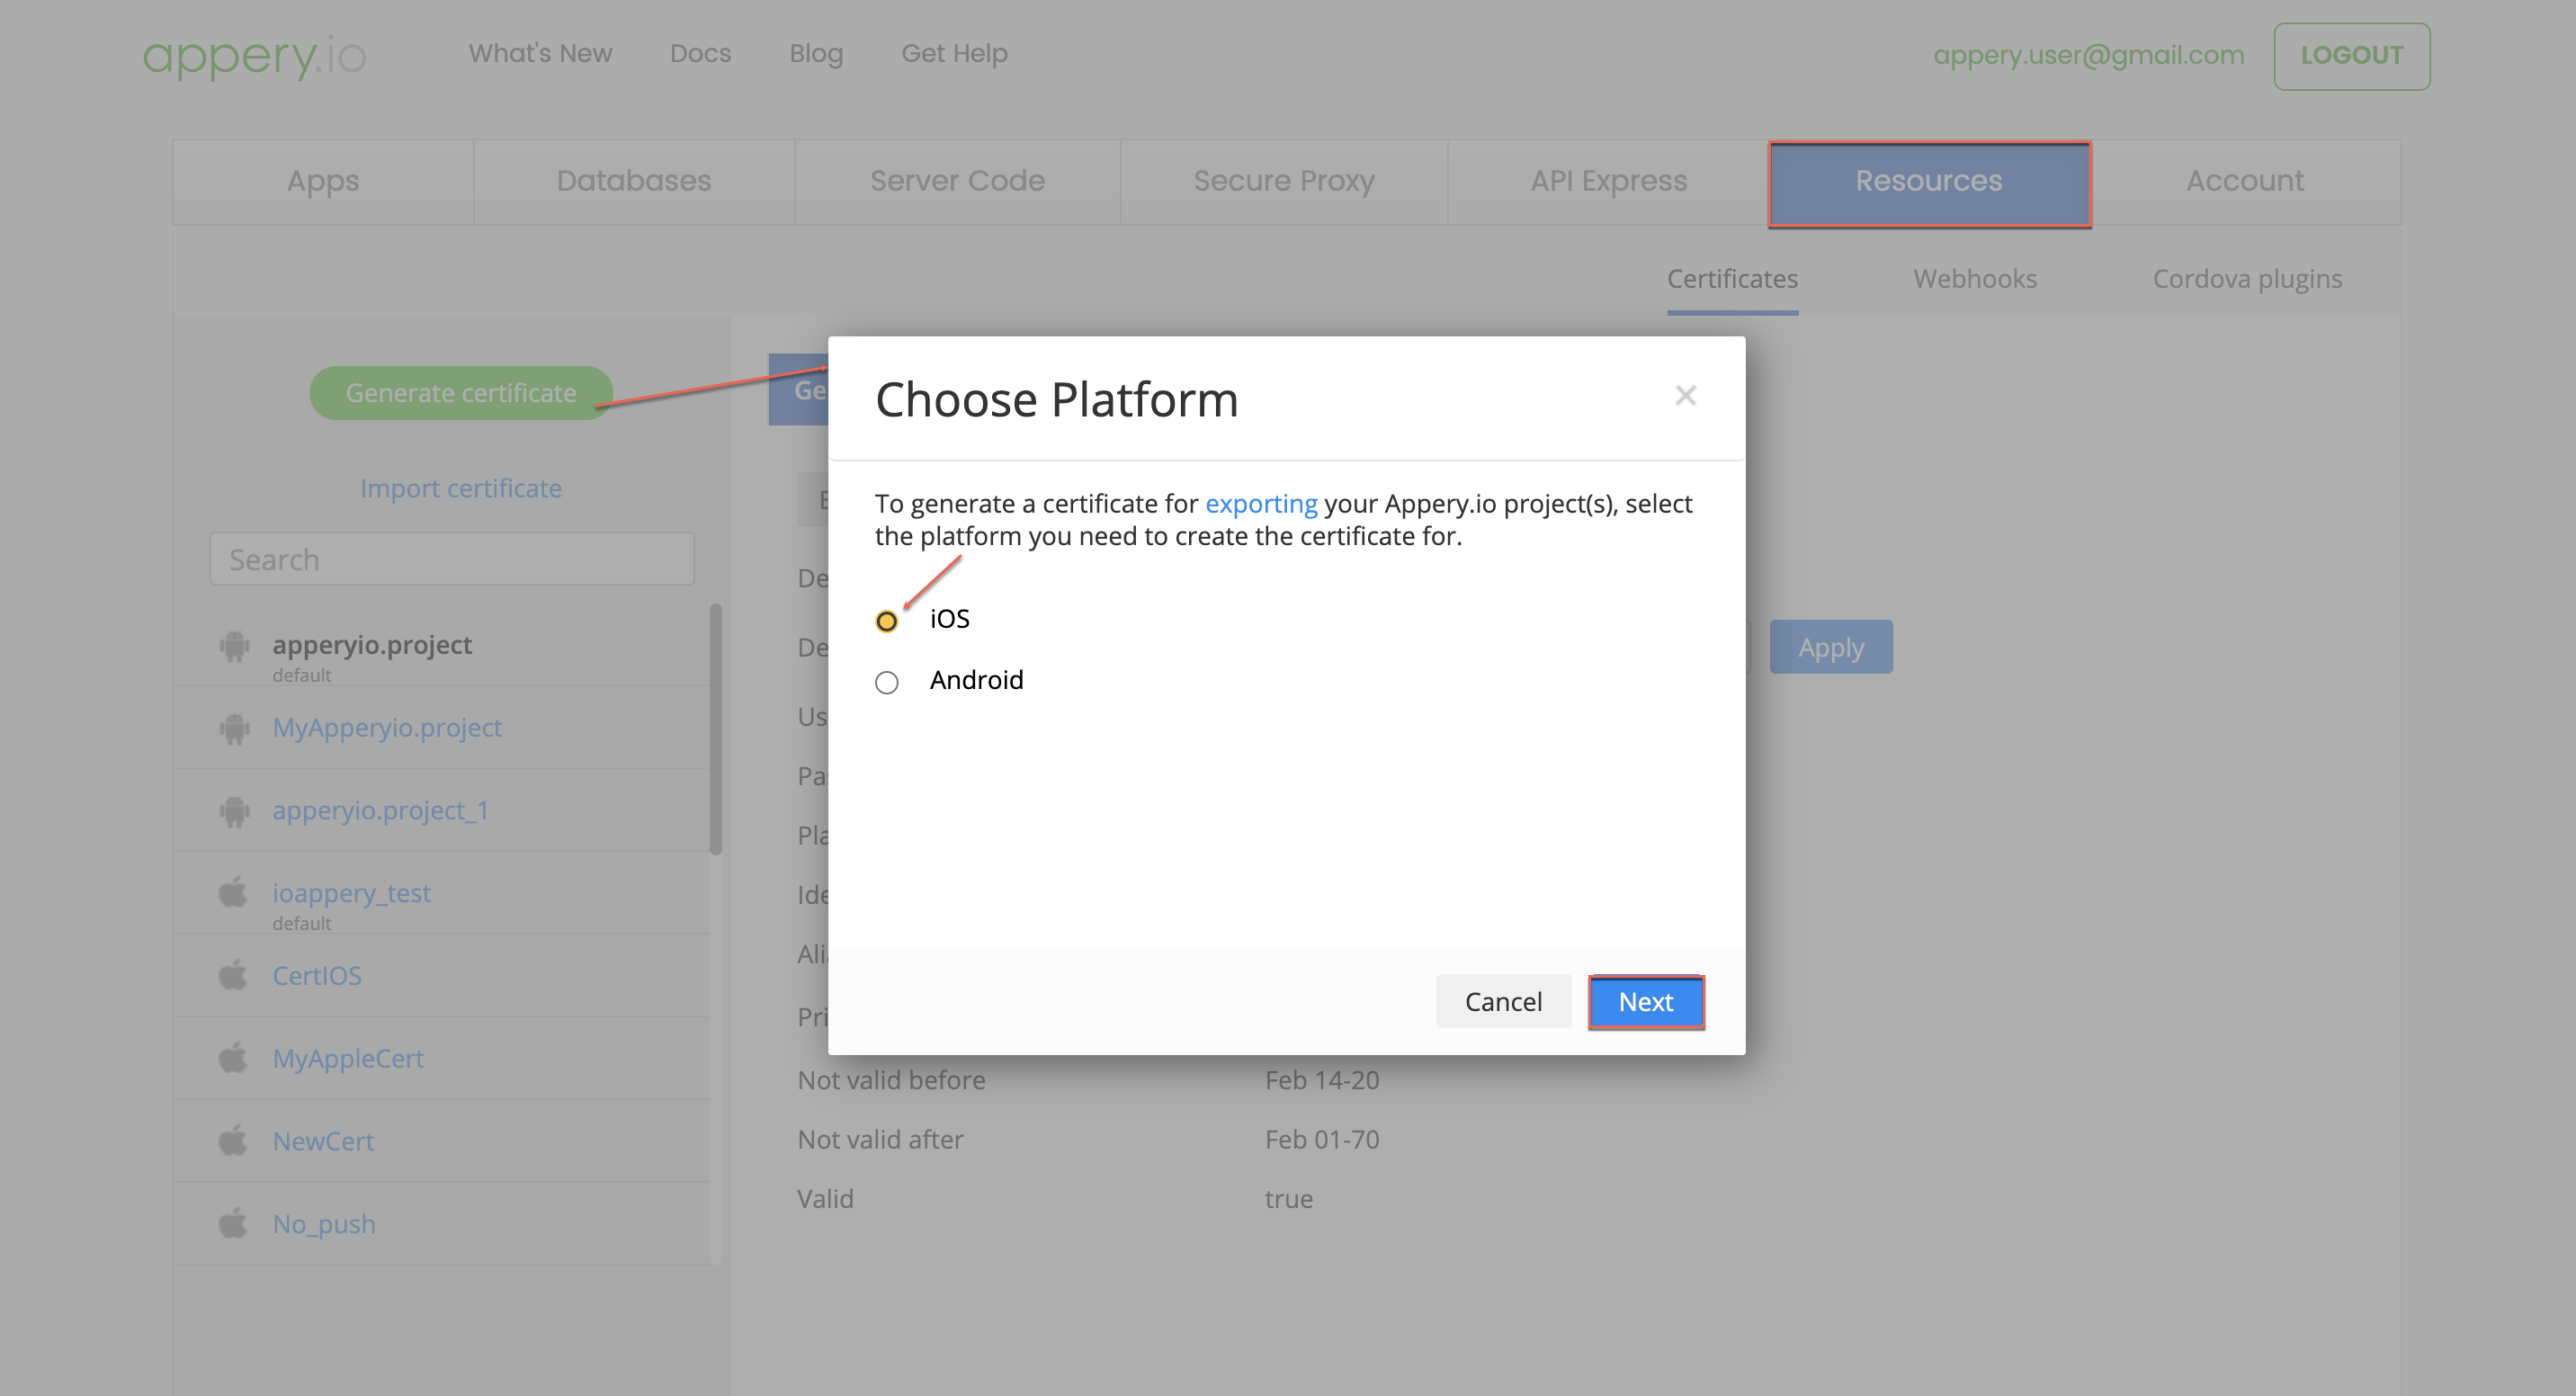
– In the next page, you must upload a Certificate Signing Request. To get it, go back to Appery.io Resources tab. Click Generate certificate, for Platform select iOS, and click Next.

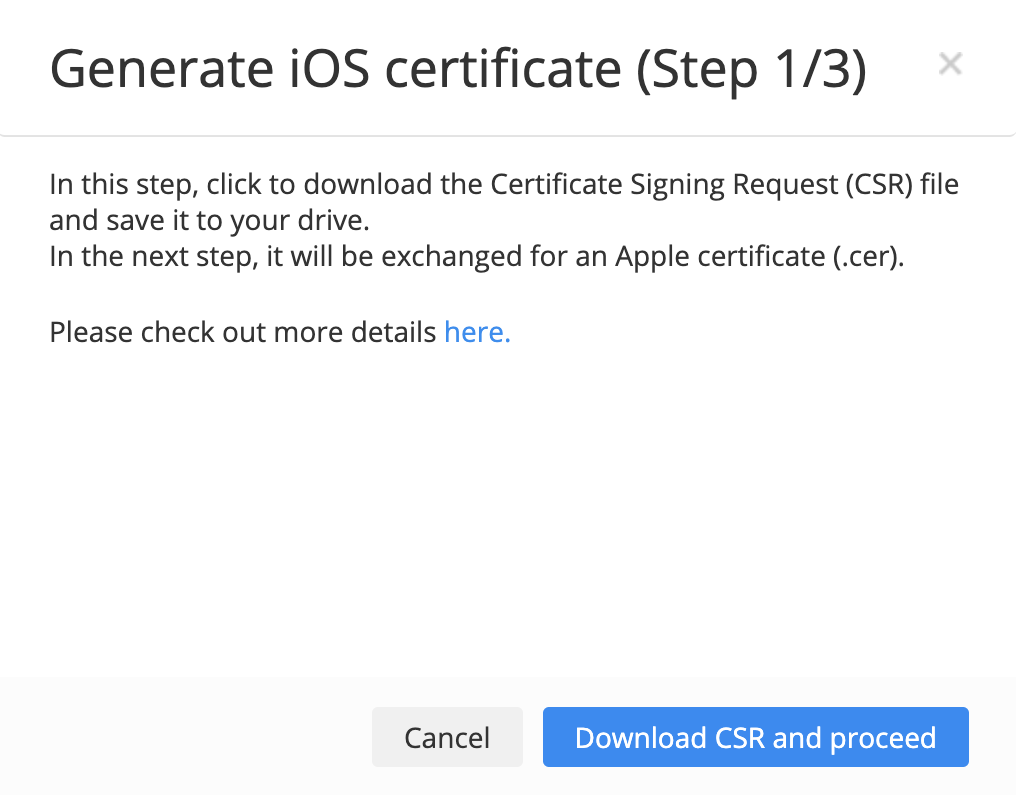
– The Generate iOS certificate wizard opens. In Step 1/3, download the CSR file to your drive.


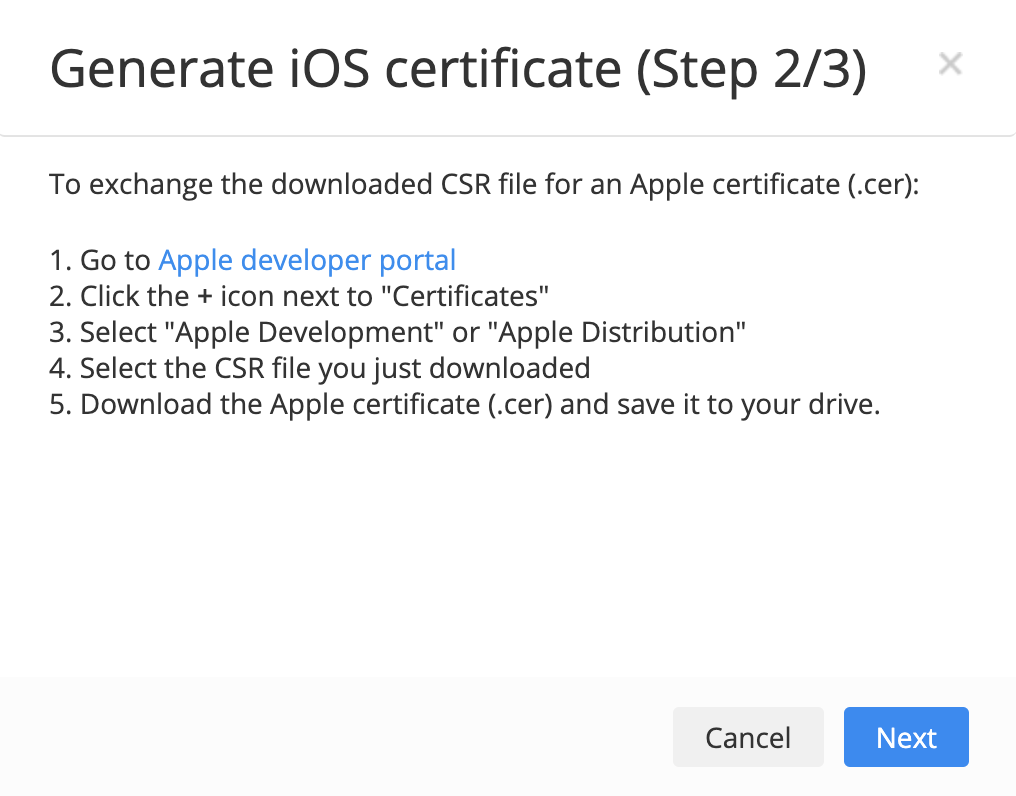
– In Step 2/3, the instructions are displayed how to exchange the certificate signing request (CSR) you just downloaded for an Apple certificate (.cer).


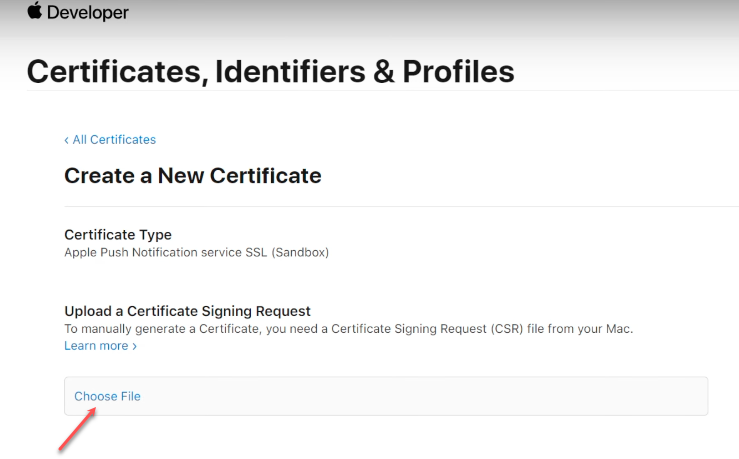
– For this, go back to the Apple Developer Console Certificates section and click Choose File to select and upload the downloaded CSR file. Click Continue.

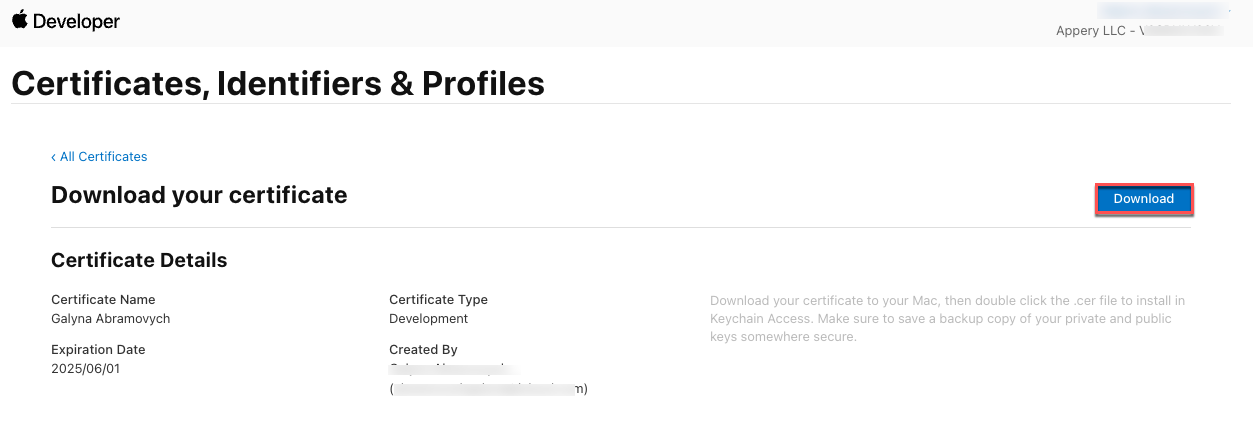
– Download the generated certificate in the next step.


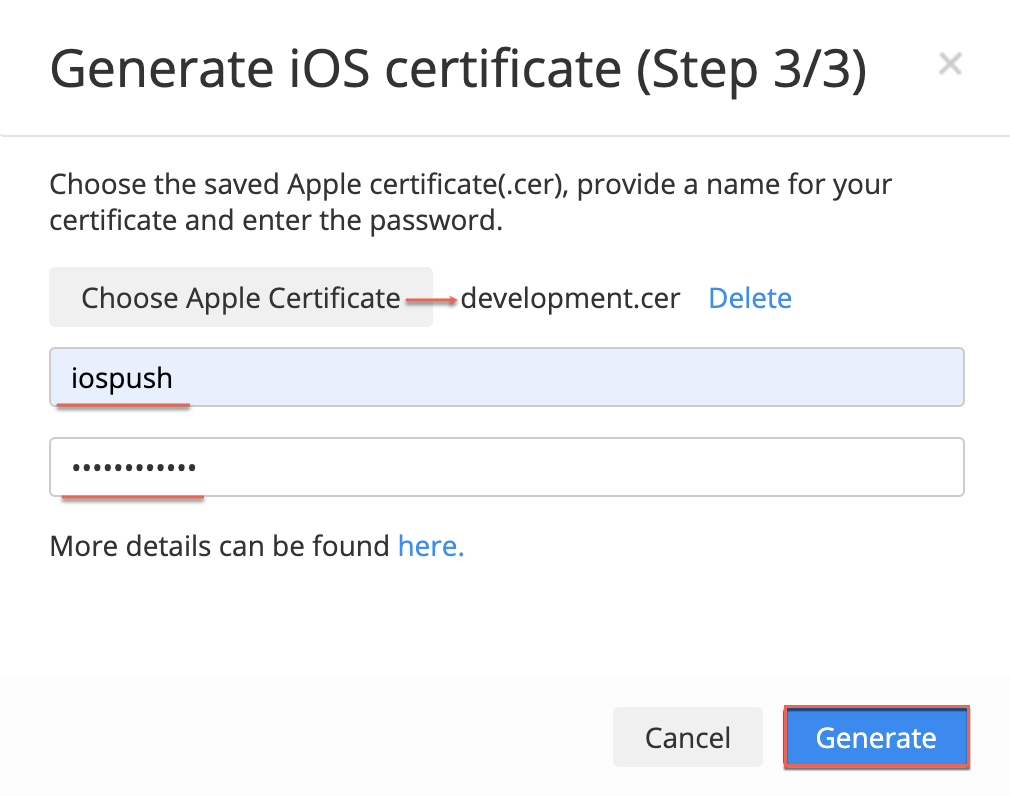
– Go back to Appery.io and in Step 3/3 of the Generate iOS certificate wizard, choose it, enter the name and password for your certificate, and click Generate.


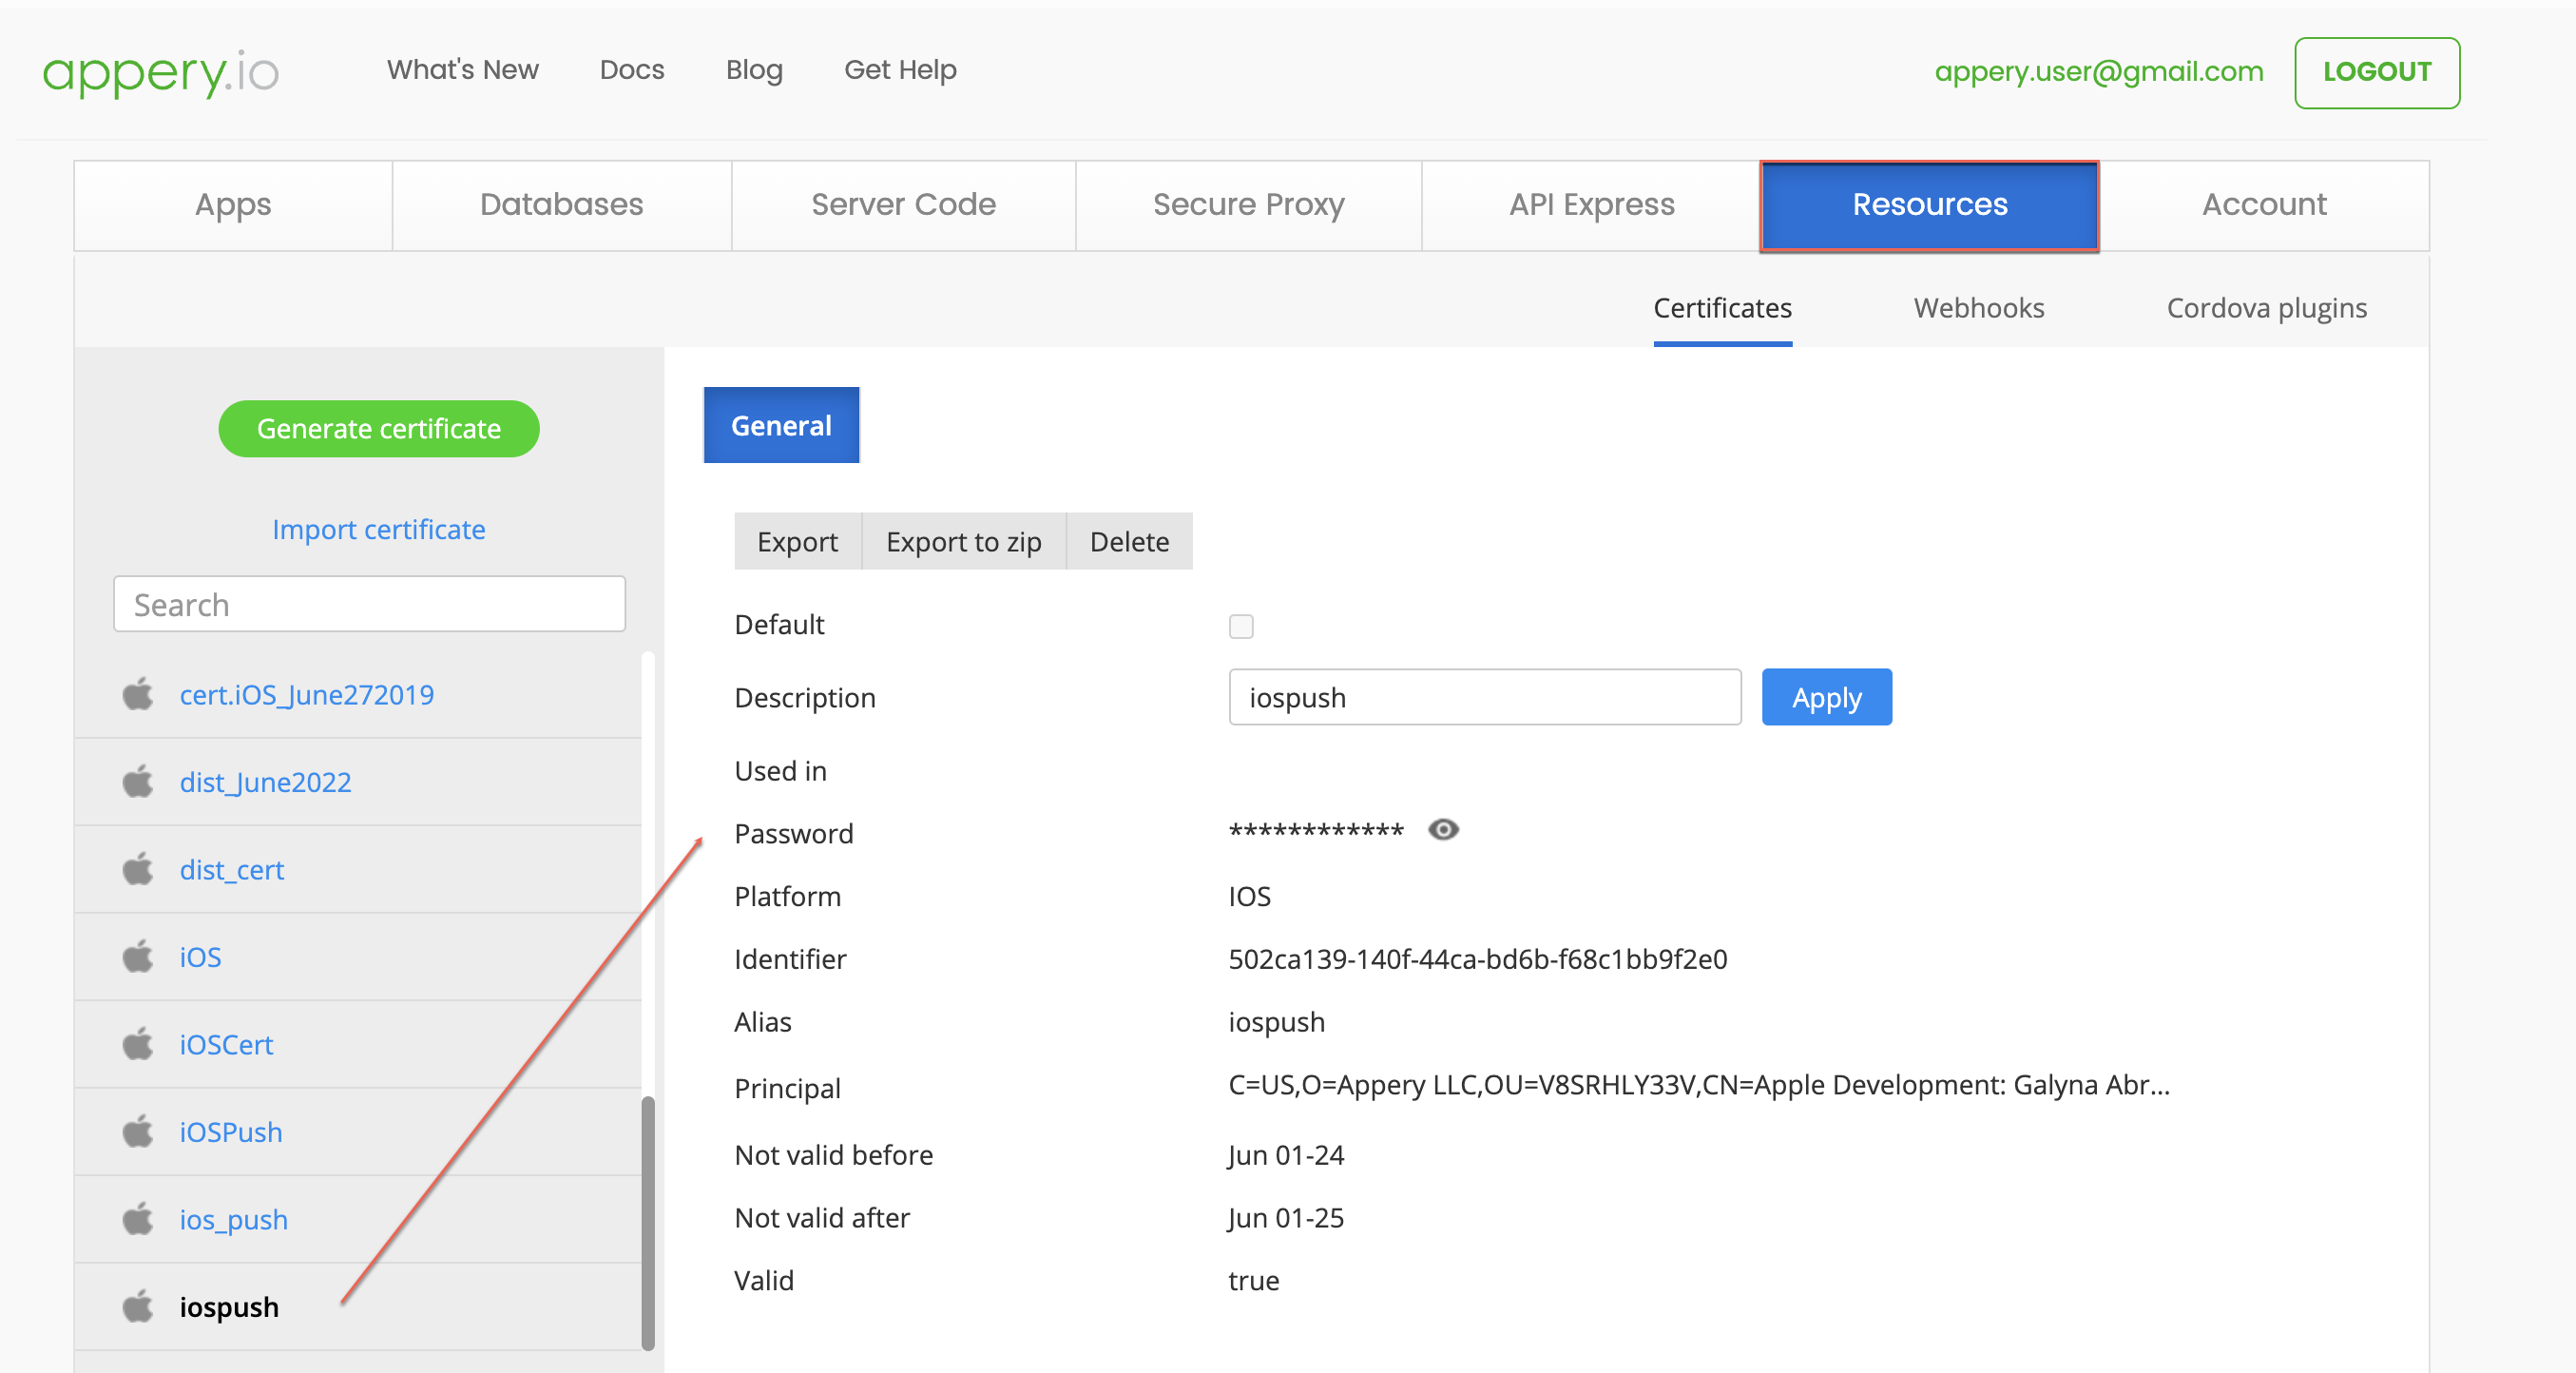
The development certificate is generated successfully.

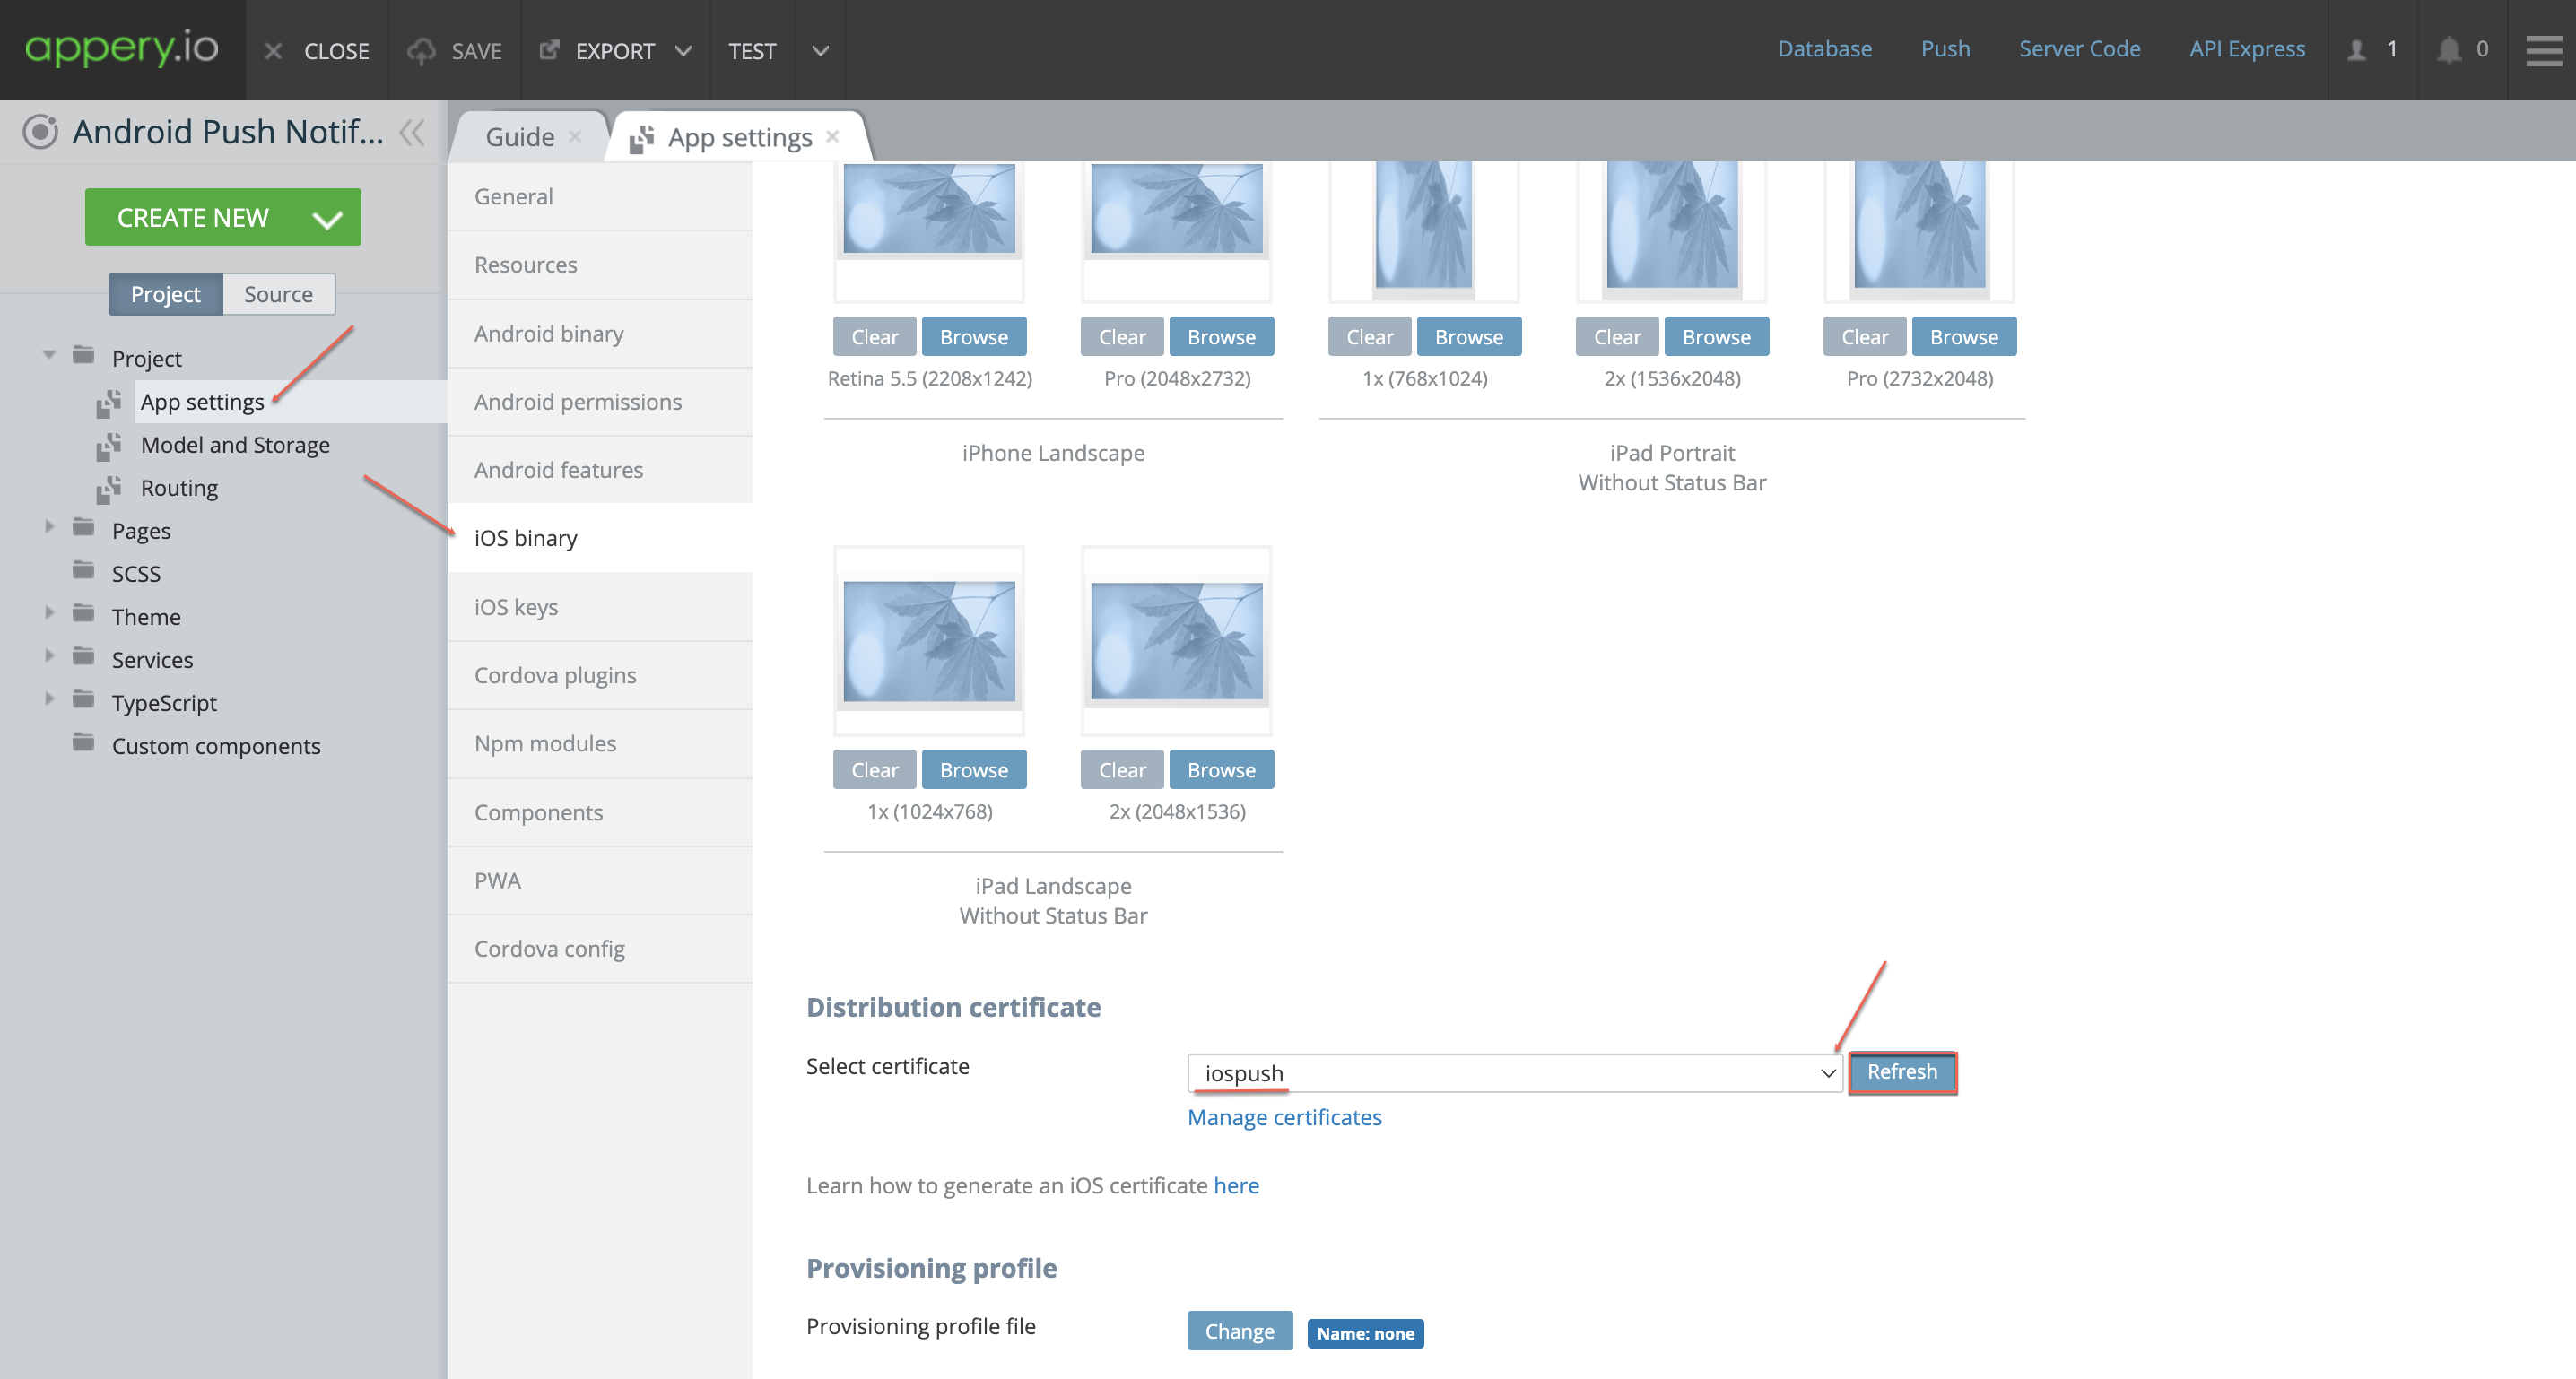
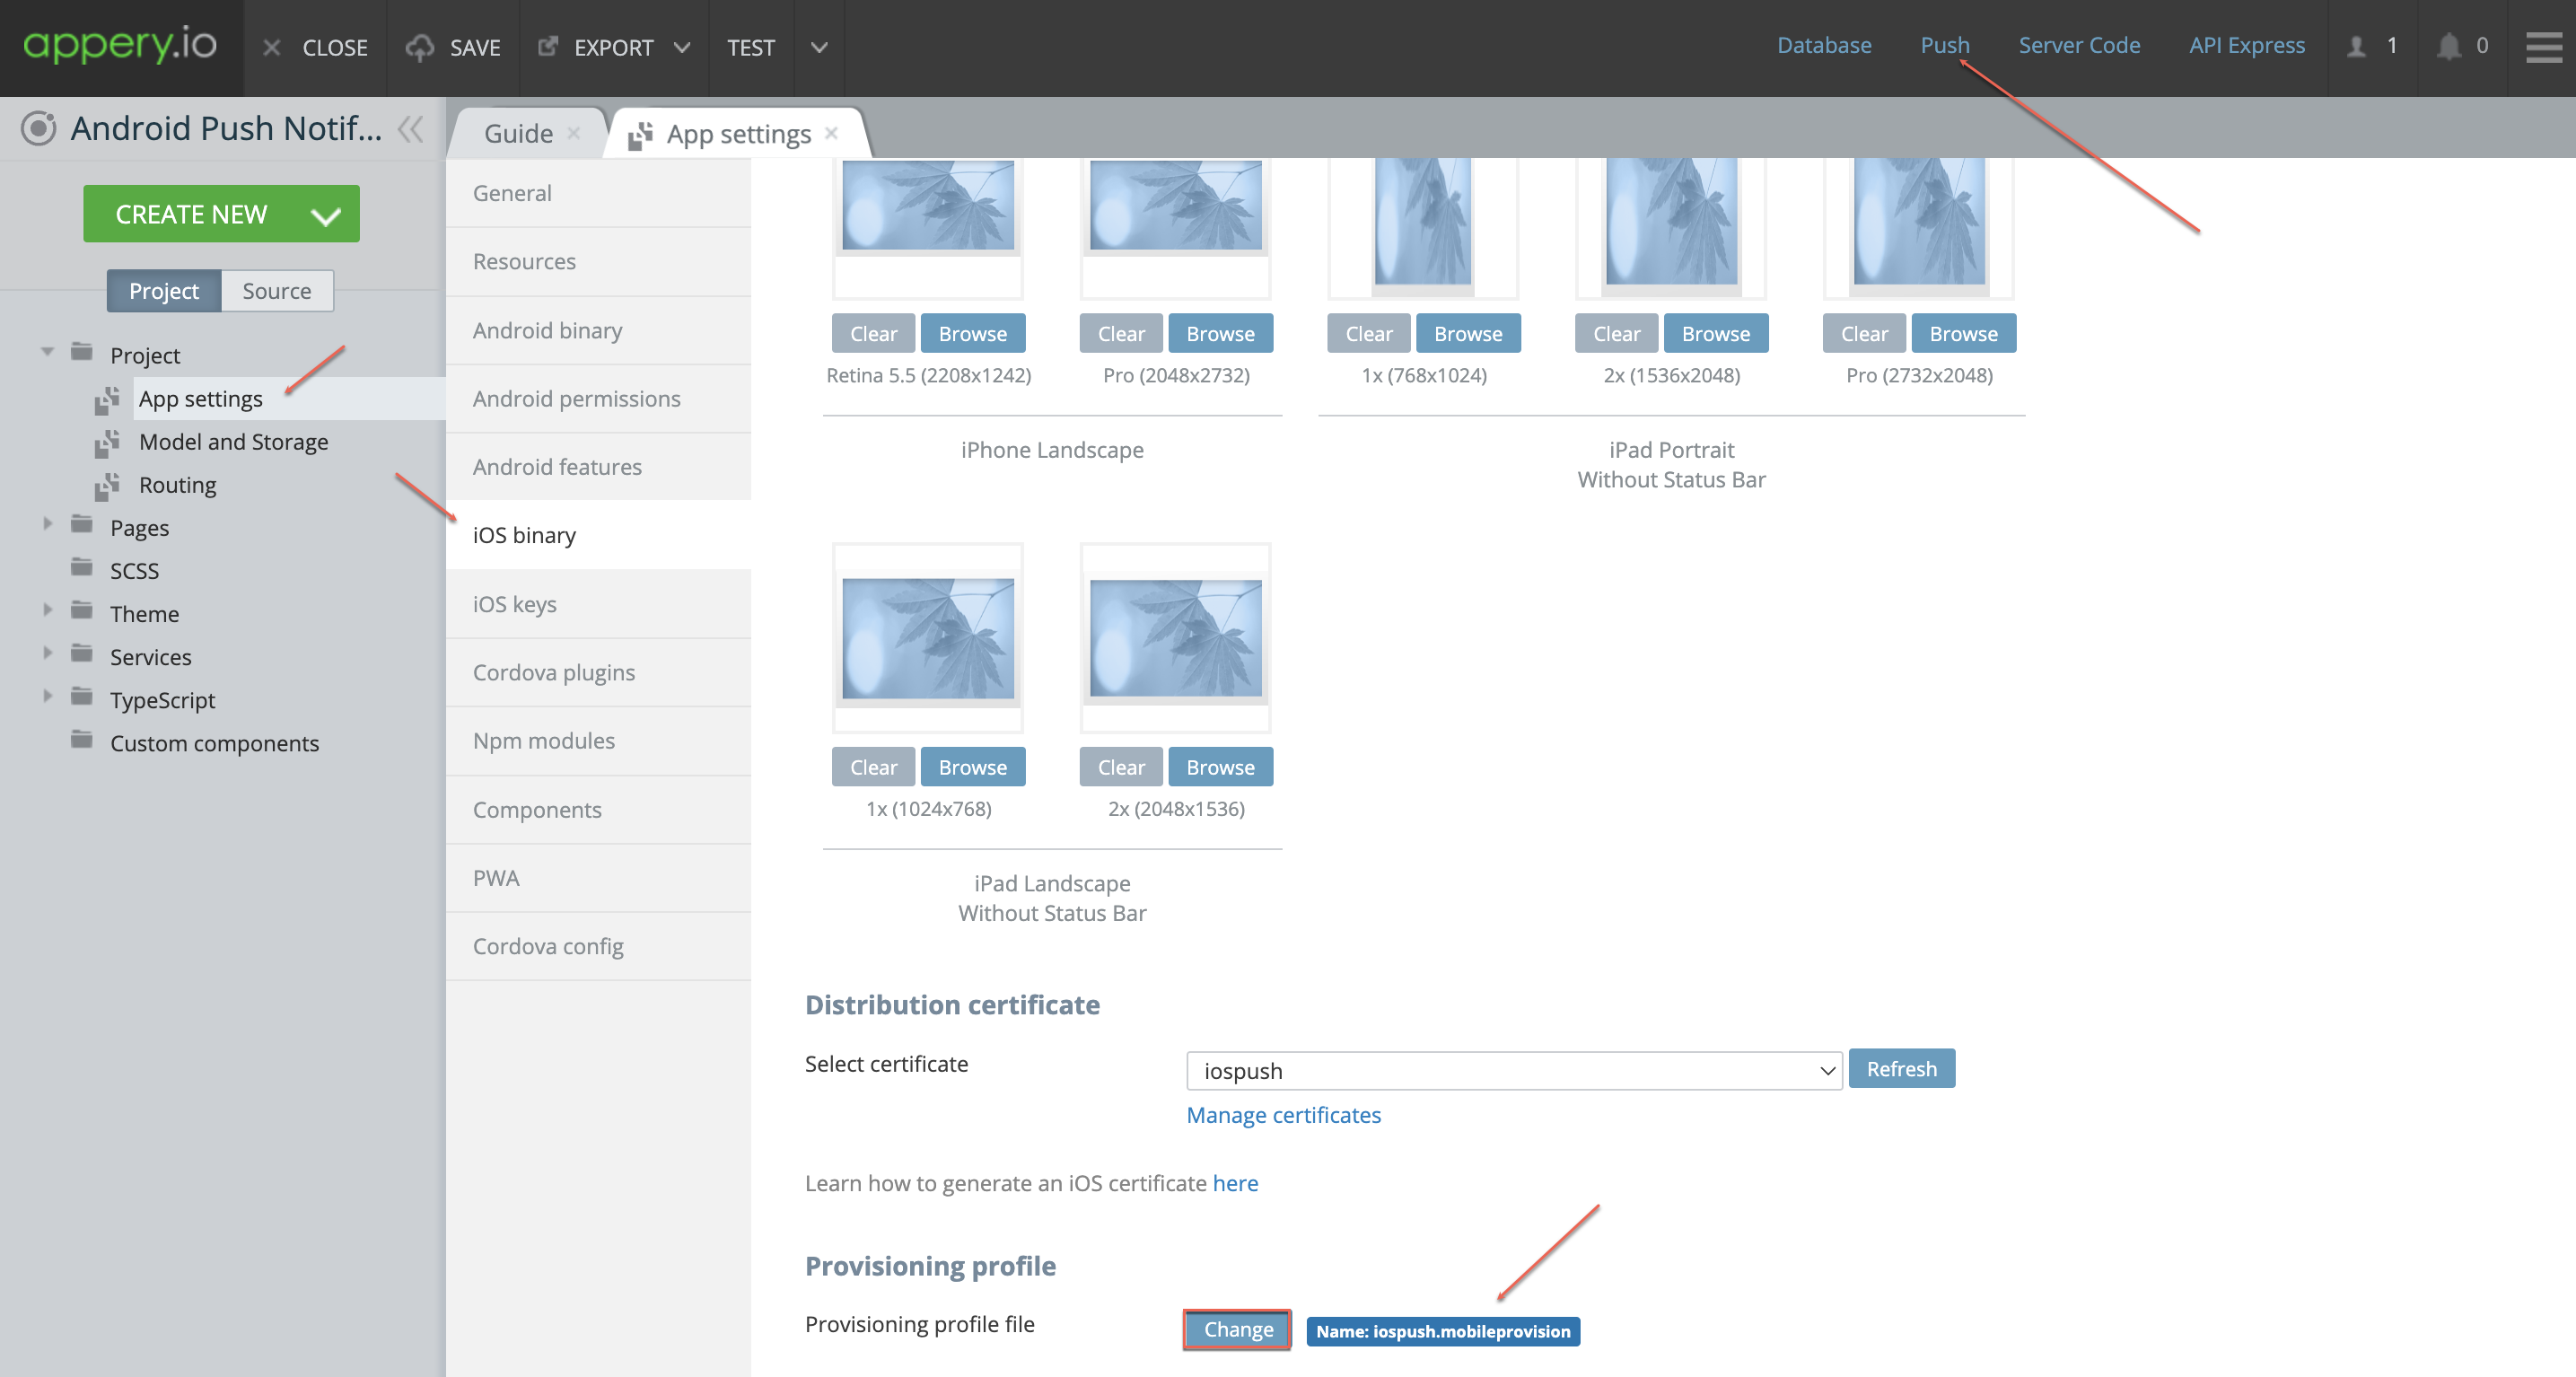
  • Now, you can add it to the Appery.io app App settings > iOS binary tab. To do it, scroll down to the Distribution certificate section, and select the iospush certificate you just generated (refresh the list if the certificate cannot be found).

2. Create a Provisioning Profile:

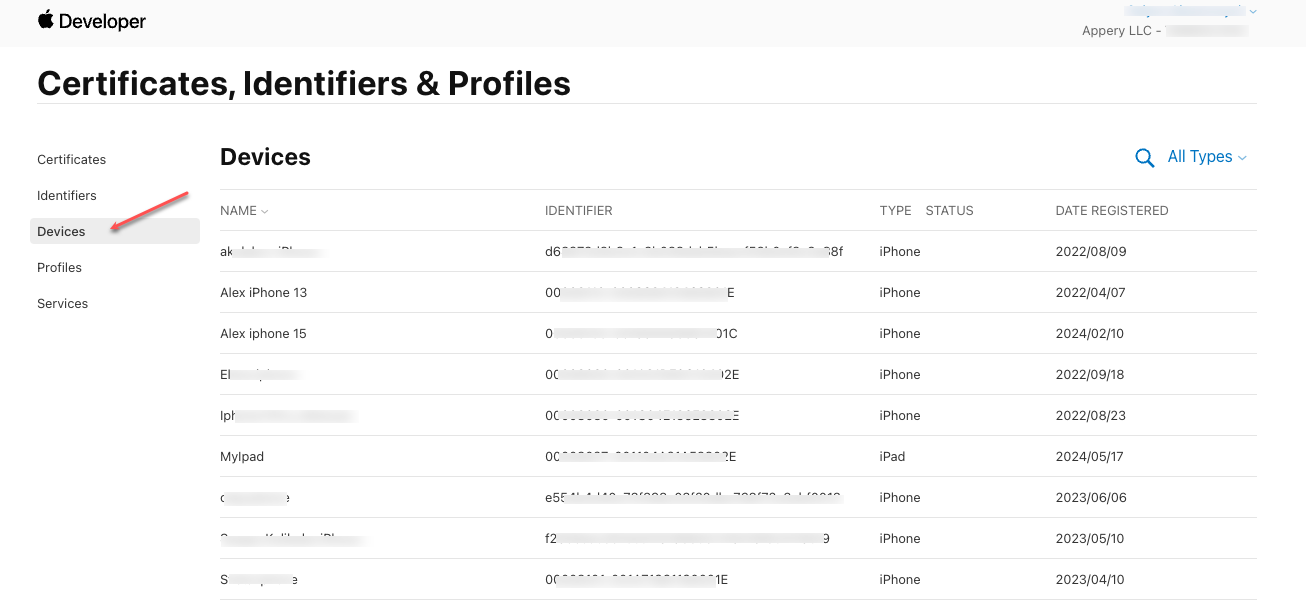
– Now, we need to create a Provisioning profile. For this, in the Apple Developer Console, register your device in the Devices section. You will be asked to add your device UDID. To find it, start iTunes, go to the Summary section, and click the device info panel several times until the UDID appears.

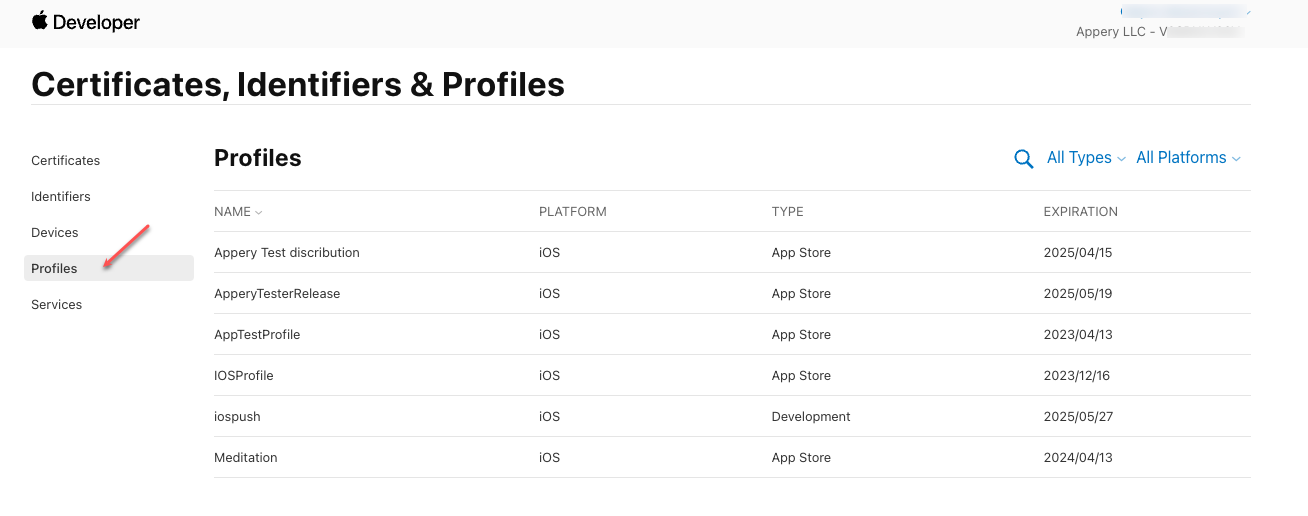
– Next, go to the Profiles section and create a new profile.

When specifying it, indicate it is of the iOS App Development type, then proceed to selecting an App ID from the list, then selecting your certificates and devices (you are free to select all the available certificates/devices).

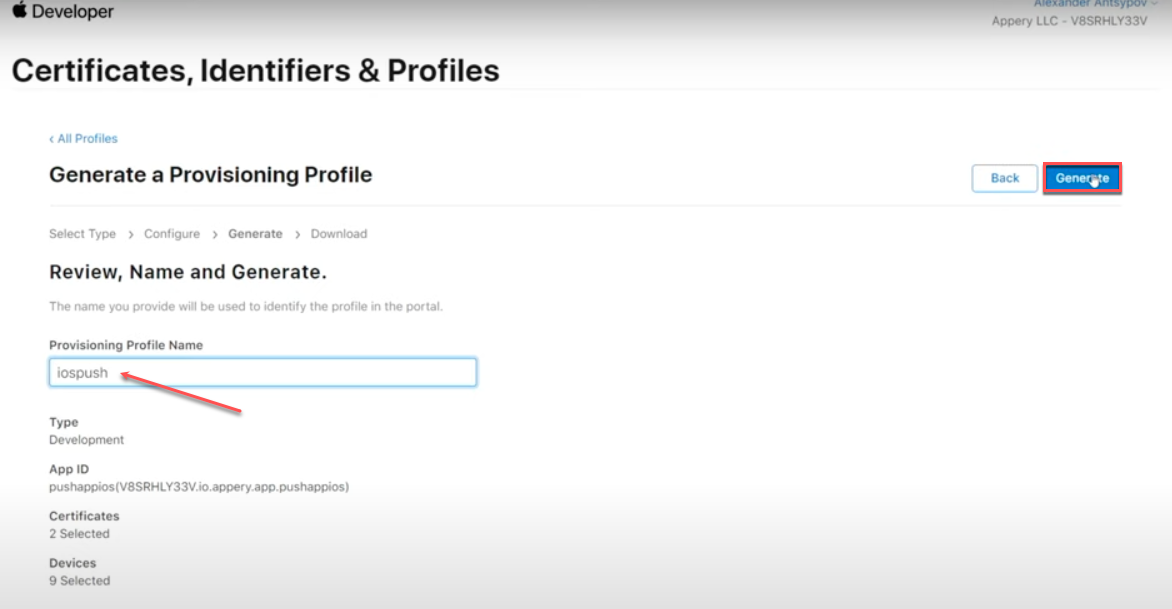
– When done, enter the Provisioning Profile Name, click Generate and download it to your drive.

– You can now upload it to Appery.io. Go to the App settings > iOS binary tab, scroll down to the Distribution certificate section, and click the Change button to upload the file you just generated using the Media Manager tool. Then, click the Push link in the header to open the Push Notifications tab.

Set Up Push Notifications in Appery.io

Now, let’s configure push notifications within Appery.io:

1. Enable Push Notifications:

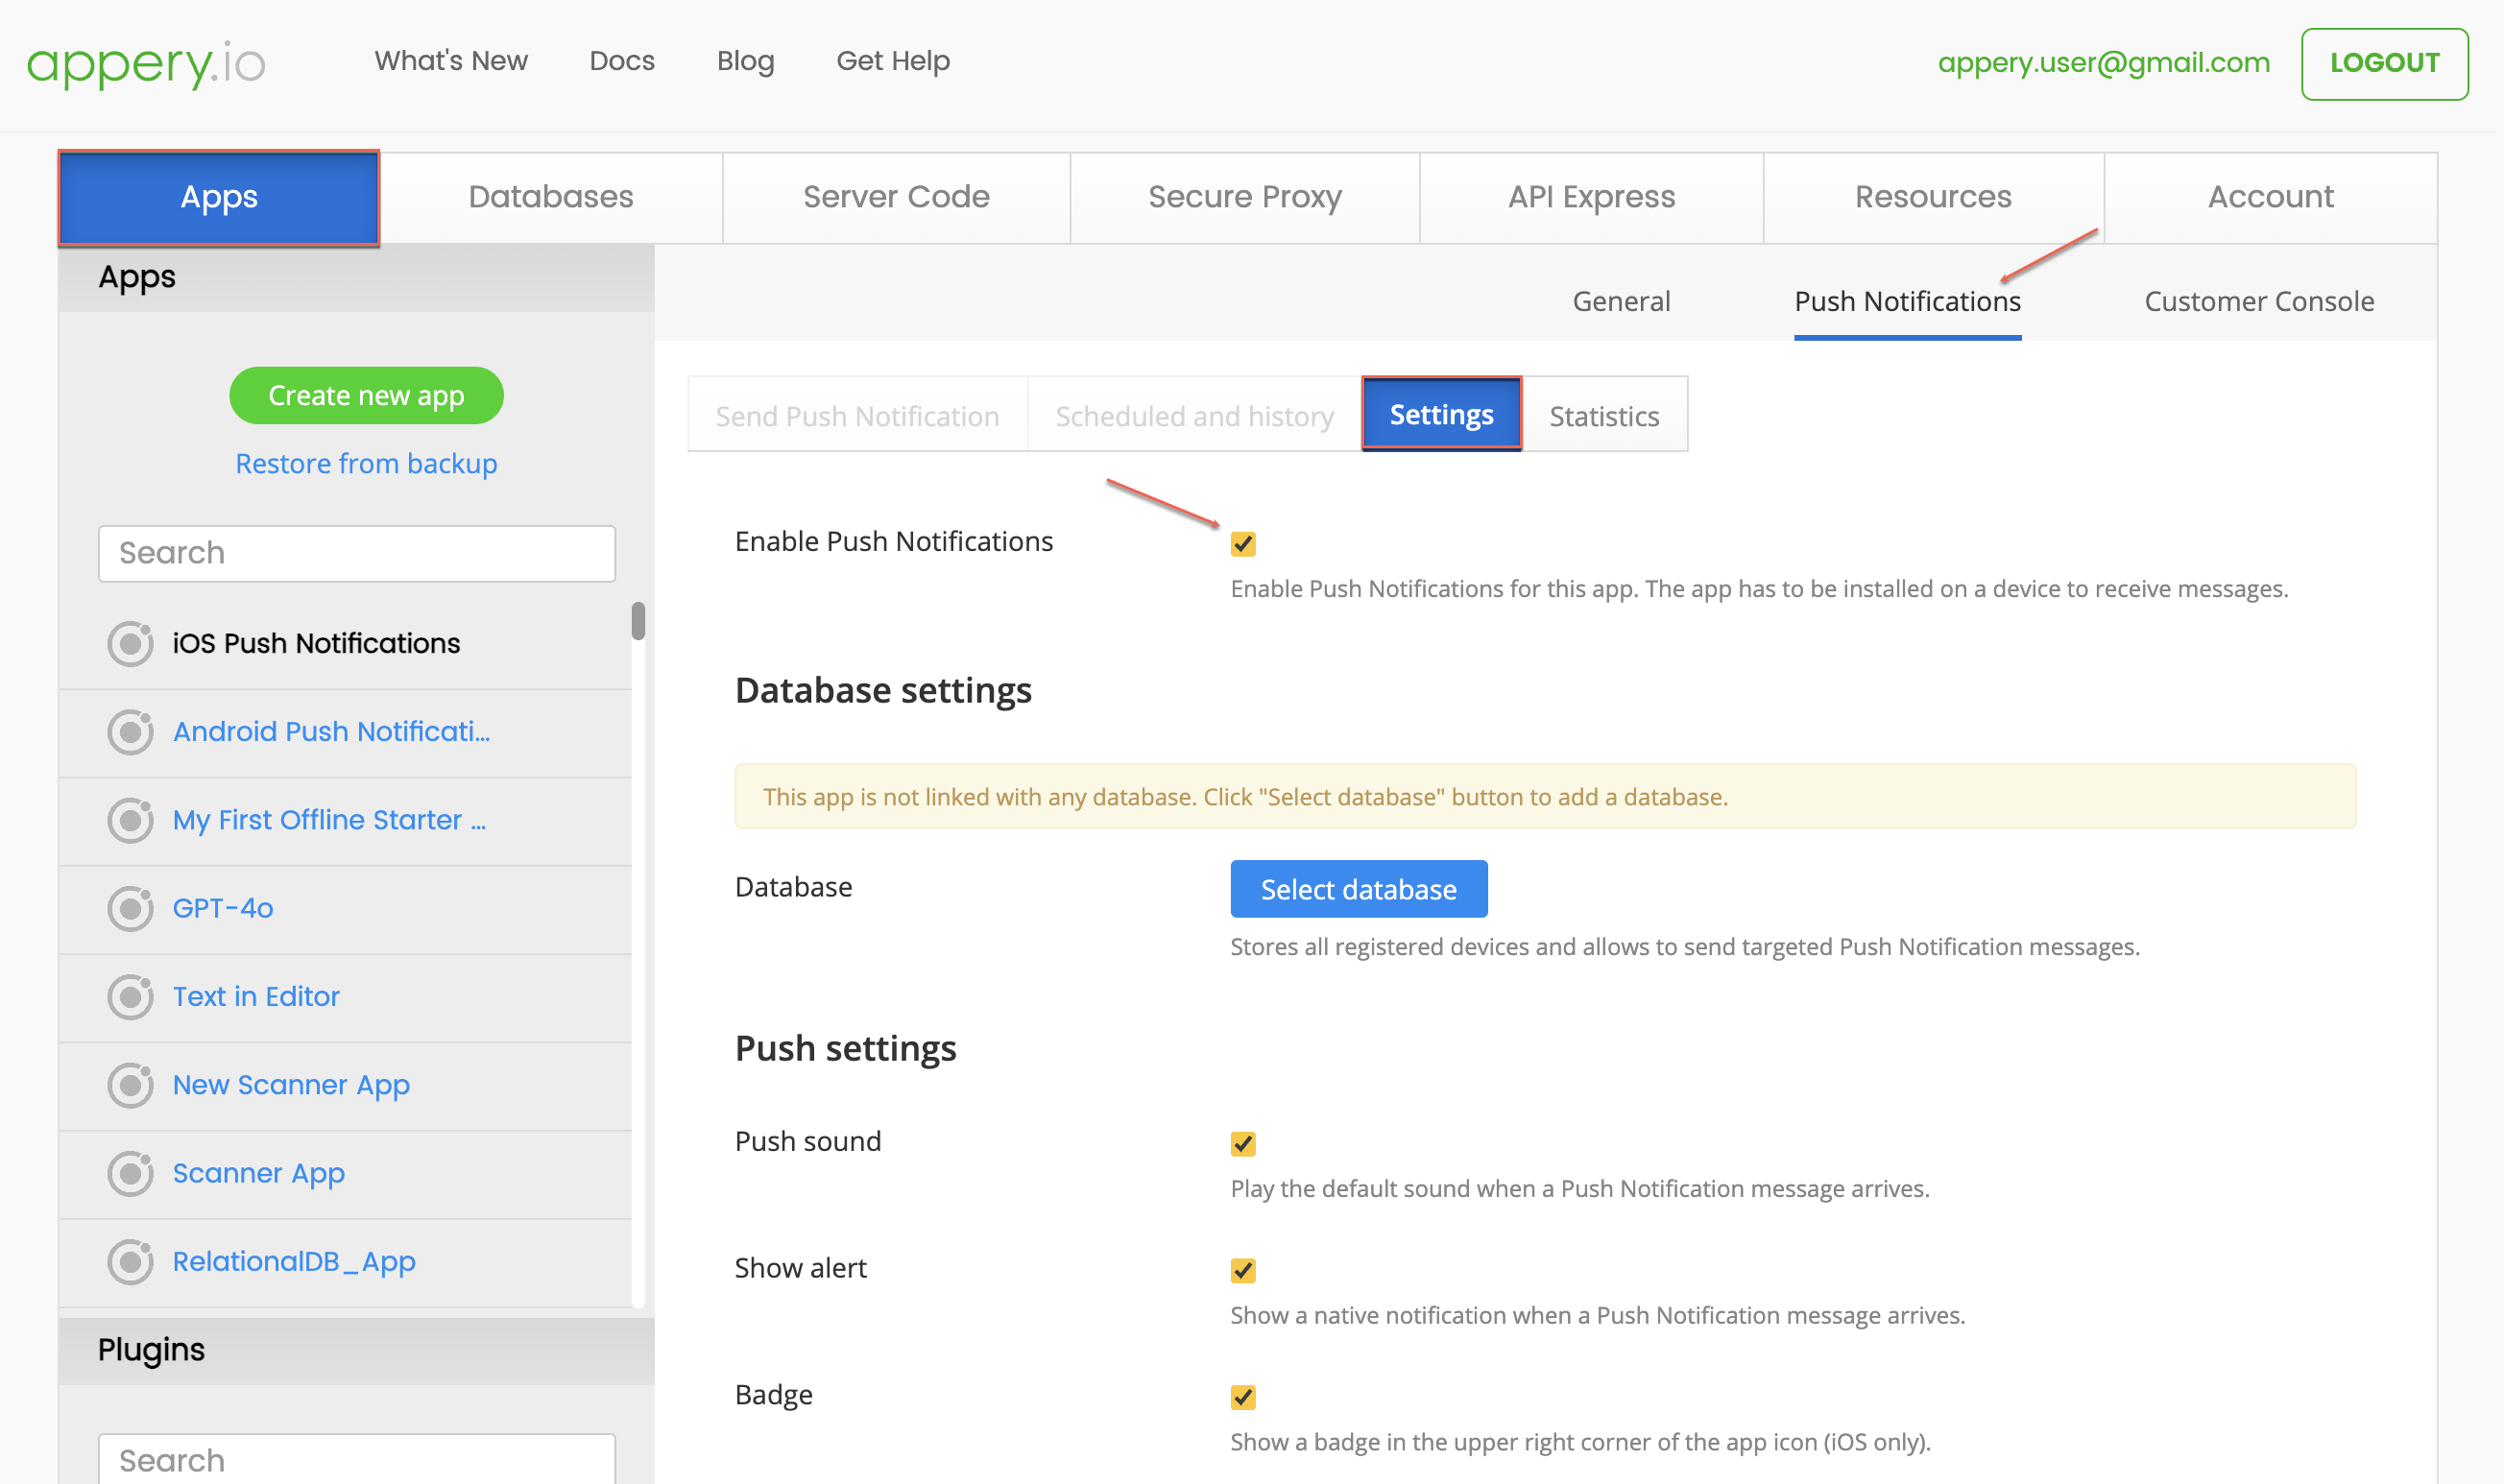
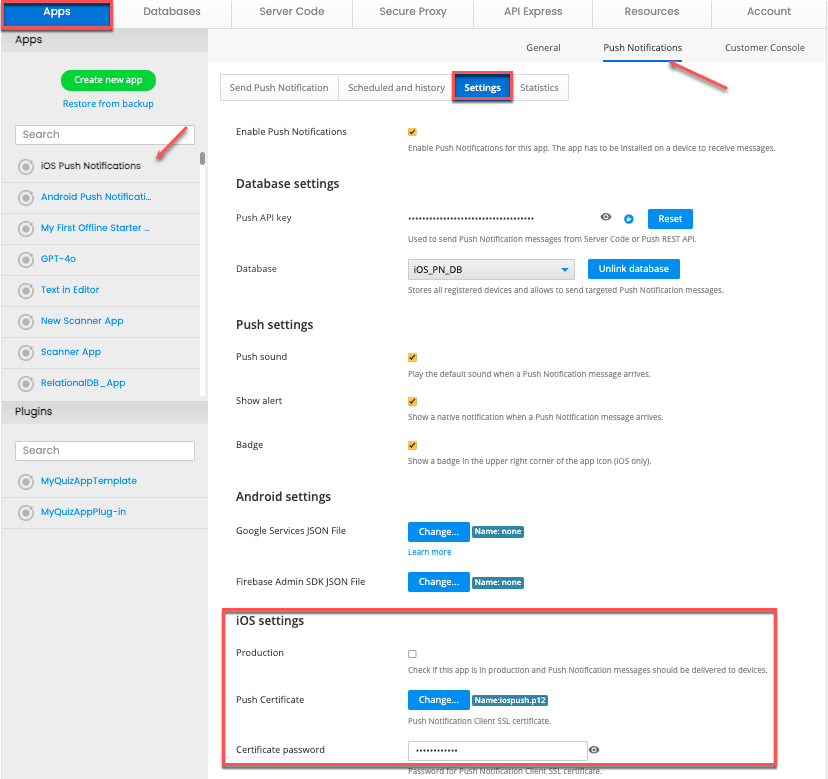
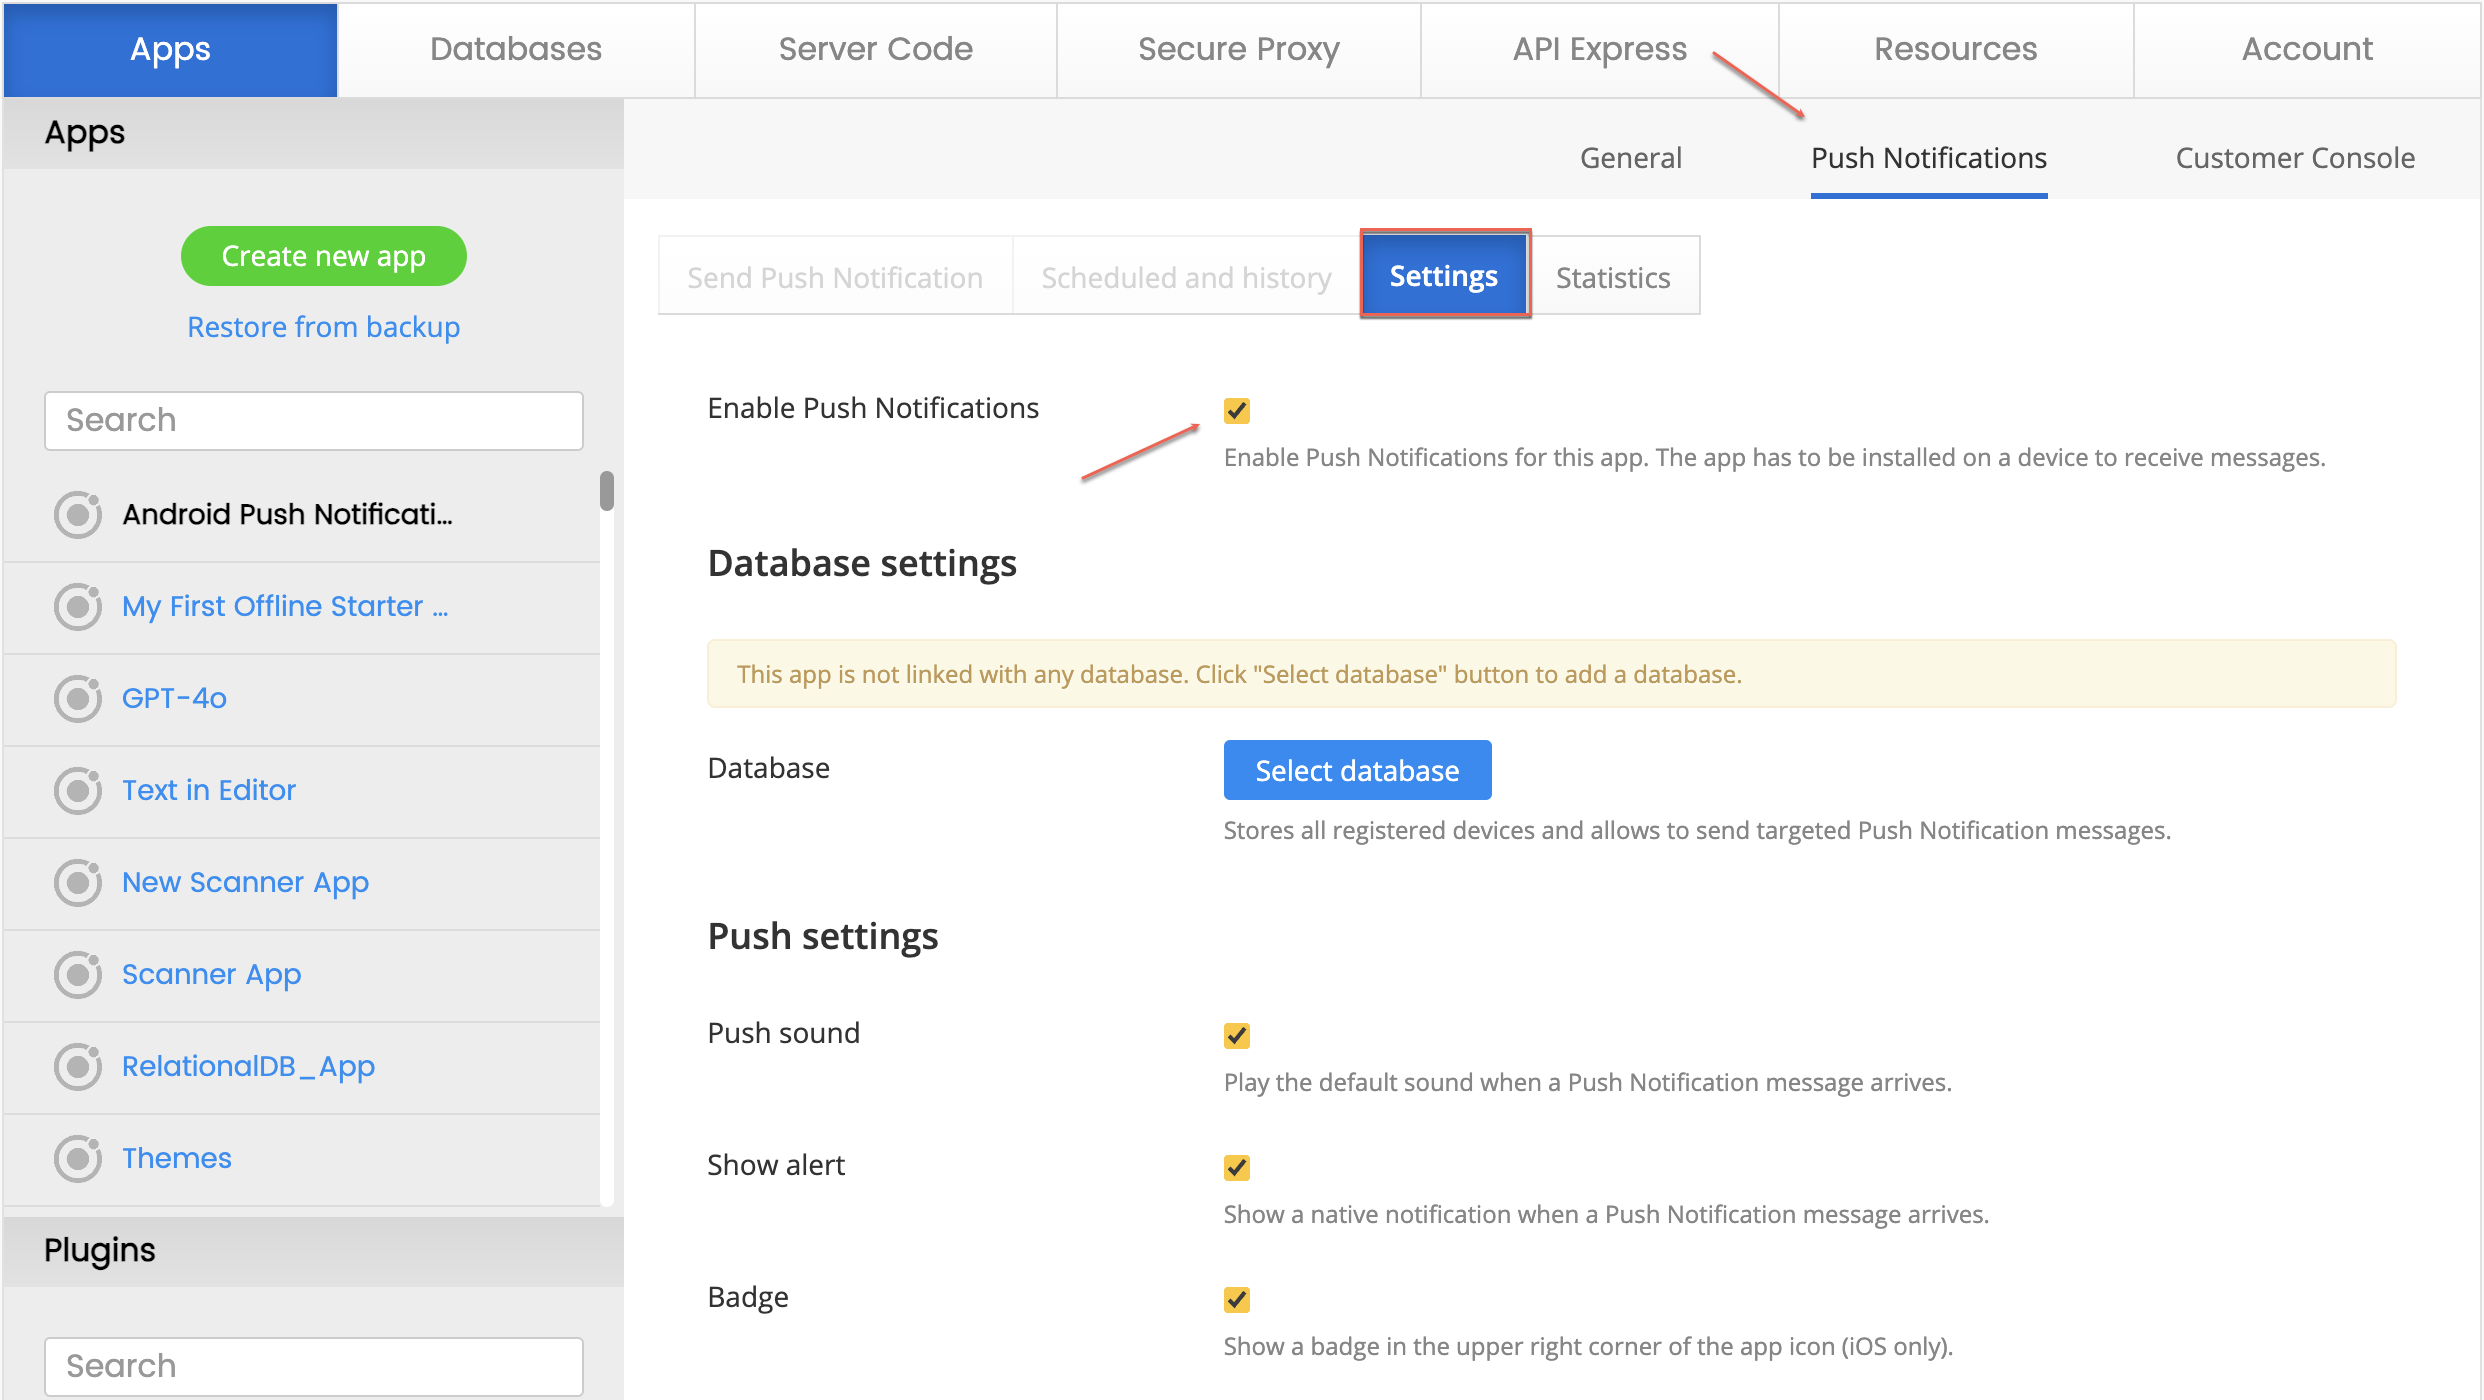
– In your project, go to the Push Notifications > Settings section and enable the Push Notifications checkbox.

2. Configure the Database:

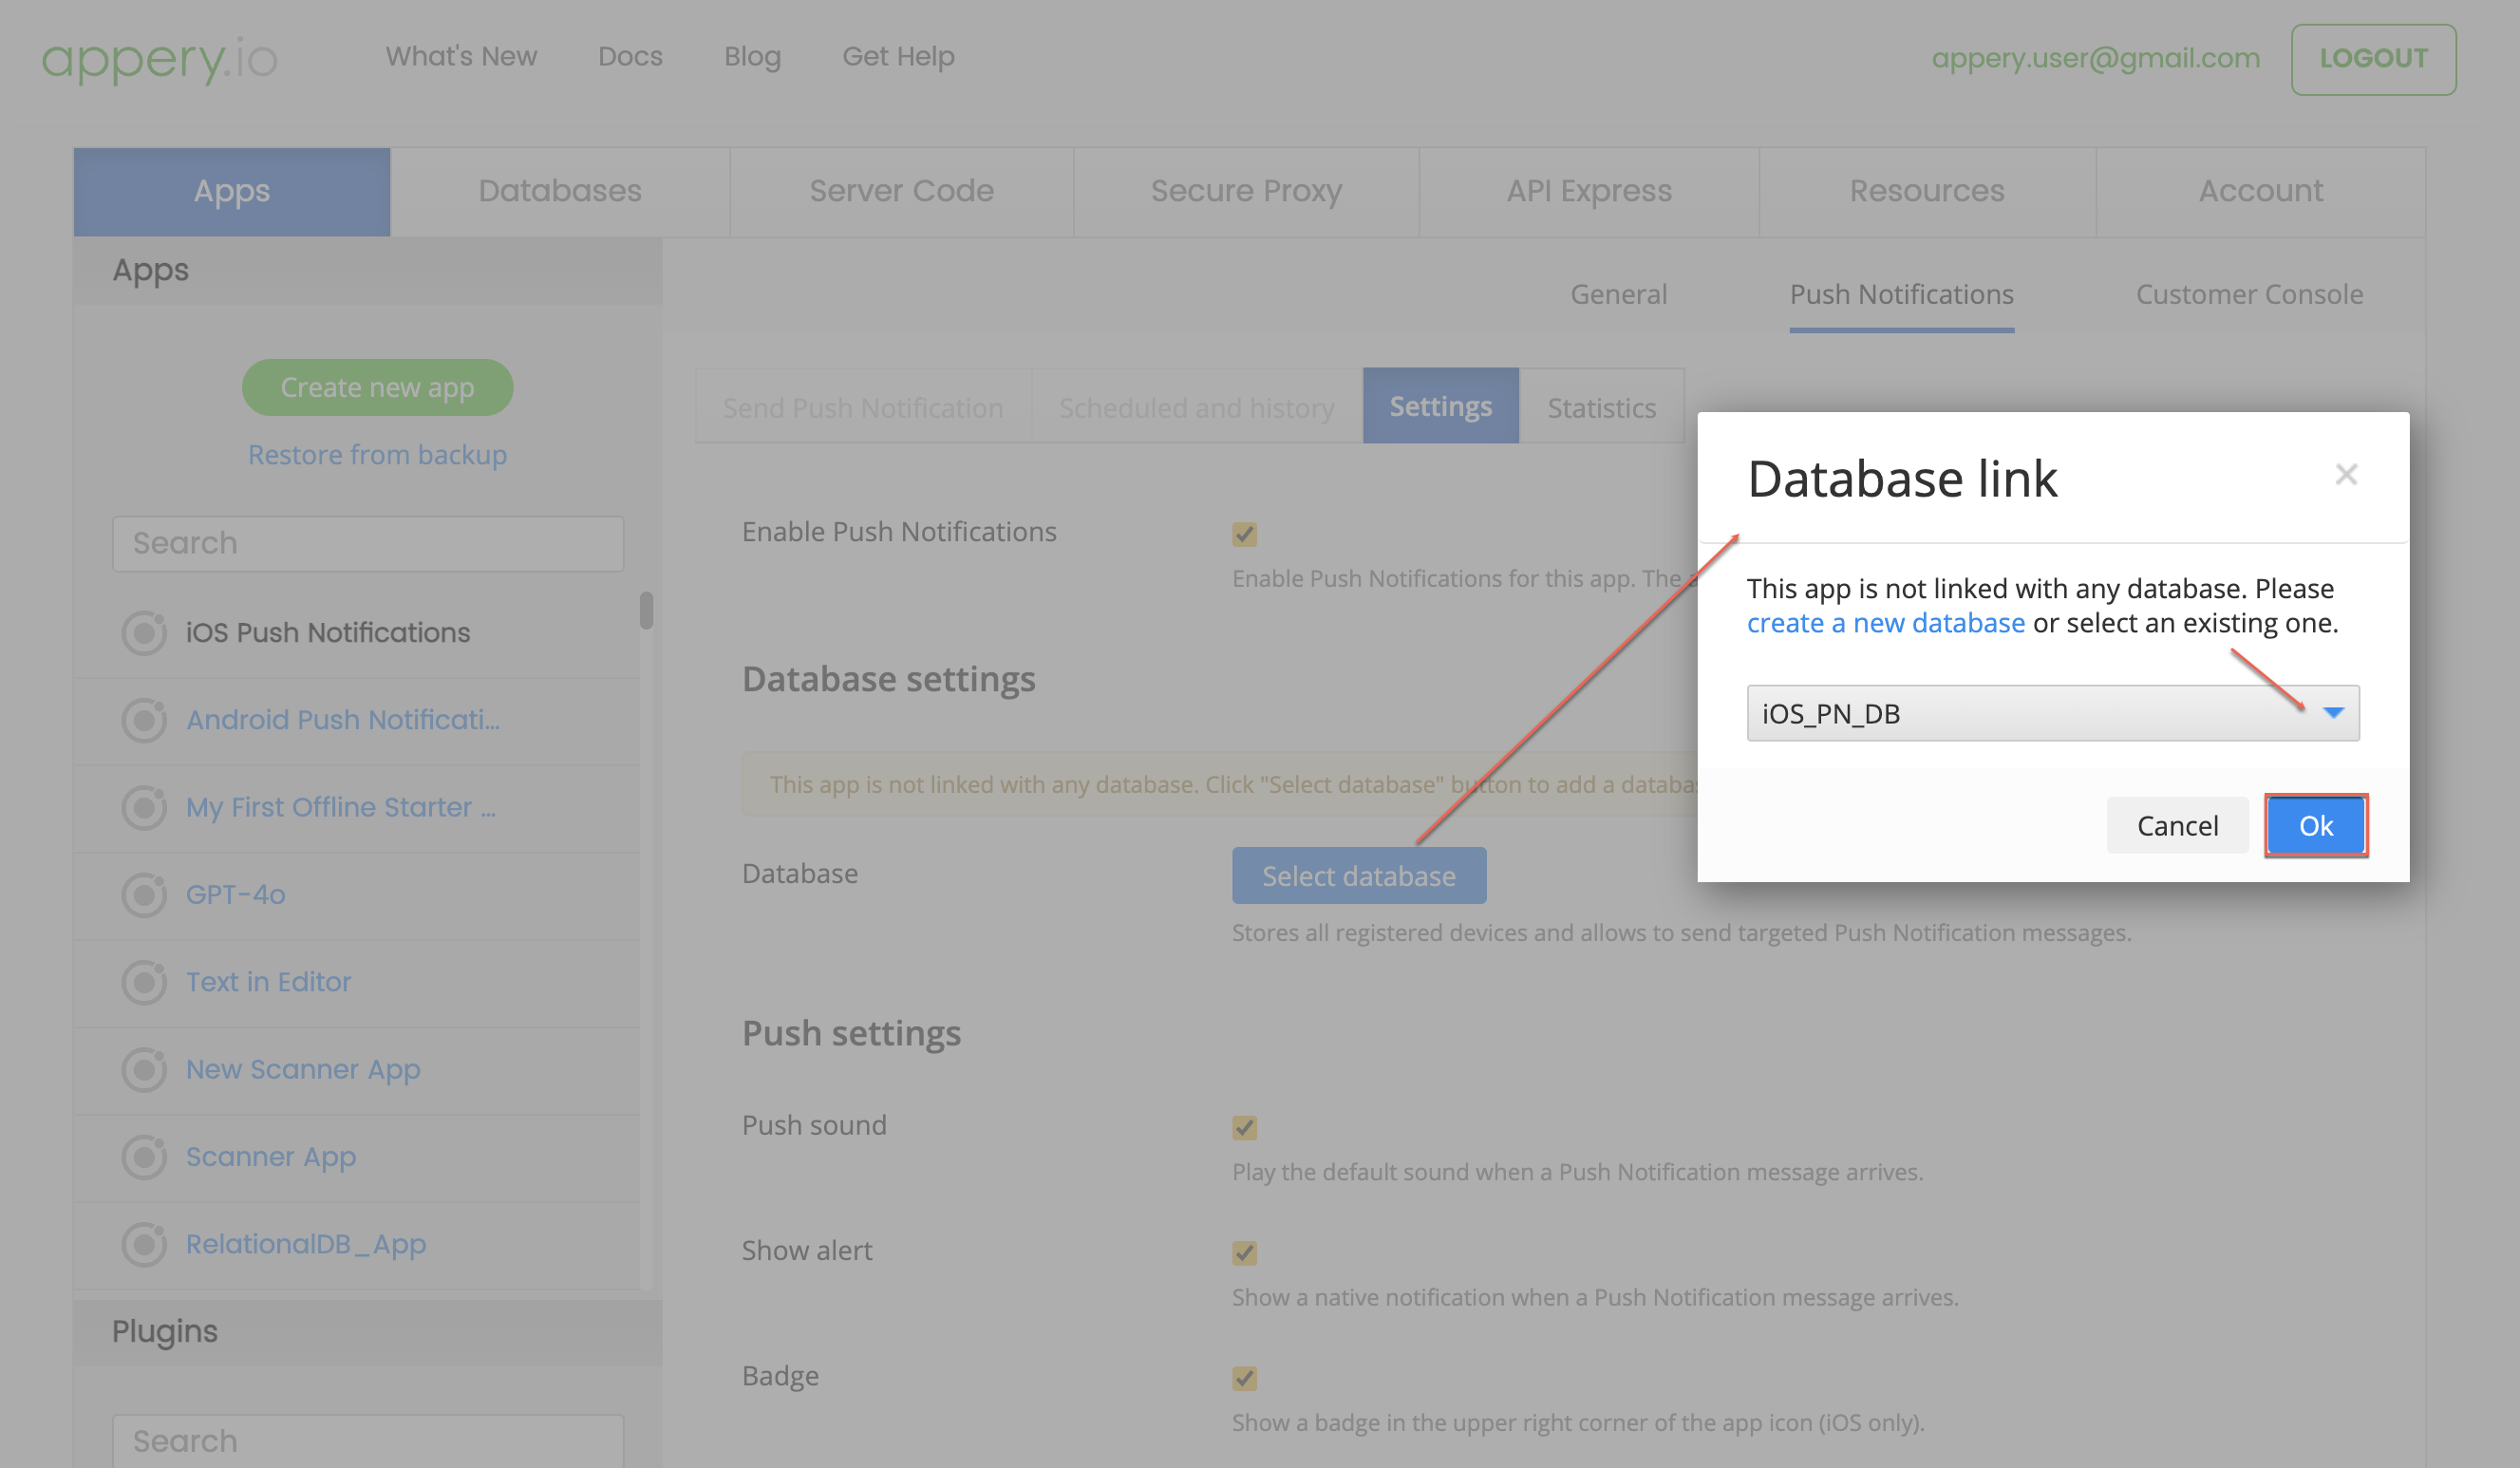
– In the Database settings section,  select a database where device tokens will be stored. You can use any existing database or create a new one.

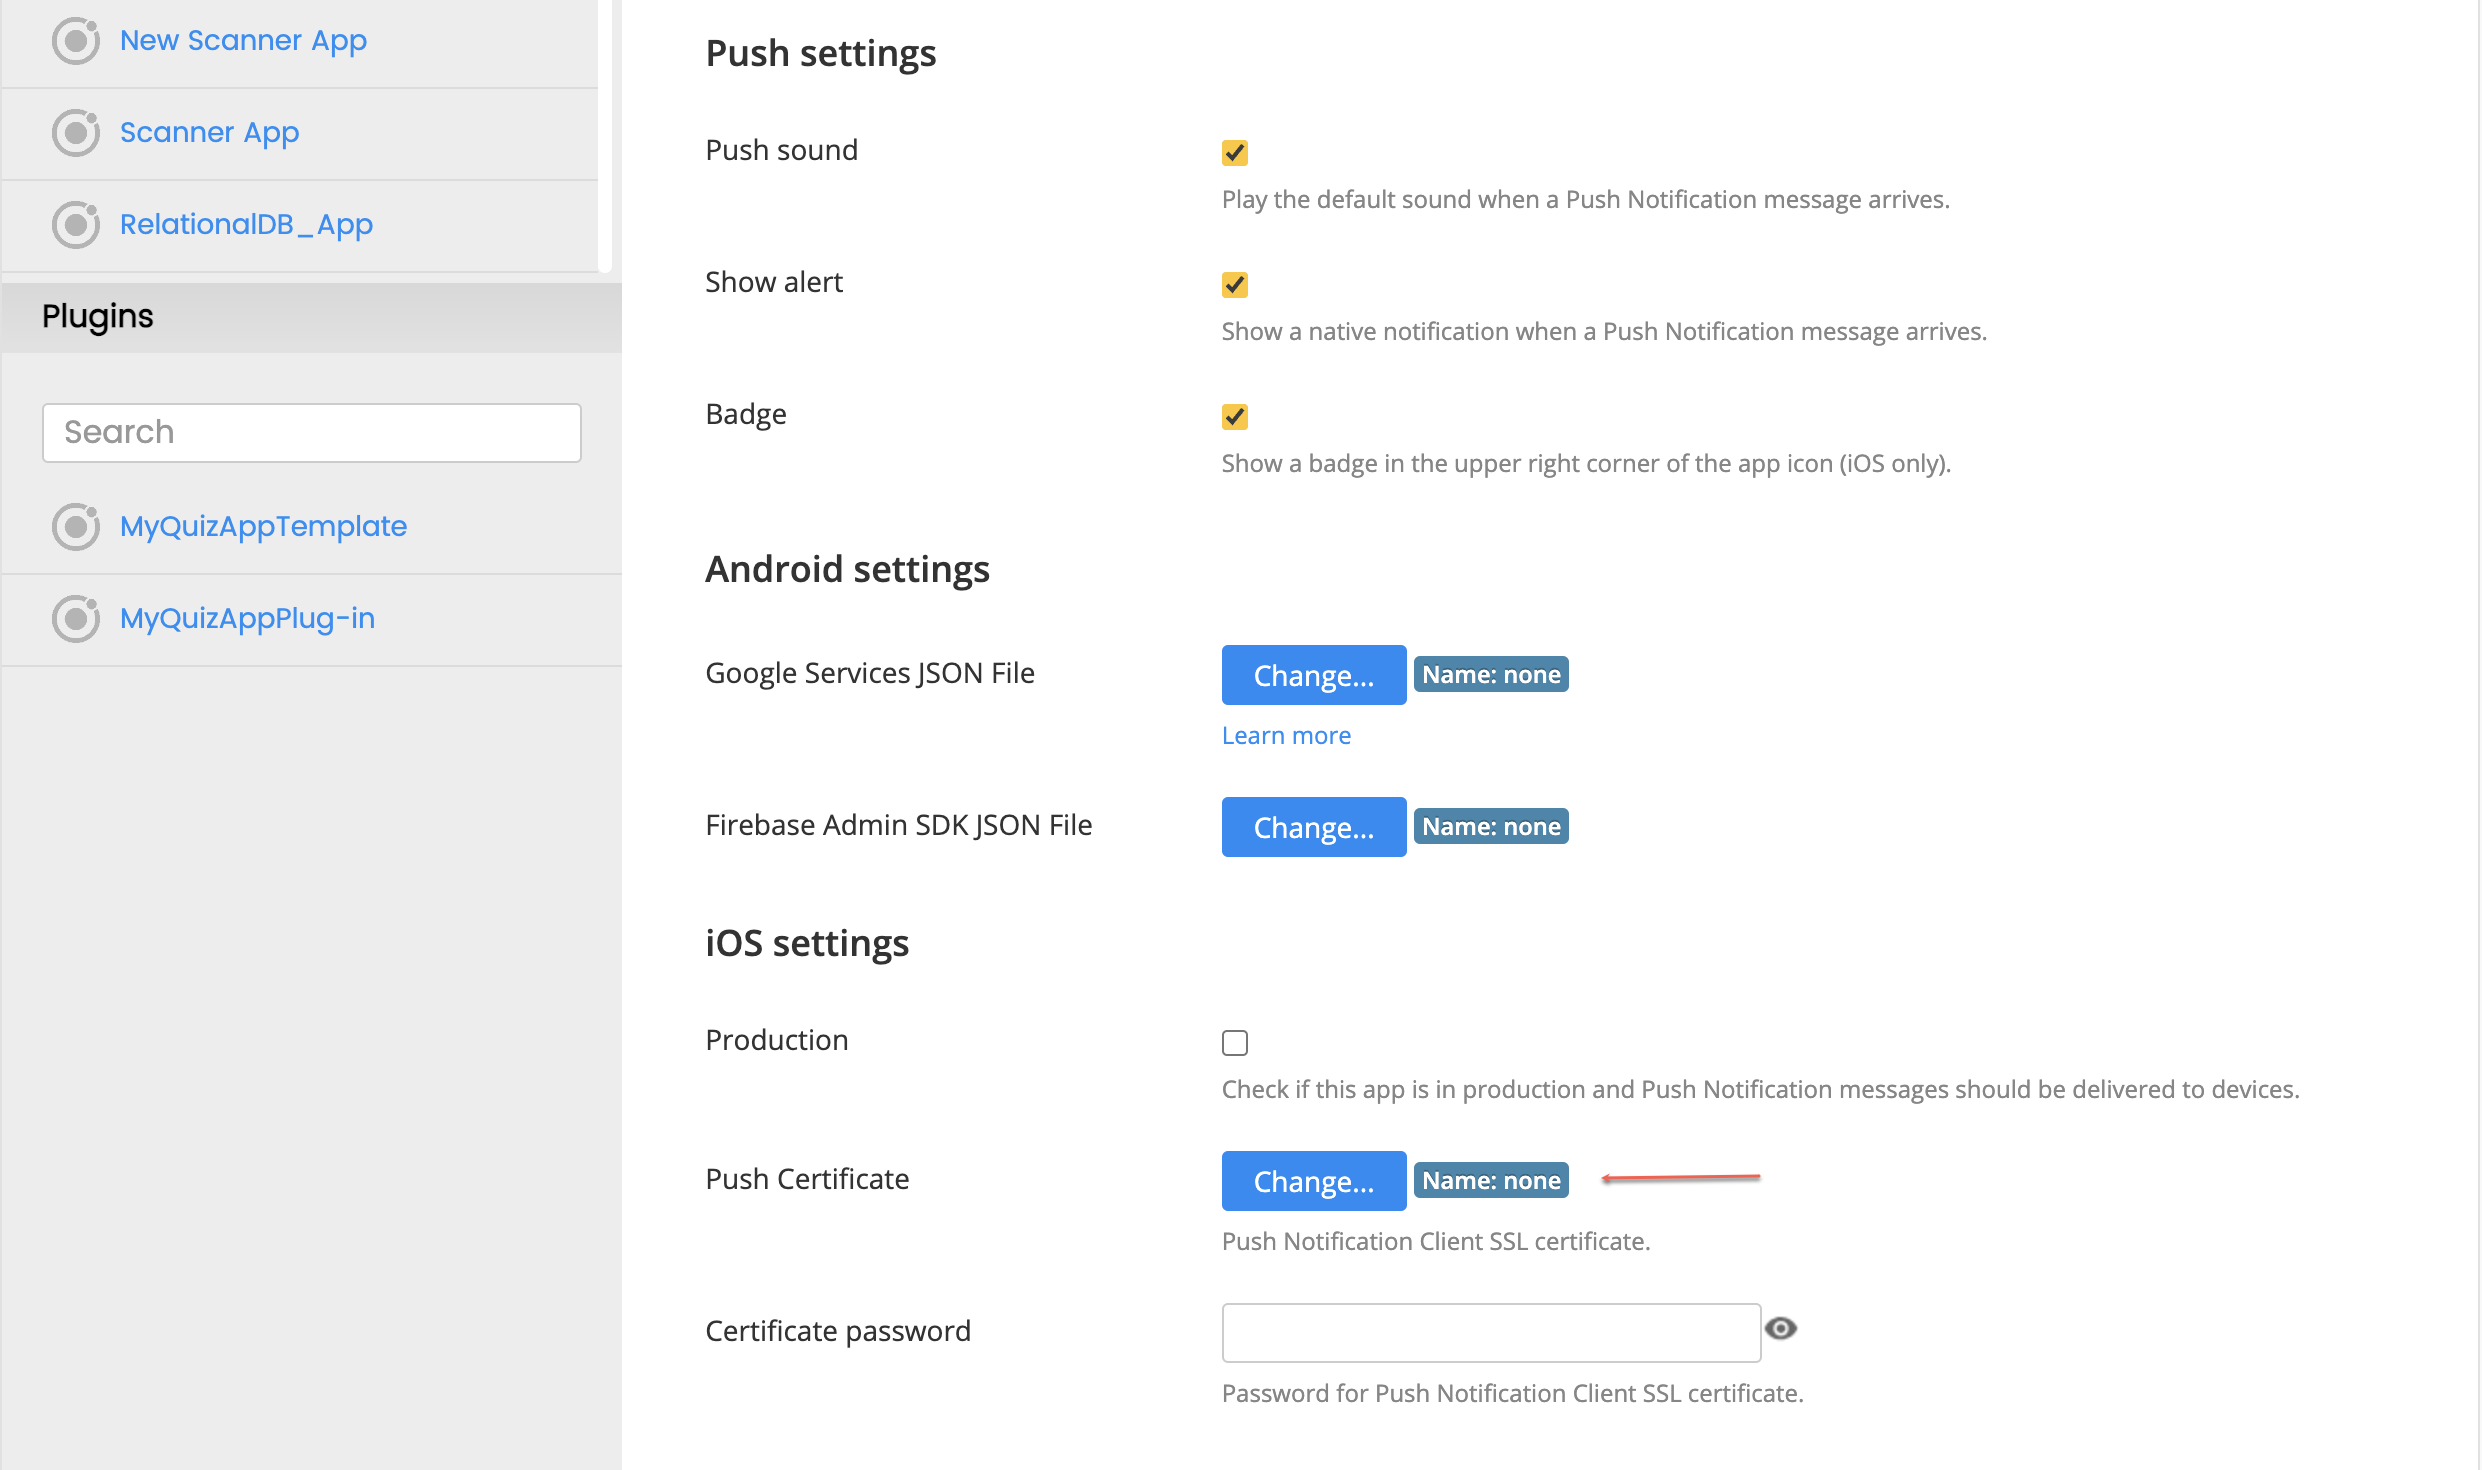
– When you scroll down, you will see that you will also need to provide the Push Certificate to make you app send pushes.

3. Upload Push Notification Certificate:

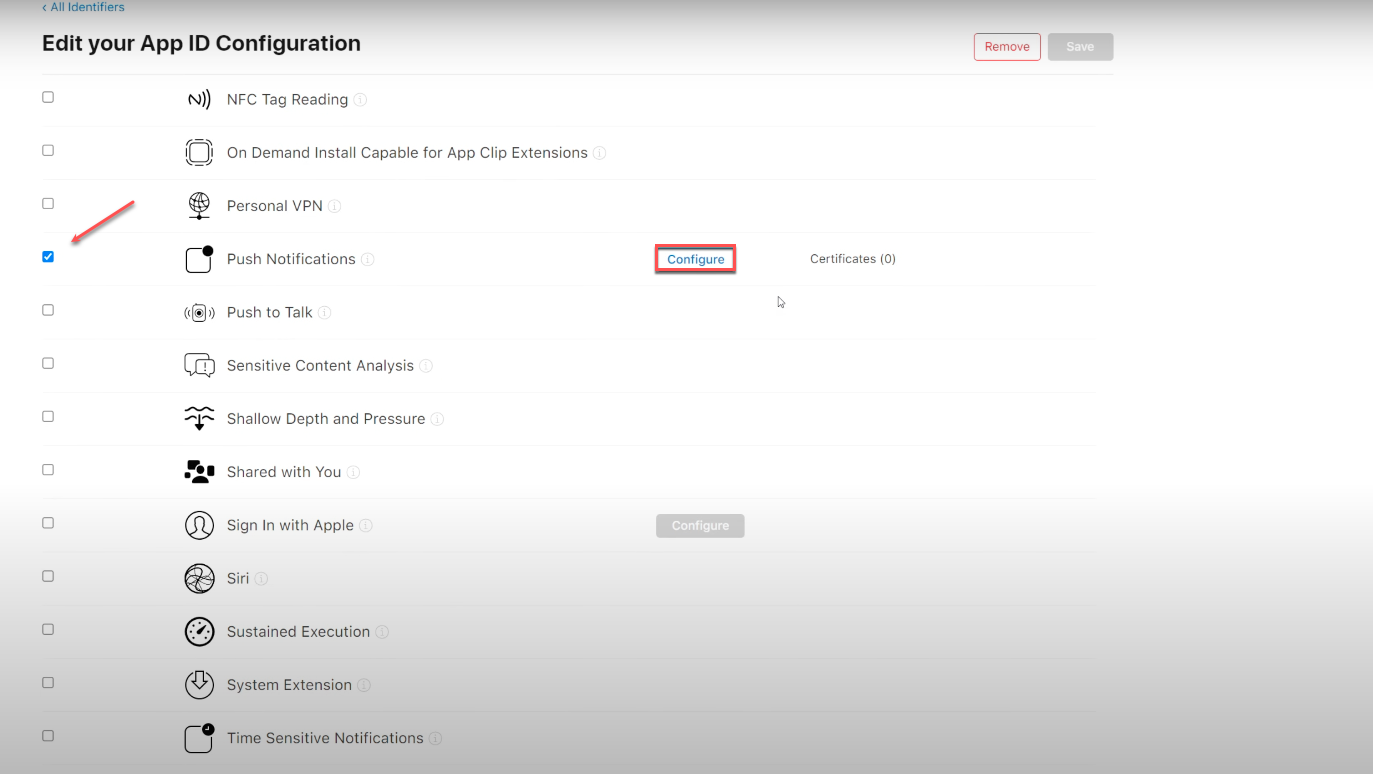
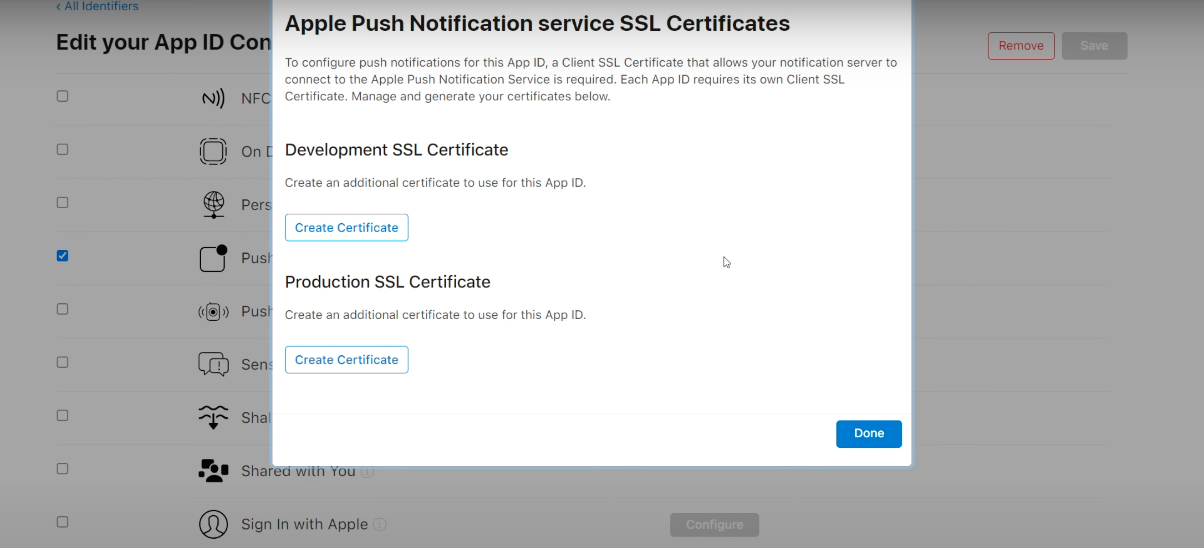
– To generate and download a push notification certificate from the Apple Developer Console, go to the  Identifiers section, select the pushappios identifier created earlier and, in the Edit your App ID Configuration page, scroll down to the Push Notifications app service item, and click the Configure button.

– Select Development SSL Certificate and click Create Certificate.

 – Next, you need to generate and upload a certificate signing request for Apple Push Notification service SSL. To do this, go back to the Appery.io app and, in the Resources tab, generate a new request it by using the Generate iOS certificate wizard. When ready, the certificate signing request can be uploaded to Apple: for this, just select the file you just downloaded and upload it.

– After Apple has processed this request, you can finally download the push certificate and then upload it to Appery.io for use in your app.

– Go back to the Generate iOS certificate wizard, choose the certificate from your drive, then provide the name and password for your it. Click Generate.

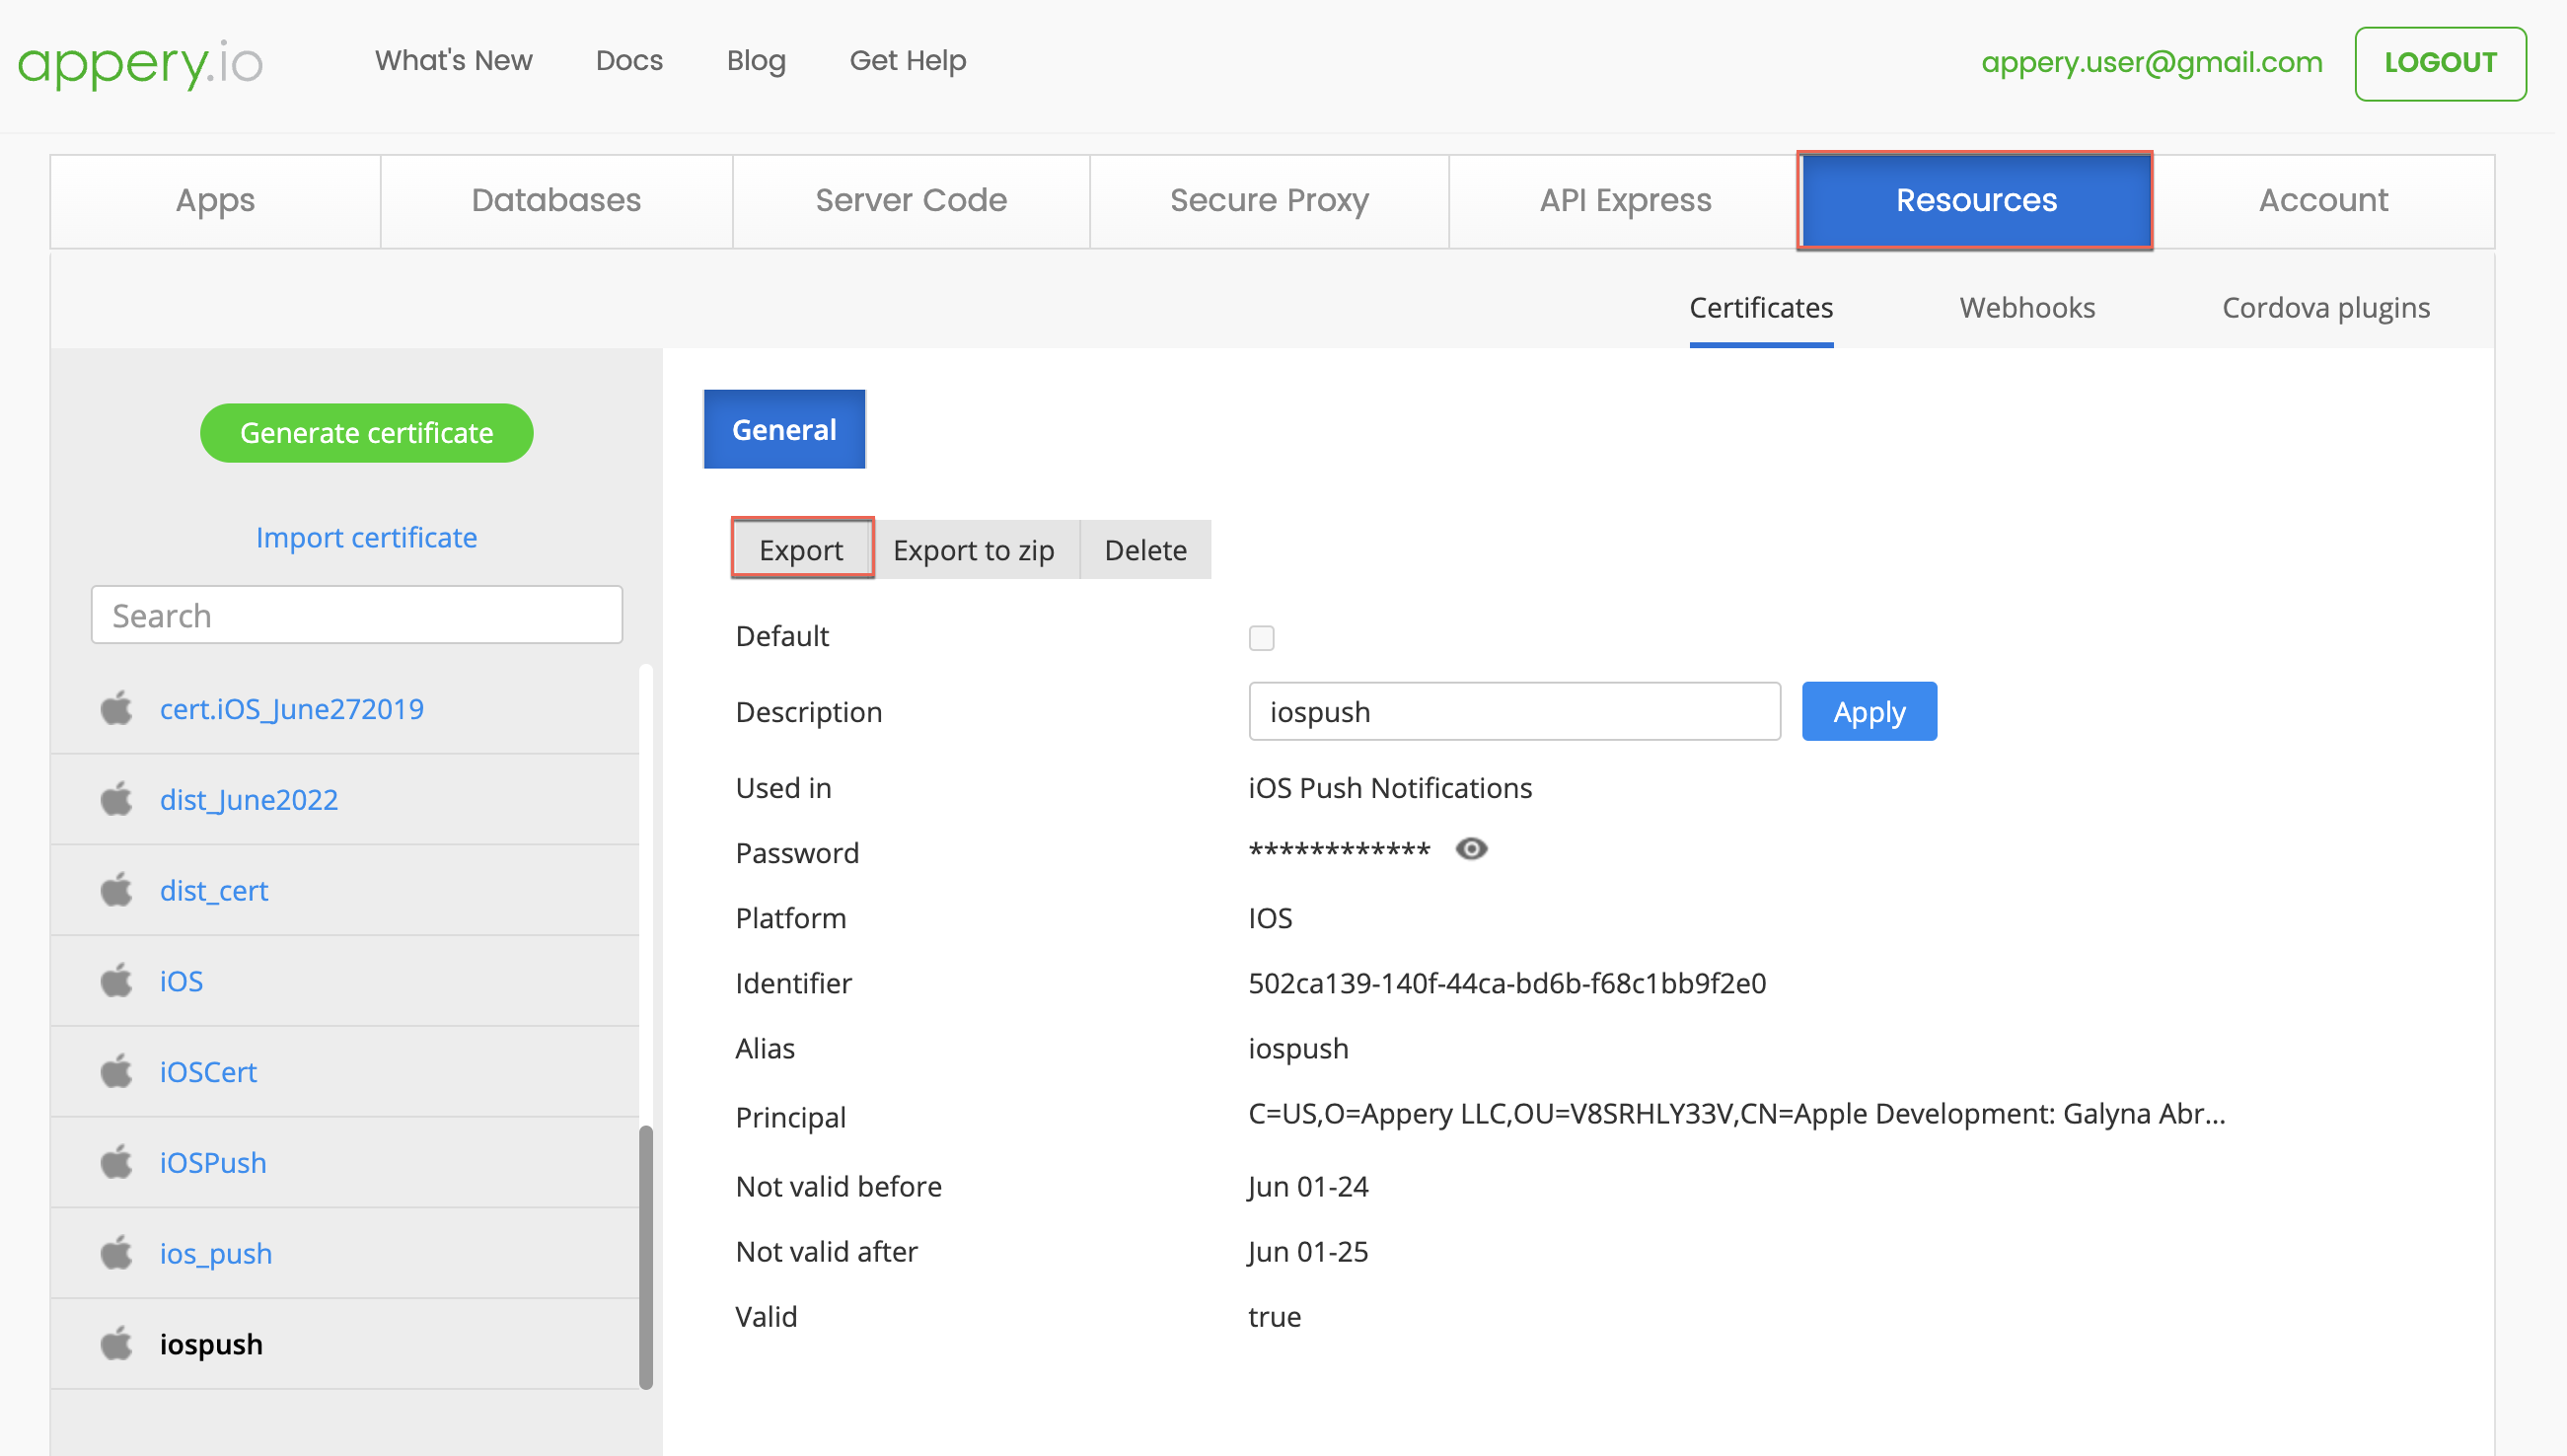
In the Resources > Certificates tab, find the the iospush certificate, and click the Export button.

– We can finally specify it for the app. Go to the Push Notifications > Settings page, scroll down to the iOS settings section and upload the certificate you just downloaded in the .p12 format.

4. Build and Install Your App:

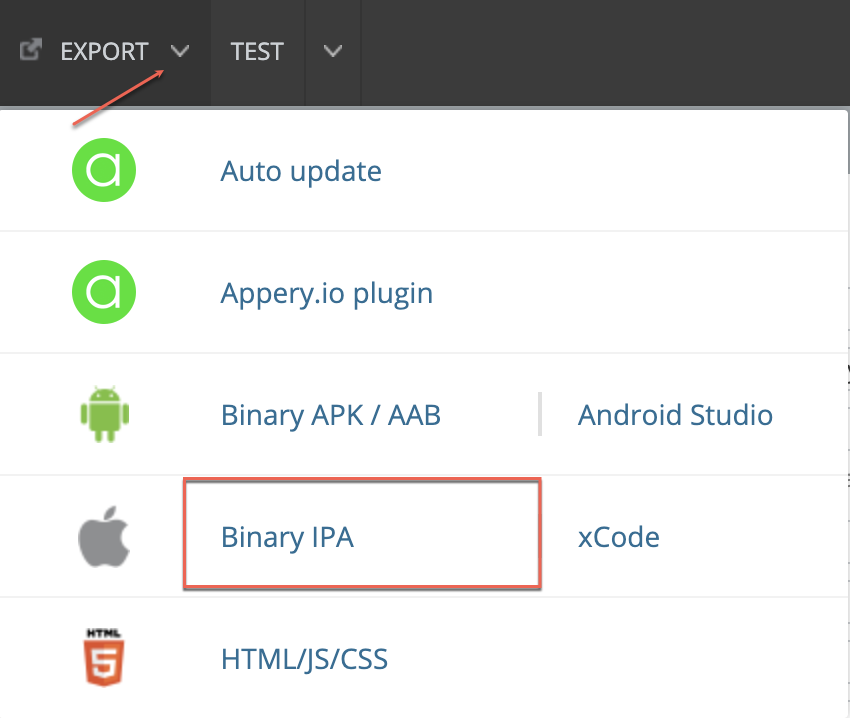
– Build your app’s binary IPA file: EXPORT > Binary IPA.

– After the app is built, install the app on your device by scanning the QR code provided and grant permission to receive push notifications within the app.

5. Test Push Notifications:

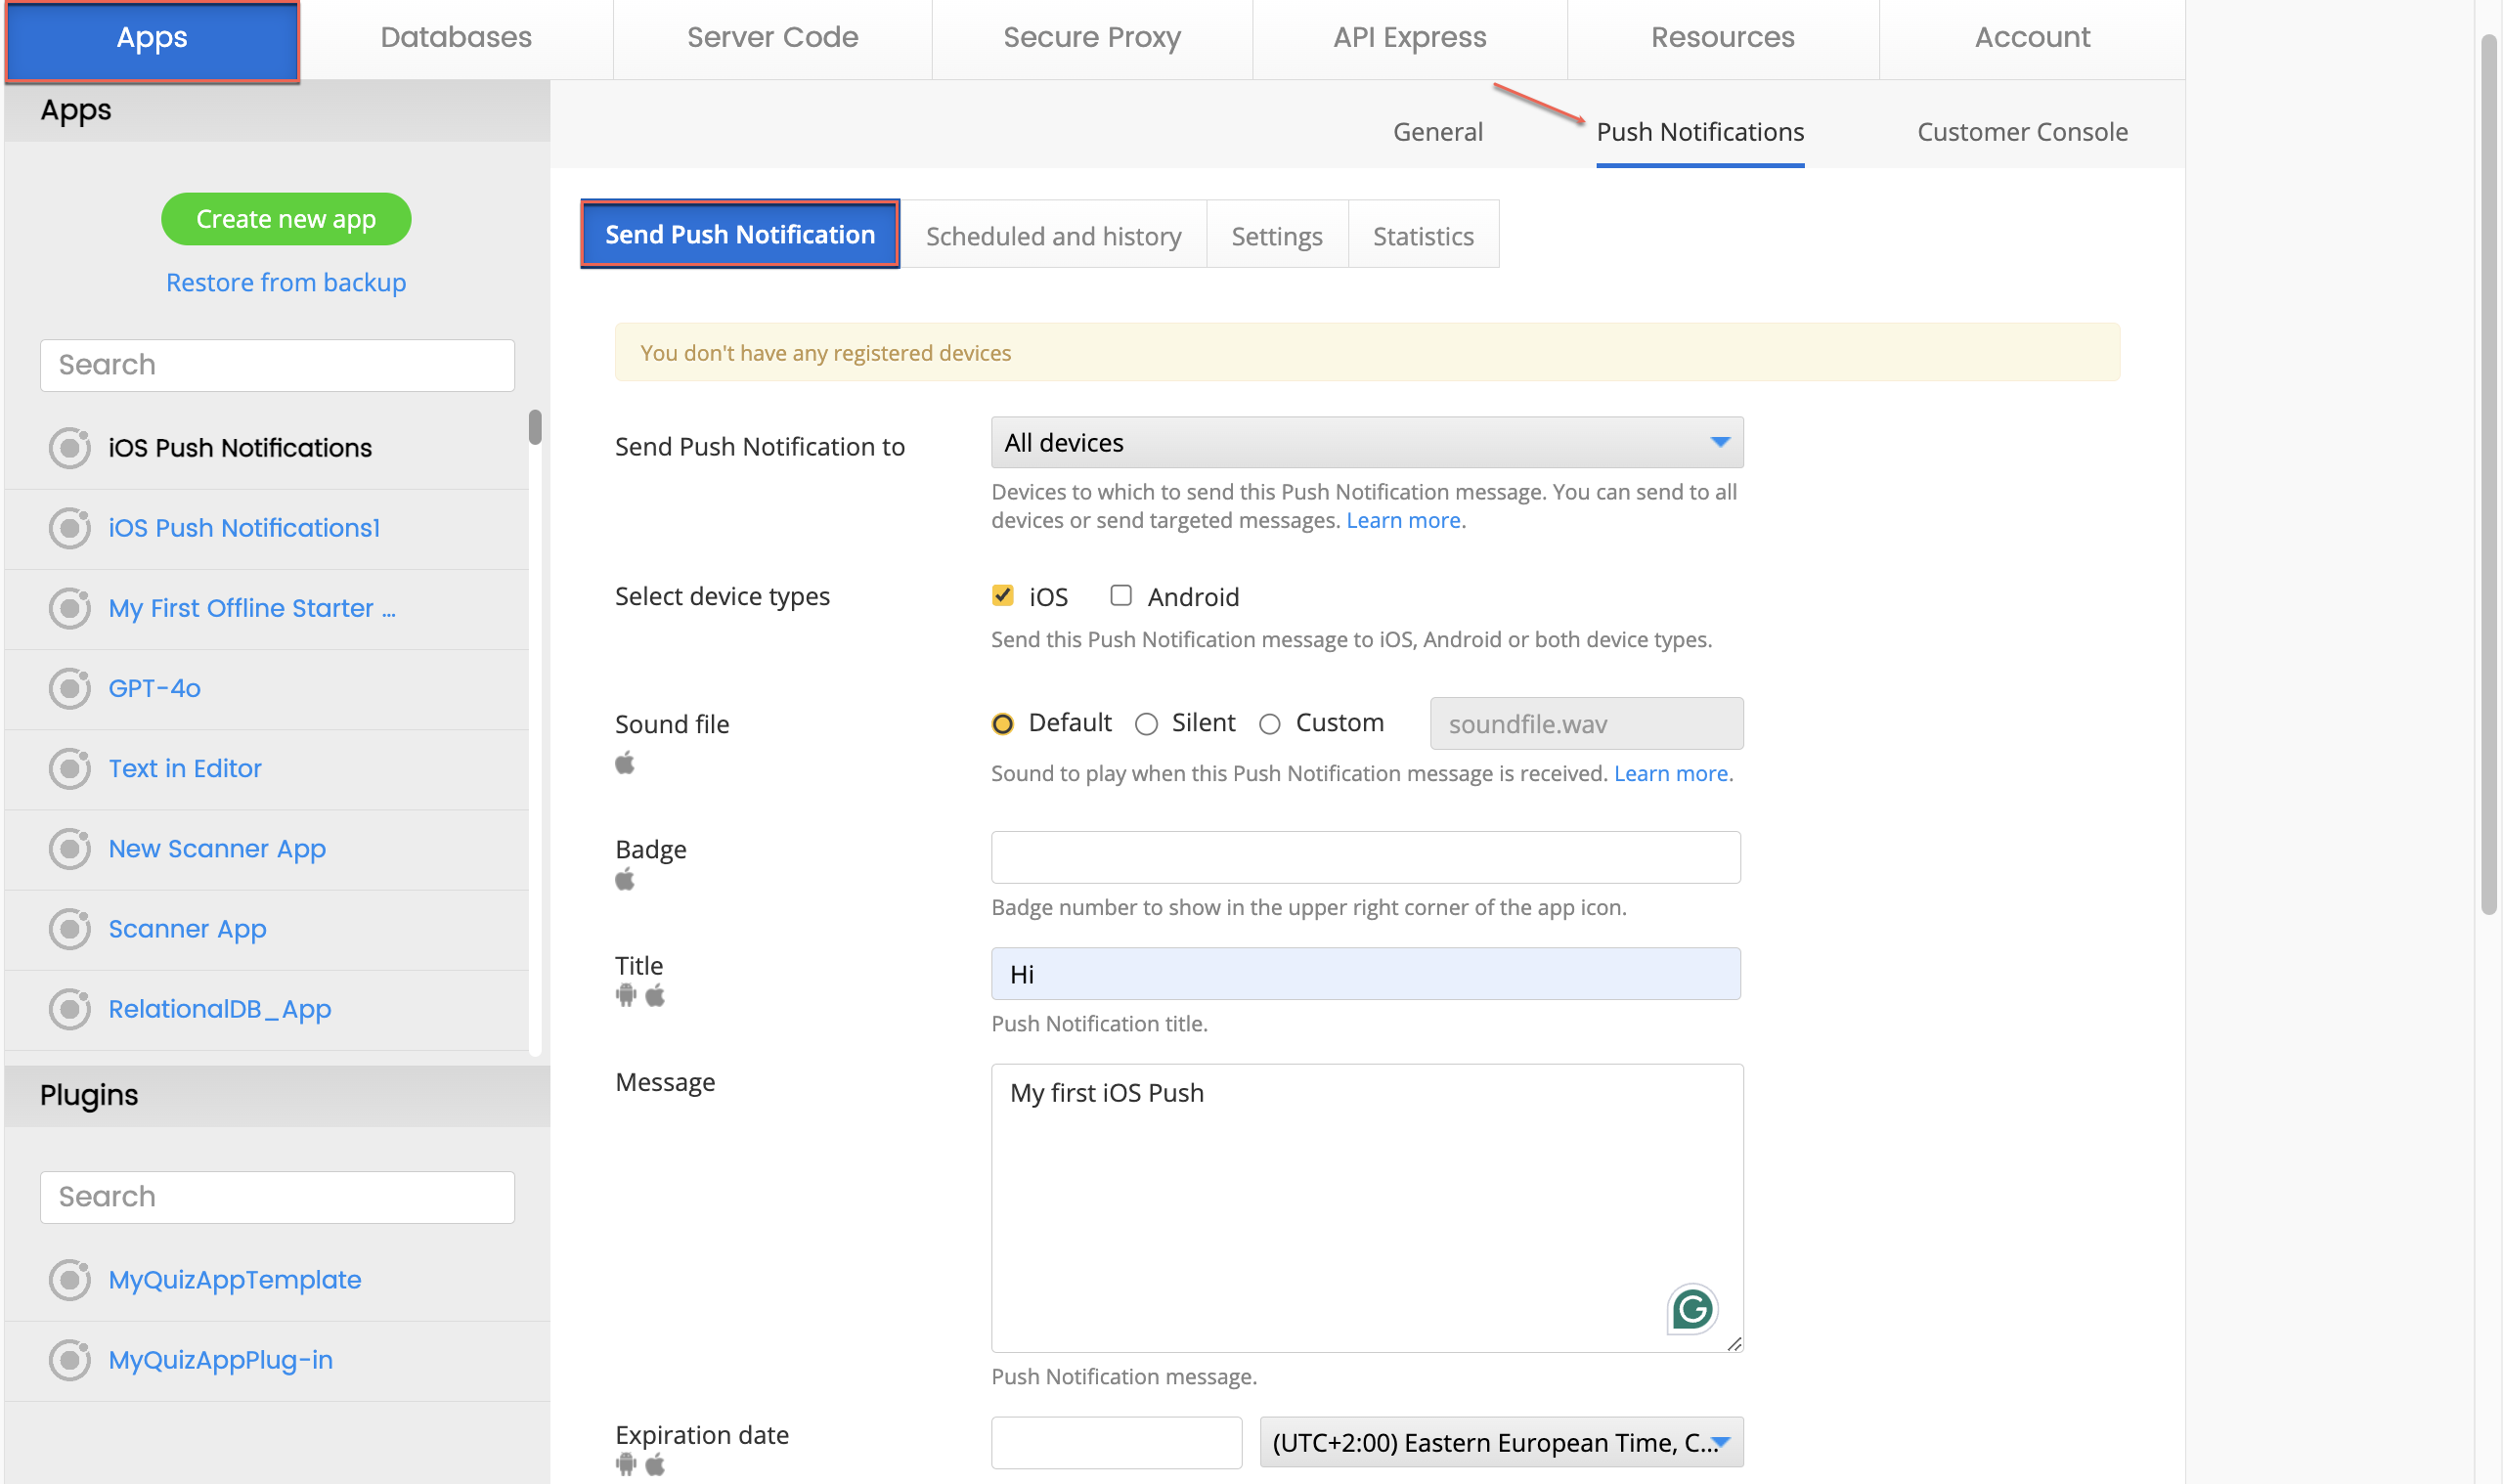
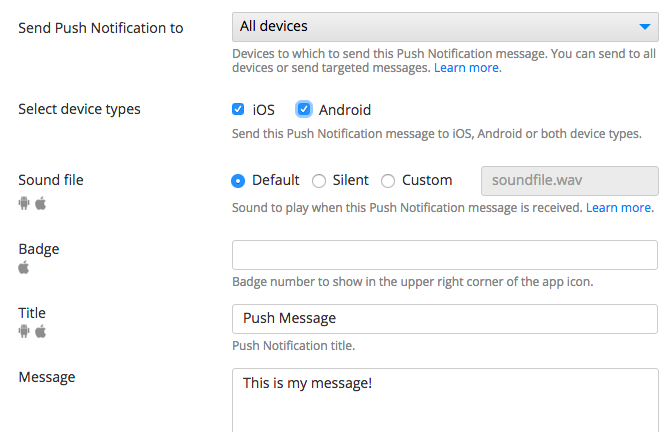
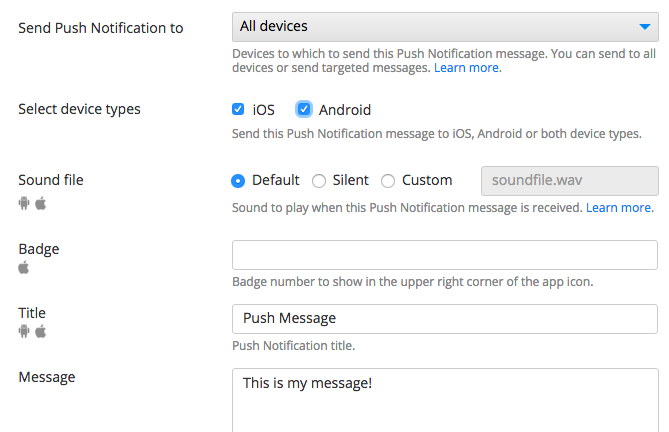
– Go to Push Notifications > Send Push Notifications tab, choose your device type (iOS), specify the title and message of the push notification and click Send.

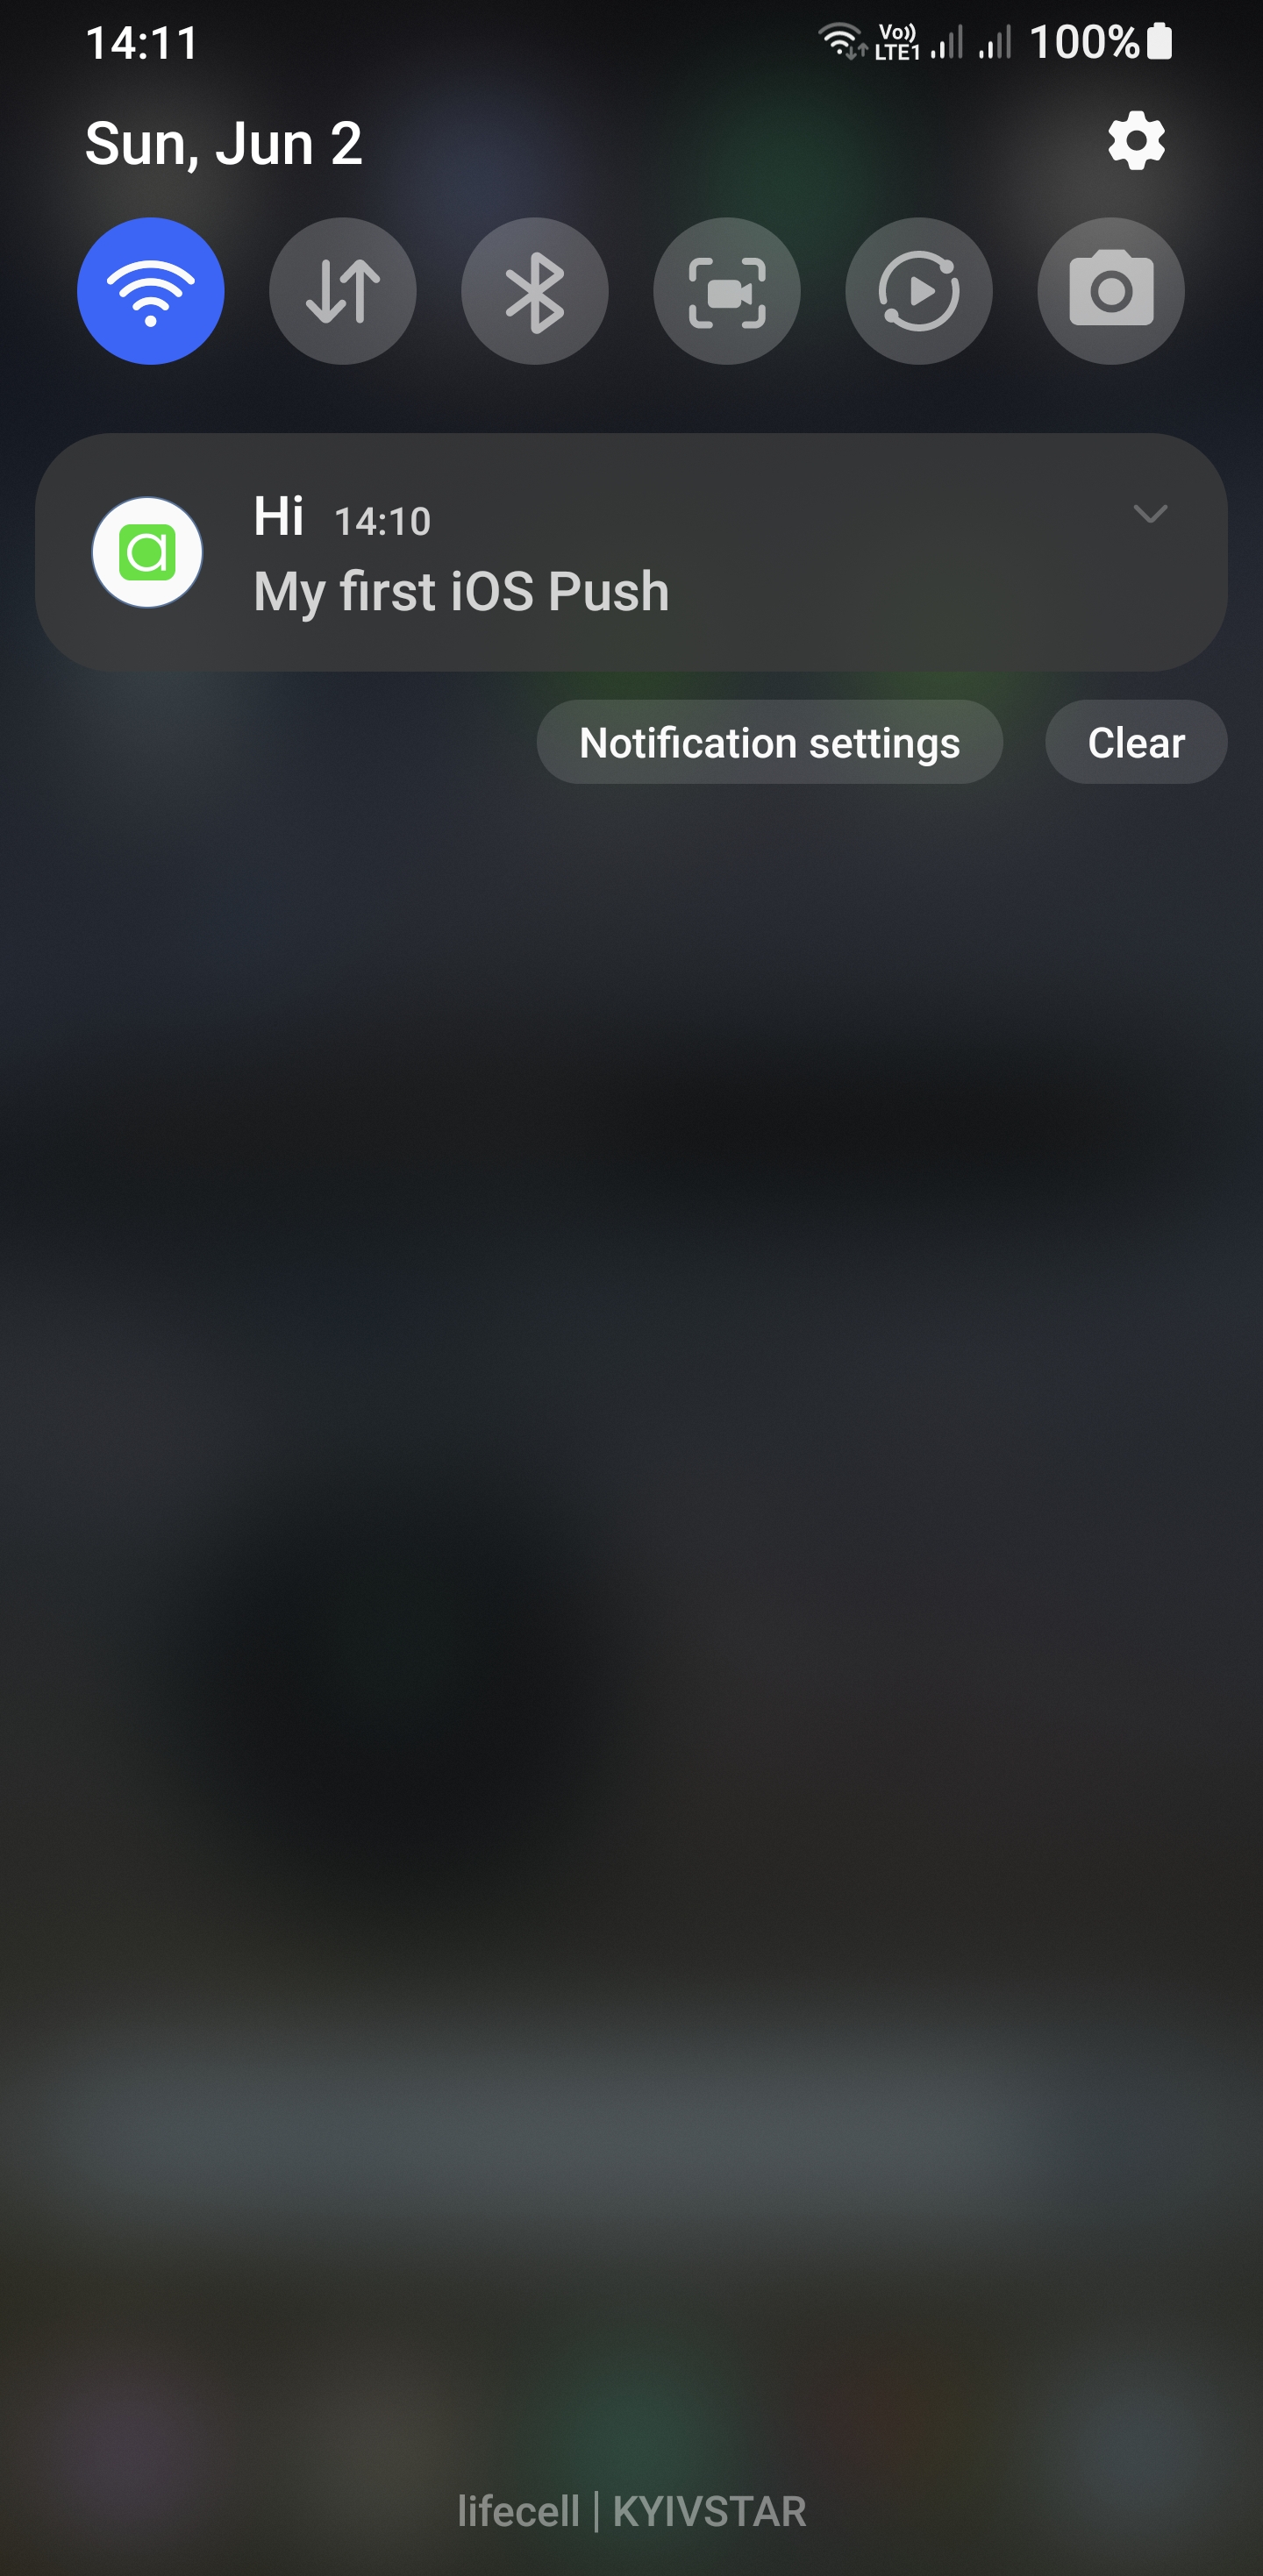
– Confirm it appears on your iOS device.

Conclusion

By following the above steps, you can effortlessly integrate Push Notifications for iOS into your app using Appery.io. This low-code platform simplifies app development, allowing you to focus more on great user experiences and less on coding complexities.

Ready to enhance your mobile app with push notifications? Start your journey with Appery.io today and keep your users engaged like never before!

Elevate Your Android App with Powerful Push Notifications via Appery.io

Hey there, fellow app developers! Want to keep your users engaged? Push notifications are the perfect way to grab their attention. Today, in our new video tutorial, we’ll guide you through setting up push notifications for Android apps using Appery.io. Let’s dive in!

Here’s a short plan of actions:

Step 1: Create a New Application

First, launch Appery.io and create a new application. Go to Project > App settings > Cordova plugins and enable the Push Notification plugin to get started.

Step 2: Configure Push Settings

Exit the editor and head to the Push Notifications Settings section. Toggle the Enable Push Notification option. Then, we need to specify a database to store device identifiers.

Step 3: Set Up a Database

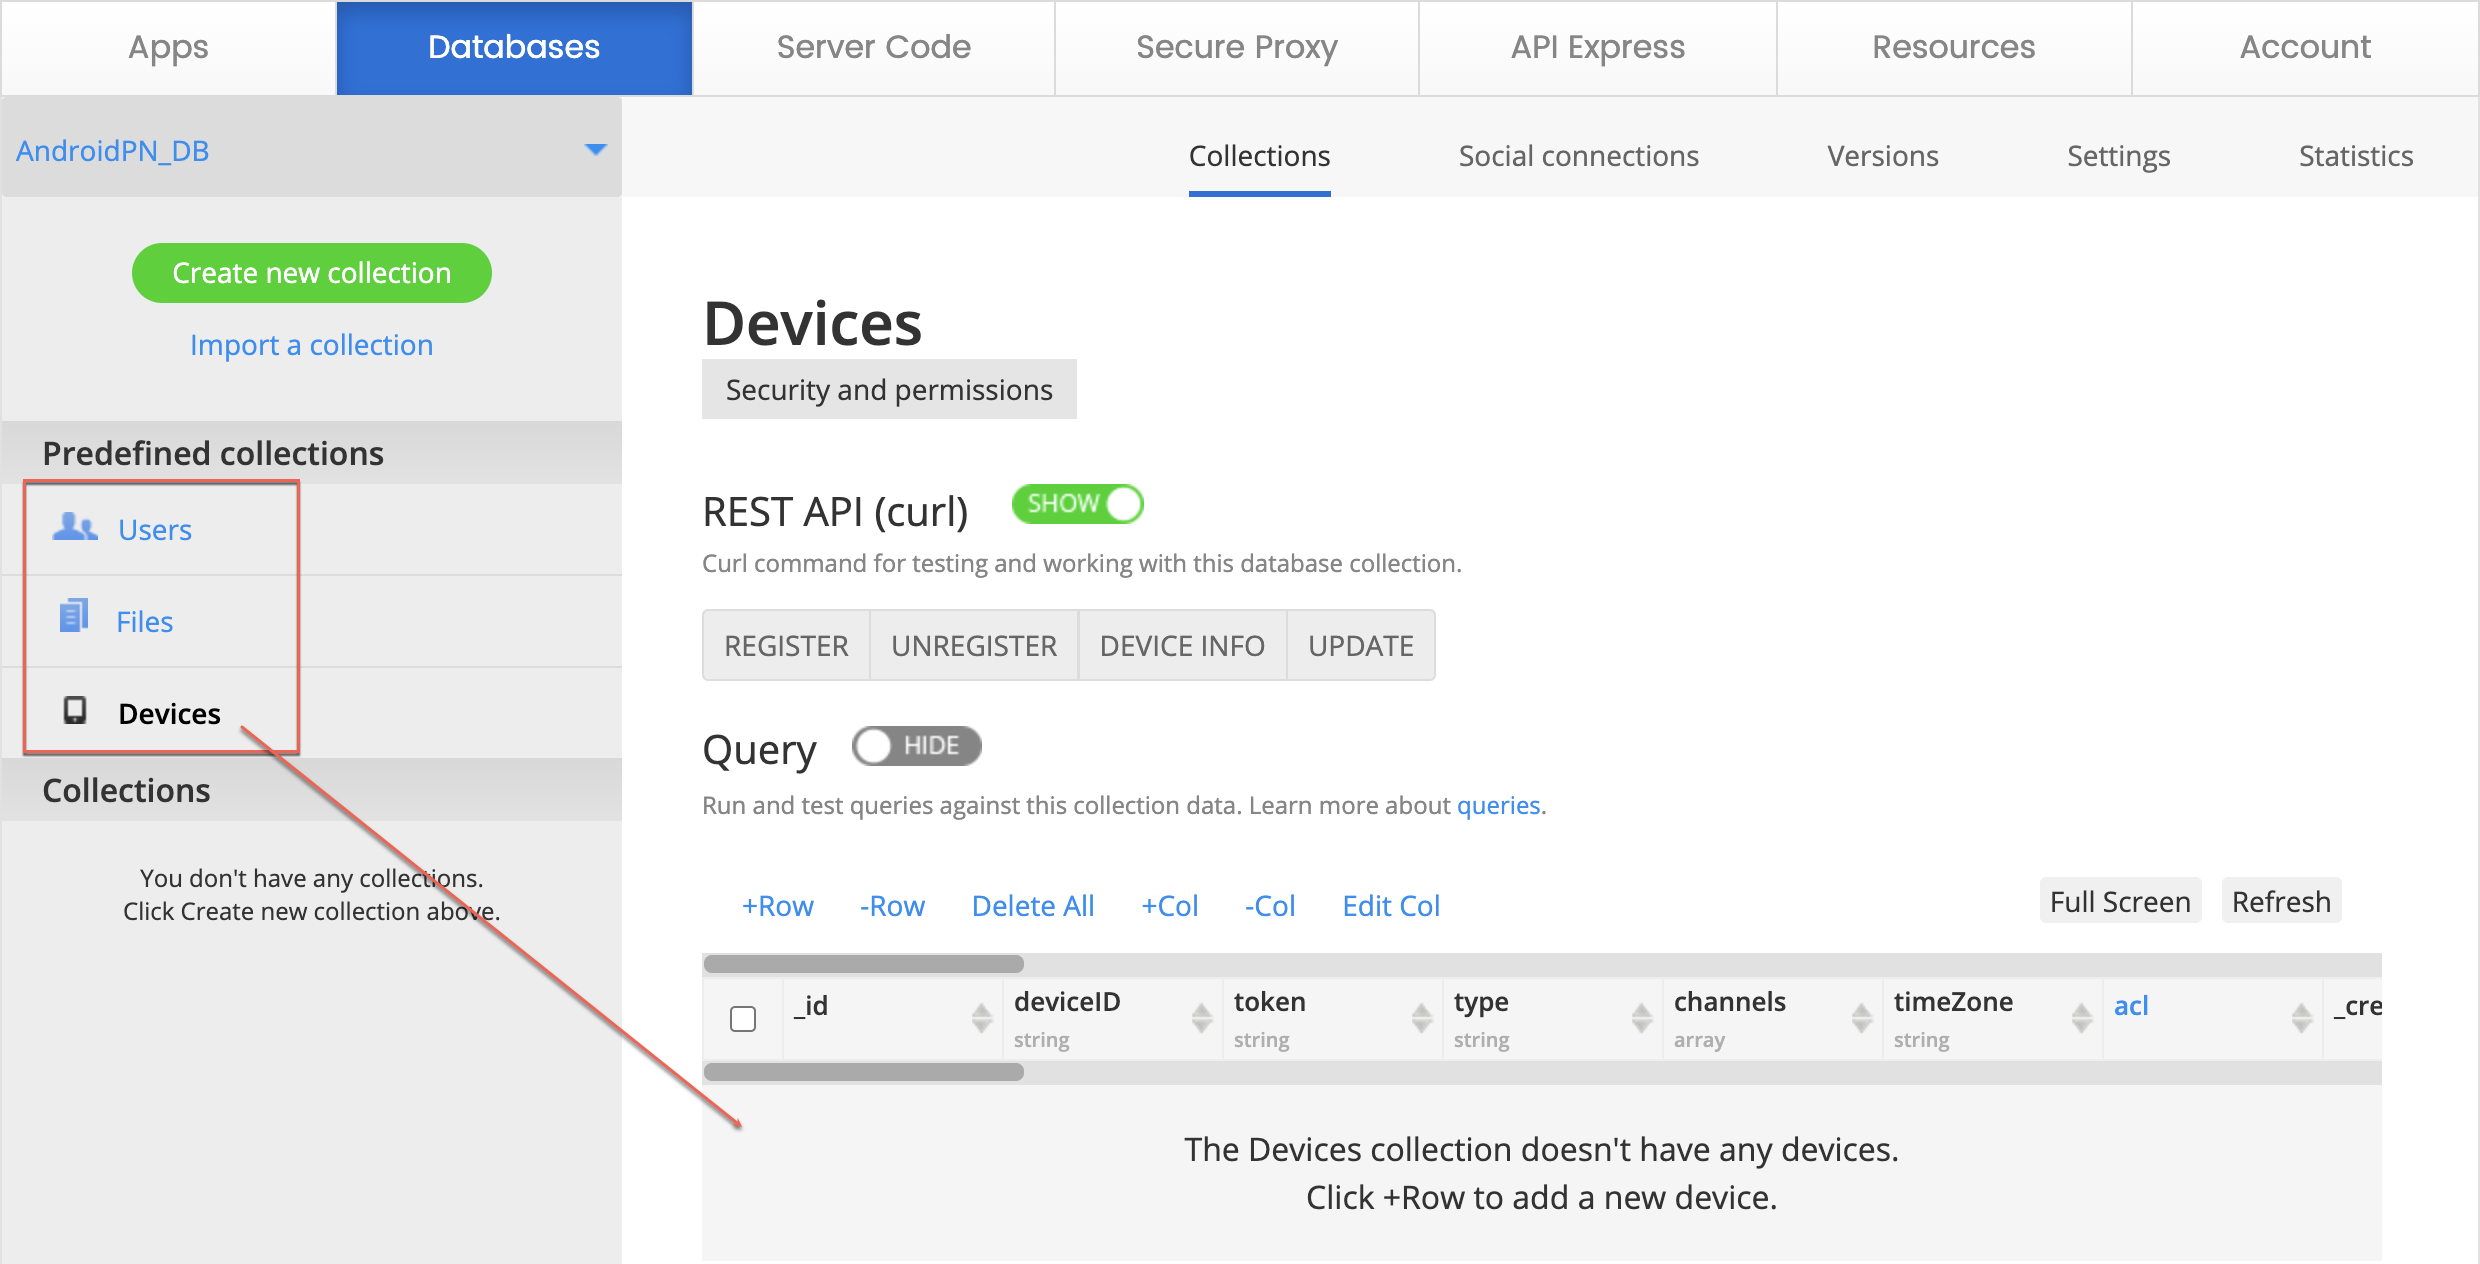
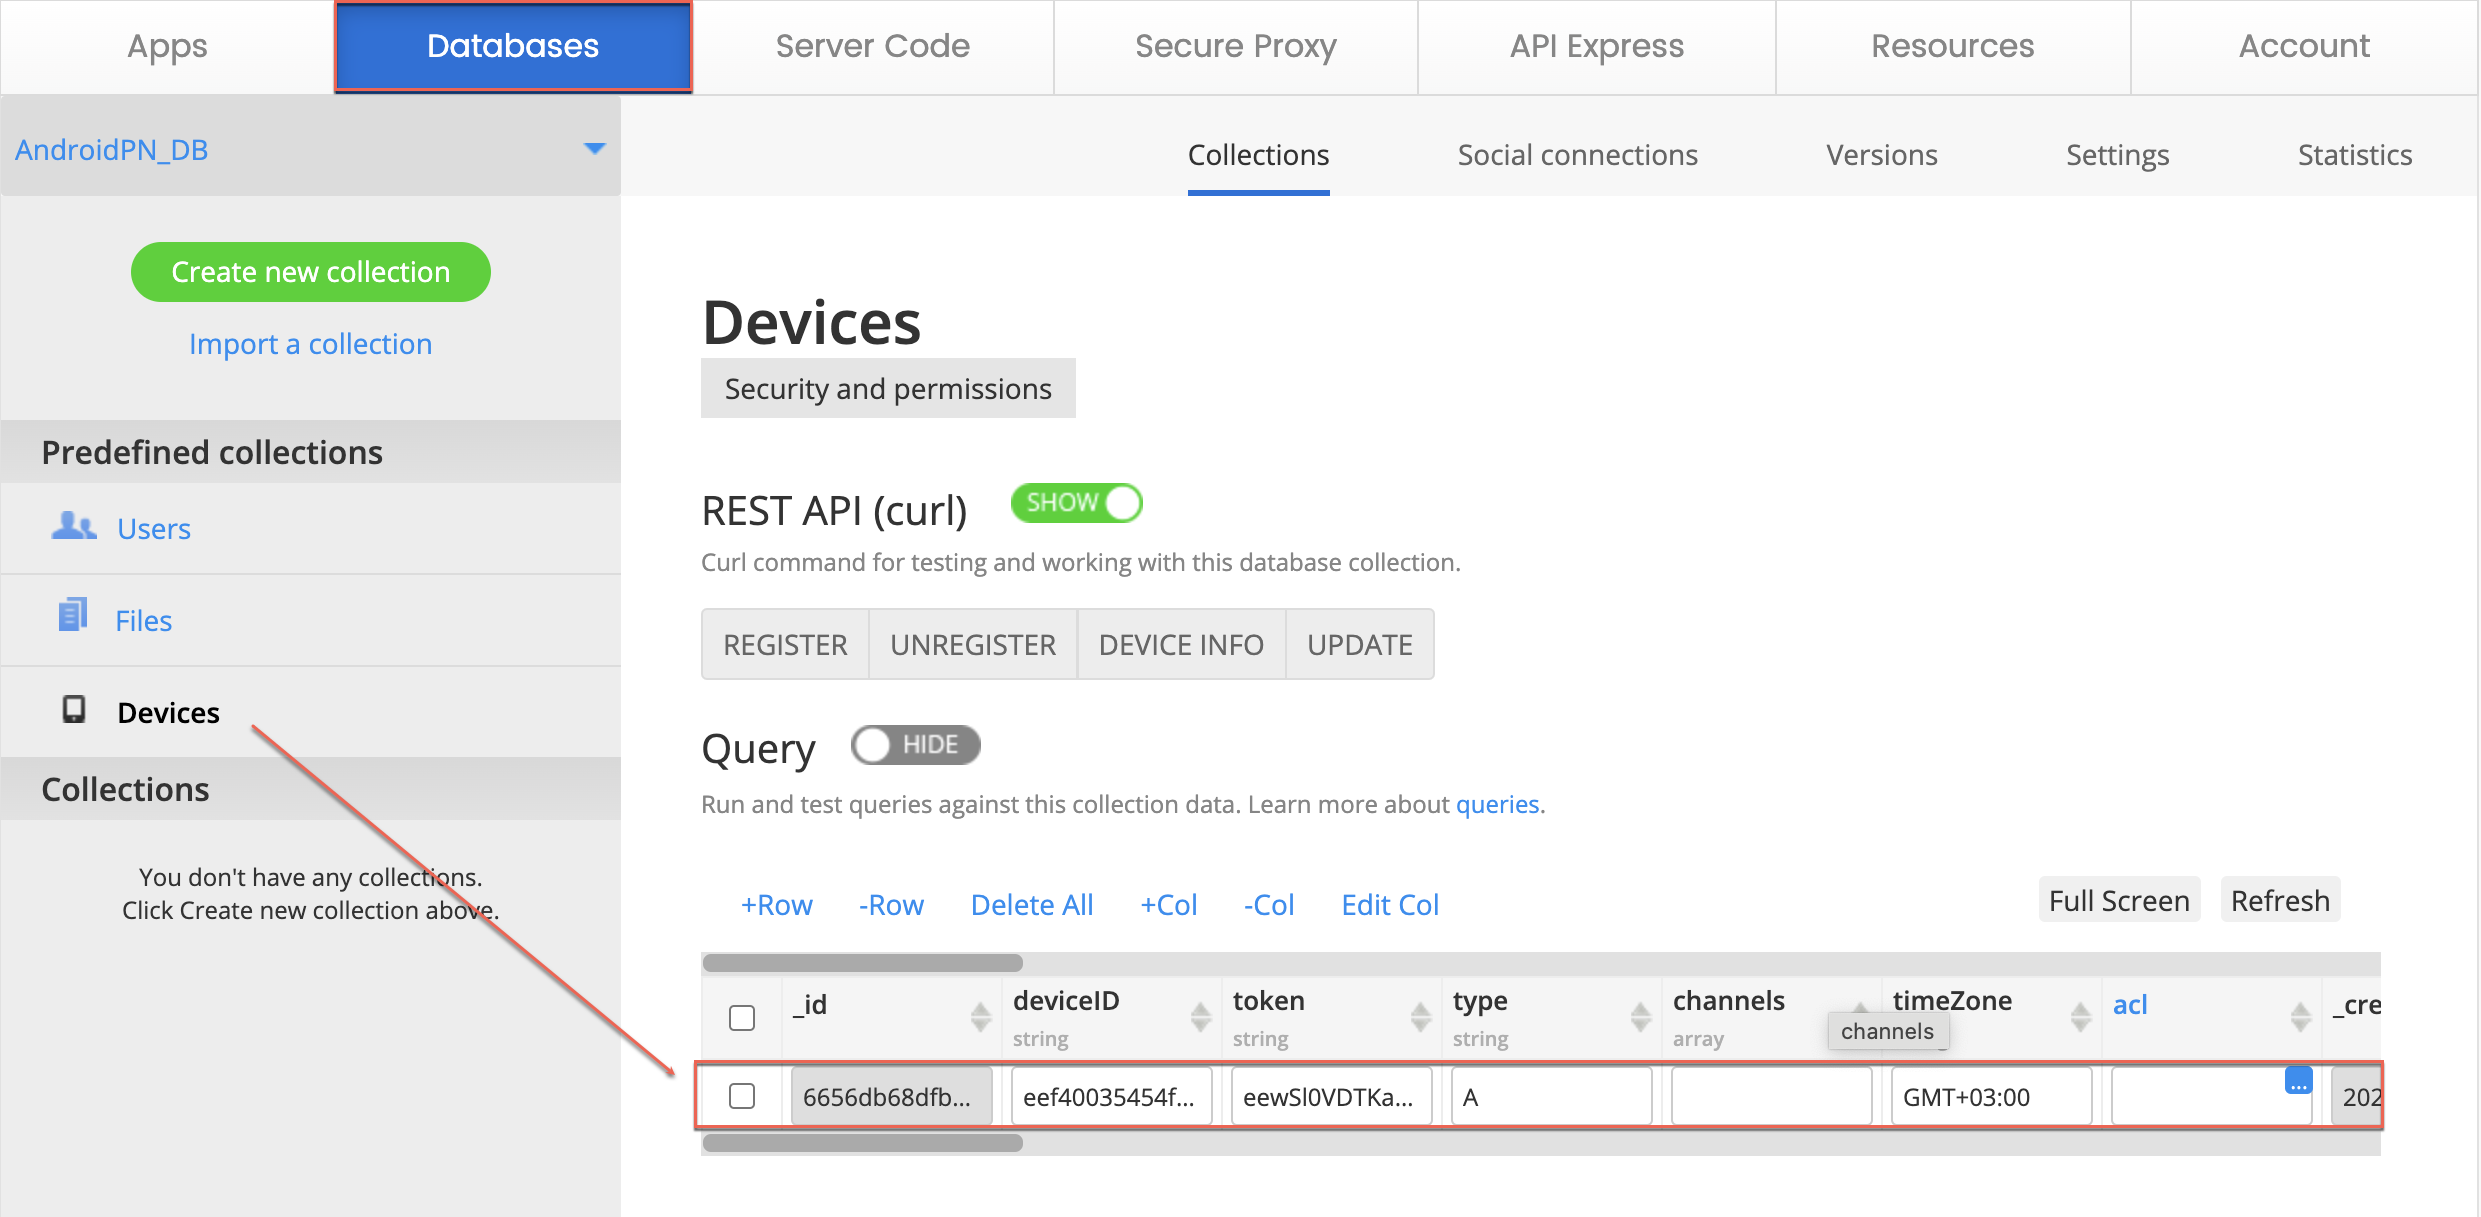
Navigate to the Databases tab and create a new database. By default, Appery.io provides the predefined Devices collection for storing device IDs and tokens.

Step 4: Link Firebase to Your App

Push notifications on Android require Firebase. You need to get two files:

1.  google-services.json

2. Firebase Admin SDK JSON

So, head to the Firebase console to create a Firebase account if you don’t already have one. Set up a new project and register your Android app. Grab the package name from the Android Settings in Appery.io and enter it into Firebase.

Step 5: Download and Upload Files

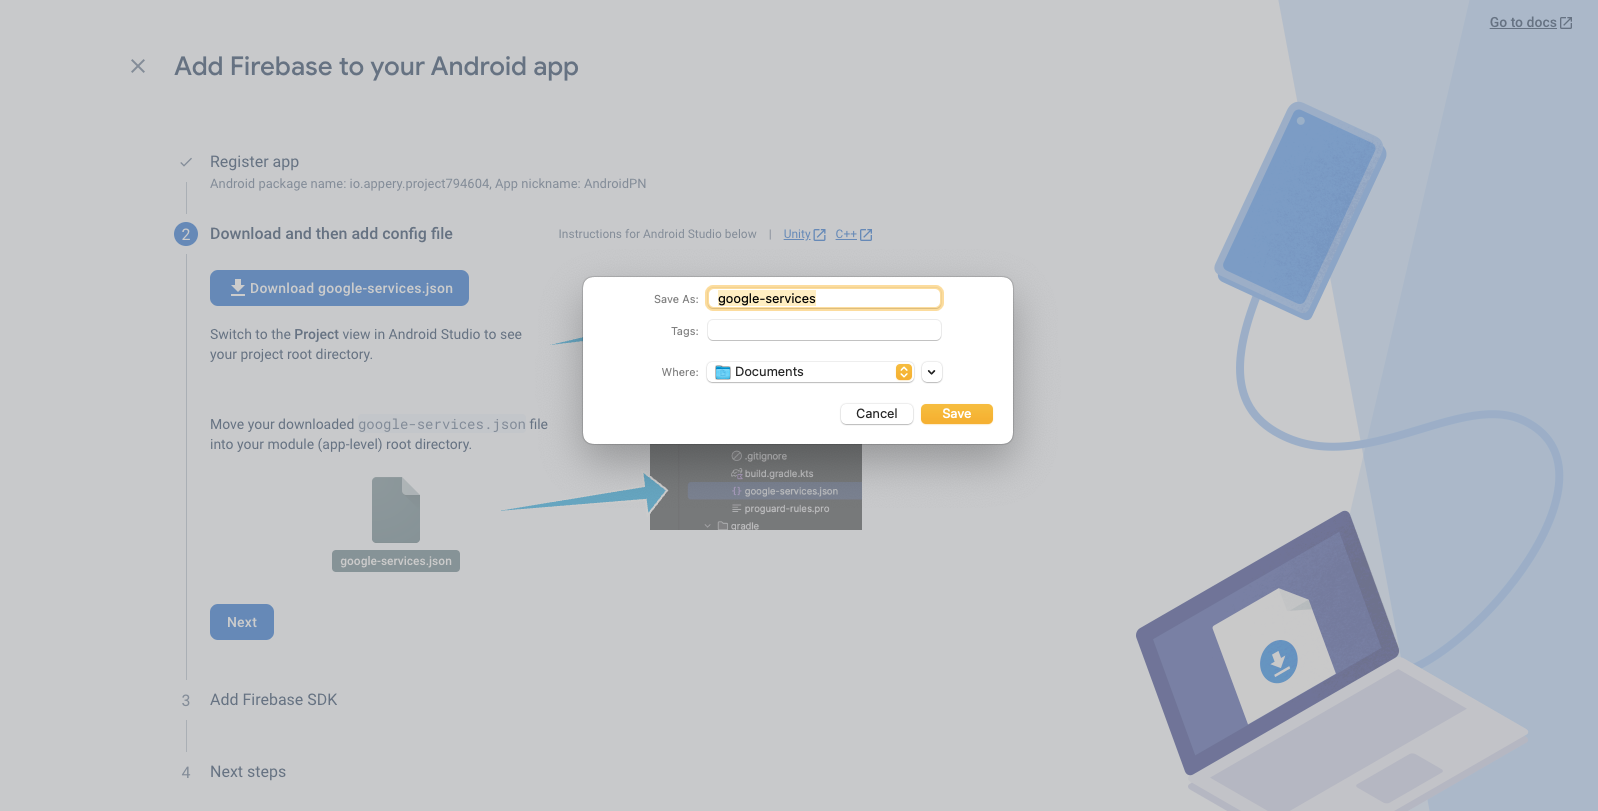
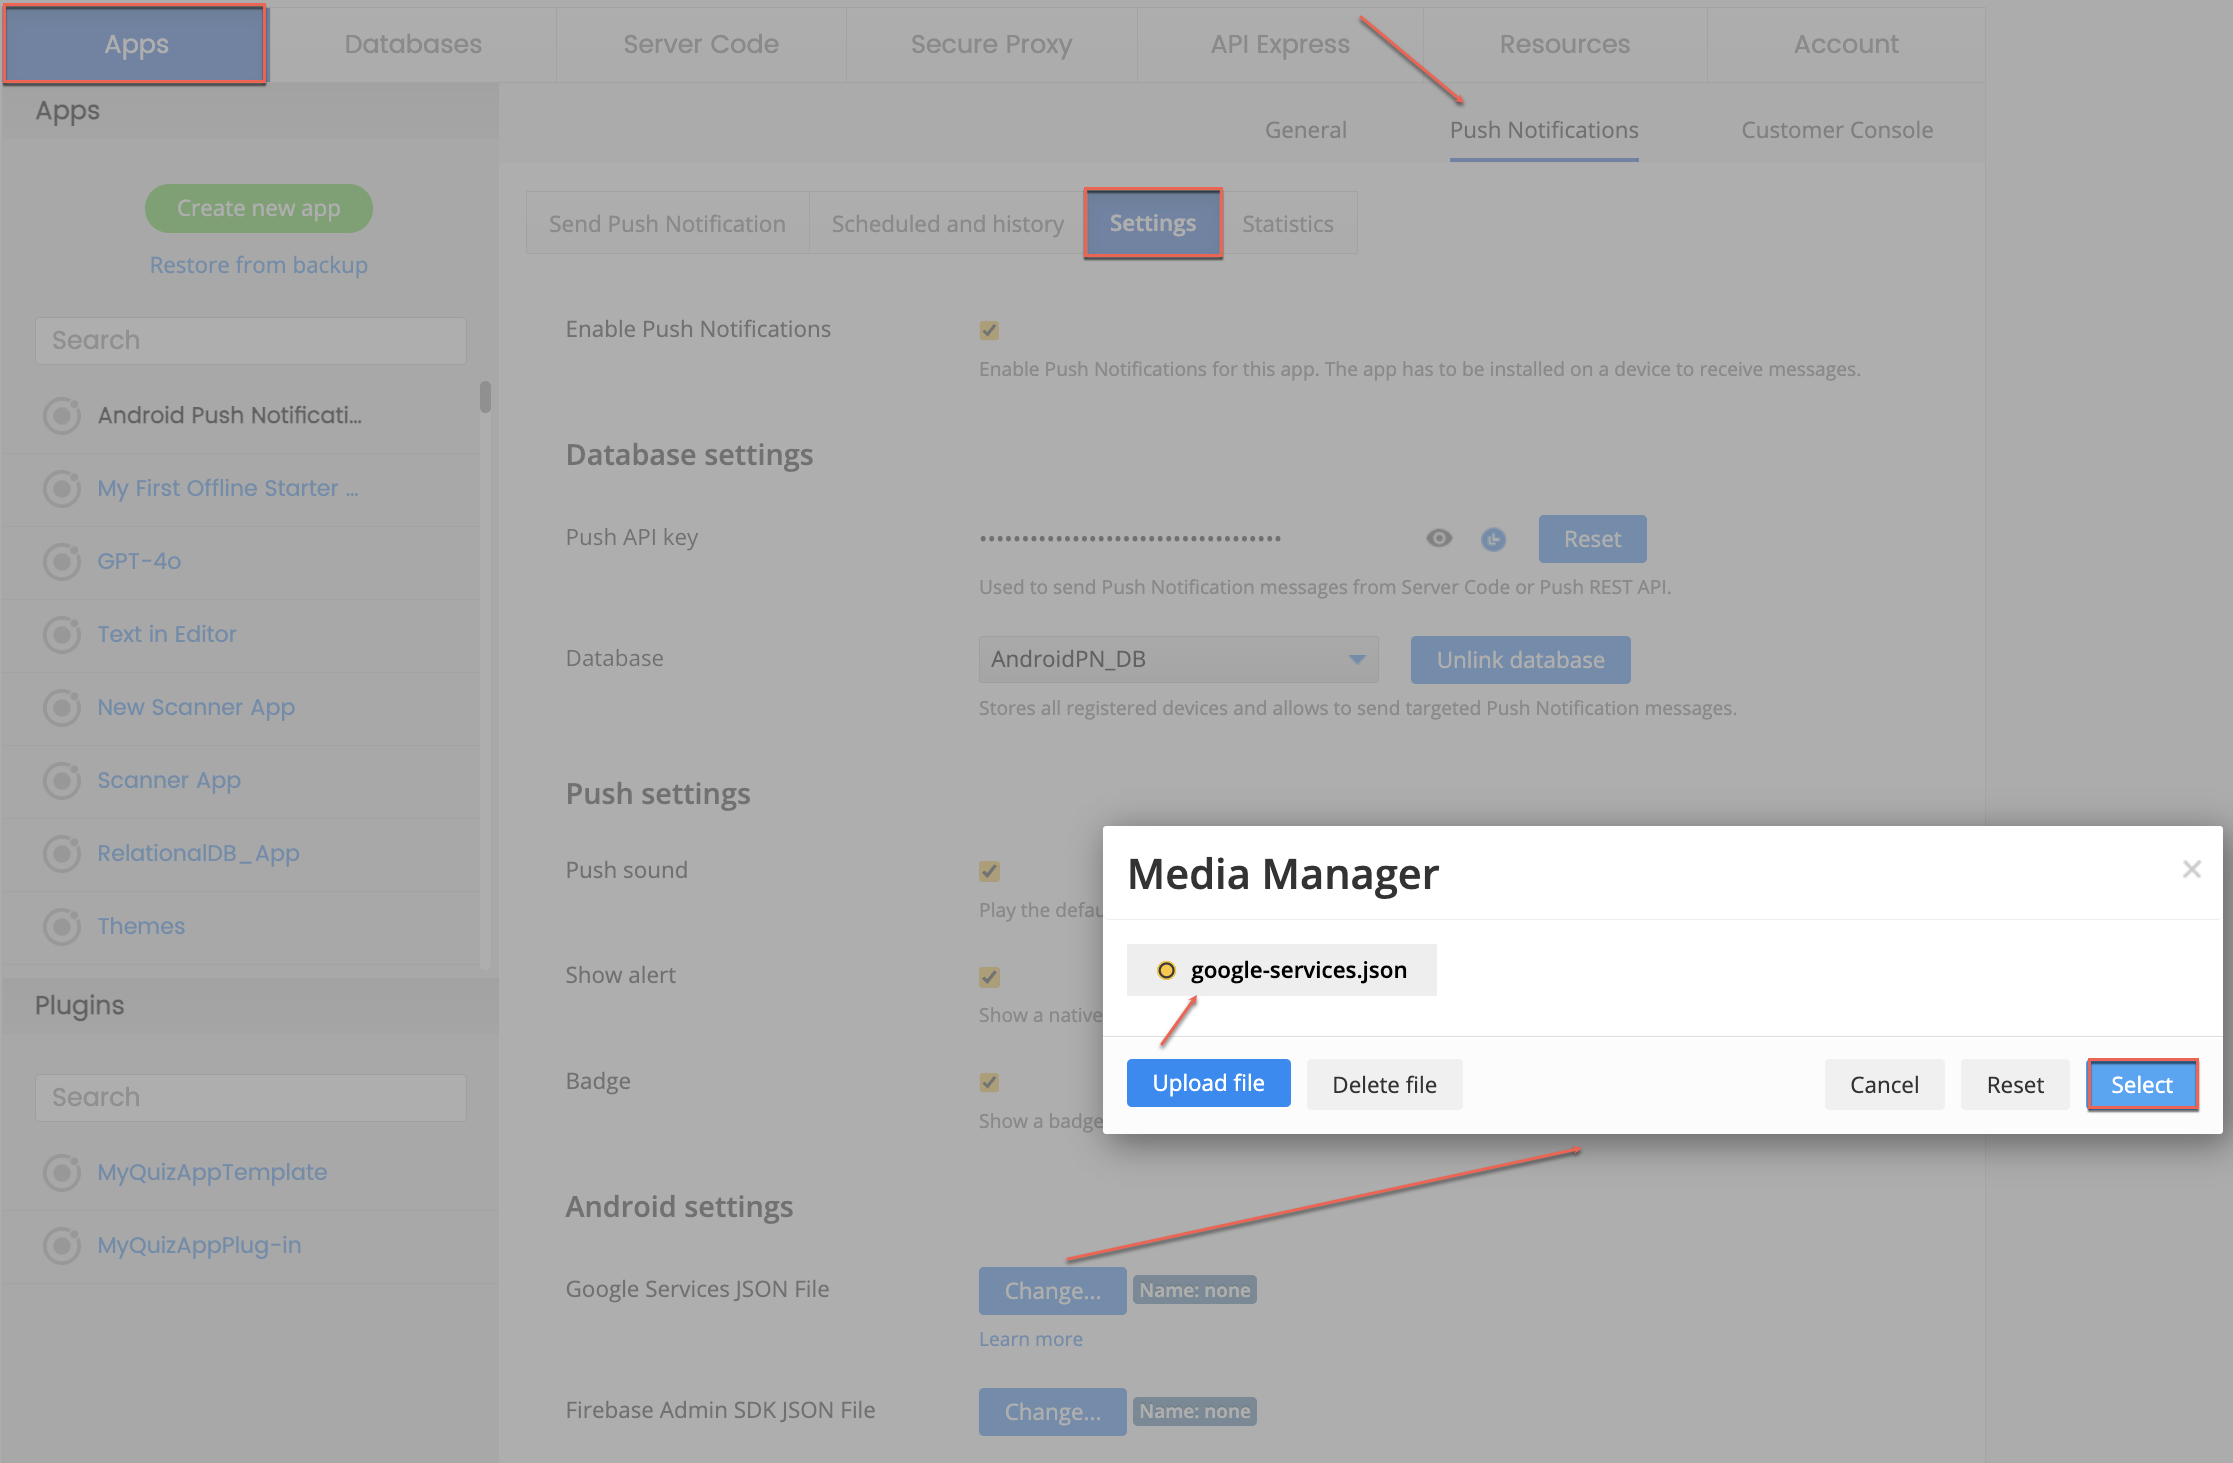
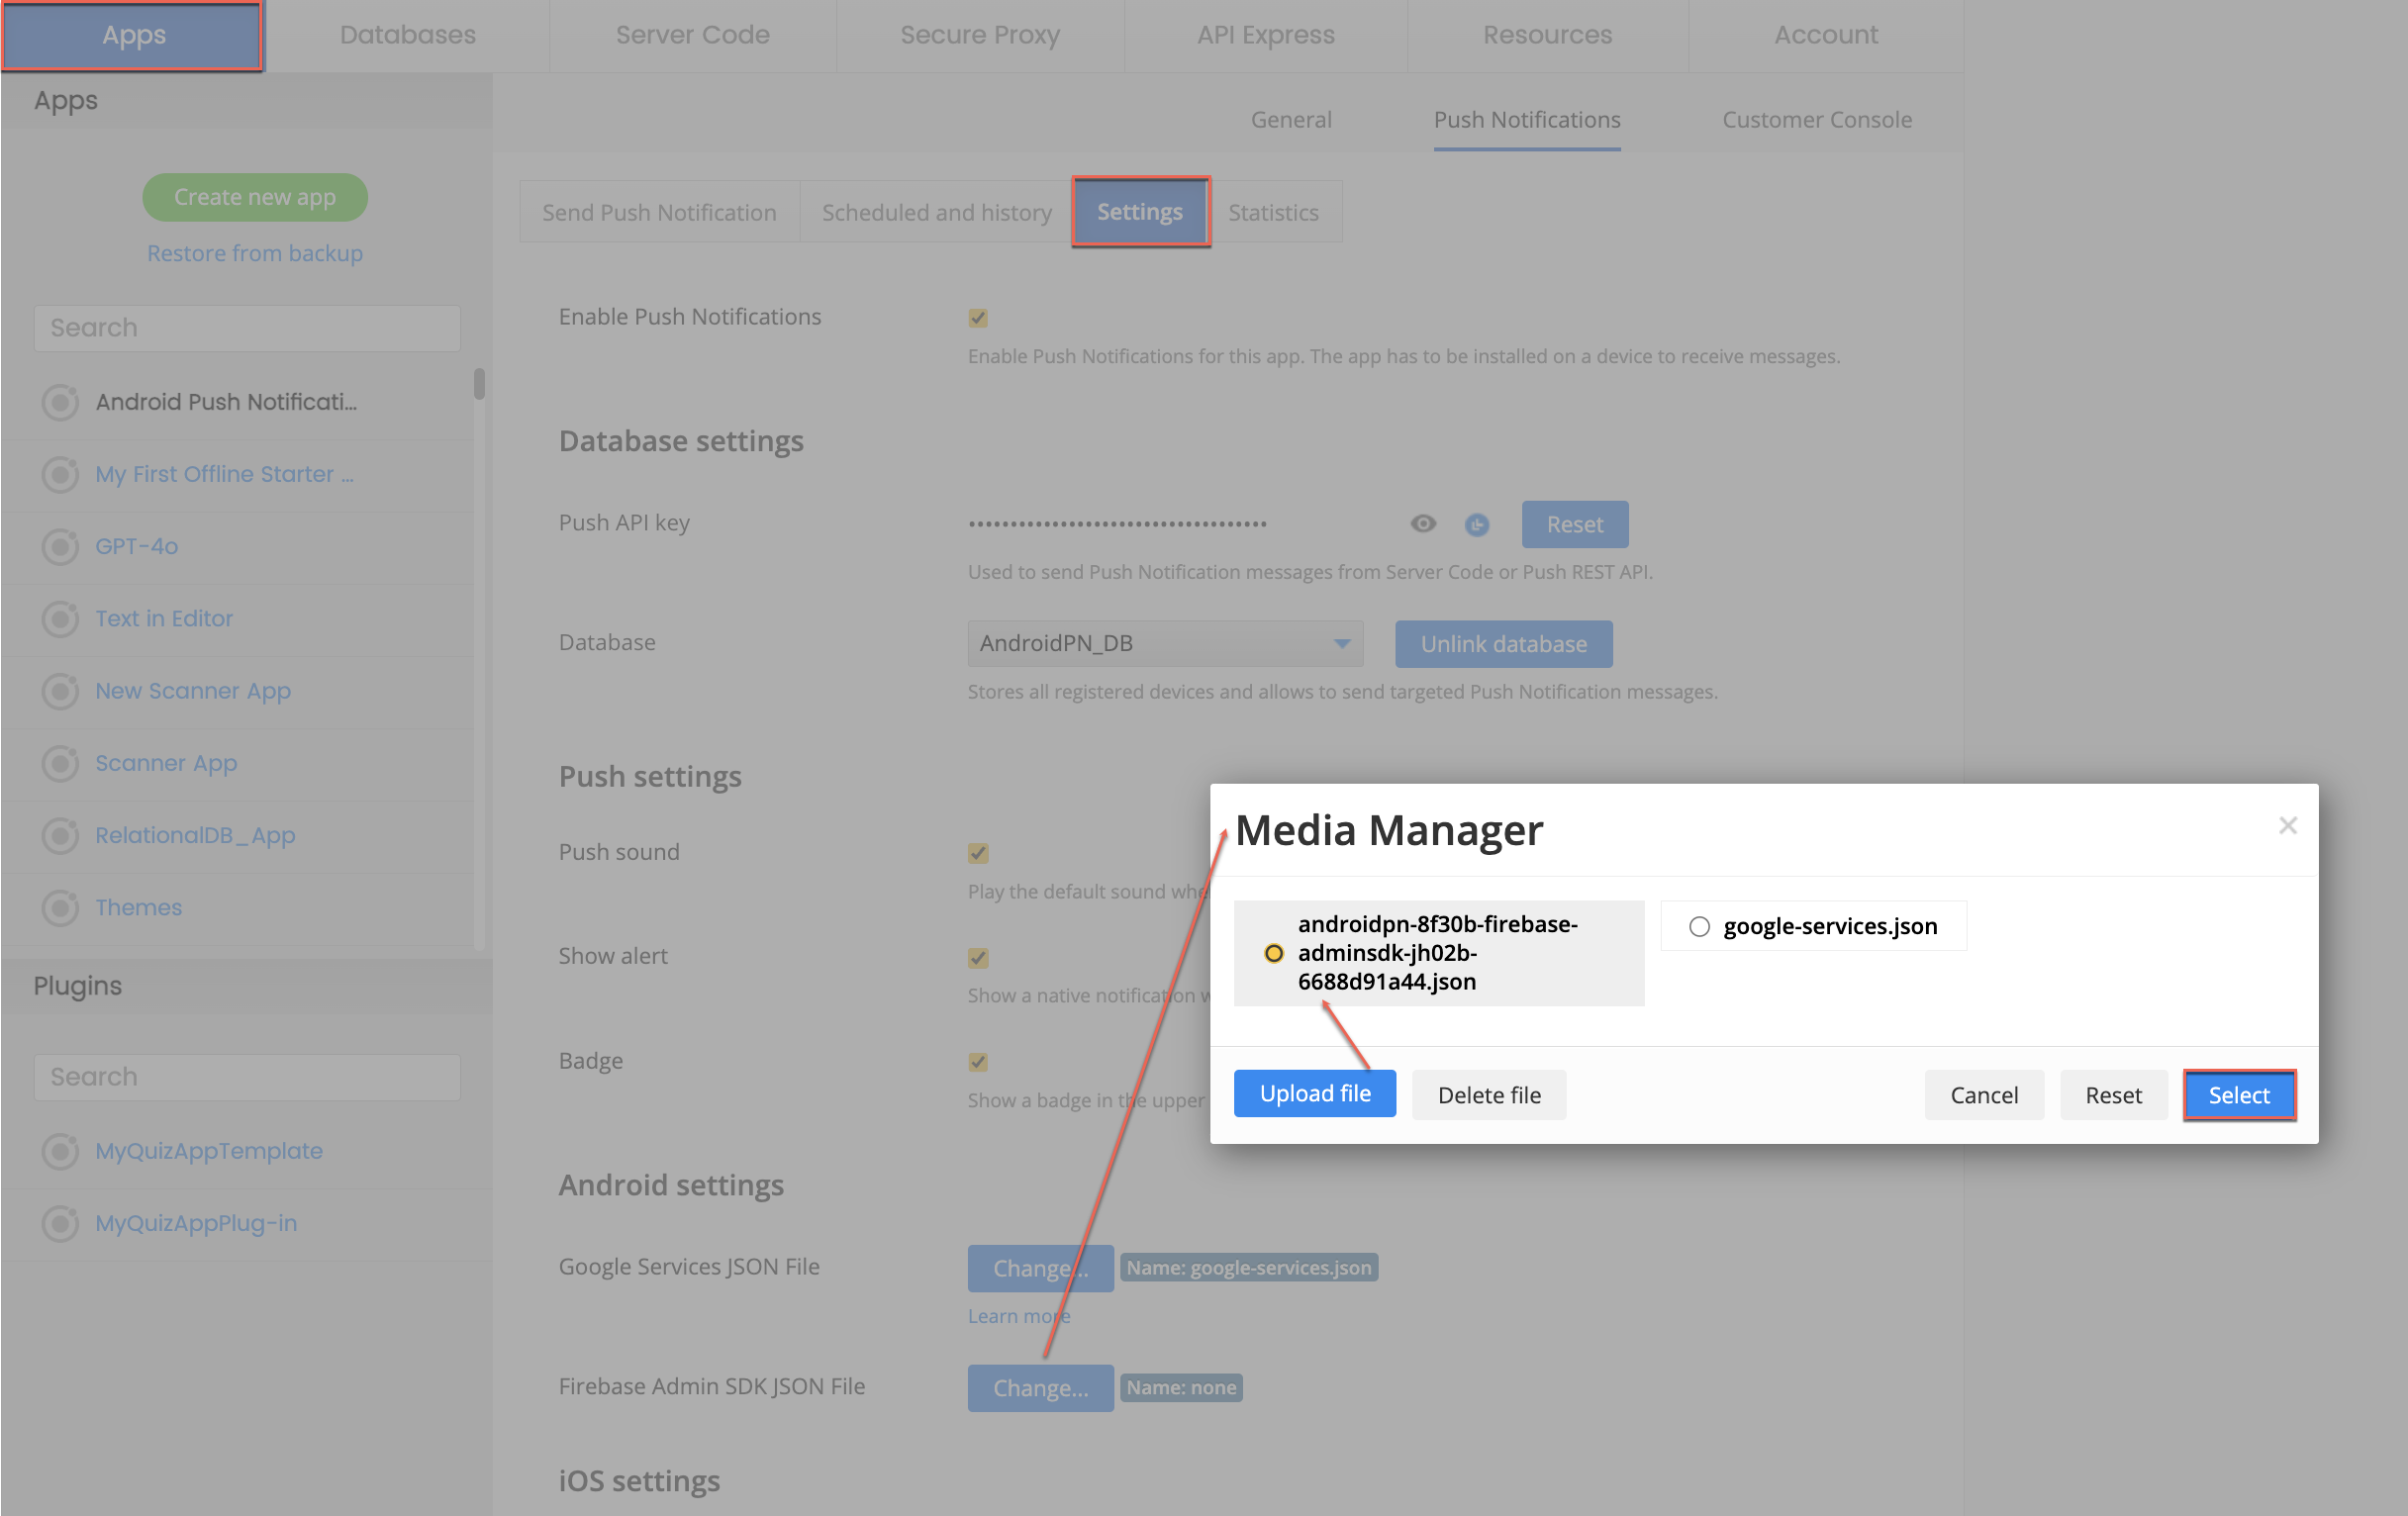
Download the `google-services.json` file from Firebase:

And upload it to your Push Notification Settings in Appery.io:

Then, click Next and follow the steps in Firebase to get the Admin SDK file and upload it to Appery.io.

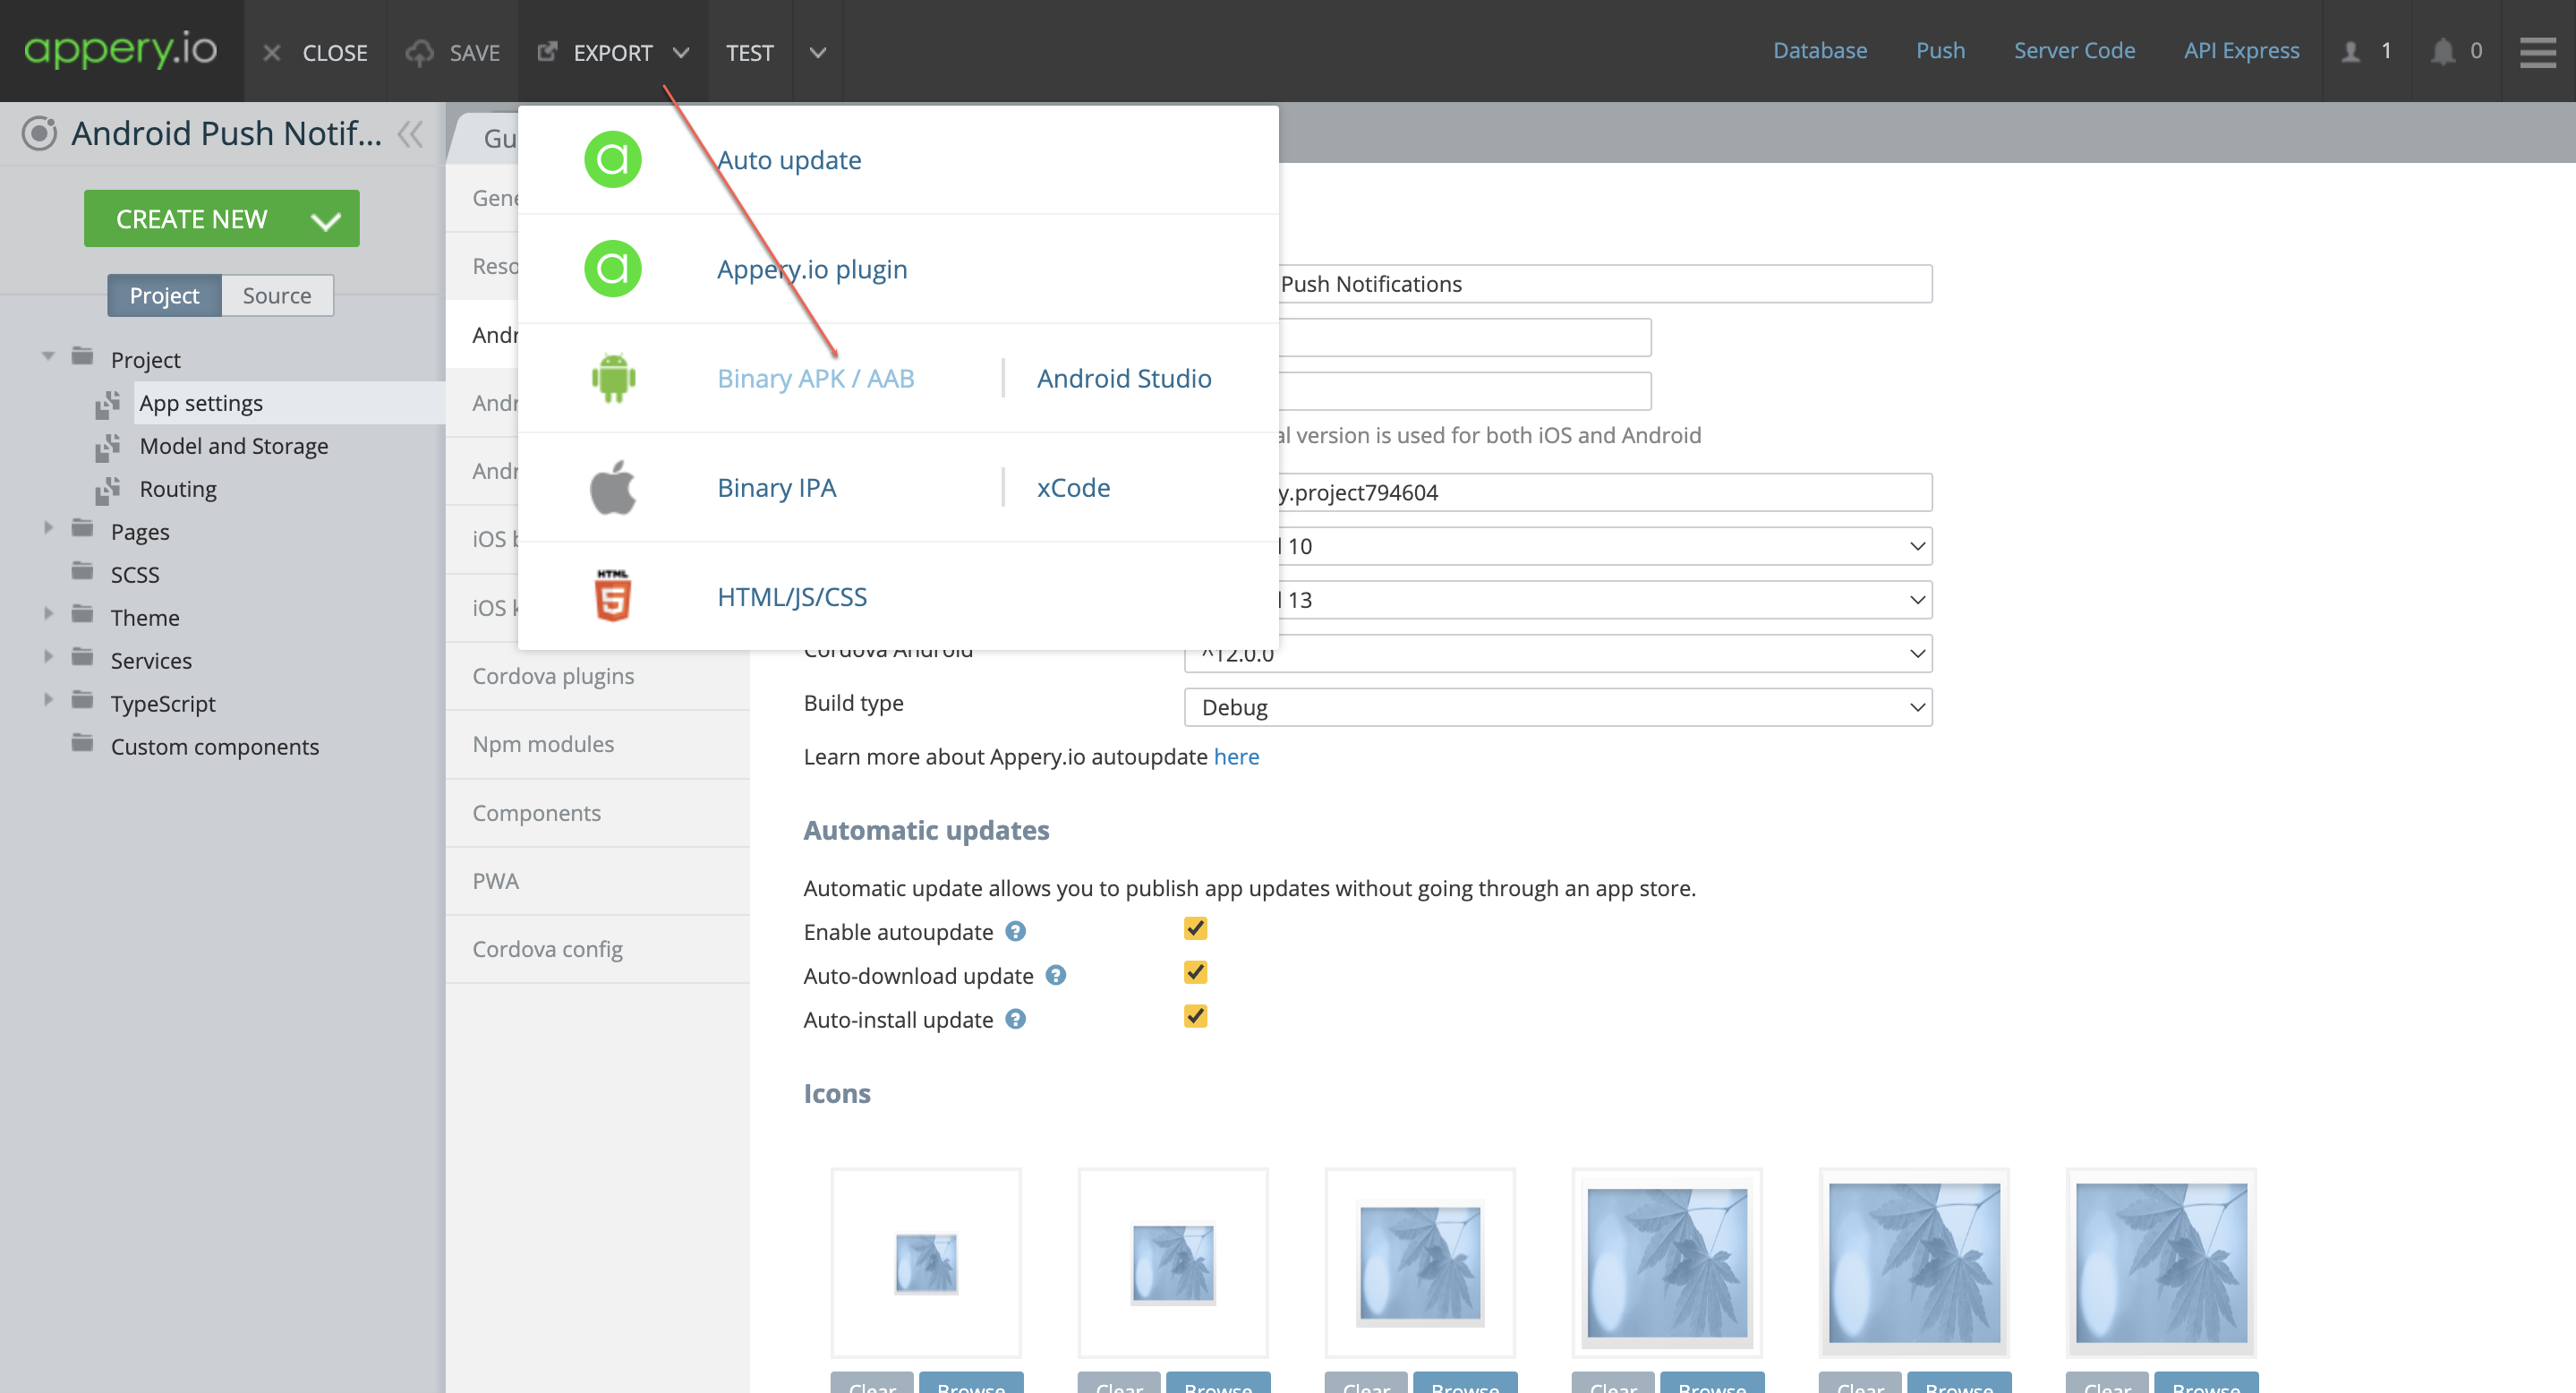
Step 6: Generate Your APK

With everything configured, generate your binary APK file:

Step 7: Test Your Application

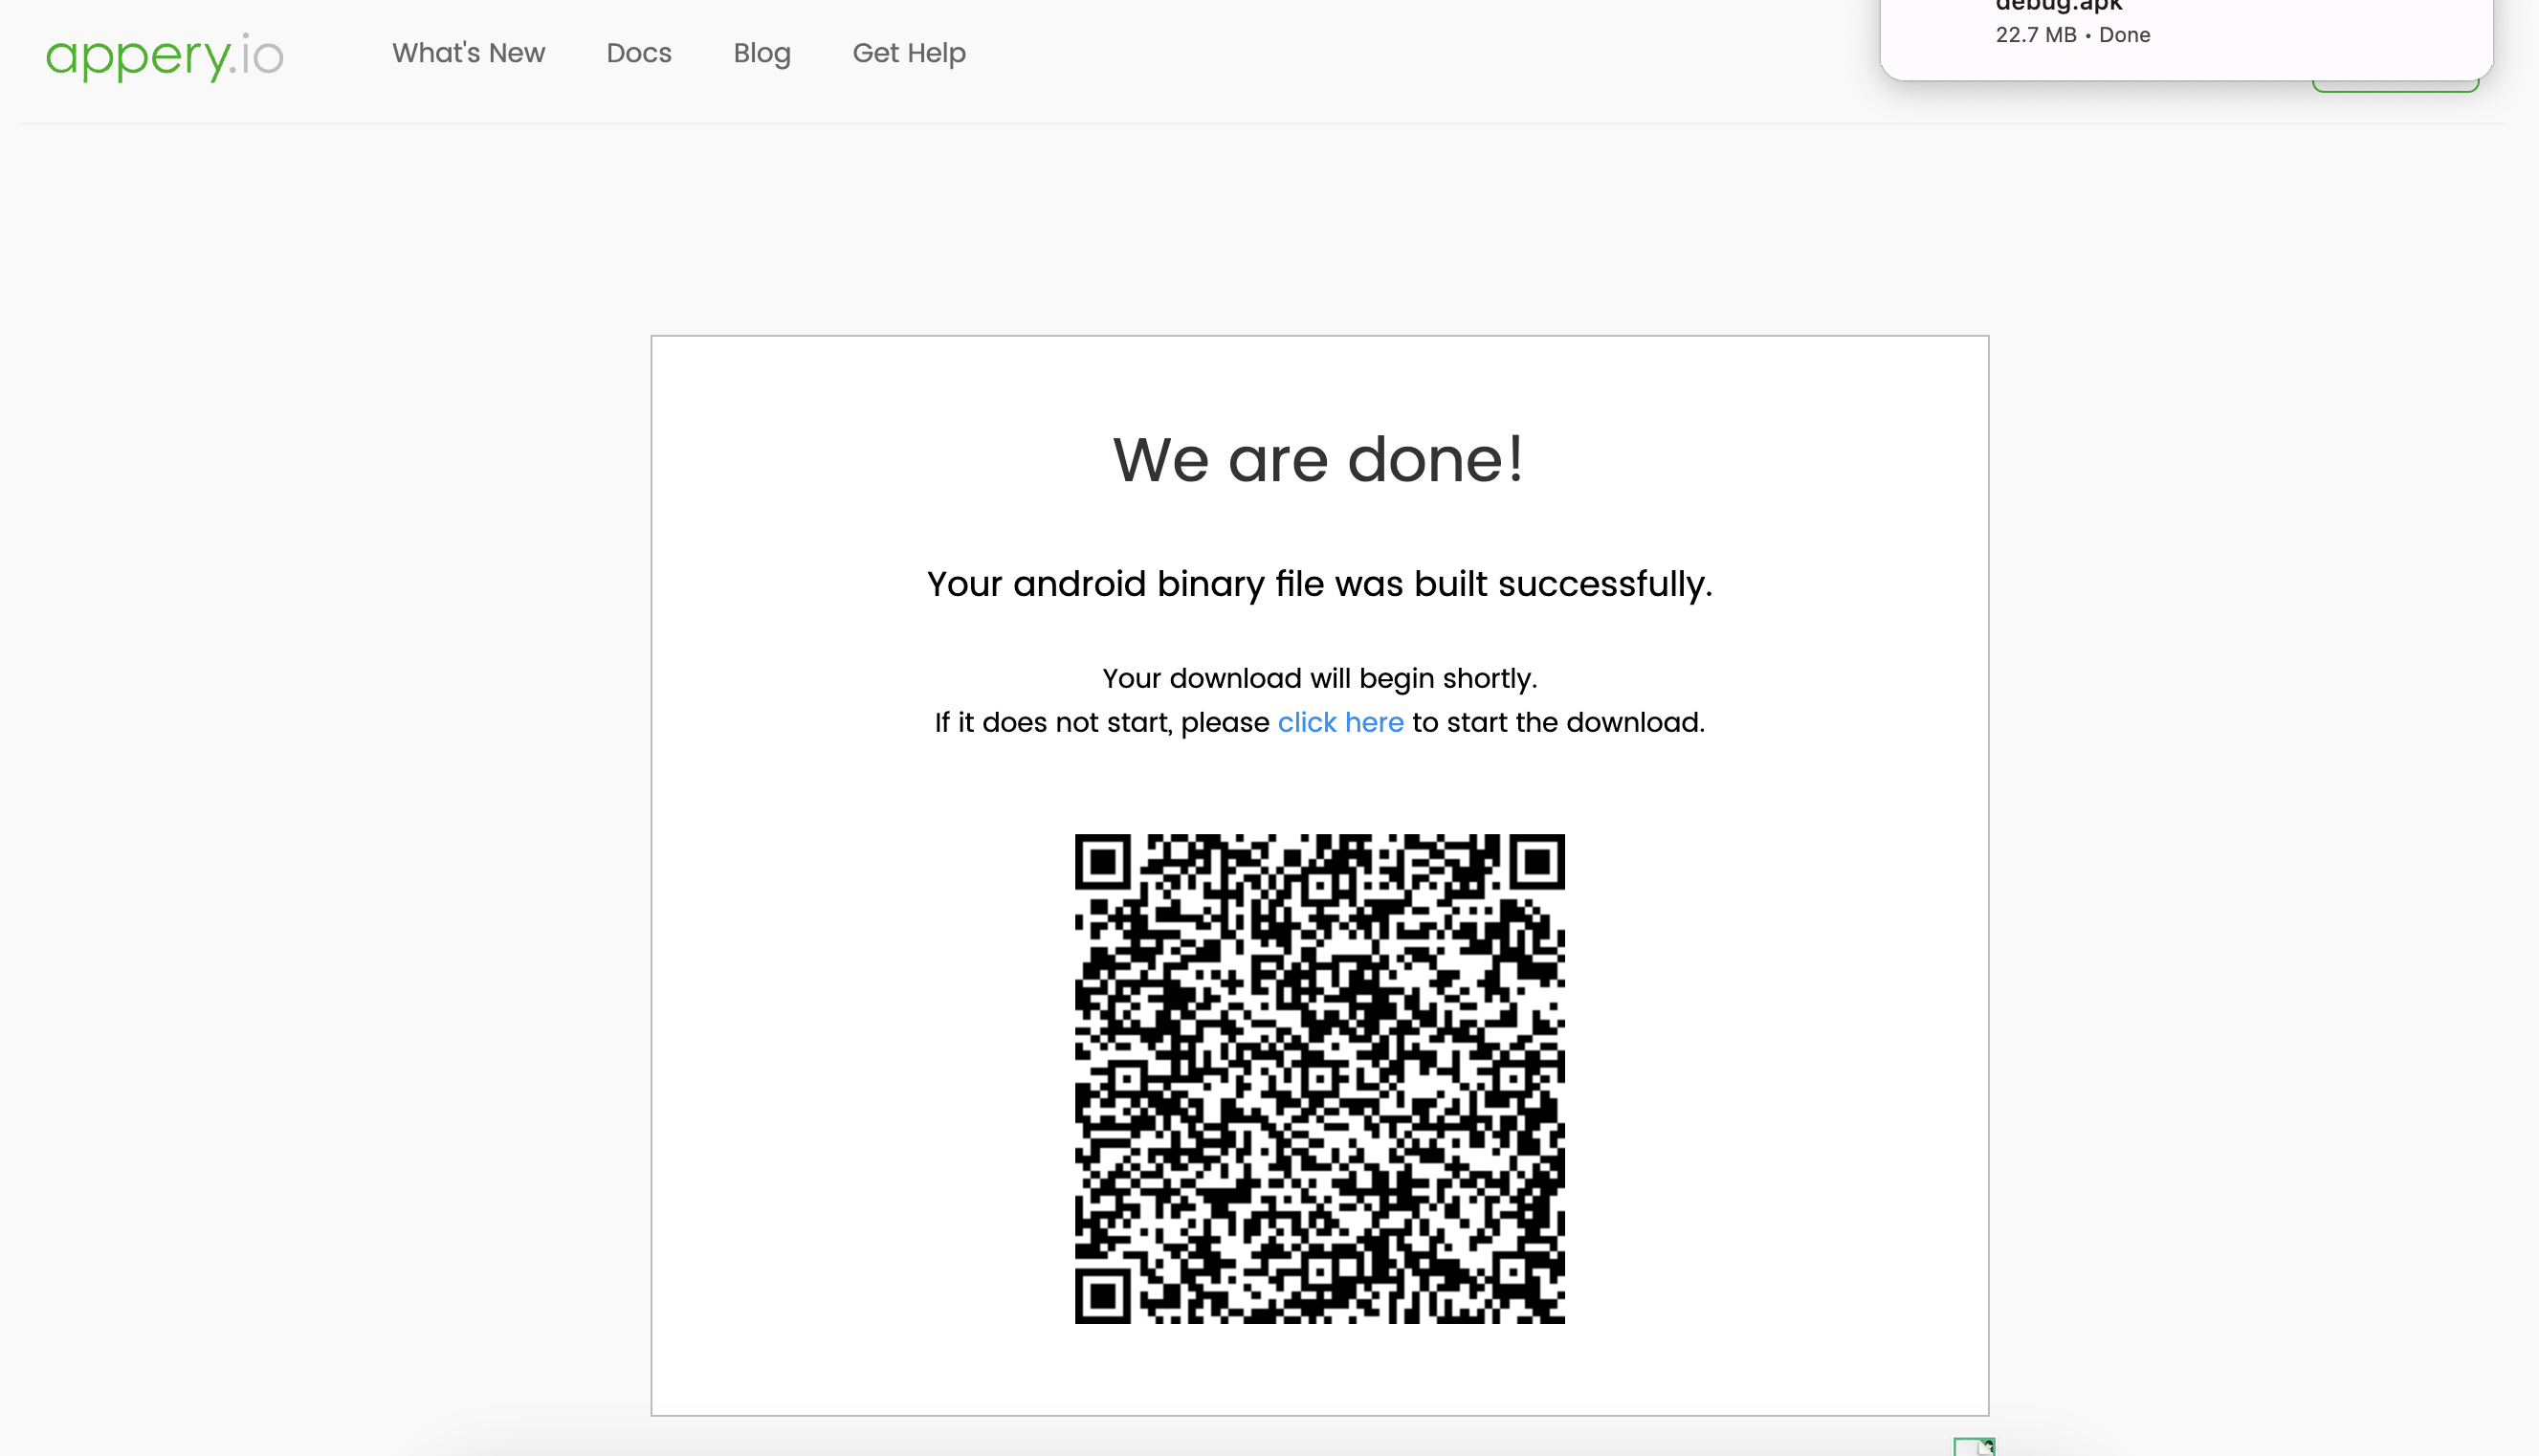
Scan the generated code to install the APK on your device:

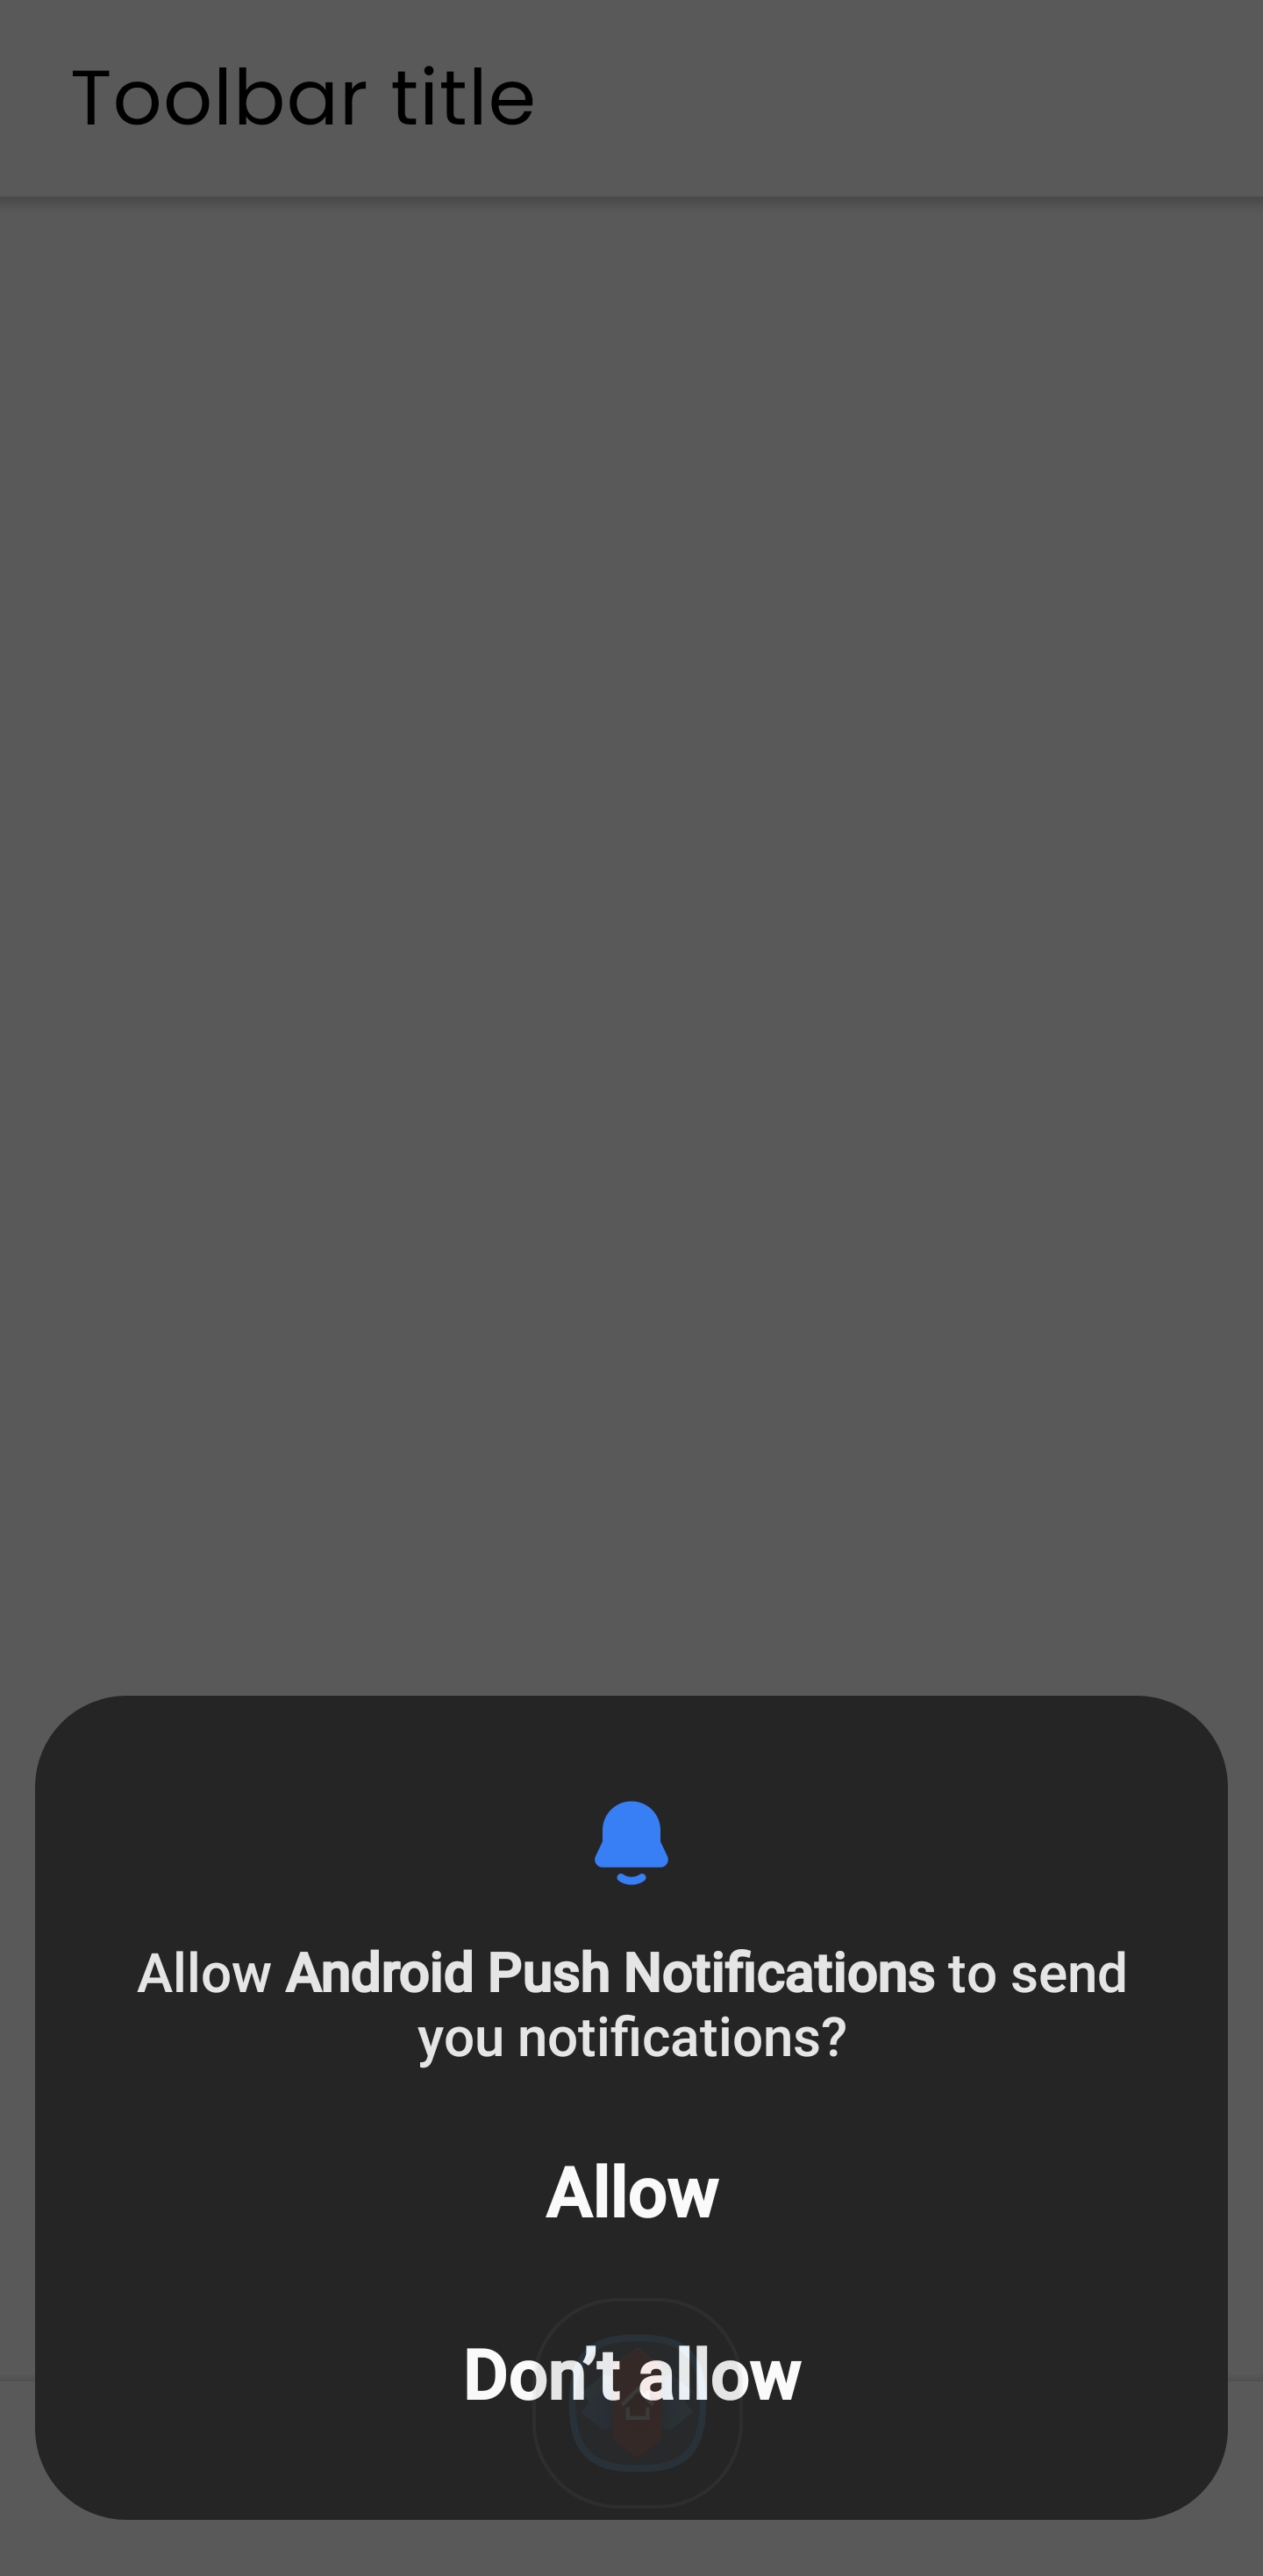
Launch the app and grant permission to receive push notifications:

Minimize the app, refresh the Devices collection in your database, and you’ll see a new entry for your device:


Step 8: Sending Push Notifications

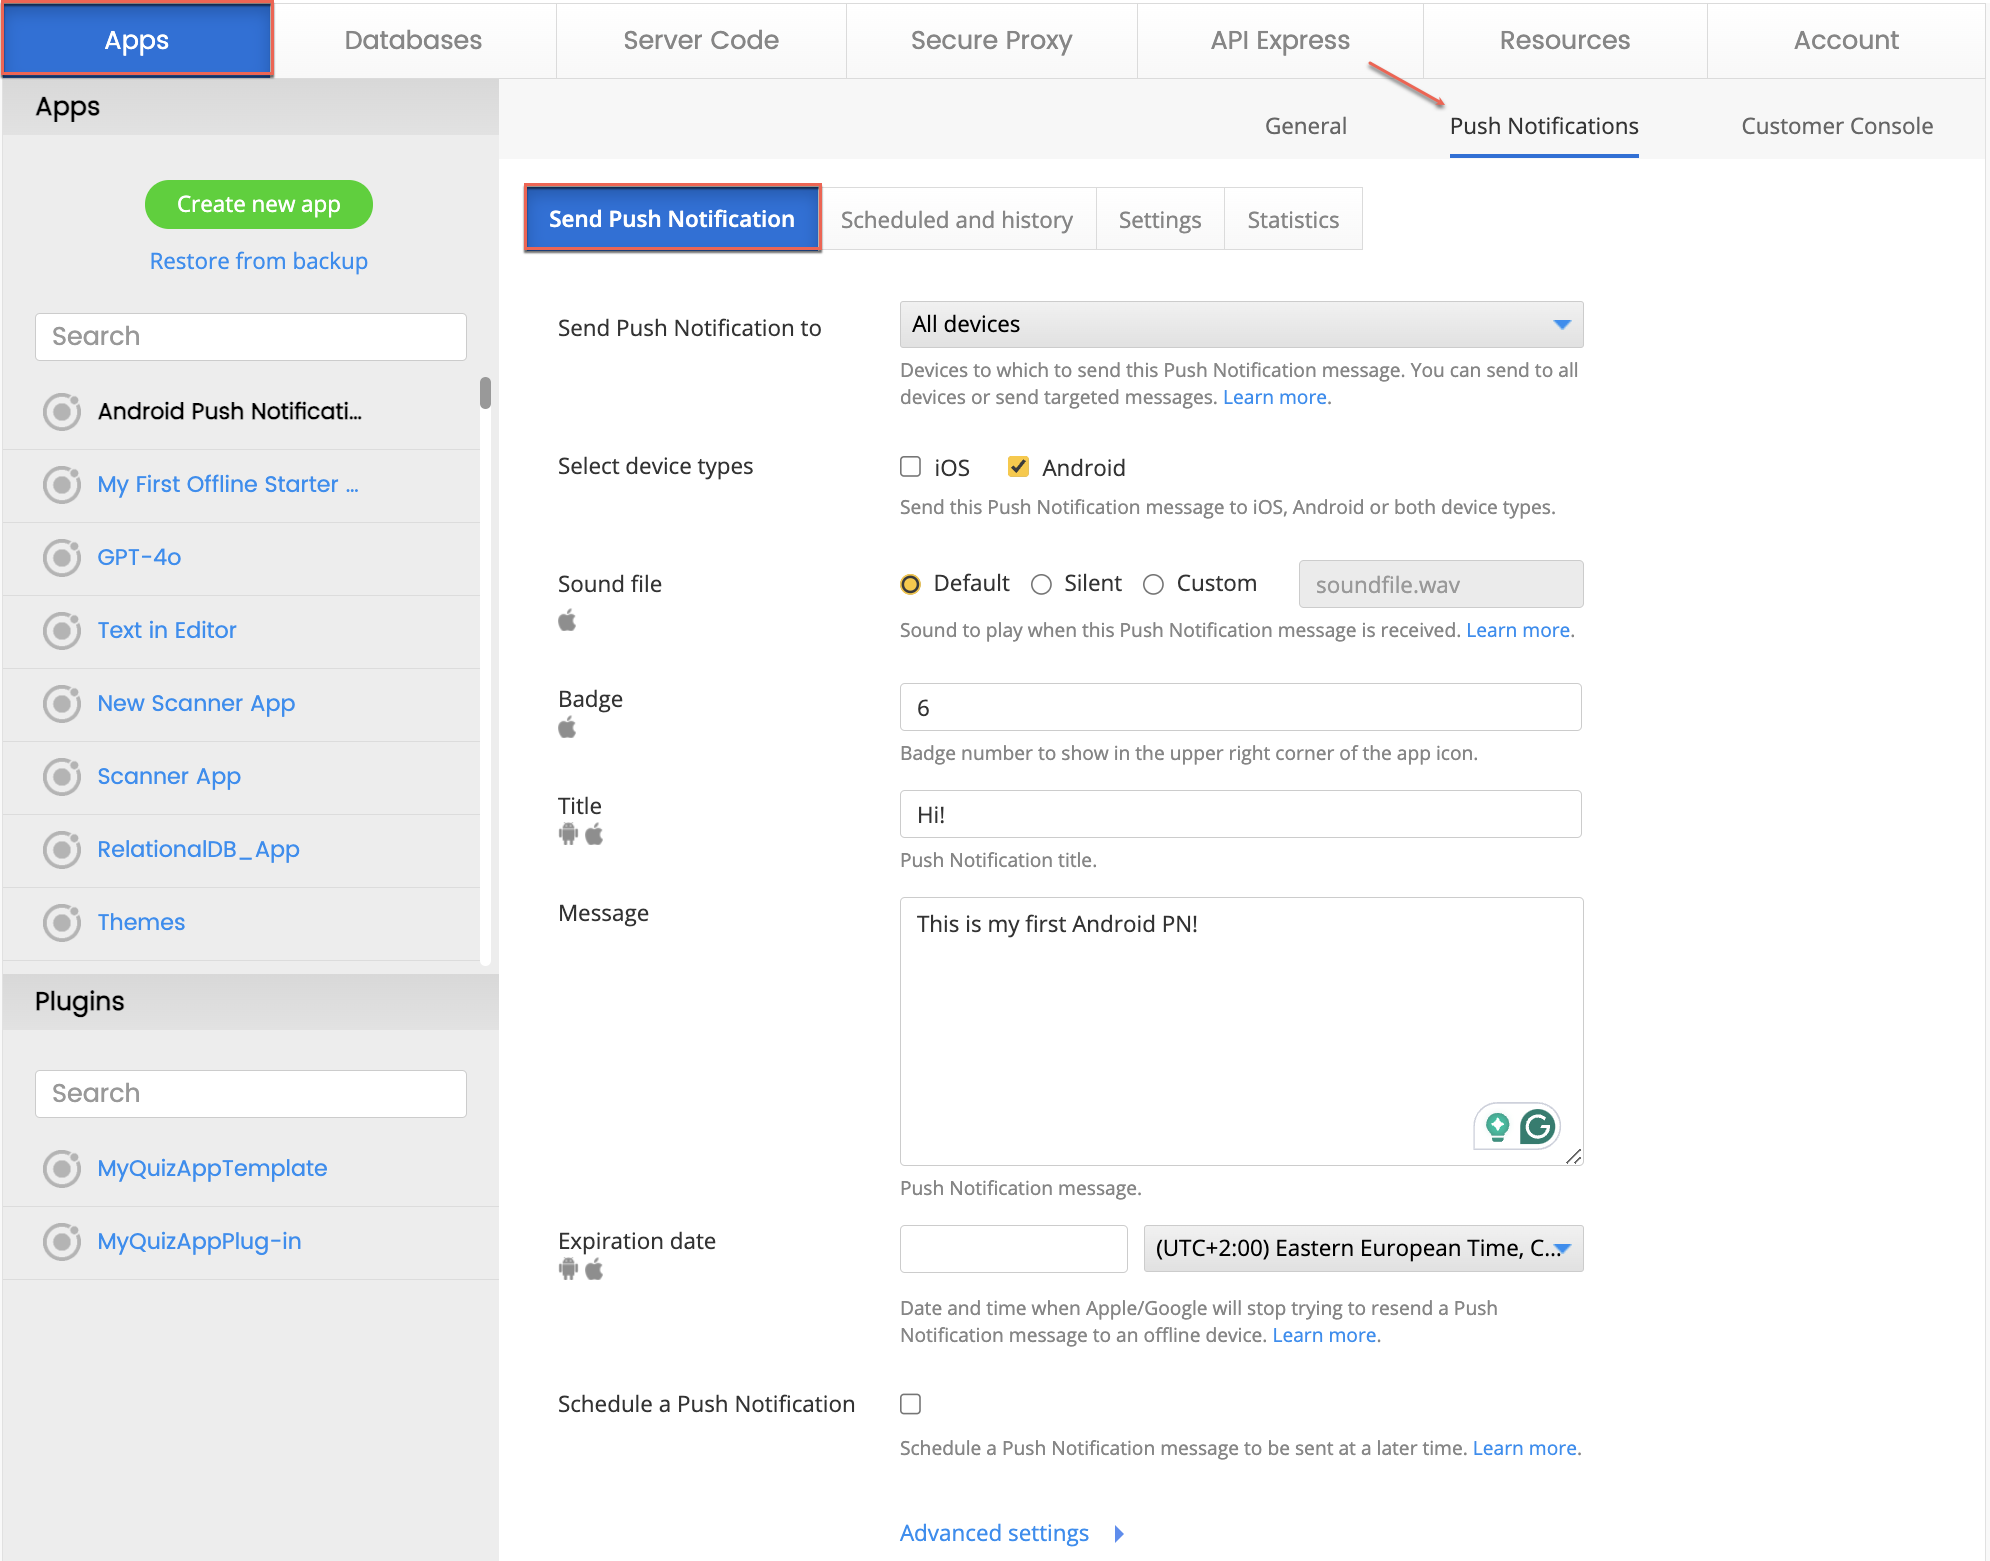
Go to the Push Notification Sending section in Appery.io. Specify the type of device (Android), and customize the notifications sending options of your message:

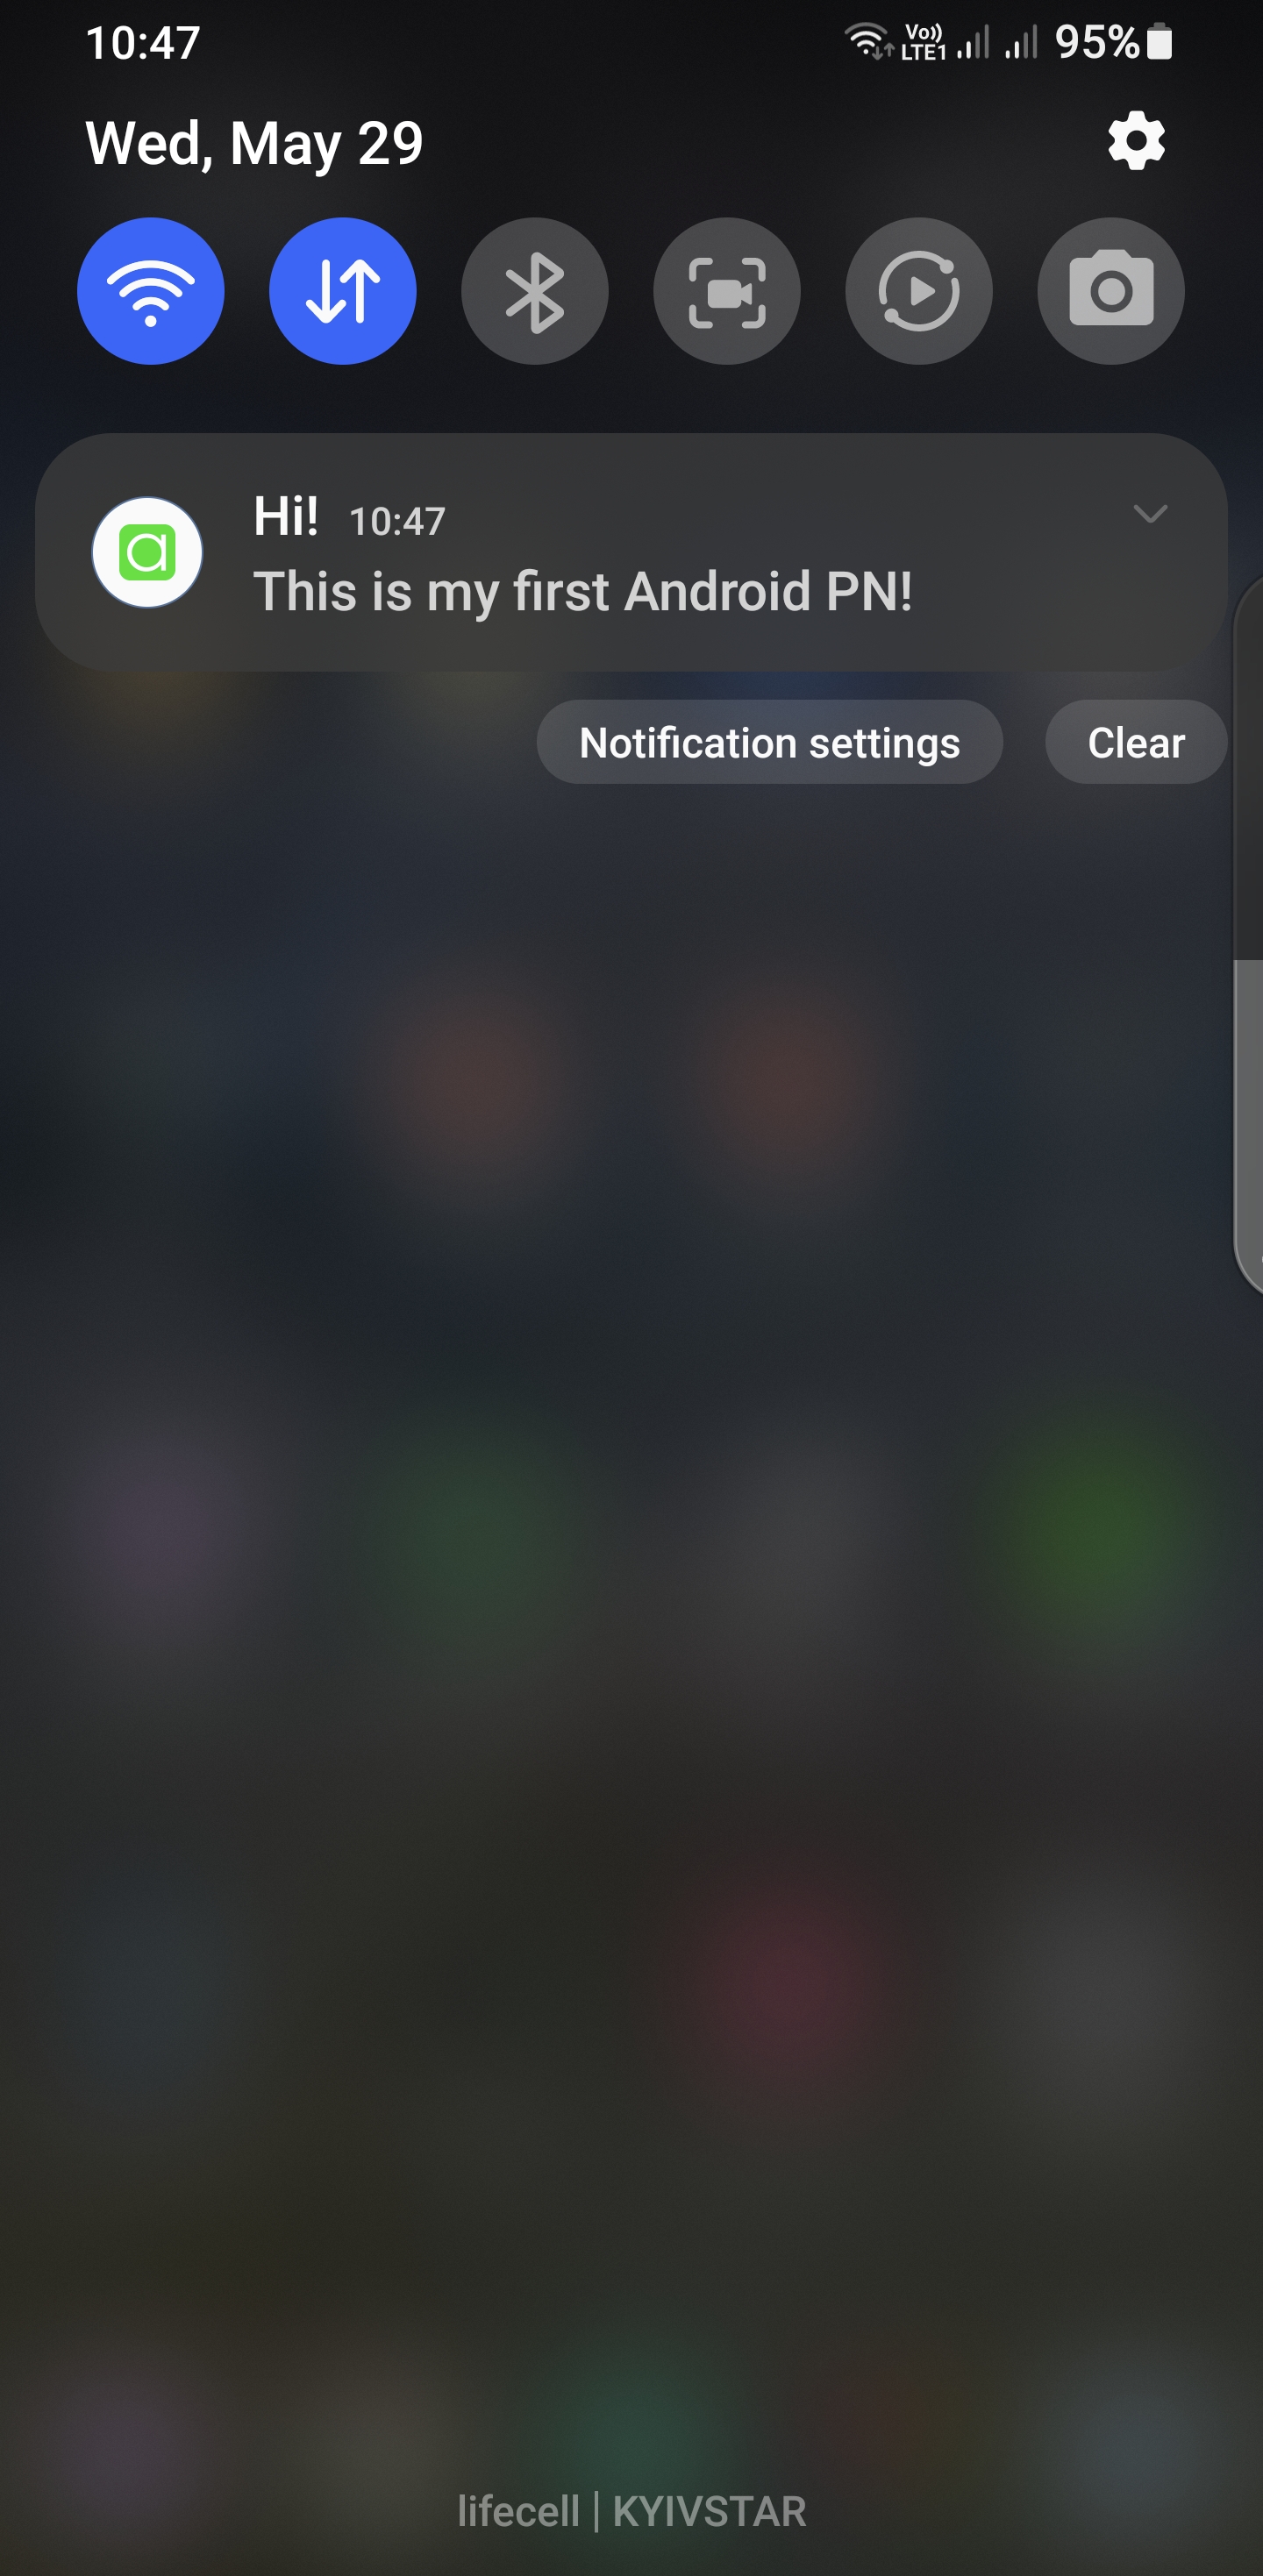
Send the test notification and watch it appear on your app’s icon:

Conclusion

And there you have it! You’ve successfully set up push notifications for your Android app using Appery.io. Stay tuned for more tutorials on setting up notifications for iOS, associating devices with users, and sending notifications from Appery.io Server Code.

Don’t forget to like, subscribe, and share this post if you found it helpful! Happy coding!

Feel free to leave any questions in the comments below. We’re here to help!

How to Never Miss Important Messages in Push Chats

In this post, we will guide you on how to create a Push Notification sounds mobile app where no messages will be missed.

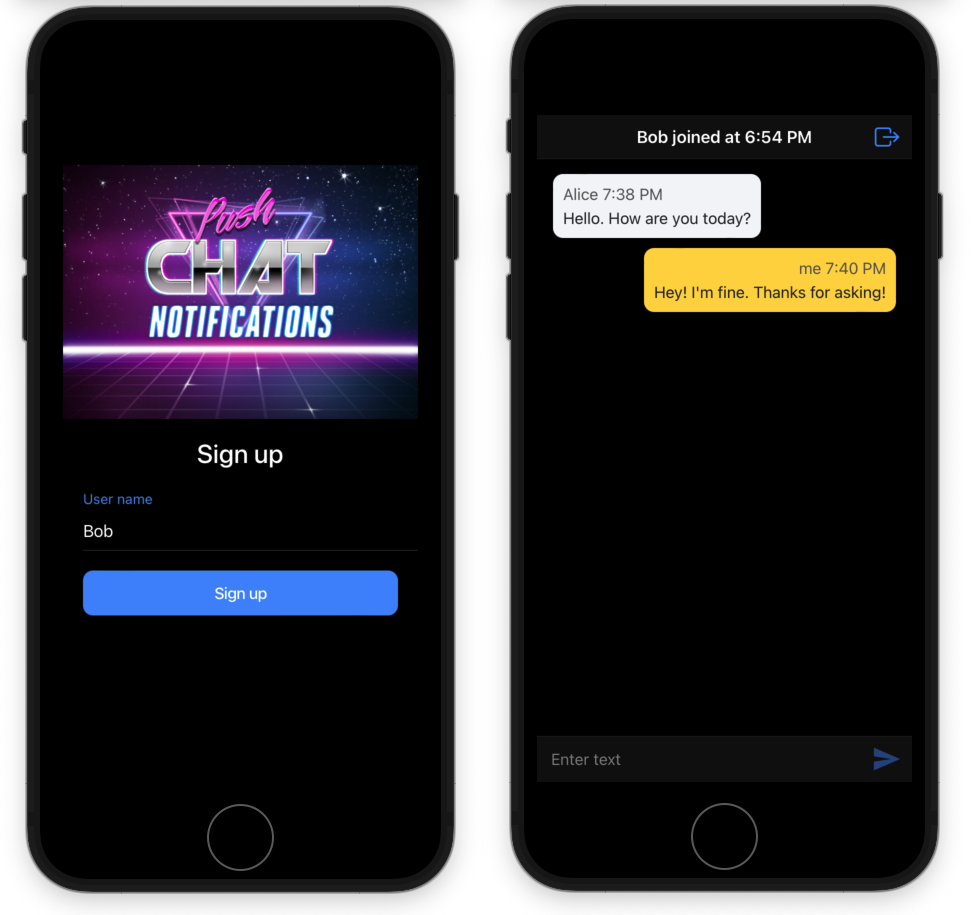
Actually, we will create a chat app that will receive messages from push notifications. No one should miss our messages, so we’ll make them loud enough with special sounds!

Let’s do it using Appery.io so it doesn’t matter if your friend uses iPhone or Android, they can use your app anyway!

Creating push project from backup and customizing it

You know what? We have already prepared this project for you, so you can grab .zip file from here and open it in Appery.io and we will walk through you this project to explain how to customize it and how it works from the inside.

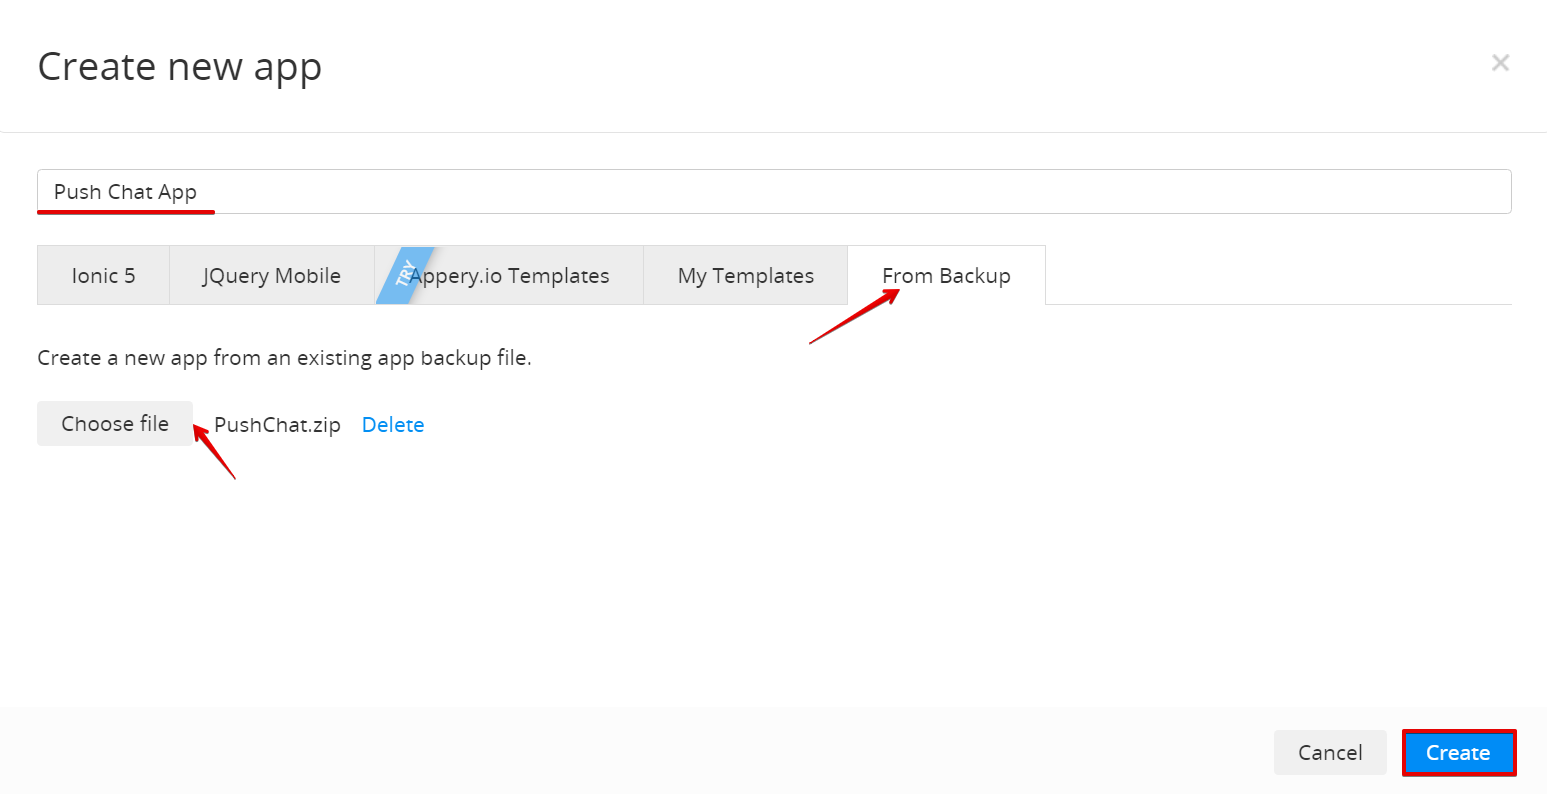
1. To do this, choose Create new app > From Backup, then select the downloaded .zip file, click Create, and wait a bit while Appery.io creates the project for you.

If you have any questions, you can learn everything you need and more about restoring Appery.io projects from the documentation.

OK, great! Now you have a shiny new project in your Appery.io workspace! And it’s time to make it entirely yours.
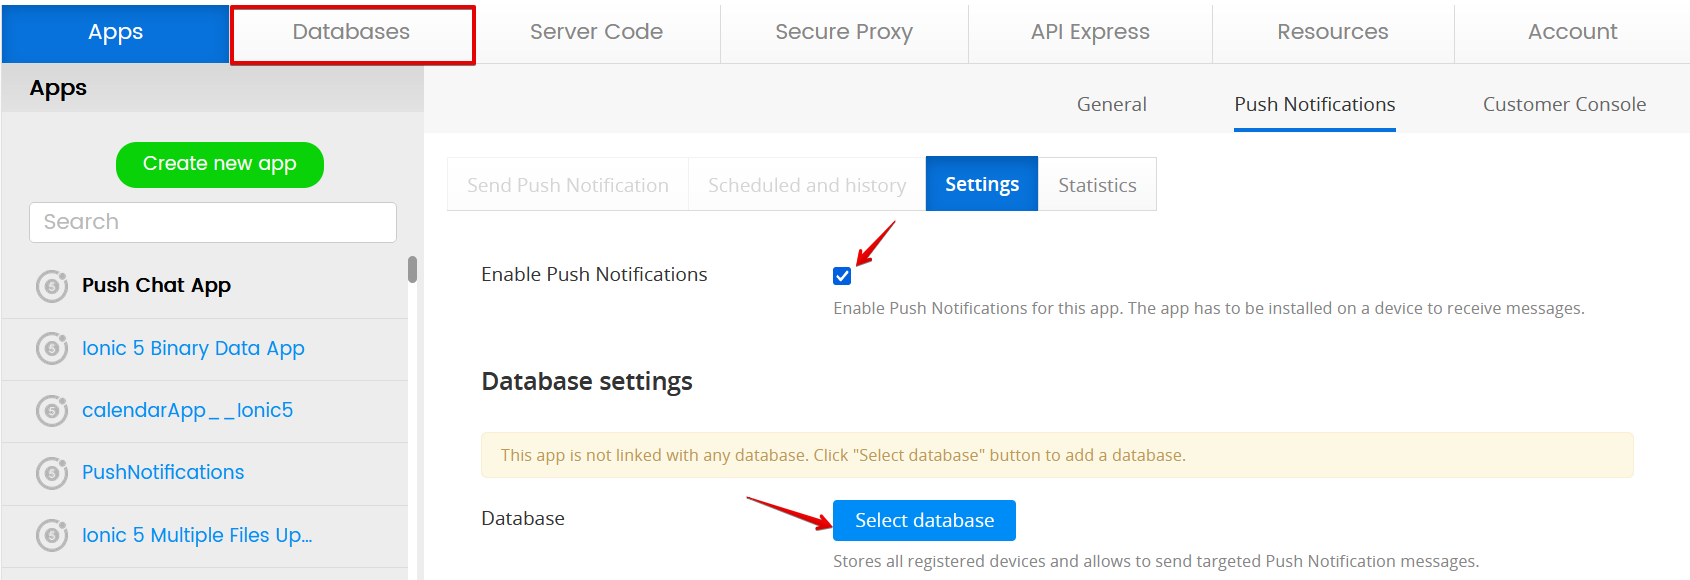
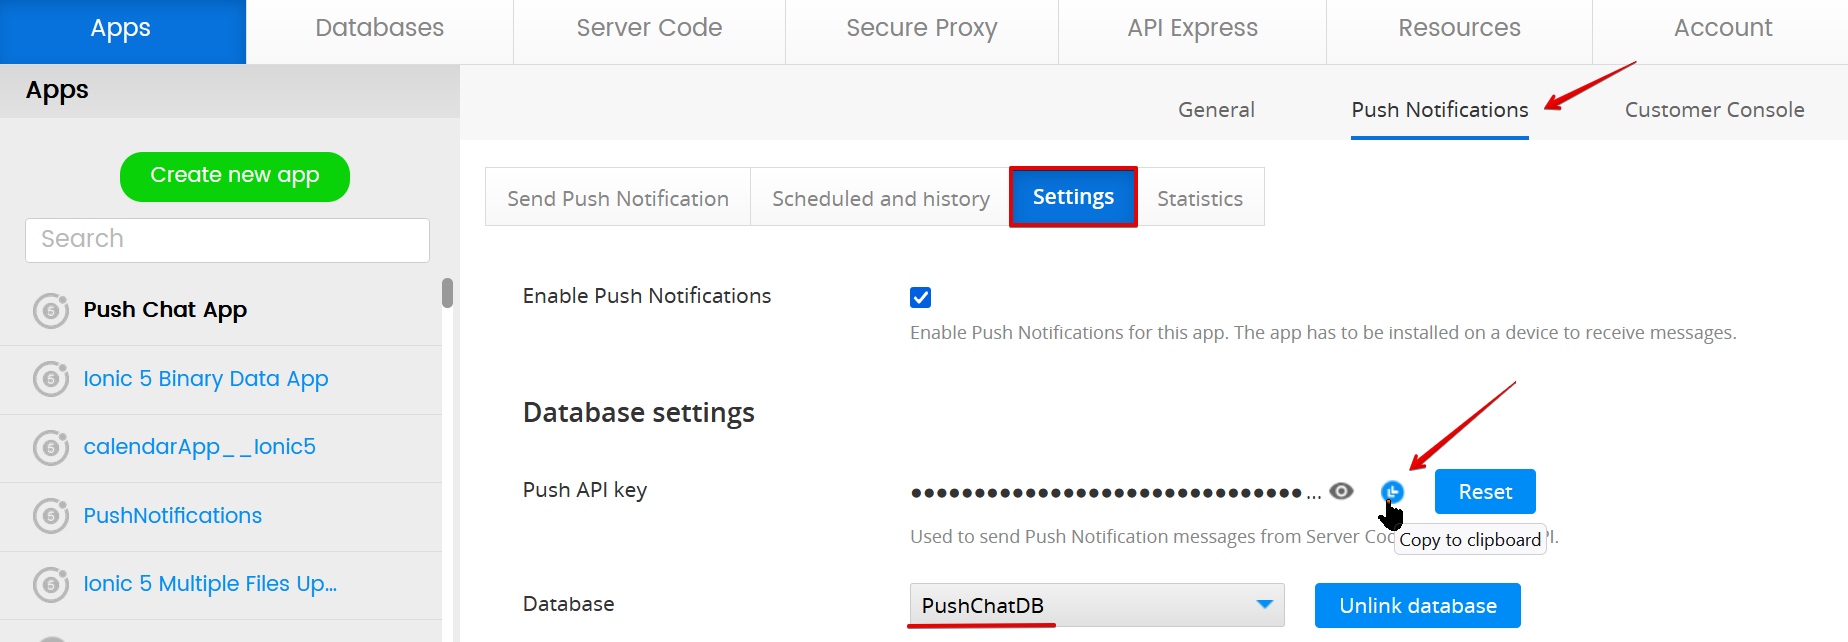
2. First, click the Push button on the toolbar to be redirected to the Push Notifications > Settings page:

This awesome page already has the Enable Push Notifications checkbox checked, but you also need to select the database where the chatting devices will be registered.

Creating and linking database

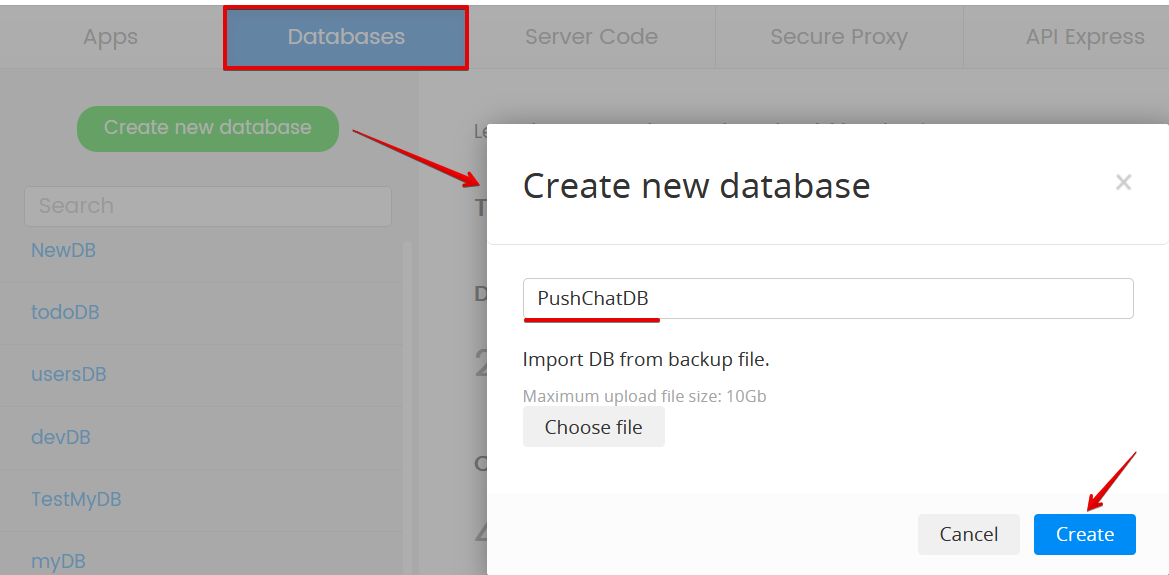
3. If you have no database that will do, you will first need to create one that will be linked to our app: go to the Databases tab in the header and create a new database, for example PushChatDB:

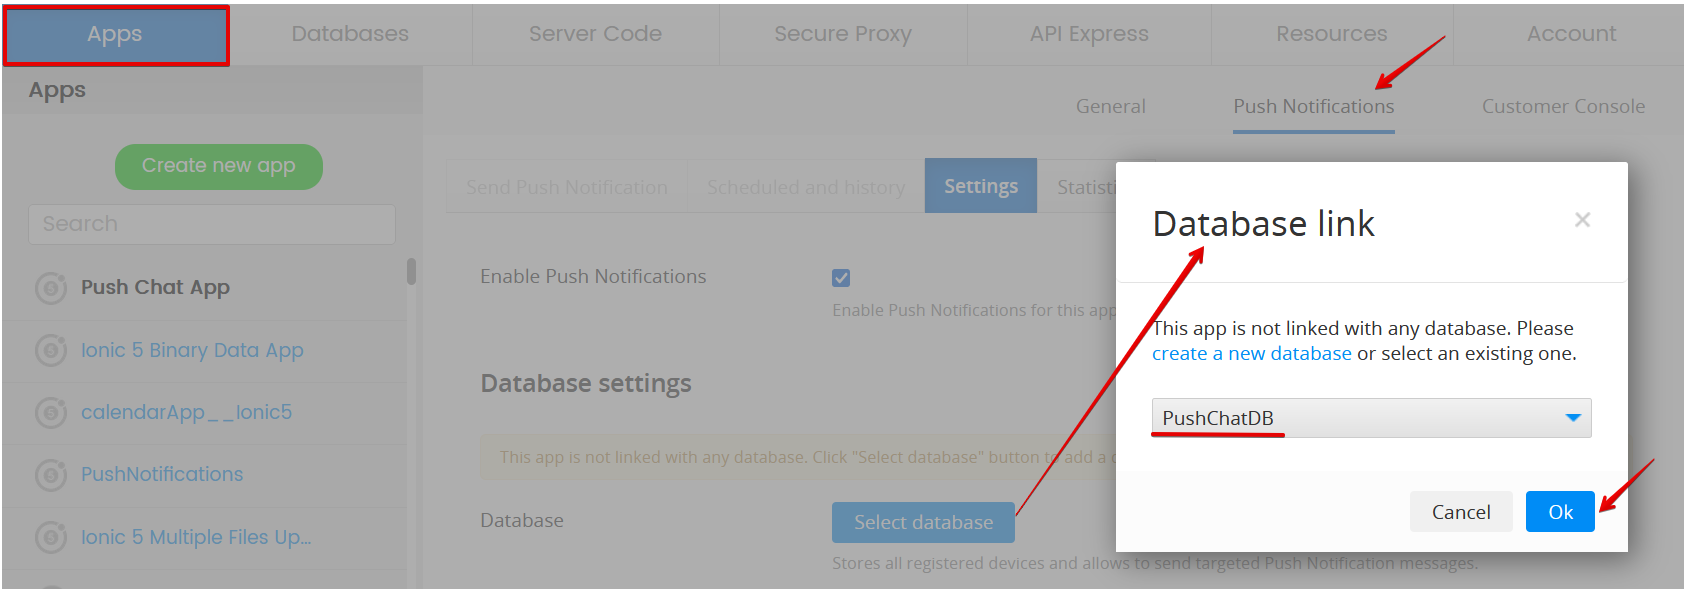
4. Now, you can link it to our app on the Push Notifications > Settings page:5. After you confirm this operation, the database will be linked and you will be able to copy its Push API key to clipboard:

6. In your project, unfold the Services > Settings folder and paste the copied key into the PUSH_API_KEY value field:

Configuring Push settings

To configure other settings on the Push Notifications > Settings page, you need to complete the following configuration steps:

– Choose an ID for your app. If you plan to support iOS, please make sure your app ID matches the ID in your APNS certificate.

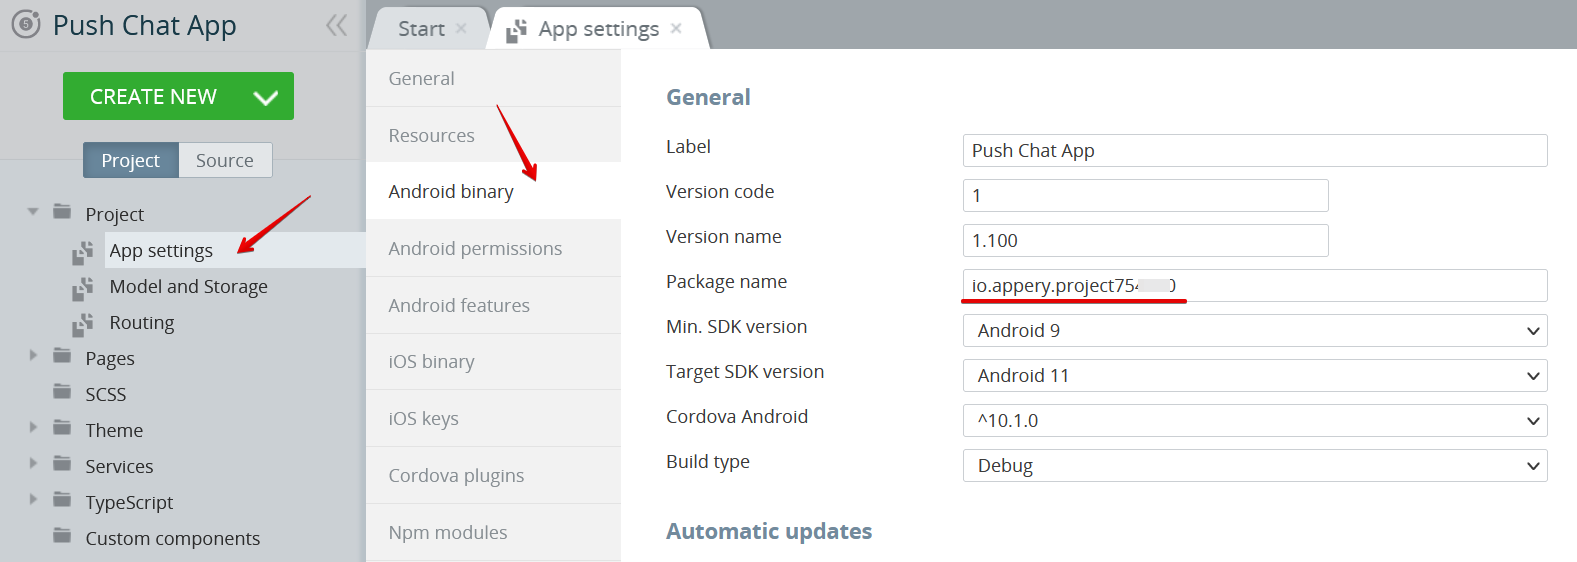
– Set Package name under the Project > App settings >Android binary tab to your app Bundle ID chosen in the previous step.

– Set Bundle ID under the Project > App settings > iOS Binary tab to your app ID as well:

– Set up Firebase Cloud Messaging Provider. Make sure the app package name in Firebase matches your app ID.

– Download Google Services JSON file and Firebase Admin SDK JSON file from Firebase and add them to Push Notifications > Settings page.

– To support push notifications on iOS, add your APNS Push Certificate and Certificate password in iOS settings.

Detailed instructions for above steps can be found on the Push Notifications Configuration page in Appery.io documentation.

App composition

Now, let’s go back to the App Builder and take a look at the app composition.

The app has 2 pages: SignUp and Chat, which are custom versions of the two predefined page templates (SignUp and Chat correspondingly), available via Create New > Page dialog.

SIgnUp page

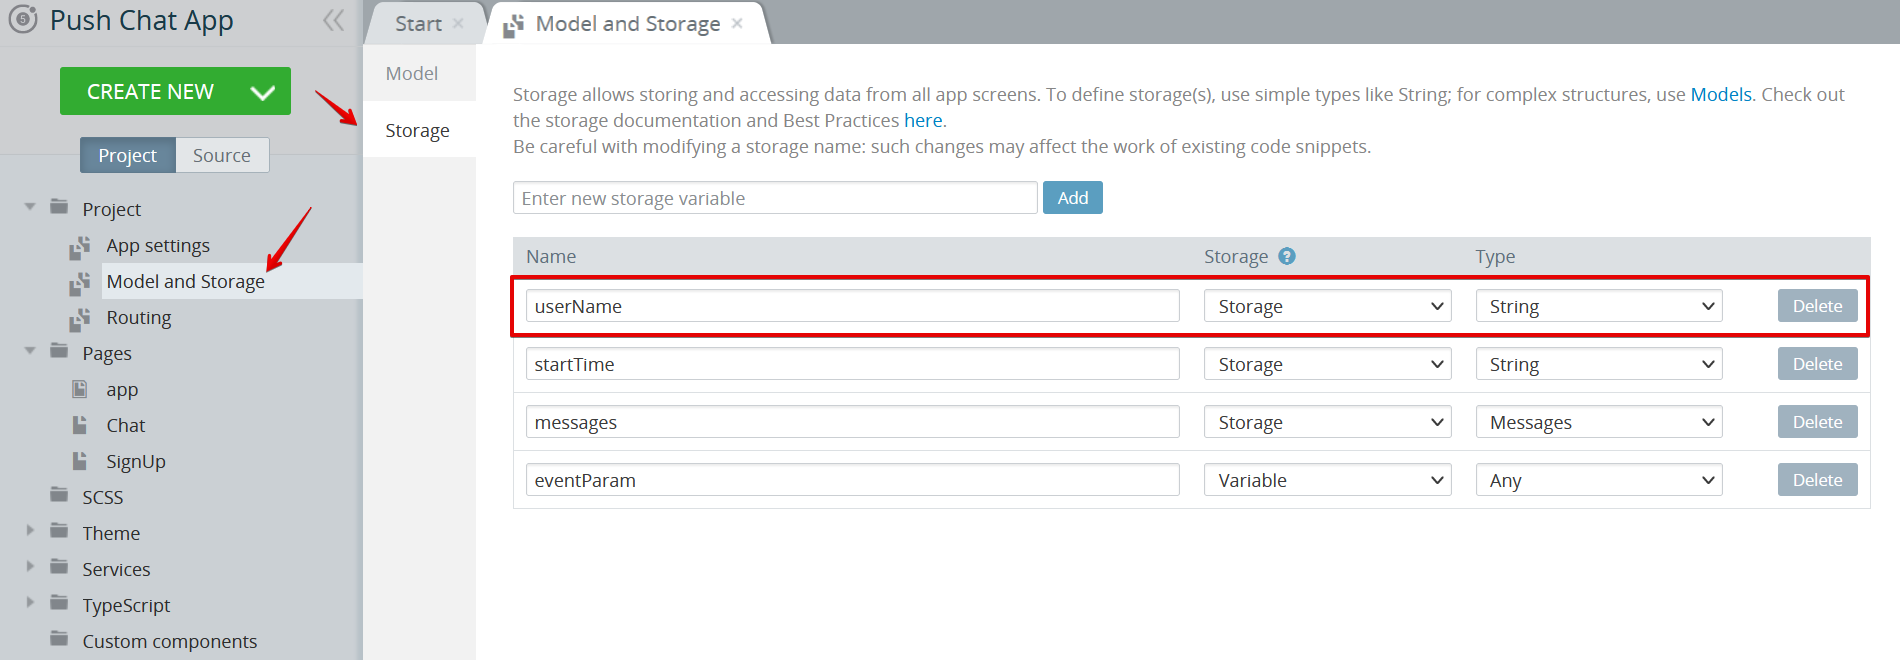
The SignUp page has the userName input field, which is a storage variable defined in Project > Model and Storage > Storage:

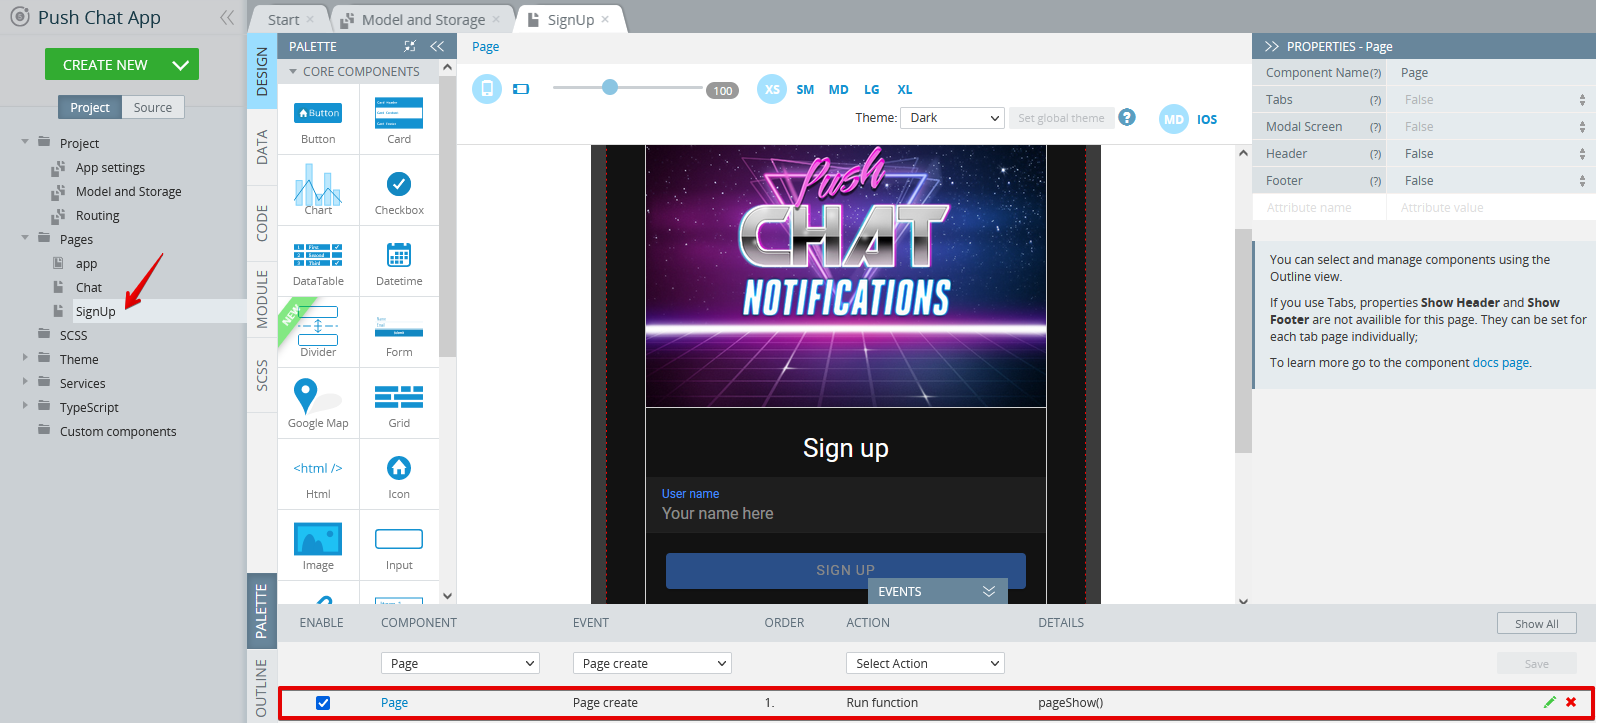
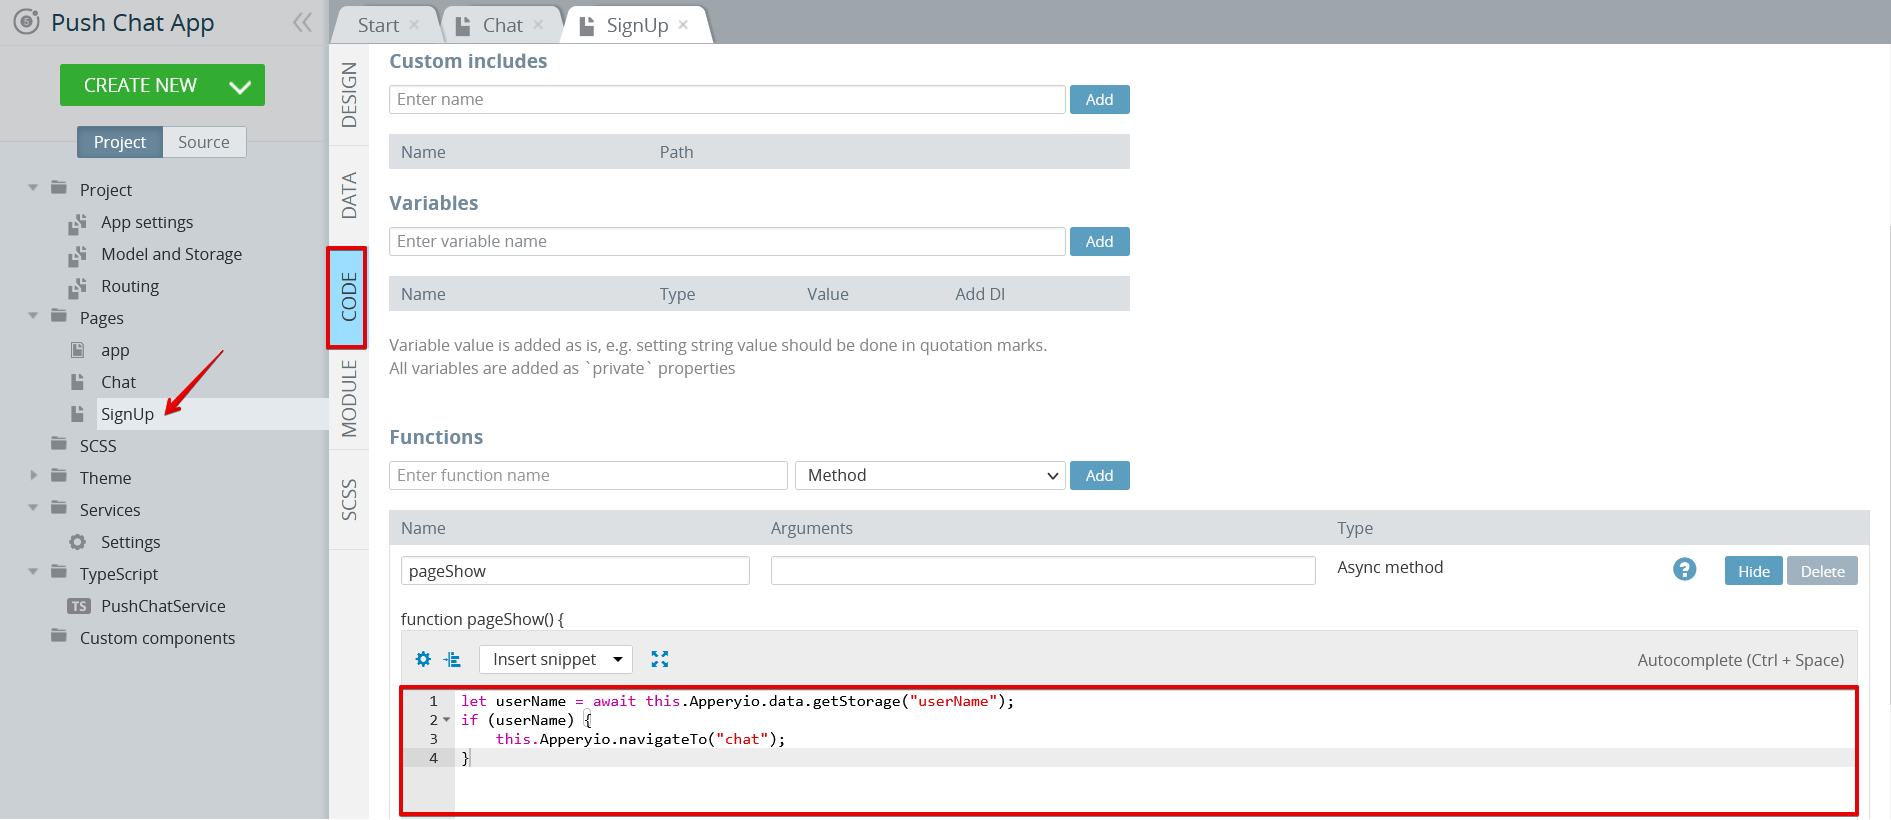
This page also has the Page create event that fires the pageShow() function to check if this userName has already been registered and so the SignUp page can be skipped:

To view the pageShow() function, open the page CODE panel and select it:


let userName = await this.Apperyio.data.getStorage("userName");
if (userName) {
this.Apperyio.navigateTo("chat");
}

Chat page

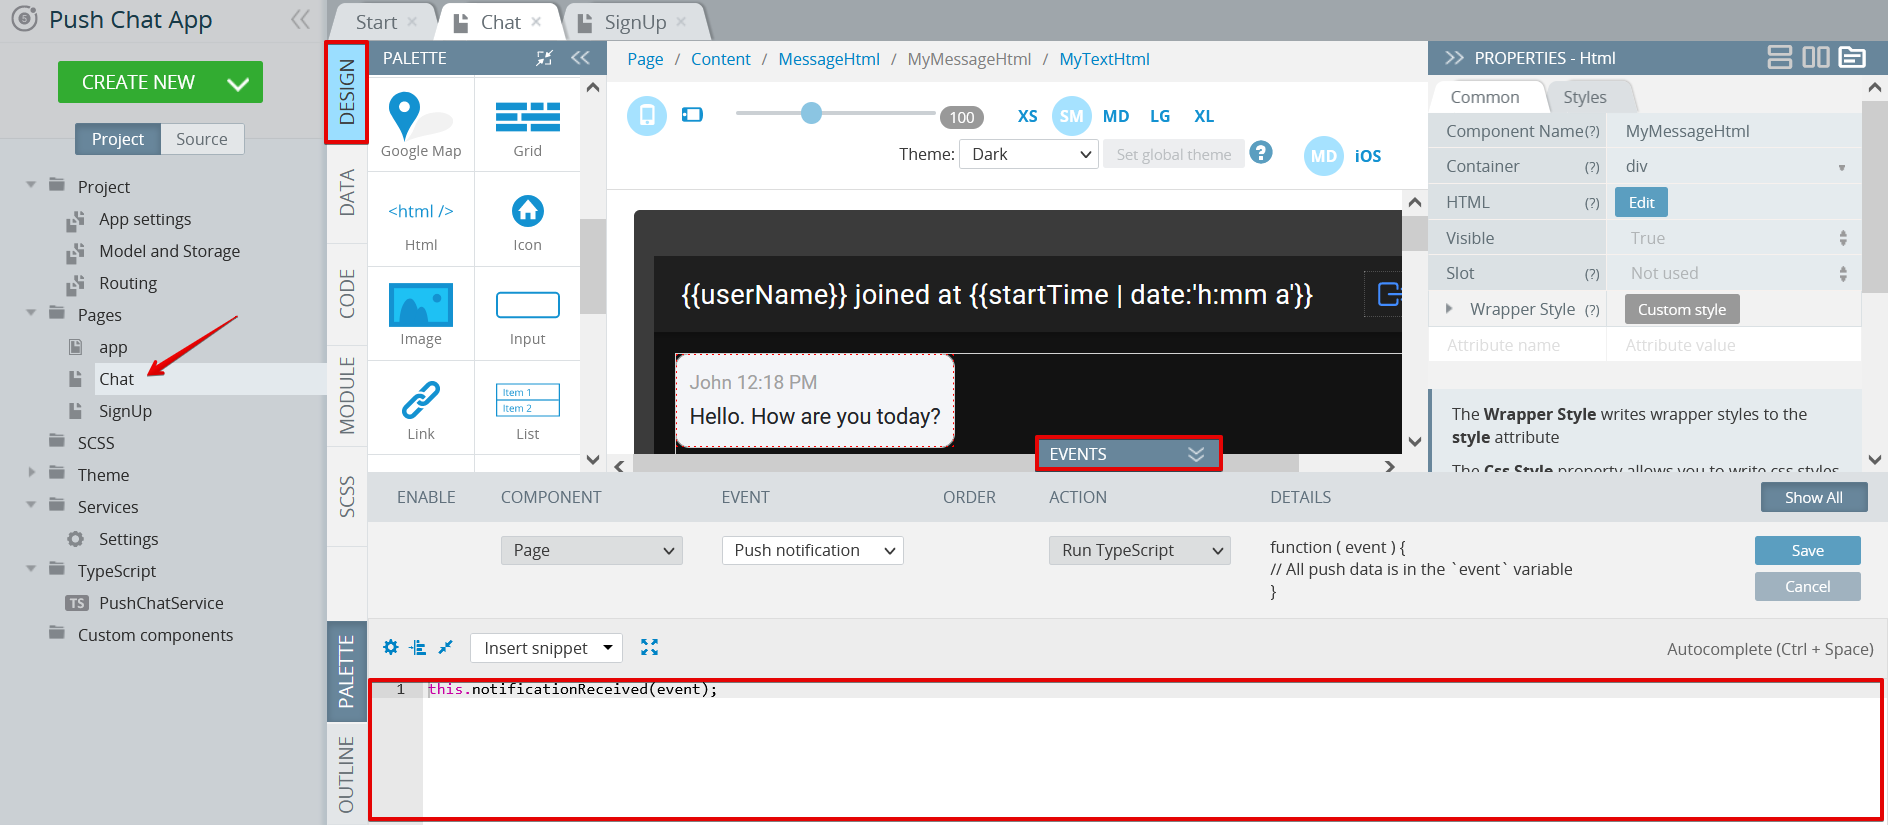
The Chat page has the Push notification event that fires the notificationReceived(event) function to handle push notifications. Here we are forwarding the event to the pushChatService.receive(event) service and updating the messages list on the page:

If the app receives the Push notification event for the user that has not signed up yet, he will be redirected to the SignUp page:


await this.pushChatService.receive(event);
await this.updateMessages();

let userName = await this.Apperyio.data.getStorage("userName");
if (!userName) {
this.Apperyio.navigateTo("signup");
}

PushChat Service

Let’s take a look at the receive(event) service function that can be found under TypeScript > PushChatService. Here we need to handle several different situations:


Push message arrives with the app in background

In this case, the custom push notification sound will be played and the message will be displayed in the device’s notification center.

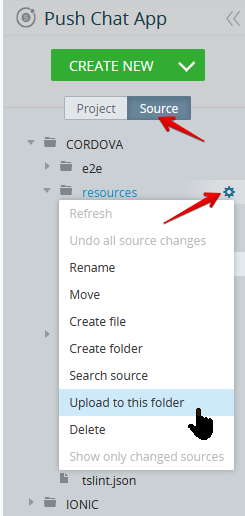
Our custom push notification sound file is called pushsound.wav. Switch to the Source tab, unfold the CORDOVA > resources folder and upload your custom sound file (should be prepared beforehand). Please note that to work on both iOS and Android the .wav format is recommended.

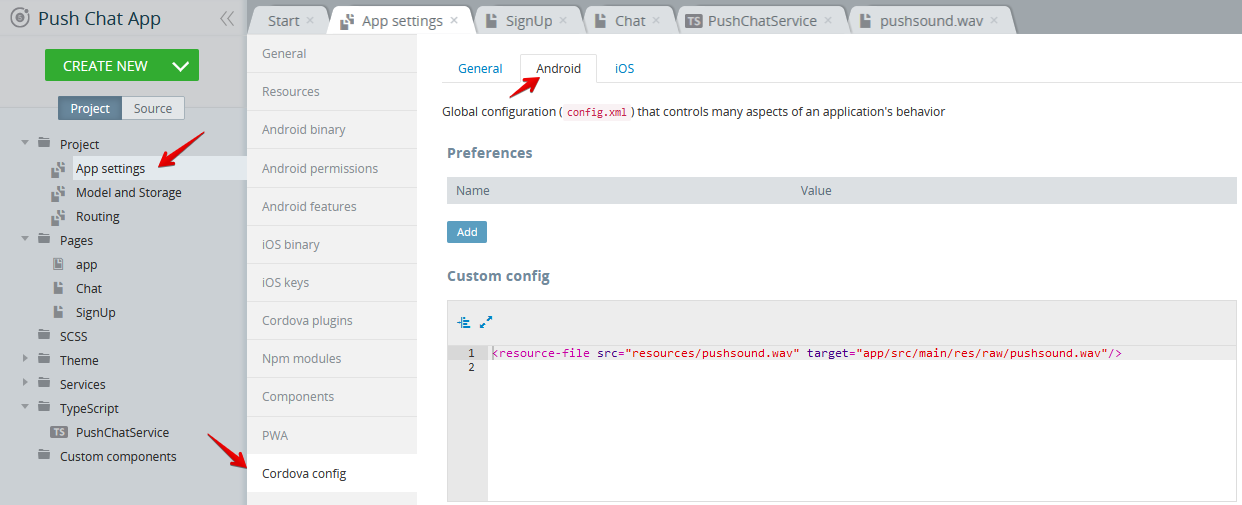
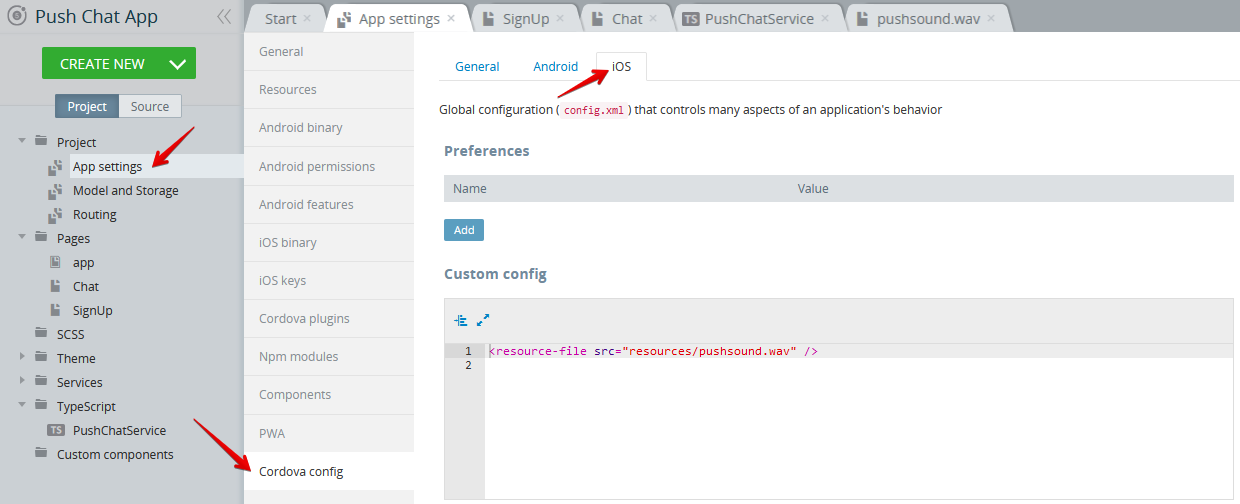
It is also recommended that this file is put into different folders for Android and iOS; this is handled on App settings > Cordova config tab.

For Android it will be:

<resource-file src="resources/pushsound.wav" target="app/src/main/res/raw/pushsound.wav"/>

For iOS the code is like this:

<resource-file src="resources/pushsound.wav" />

Push message arrives with the app in foreground

In this case, custom push notification sound will not be played and we have to play it ourselves from the `receive(event)` function in PushChatService that we assigned to handle the push notification request.

But how can we differentiate between the app in the background when the sound was already playing, and the app in the foreground, when we still need to play it?

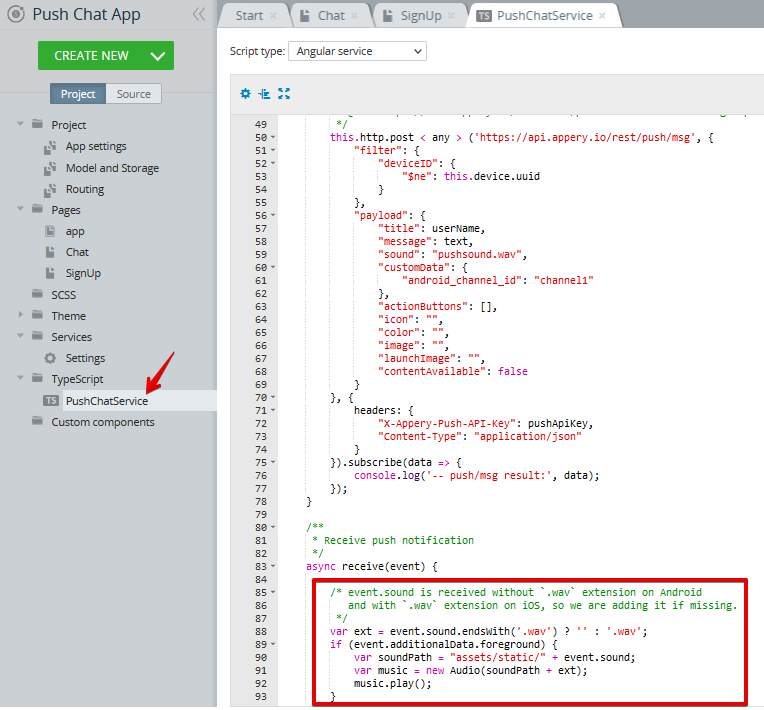
Here, `event.additionalData.foreground` field comes to rescue, so we have the code:

var ext = event.sound.endsWith('.wav') ? '' : '.wav';
if (event.additionalData.foreground) {
var soundPath = "assets/static/" + event.sound;
var music = new Audio(soundPath + ext);
music.play();
}

To view it, open the ***PushChatService*** TS file and scroll down:

Sounds in Android vs sounds in iOS 

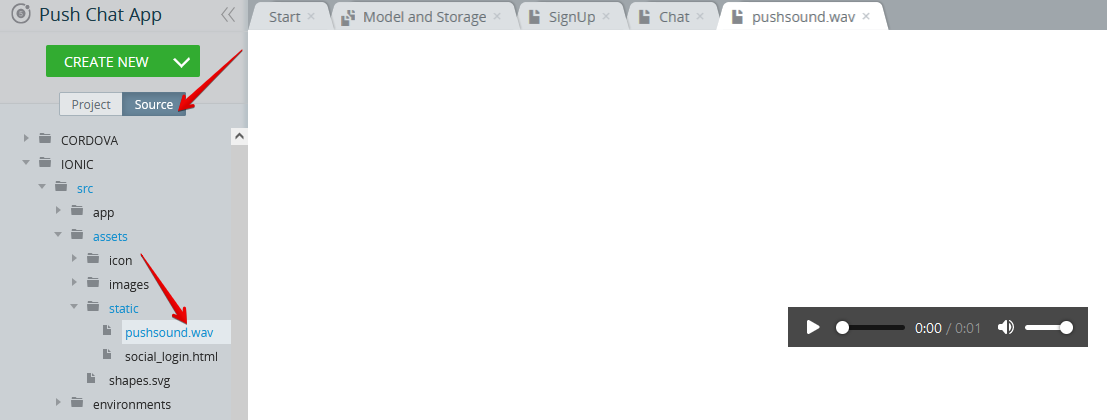
Finally, the app also handles the situation when event.sound is received without .wav extension on Android, but with this extension on iOS, so we add it if it’s missing. We also expect pushsound.wav to be in assets/static/ folder, so we go back to the Source tab and upload the pushsound.wav file to the IONIC/src/assets/static folder as well:

The remaining code in `receive(event)` function just saves the new message entry to local storage.

let messages = await this.Apperyio.data.getStorage("messages");
messages = messages || [];
messages.push({
time: new Date().toISOString(),
message: event.message,
user: event.title
});
await this.Apperyio.data.setStorage("messages", messages);

Sending push notifications

We have another function embedded into PushChatService named `send(text: string)` that sends push notifications to other devices registered in your database’s Devices collection. Registration happens automatically when the user opens the app for the first time.

Appery.io API to send push notifications is documented here.

Angular HttpClient was already imported in our PushChatService when we created it with Create new > TypeScript > Angular service. We can use it to send REST request to the Appery.io push notification server.

this.http.post < any > ('https://api.appery.io/rest/push/msg', {
"filter": {
"deviceID": {
"$ne": this.device.uuid
}
},
"payload": {
"title": userName,
"message": text,
"sound": "pushsound.wav",
"customData": {
"android_channel_id": "channel1"
},
"actionButtons": [],
"icon": "",
"color": "",
"image": "",
"launchImage": "",
"contentAvailable": false
}
}, {
headers: {
"X-Appery-Push-API-Key": pushApiKey,
"Content-Type": "application/json"
}
}).subscribe(data => {
console.log('-- push/msg result:', data);
});

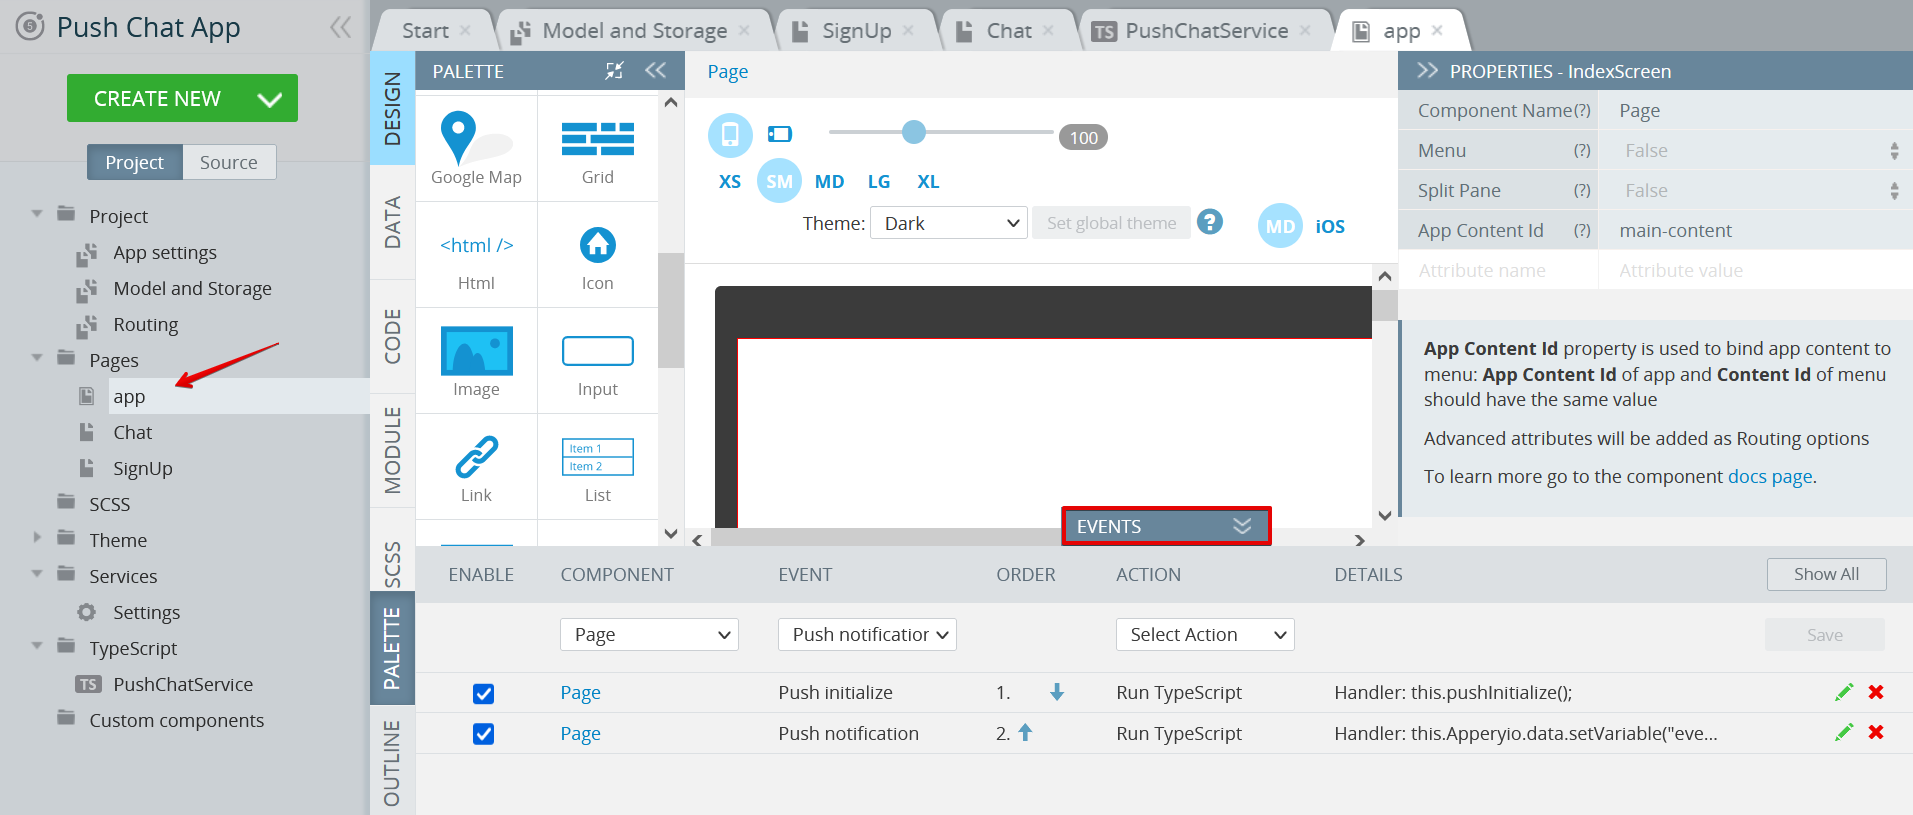
Here, in the filter field, we indicate that we are pushes will be sent to every device except ours. We also specify android_channel_id for the sound. This Android sound channel is initialized in Push initialize event of the app module.

let channelName = 'channel1';

( < any > window).PushNotification.createChannel(
() => {
console.log('Push notification channel created:', channelName);
},
() => {
console.log('Error creating push notification channel:', channelName);
}, {
id: channelName,
sound: "pushsound",
description: channelName
}
);

Basically, that’s all. Now you can build an app for your Android or iOS phone, install it using a QR-code, and help a friend to do the same, and voila! You can send messages to each other!
Important! Be sure to turn off the Silent mode on iPhone, otherwise this little toggle on mobile will be muting your push notification sounds.

Summary

We took a look at push notification settings in Appery.io and explored the insides of a small but smart app that uses the push notification mechanism to create a chat.

Please check out the code in the attached project and let us know if you have any questions.

Happy coding with Appery.io!

Enjoy your New Spring Enjoying our New Release Features

The spring of 2022 is very special for all of us and we, at Appery.io, would like to make this spring release (rolled out last weekend) enjoyable for all of you as well.

With this mission in heart, we are excited to offer you some very special improvements to our Visual App Builder that we believe will make things significantly easier and more elegant developing your mobile apps with Appery.io:

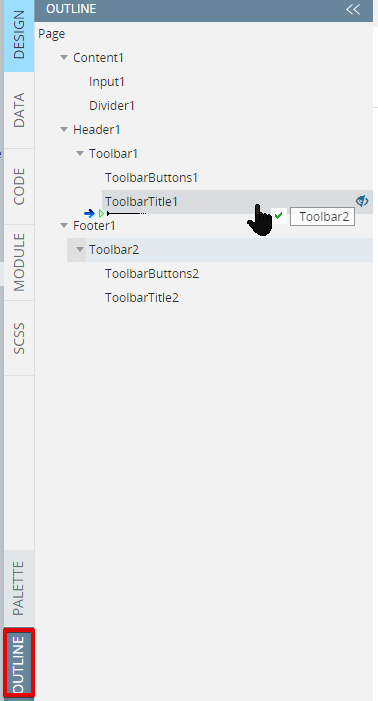
  • the first and the most asked feature will be definitely appreciated by those who prefer working with the OUTLINE view: from now on, you will be able to use the old yet simple and reliable “Drag & Drop” to arrange the components on the screen of your mobile app:

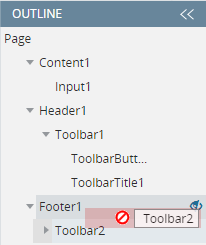
What is more: you will be even warned if trying to do something that cannot be implemented for this particular component:

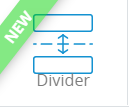
  • also, the Appery.io UI Components family now has one more member, Divider, that can be used to to separate other screen items:

  • yet another improvement was introduced for more UI components like Card, Checkbox, Datetime, etc.: they can now also be easily styled from under the PROPERTIES > Styles tab. (You might have already had a chance to evaluate the similar functionality for some UI components introduced with our Christmas release).
  • two more events were added to the Form component: Form value change and Form status change:


  • the next minor but hopefully useful feature is added to the Input component to make login procedure for your app users simpler and less stressfull. Just set the input Type property to Password and select the option to show the password being typed in (set it to True):

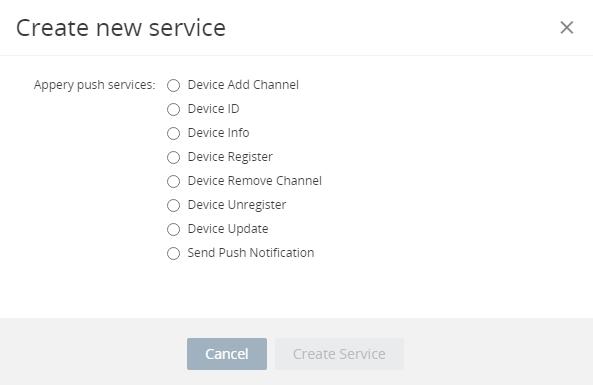
  • and the last but not least: you can now make good use of quite a few predefined Push Notification services: when in the visual App Builder, simply click the CREATE NEW button and selct the needed Appery.io backend push service(s) to import it (them) from under the Backend Services section:

.

Have Appery-related questions? Ask them on Stackoverflow!

Dear Appery.io Users,

Since recently, our customers have started complaining about issues with registration/login into our forum. Therefore, we have decided to introduce yet another open channel where you are free to ask any Appery.io-related question(s) you might have: Stackoverflow. 

Stackoverflow is one of the most popular and renown platforms where anybody can ask for an advice on any programming issue. Where hundreds of users find answers to their questions daily and thousands of experts are happy to provide their colleagues with useful recommendations and examples.

Is is truly a huge community and from now on, we encourage you to post your questions (like those on Appery.io Platform, App Builder, Appery.io plug-ins, etc.) there instead of using forum.

Please make sure you use the tag <Appery> or <appery.io> while posting so that our experts from Support Team (as well as other users that can be of help) could answer them ASAP to our mutual satisfaction:


We hope this will help to remove any barriers to effective communication and make getting professional help as easy and productive as possible.

And as usual, we offer more ways for you to get help. Please check this link to learn how to reach to our Support Team for help.

Lots of love on St. Valentine’s Day!

Your Appery.io Team


A Quick Guide to Sending Push Notifications with the Appery.io Platform

Being able to send Push Notifications to users is one of the fundamental capability in an enterprise mobile app. Appery.io platform comes with Push Notifications component out-of-the-box and allows you quickly to send targeted messages to iOS and Android devices. In this blog post we will show the four ways to send a Push Notification message to a user:

  1. Push Notifications Console.
  2. Server Code Push Notifications API (server-side).
  3. Push Notification REST API.
  4. Customer Console.

Push Notifications Console

This first option is probably the simplest way to send a Push Notifications once you have installed an app on a device. Select device types, enter the message and send. The Push Notification message should arrive on the registered device instantly.

Push Notifications console

Push Notifications console

Read the rest of this entry »

Appery.io Platform Now Supports the IPv6 Network Protocol

ipv6

We are happy to share that the Appery.io platform now has support for the IPv6 protocol. In case you don’t know what IPv6 is, you can read more about it here. IPv6 is is the most recent version of the Internet Protocol (IP) and Apple requires all apps to support this network protocol. This means that an app published to the App Store has to use IPv6 network protocol to communicate with the app backend. That’s why this support is important. Our goal has always been to support all the latest and modern features, technologies and requirements on the Appery.io platform.

Now you get all the benefits of using IPv6 network with Appery.io Backend Services:

  • API Express
  • Server Code
  • Database
  • Auto-update

The above services now all support IPv6, you can still use the old IPv4 version as well.

IPv6_api.appery.io

IPv6 support information


You can also check out IPv6 validation for api.appery.io.

IPv6 support is important as it allows to submit apps to the Apple App Store. This is just the first phase where IPv6 is supported for communication between app and backend services. The second phase will include IPv6 support to external services from Appery.io Backend Services such as API Express or Server Code.

4-Ways to Send a Push Notification on Appery.io Platform

Being able to send Push Notifications to users is one of the fundamental capability in an enterprise mobile app. Appery.io platform comes with Push Notifications component out-of-the-box and allows you quickly to send targeted messages to iOS and Android devices. In this blog post we will show the four ways to send a Push Notification message to a user:

  1. Push Notifications Console.
  2. Server Code Push Notifications API (server-side).
  3. Push Notification REST API.
  4. Customer Console.

Push Notifications Console

This first option is probably the simplest way to send a Push Notifications once you have installed an app on a device. Select device types, enter the message and send. The Push Notification message should arrive on the registered device instantly.

PN_console

Sending a Push Notification from the console.

Read the rest of this entry »