Building a Killer Conference App with Appery.io

Mastering the art of building a conference app opens a realm of engagement and efficiency in event planning. A well-crafted app can fundamentally transform how attendees experience an event. Appery.io, known for its robust app development capabilities, offers a comprehensive platform for constructing impactful conference apps.

Well, this article draws insights from a detailed video that walks through leveraging Appery.io, presenting strategies and features to elevate your conference planning.

Getting Started with Appery.io

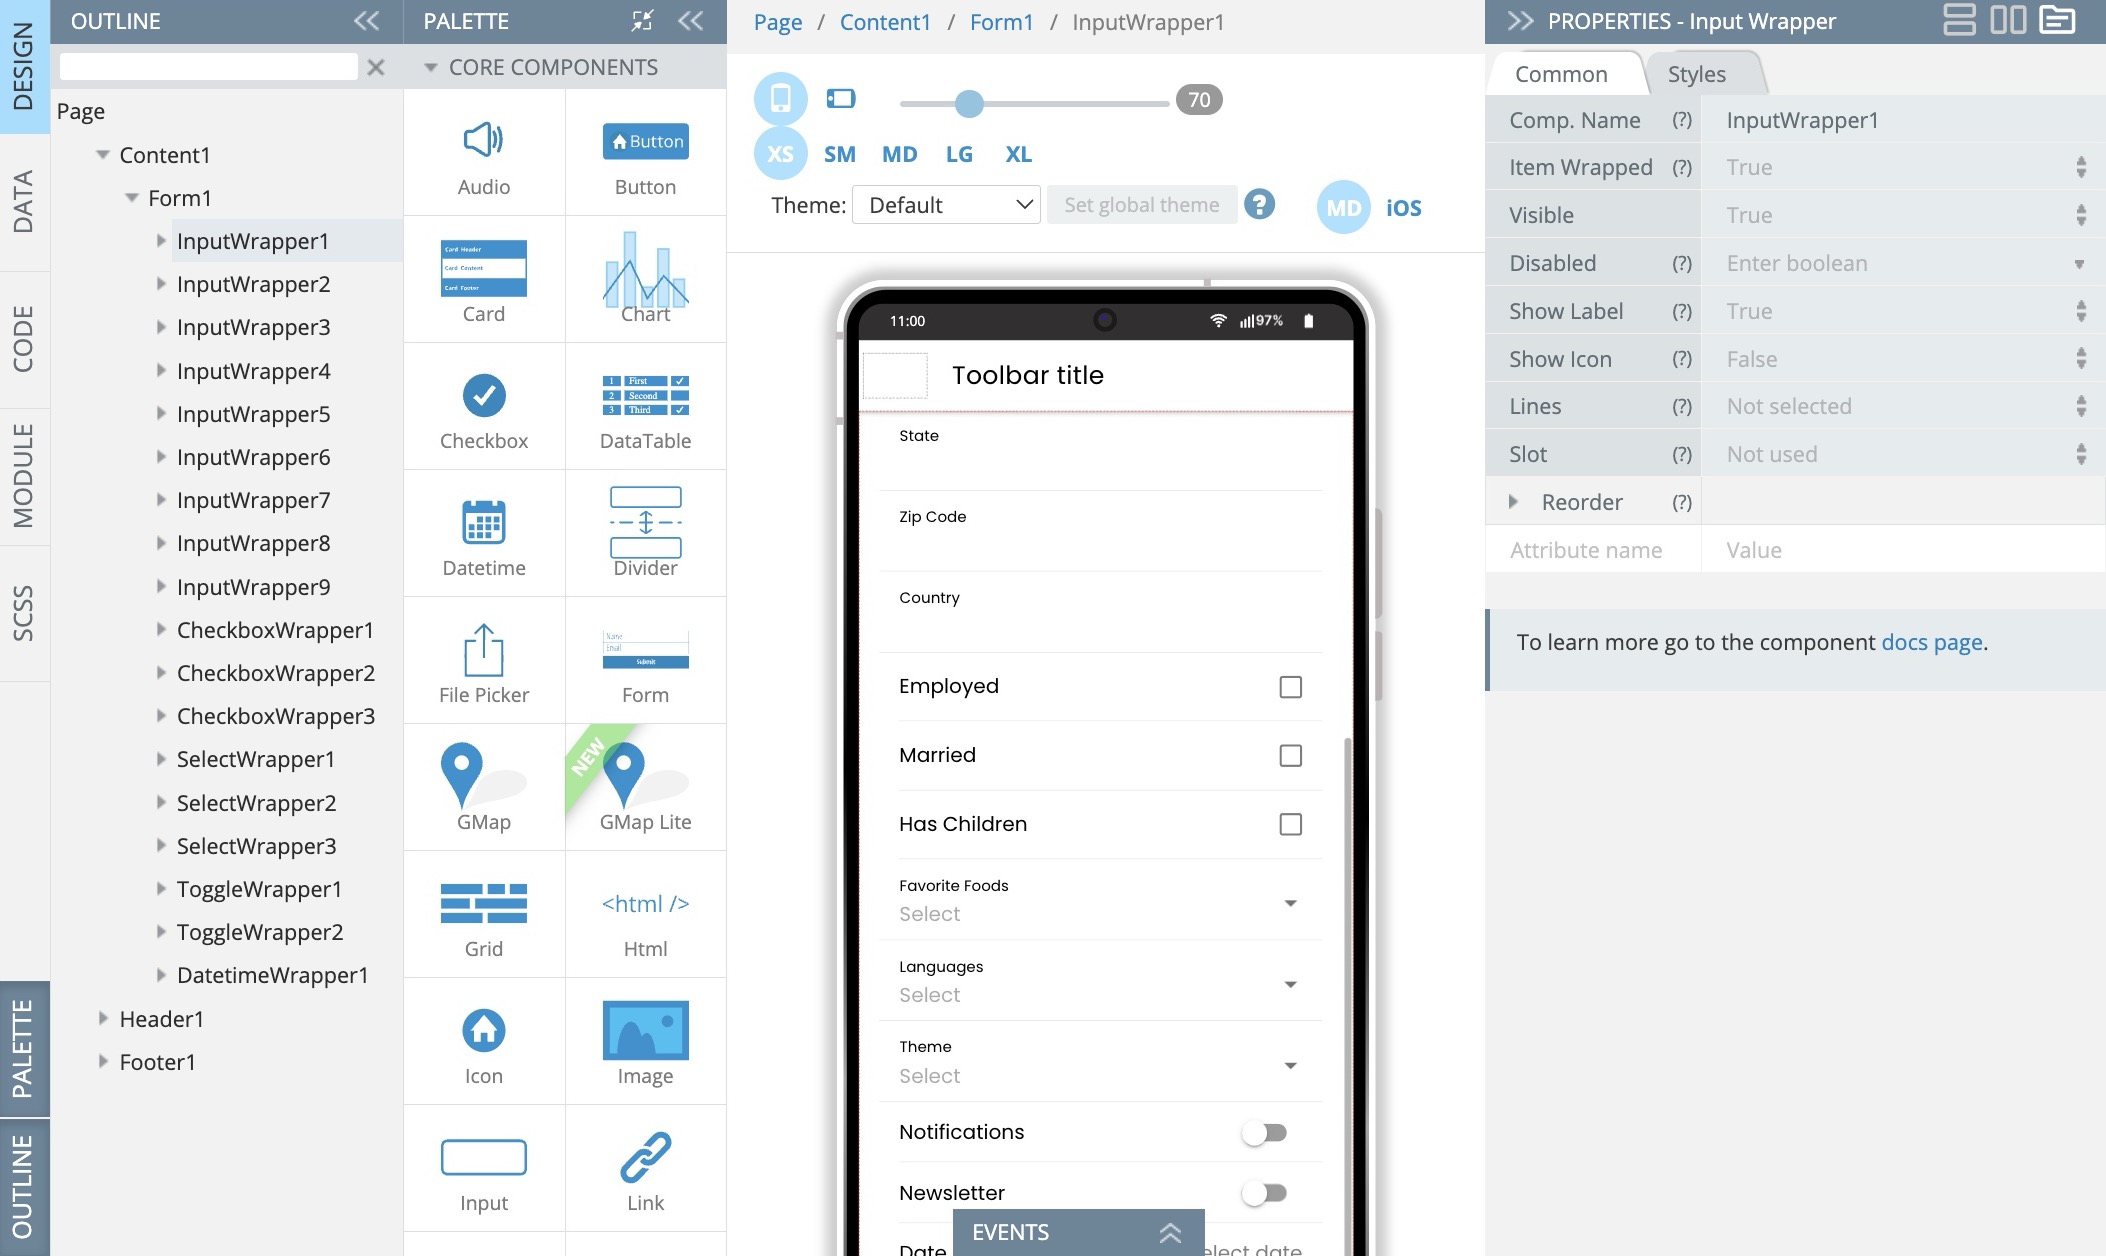
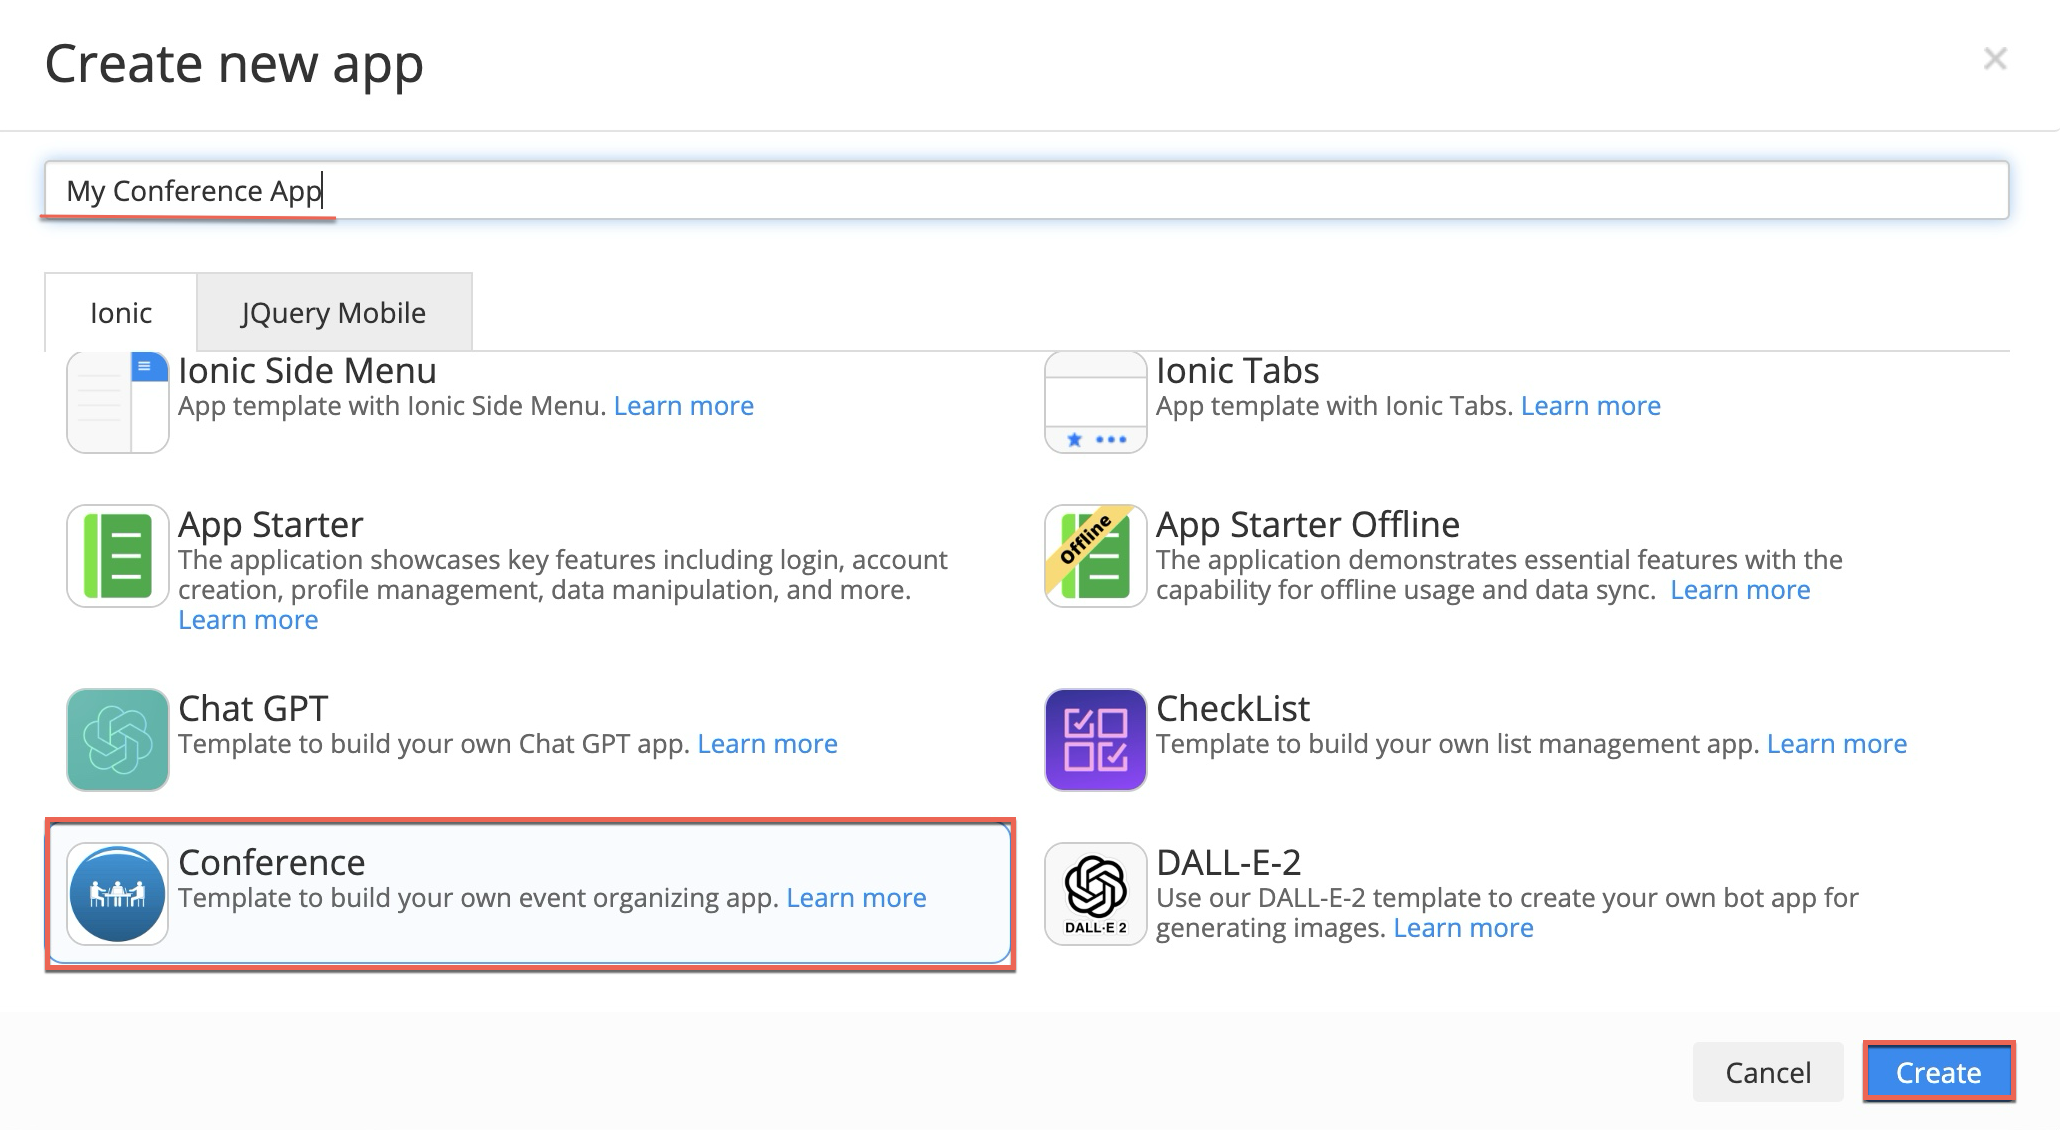
To embark on your journey with Appery.io, begin by creating an account—a gateway to a myriad of development tools. Navigate the intuitive user interface, which provides seamless access to various features and templates. Among these options, you’ll find the specialized Conference template, setting a solid foundation for your project.

Crafting the Perfect Conference Schedule

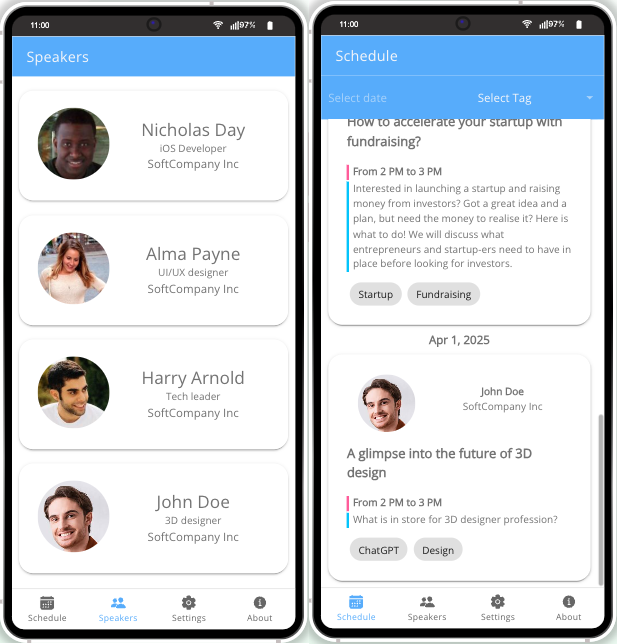
A dynamic conference schedule is the cornerstone of any successful event. Customize features like renaming the app, changing the template color themes, launch icons and screens, customizing app pages to match your event’s branding and facilitate easy attendee navigation. A well-organized schedule ensures participants can effortlessly engage with relevant sessions.

If interested, check out the instructions in the Customizing App section or watch watch our YouTube video to learn how to use our template:

Elevating the Speaker Experience

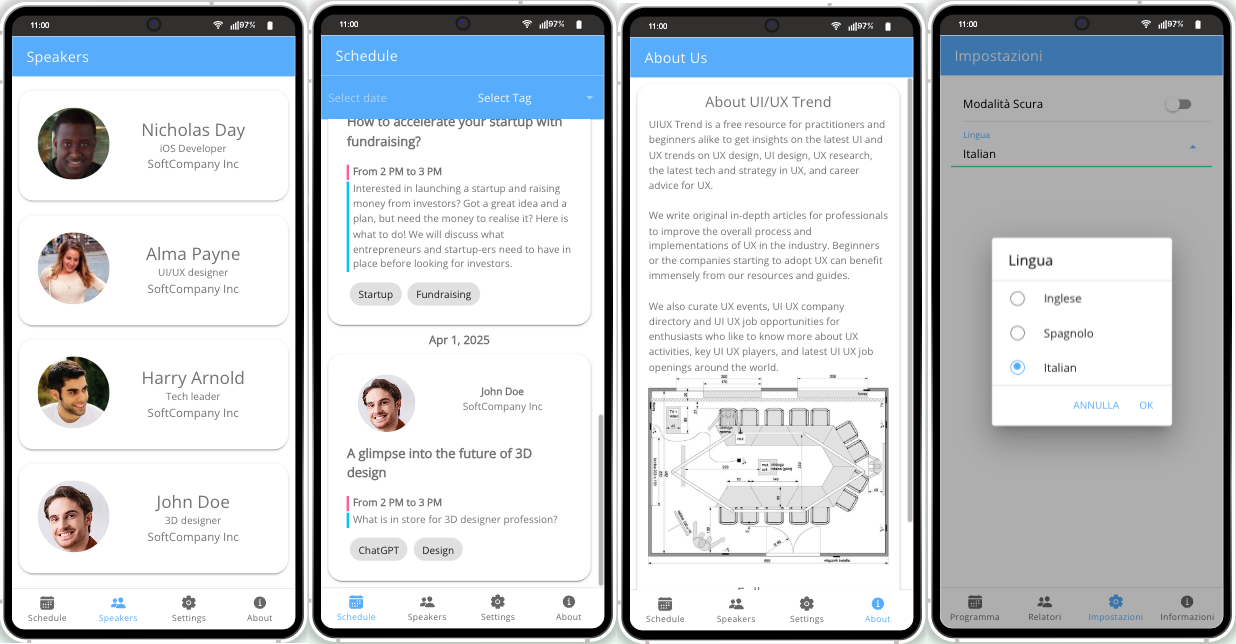
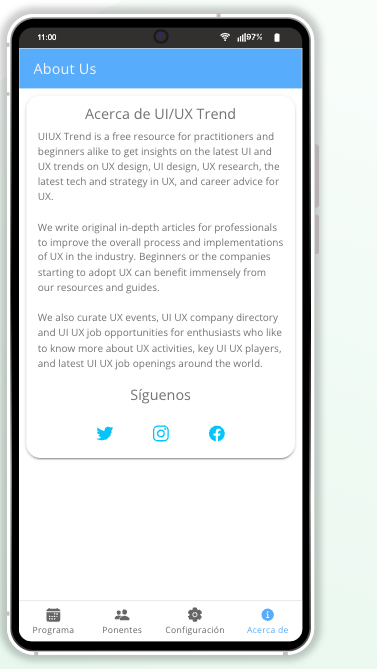
Distinguish your app by featuring detailed speaker profiles. These provide attendees with speakers’ backgrounds and related works, enriching their experience. Additionally, maintaining real-time updates ensures attendees have the most current information at their fingertips.

Engaging the Audience through the App

Interactive features within the app foster attendee engagement, transforming passive participation into active involvement. By integrating social media, you extend the event’s reach and facilitate broader interaction. A thoughtful user interface design further enhances this engagement, ensuring the app is both intuitive and visually appealing.

Customization Features at Your Fingertips

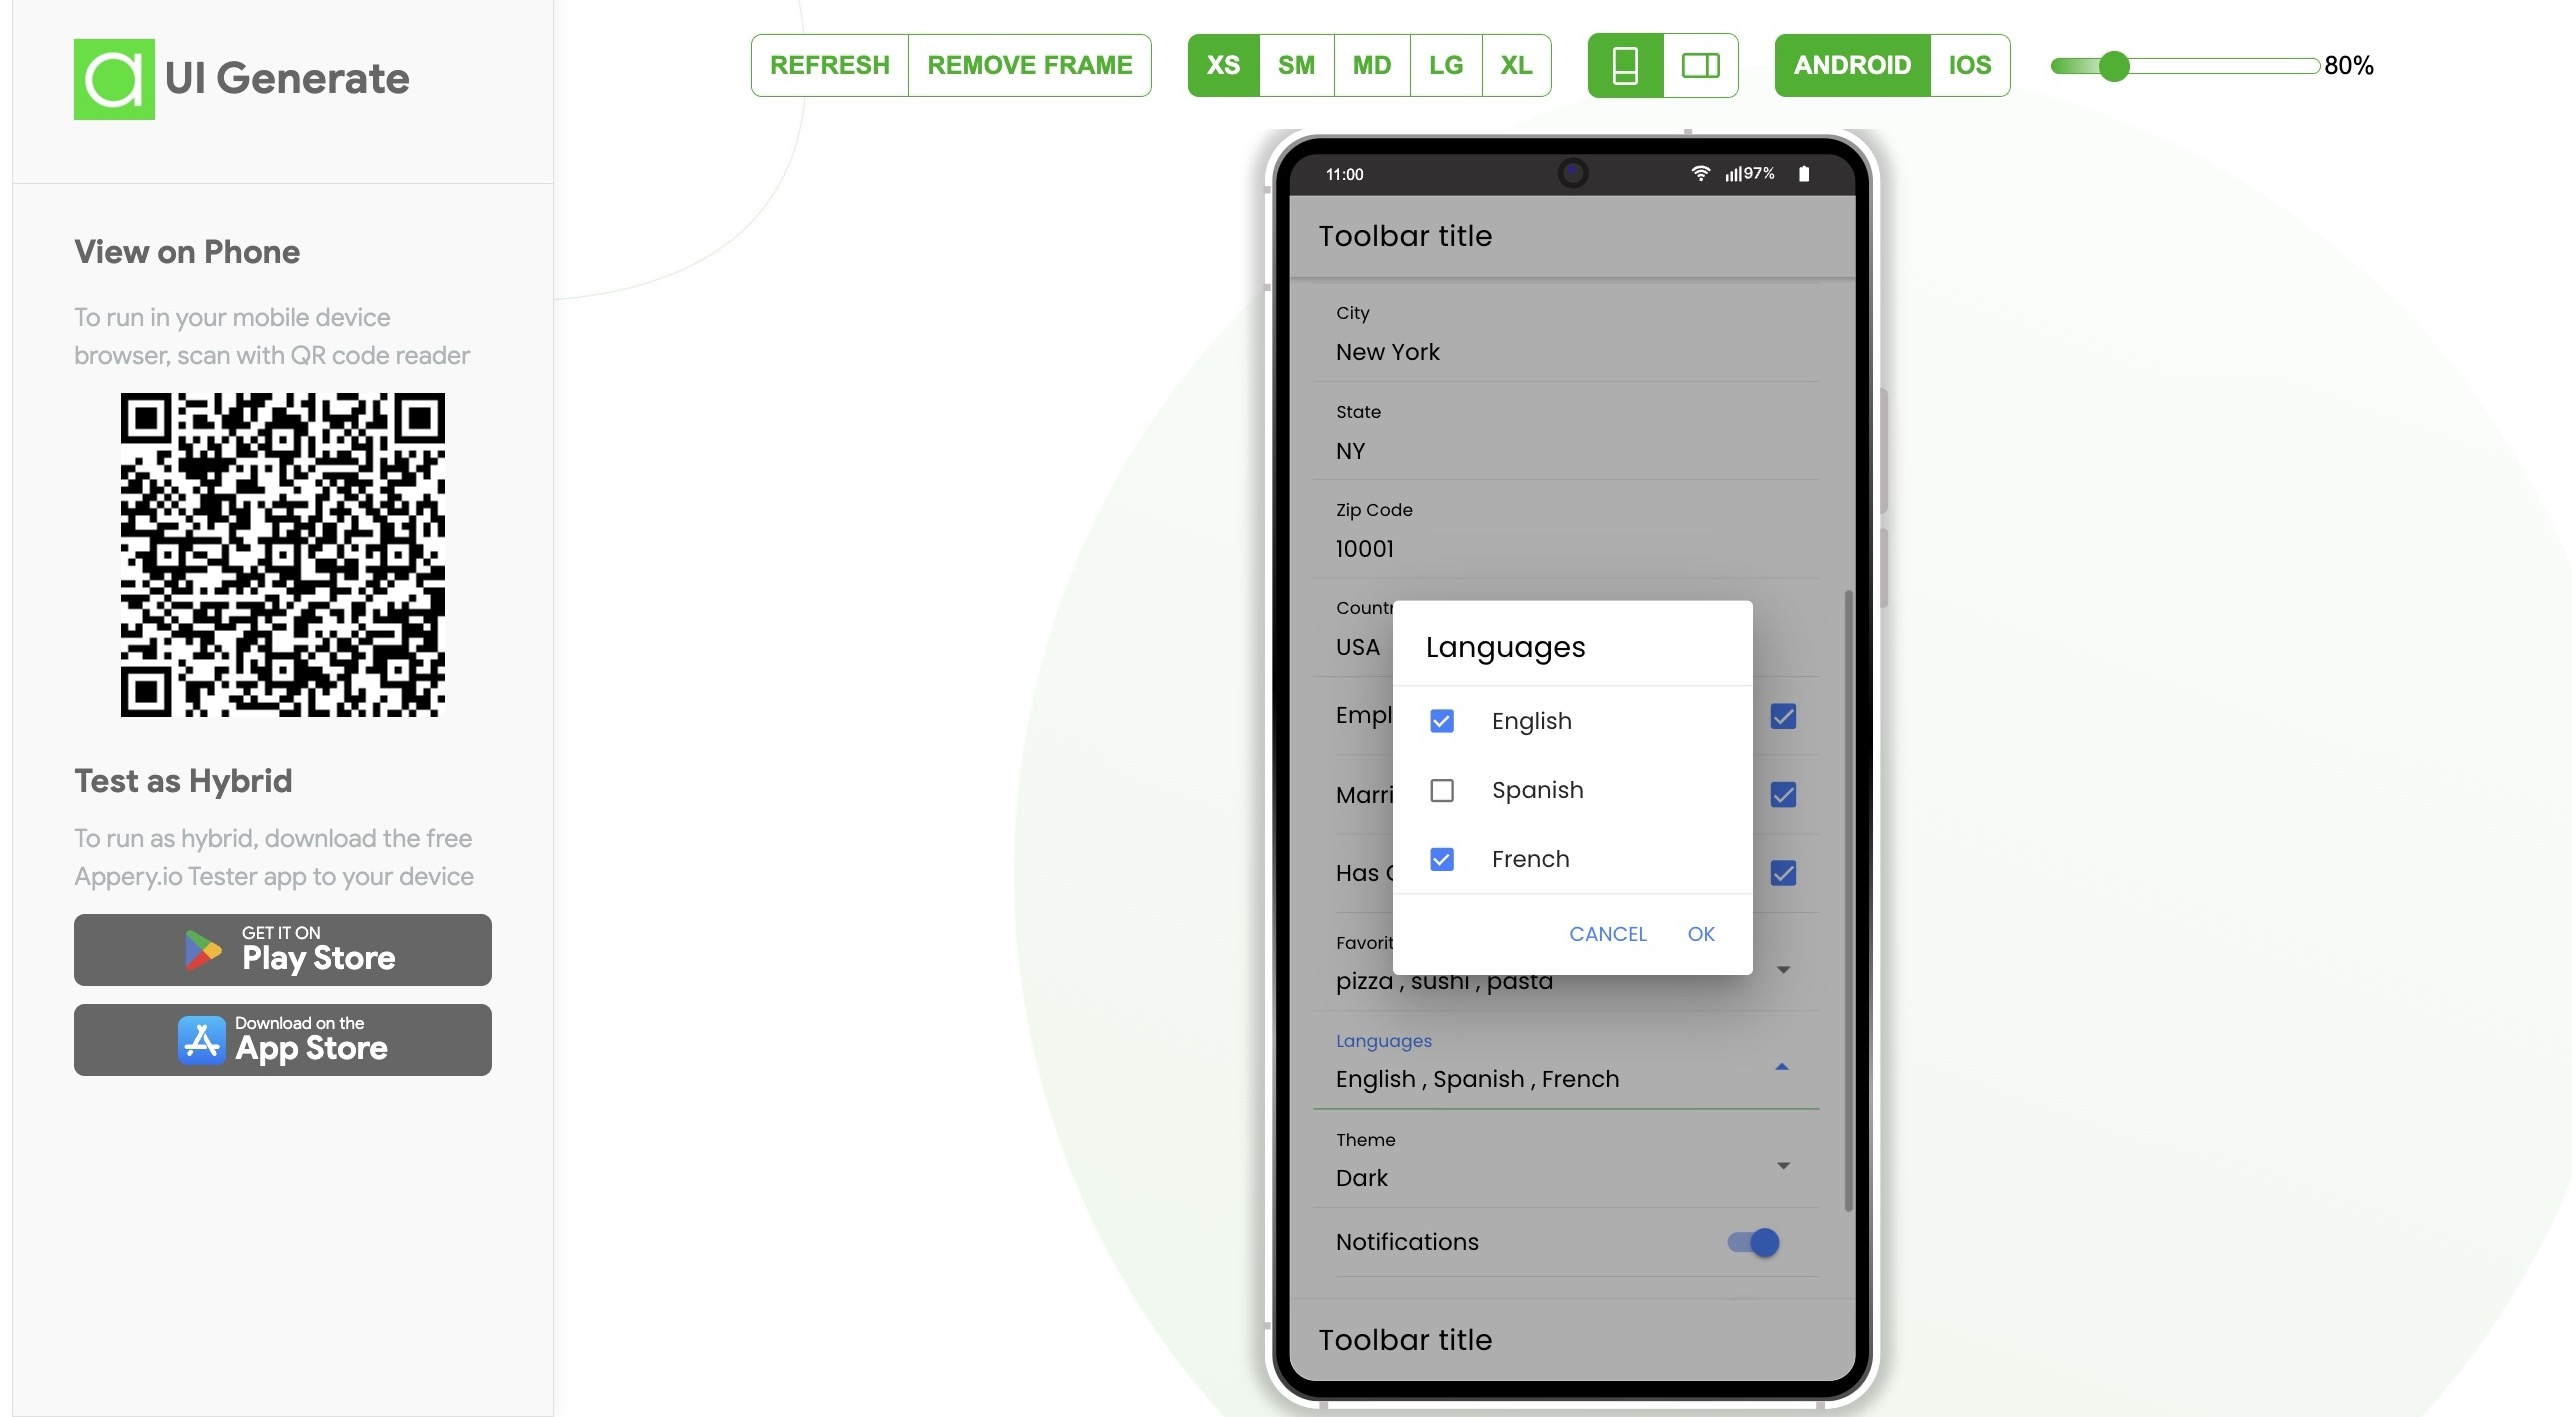
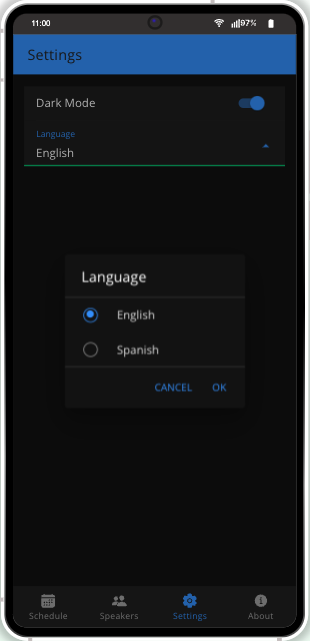
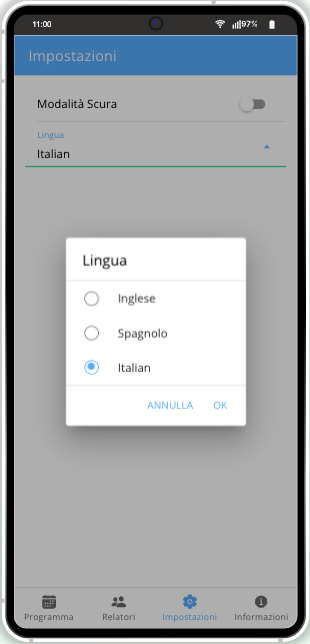
Tailor the app to meet specific audience preferences through features like language settings and dark mode. Customizing the app’s aesthetic not only enhances the user experience but also subtly reinforces brand identity.

Seamless Offline Functionality

In the digital age, providing offline functionality is a strategic advantage. Proper data caching allows users to access schedules and speaker details without internet connectivity, maintaining engagement and utility in various situations.

Tailoring Your App’s Branding

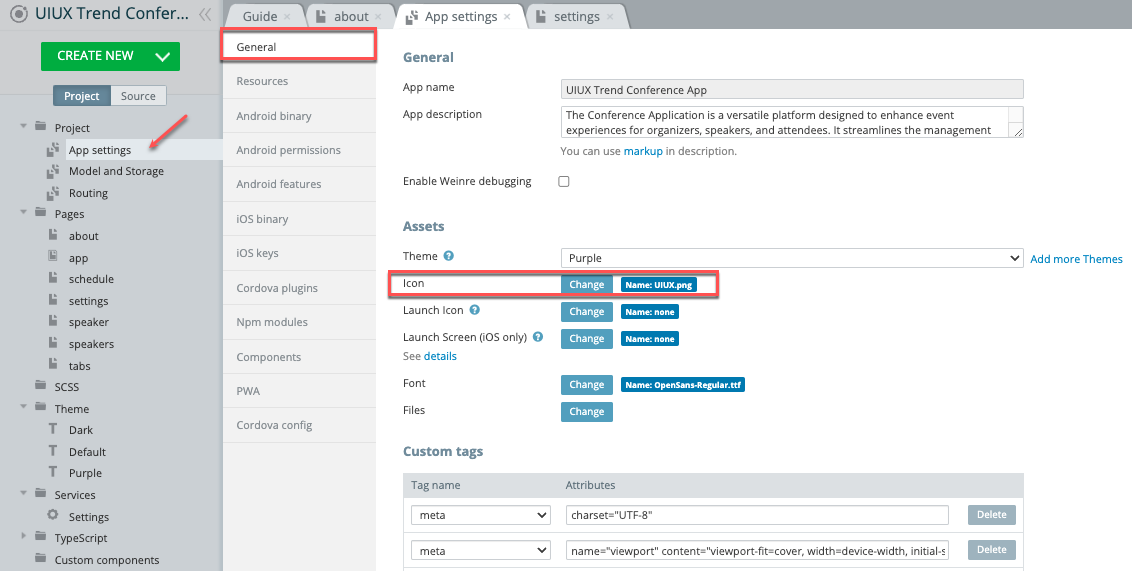
Strengthen your app’s impact by personalizing elements such as the name and icon. Aligning the app with your brand’s digital presence ensures consistency and recognition across different platforms.

Expanding Language Options

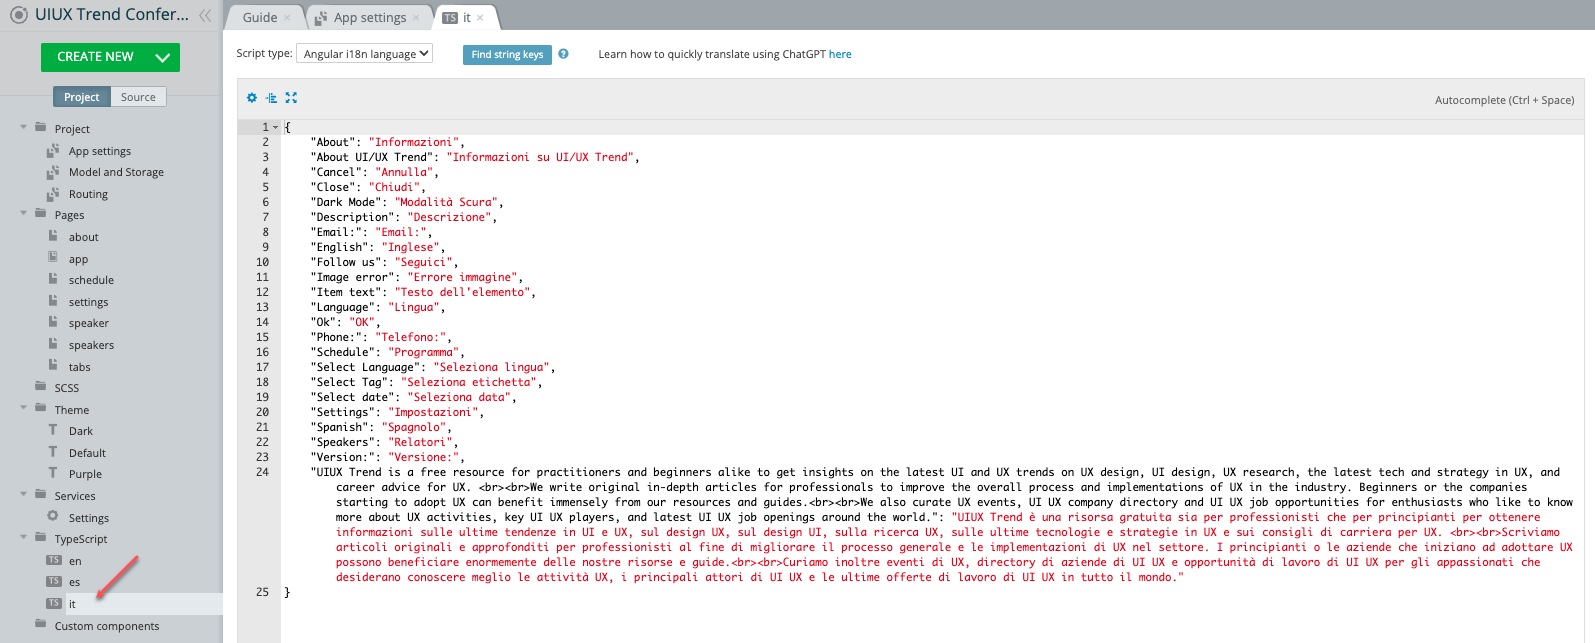
Broaden your reach by incorporating multiple languages. Appery.io facilitates this through tools like Angular and TypeScript for translations.

Comprehensive localization caters to diverse audiences, adding a layer of inclusivity to your event.

Simplifying Content Management

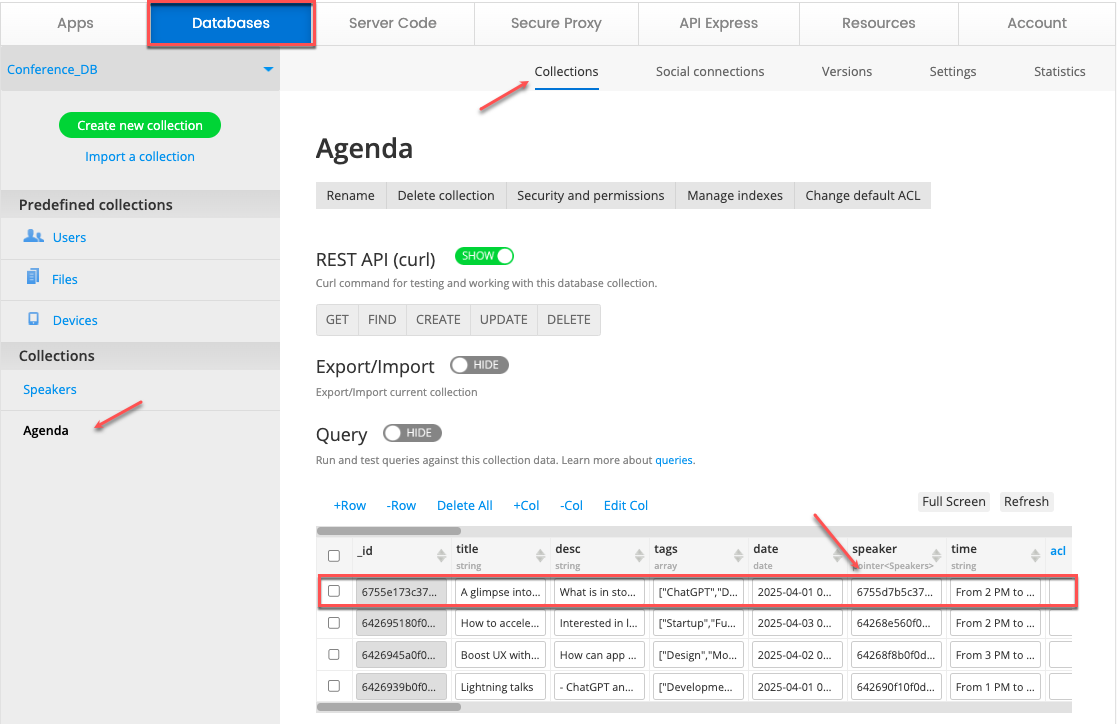
Efficient content management is essential for a streamlined user experience. Leverage the conference database to manage speaker details and agenda items effectively, ensuring all content is readily accessible and easily editable.


Final Preparations for Launch

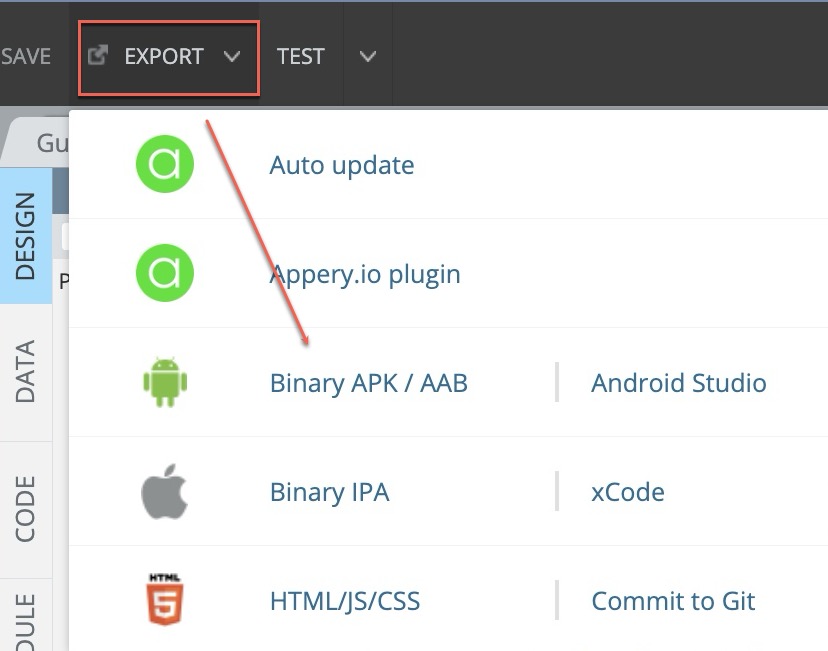
Once your app is polished and ready, export it for publication. Whether you choose the Google Play Store, the App Store, or a web application, ensure you select platforms that best serve your audience. Consider Progressive Web App (PWA) options for extended functionality and reach.


Ultimately, crafting a conference app with Appery.io is about more than just technology. It’s about creating a holistic experience that caters to the needs of organizers, speakers, and attendees alike. For those seeking a deeper exploration, the video provides a comprehensive walkthrough, rich in insights and practical tips to enhance your app development journey.

Create an Offline Map App Without Knowing How to Code!

Are you ready to turn your mobile device into an offline map powerhouse?

Imagine exploring new places with no need for data connections. With Appery.io’s Offline Map app template, you can create a fully functional map app — no coding experience required. Here’s how you can get started today.

To make sure creating this app takes minimum of your time and efforts, you can watch our YouTube video:

Also, you are free to follow our detailed tutorial on using our customizable Offline Map app template. 

In short, the process can be described in the following simple steps:

Step 1: Build Your Offline Map App with Appery.io

Creating your app with Appery.io is a breeze. Simply:

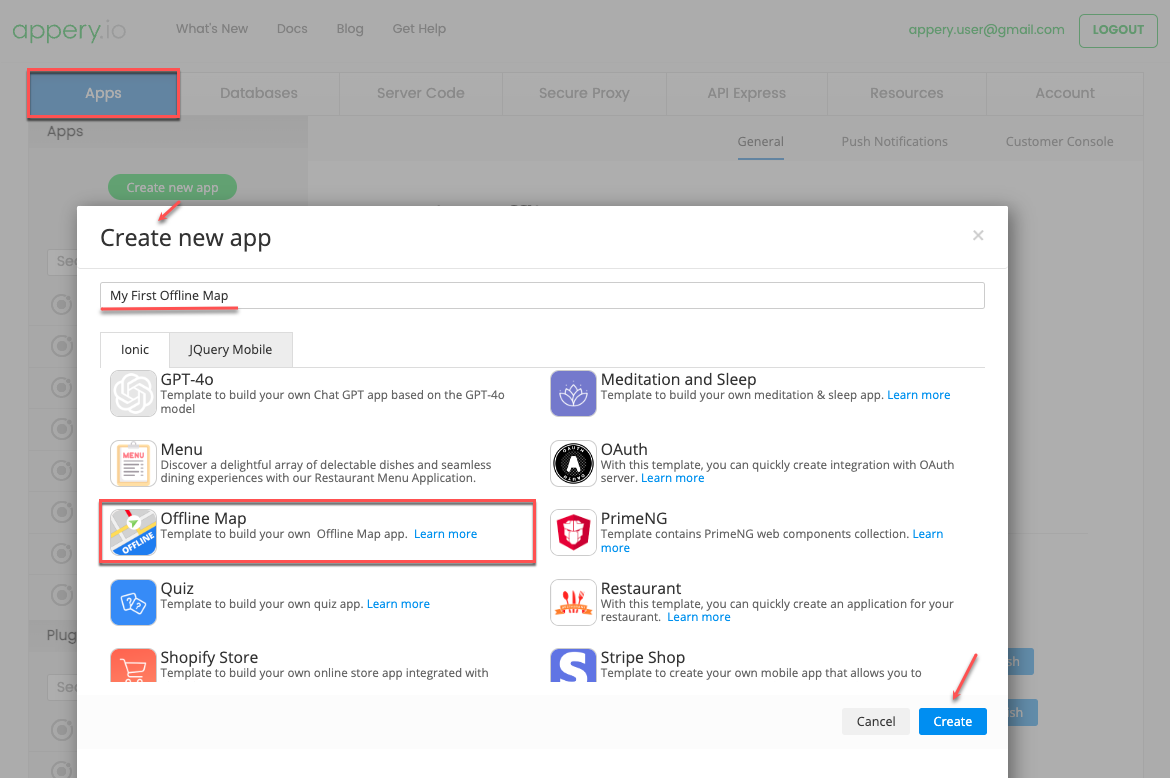
  1. Go to the Apps tab in Appery.io.
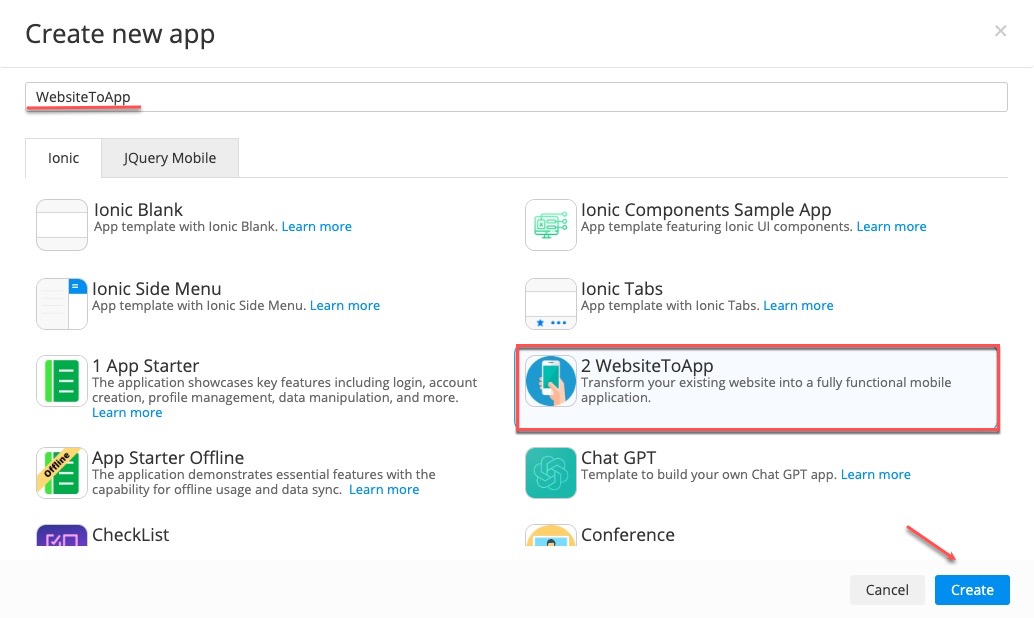
  2. Click Create new app and choose the Offline Map template.
  3. Give your app a name, click Create, and your project will be ready in seconds.

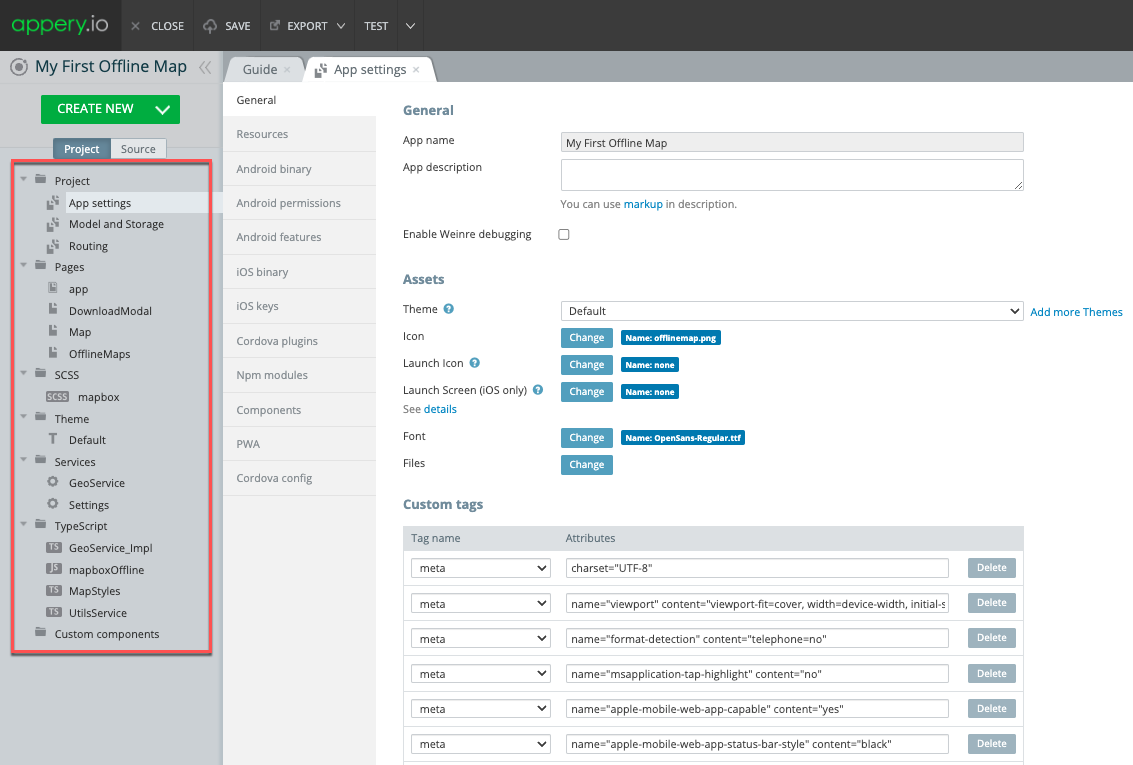
This template includes predefined data and settings to make the setup seamless. You’ll see everything organized in the Project view section, with all essential elements already in place.

Step 2: Get a Mapbox Access Token

To activate your maps, you’ll need a Mapbox access token:

  1. Visit the Mapbox’s website and generate your unique access token.
  2. In Appery.io, navigate to Services > Settings and enter your token.

This token enables the map features and gives you access to interactive, high-quality mapping.

Step 3: Test Your App on a Device

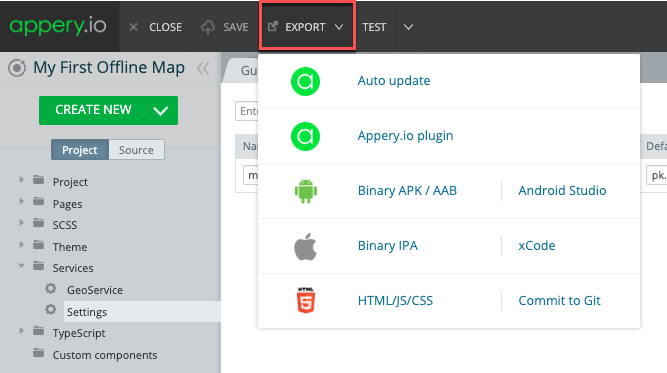
Testing in a browser won’t work due to the native APIs. To test, click to export the app as an APK (Android) or IPA (iOS), or use the Appery.io Tester app for quick previews.

Exploring the Offline Map App

Launch the app, and you’ll see a default map of San Francisco. Test the different view modes, like Streets or Outdoors, to see what suits you best.

Pro Tip: Use the Appery.io Tester app (available for free on iOS and Android) to preview your map instantly before exporting.

Want a full-screen experience? Hide the controls while using the Appery.io Tester.

To go fully offline, follow these steps:

  1. Enable online mode on your device.
  2. Click Maps to open the preloaded maps page.
  3. Download one of the maps — this is what allows offline access later.

Now you’re set to navigate without an internet connection!

Customize Your App

You’re free to modify the template to fit your specific needs. The template documentation provides insights on how to use free maps from resources like MapTiler. Whether you choose free or paid maps, you’ll find options to match your adventure.

Export Your App

When done, take your app on the road! With Appery.io, exporting is easy. For Android and iOS, follow the export guides linked in the template documentation.

Start Navigating — No Connection Required!

With Appery.io’s Offline Map app template, your mobile device becomes a robust, customizable navigation tool. Perfect for travel, hikes, and exploring remote areas, this template takes your app ideas offline with ease.

Happy navigating!

Custom Domain Publishing Made Simple with Appery.io

Are you interested in mobile app development but concerned about the complexities of deploying your app? Look no further! Today, we’ll discuss custom domain publishing in the context of Appery.io, a user-friendly, low-code app-building platform. This feature allows you to seamlessly publish your Appery.io application on a custom domain with an automatically generated SSL certificate. This process eliminates the need for purchasing SSL certificates, saving you both time and money.

What is Appery.io?

Appery.io is an accessible, low-code platform designed for developing mobile apps. It stands out due to its ease of use and rapid development capabilities. Whether you’re an experienced developer or just starting your journey, Appery.io provides an intuitive interface for building high-quality applications quickly.

Why Choose Custom Domain Publishing?

1. Professional Appearance: Publishing your app on a custom domain provides a more professional look and feel.

2. Enhanced Security: The automatically generated SSL certificate ensures your app is secure without any additional costs.

3. Ease of Sharing: Custom domains make it easier for users to remember and access your app.

Step-by-Step Guide to Custom Domain Publishing

Here’s a simple guide to publishing an Appery.io application on a custom domain:

1. Enter Your Domain Name:

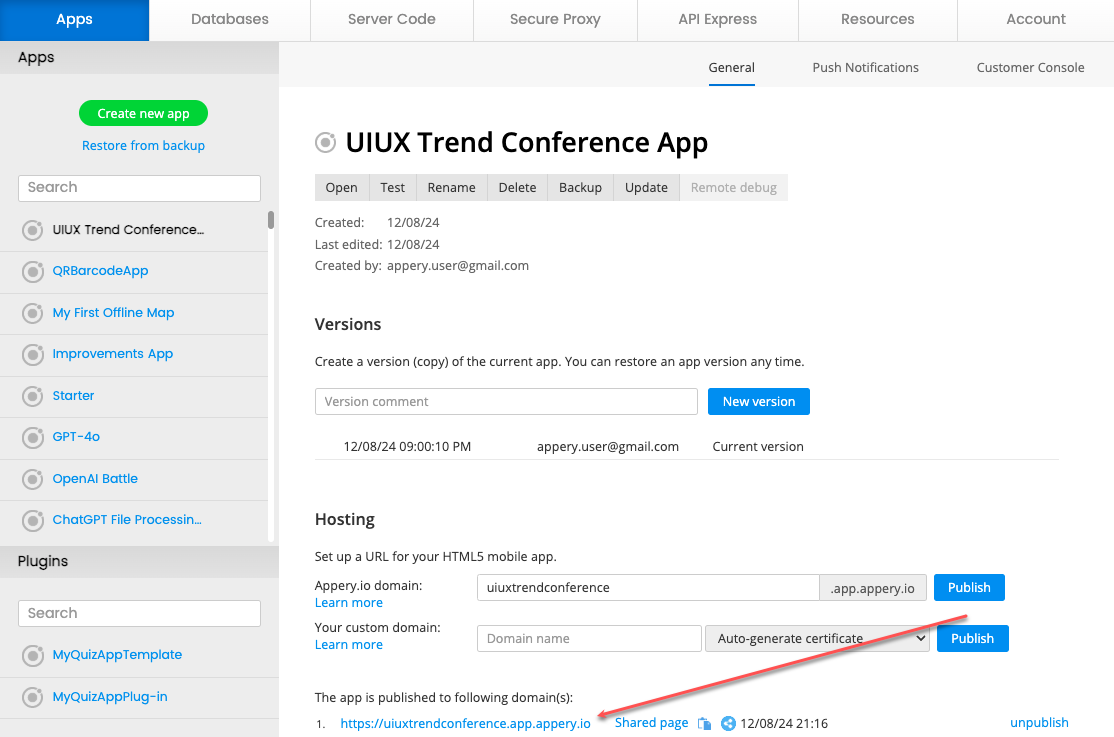
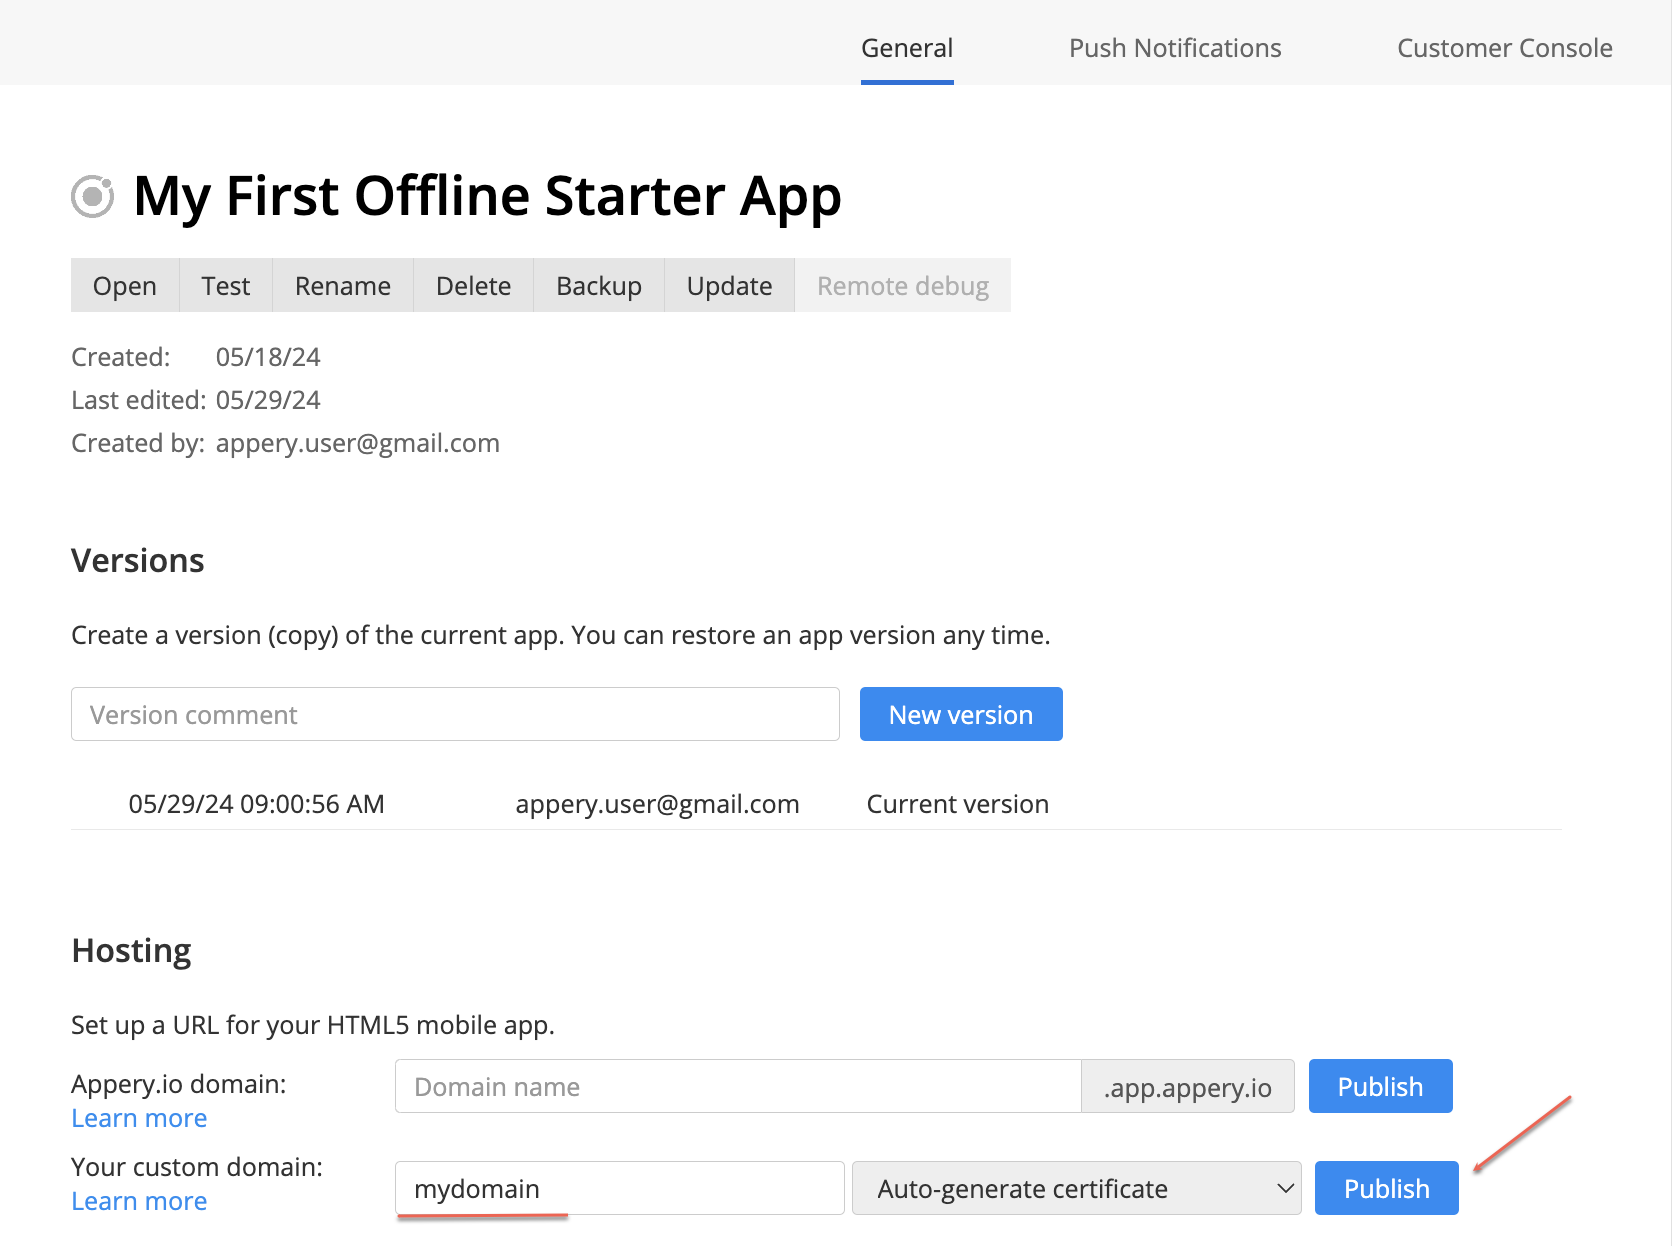
– If you have an existing domain, enter it in the designated field within the Appery.io platform Hosting section and click Publish.

– Follow the on-screen instructions for the next steps.

2. Don’t Have a Domain?

– Click on the provided link to purchase a domain from Google or another domain provider.

3. Configure DNS Settings:

– If you already own a domain, navigate to your Domain Registration Website.

– Click on the “Manage” button and access the DNS settings.

– Add a new record: specify the name and IP address you copied from the instructions.

4. Finalizing the Process:

– Retry the publish process if an error occurs; sometimes, new DNS records need a few minutes to propagate.

– Click Publish again. Once completed, your app will be available by default via HTTPS.

Viewing and Sharing Your Published App

Once your app is published, you can view it through the provided link. For sharing purposes, Appery.io offers a user-friendly interface that makes your app more appealing and professional. You can share this directly on popular social media platforms like Facebook, Twitter, LinkedIn, or even via email.

Conclusion

Custom Domain Publishing withAppery.io makes mobile app deployment straightforward and efficient. No more worries about buying SSL certificates or dealing with complicated setup processes. Your app can now have a professional touch with enhanced security in just a few steps.

Sounds interesting? Head over to our latest video for the complete guide!

If you found this article helpful, consider subscribing to our blog for more guides and tips. Thank you for reading, and happy app developing!


Ultimate Guide: Set Up Push Notifications for iOS with Appery.io

Push Notifications for iOS are essential for keeping your app users engaged and informed. Imagine seamlessly integrating this vital feature into your mobile app without coding headaches. That’s exactly what you can do with Appery.io, a user-friendly, low-code app-building platform. Let’s take a closer look at how you can set up push notifications for iOS using Appery.io.

Why Use Push Notifications for iOS?

Push notifications are a powerful way to communicate with your users. They ensure timely updates, promote re-engagement, and improve overall user experience. For iOS apps, configuring push notifications can often seem complex. But with Appery.io, even those without deep technical expertise can accomplish this task with ease. For details, you can watch our how-to video or follow the steps below.

Getting Started with Appery.io

Before diving into the configuration process, you need to create your app on Appery.io:

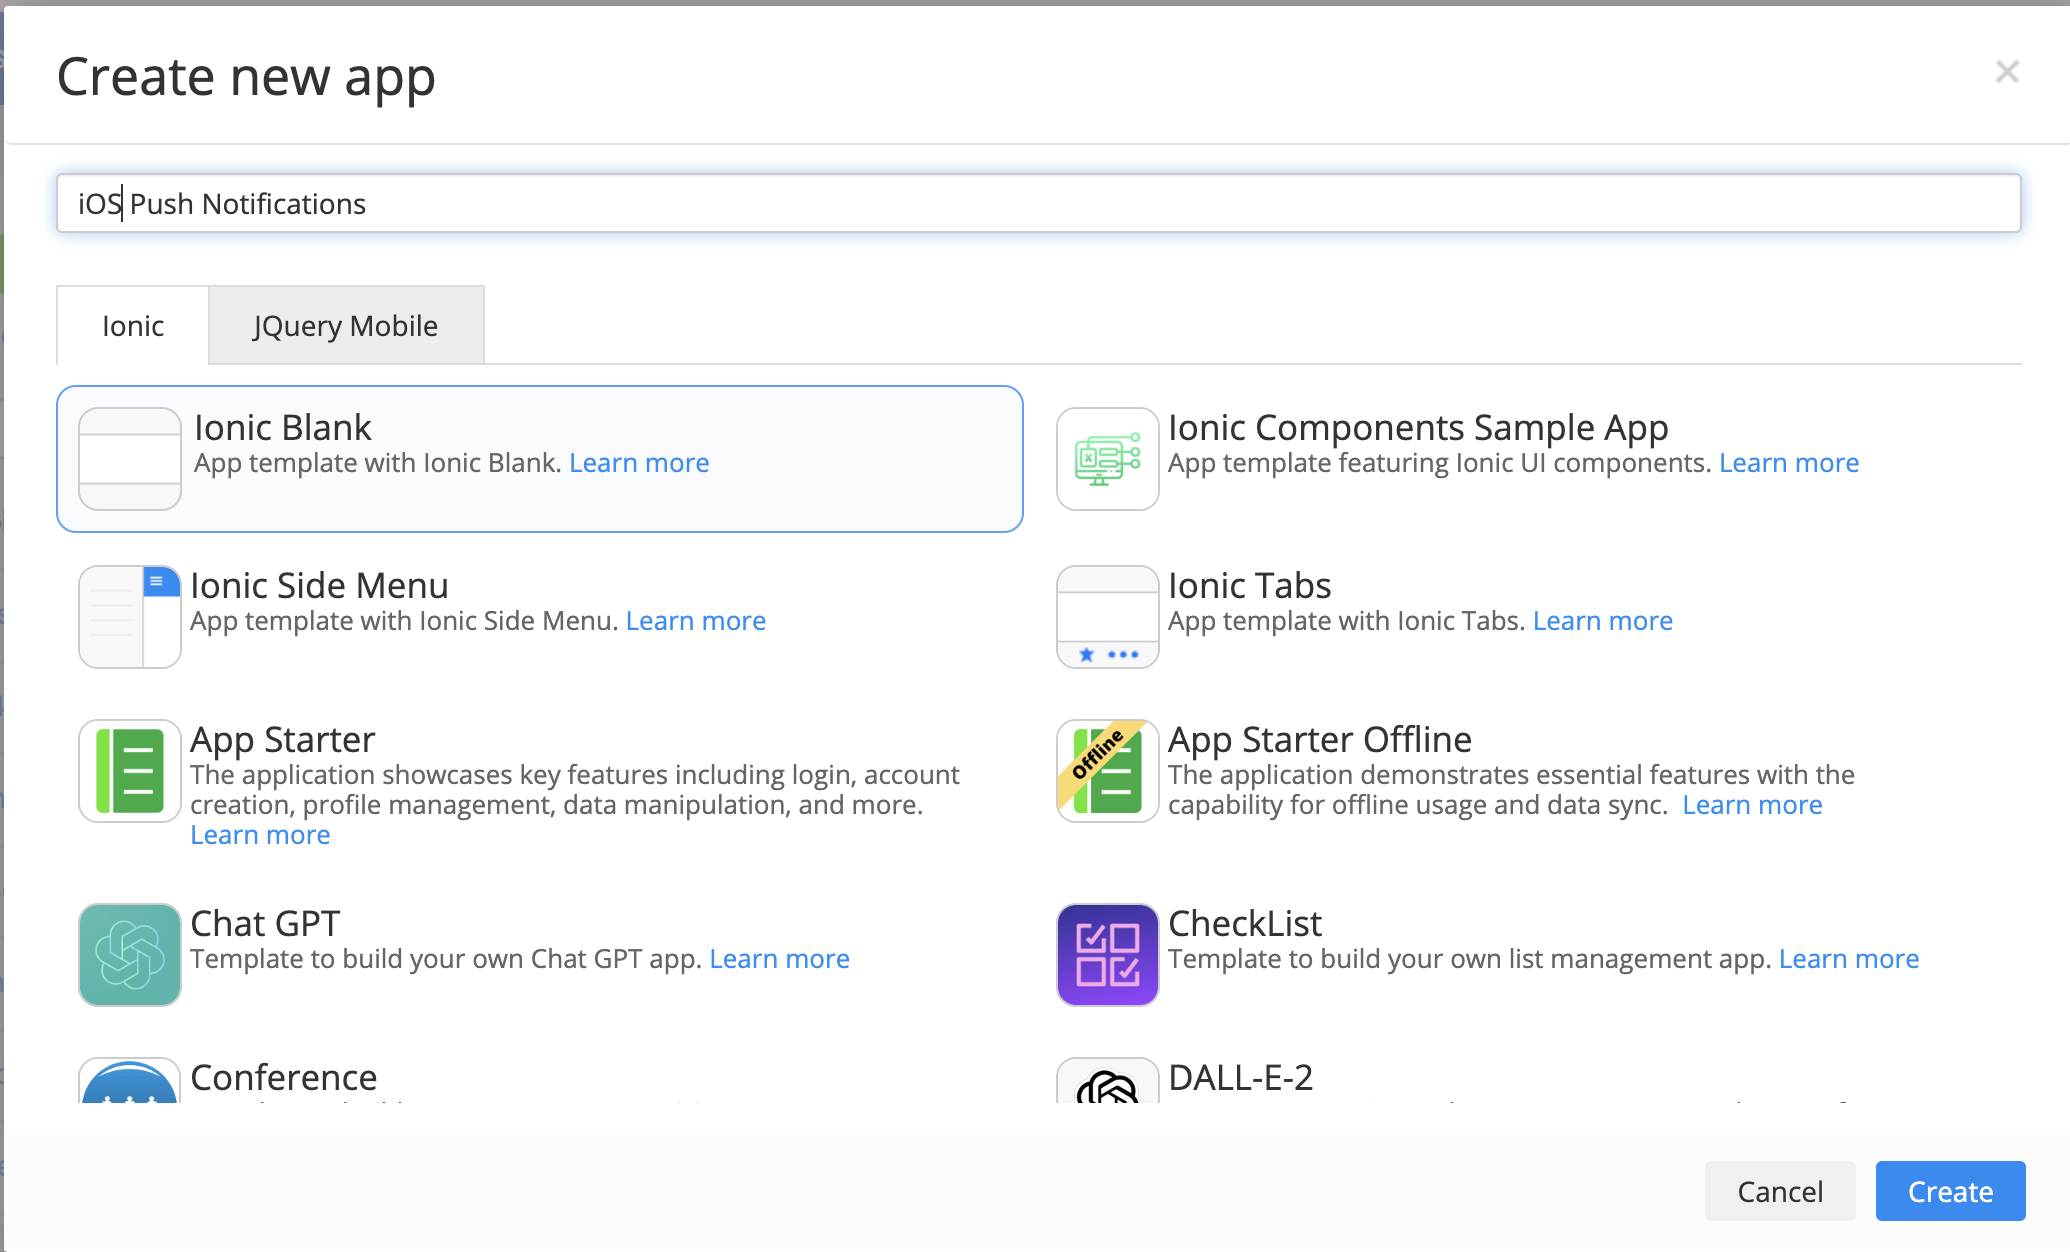
1. Create Your App:

– Log into Appery.io.

– Start a new project by selecting the template that suits your requirements.
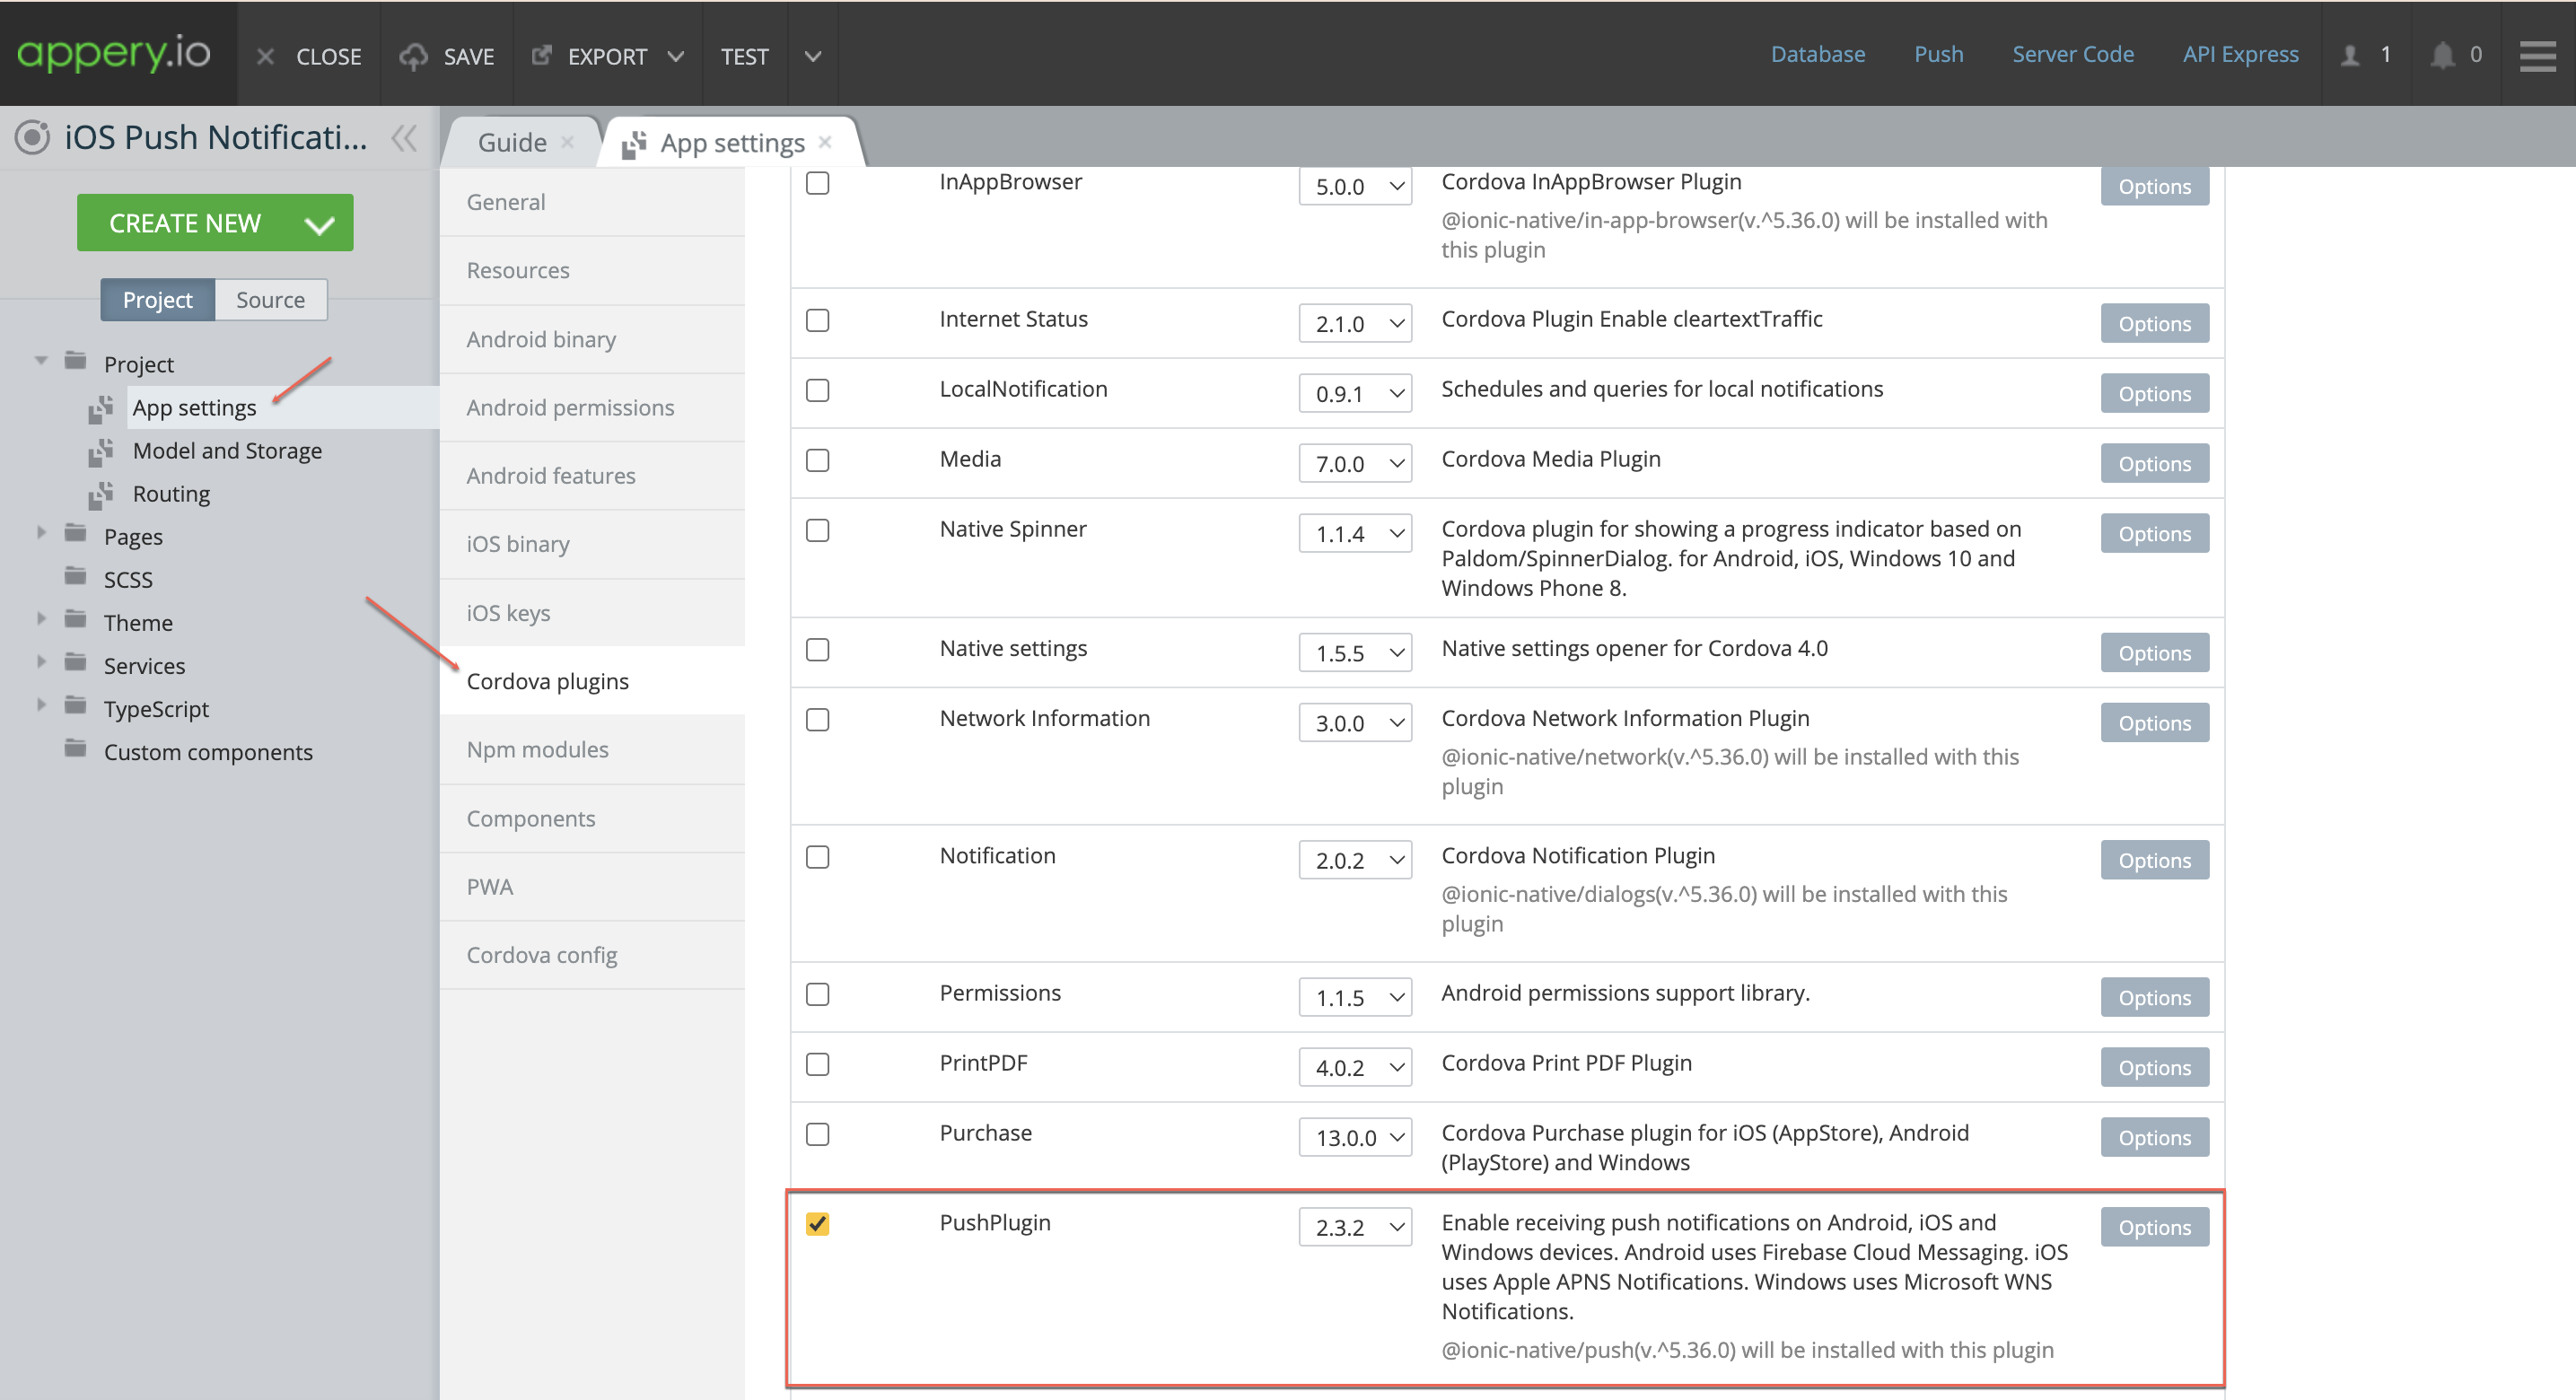
2. Enable Push Cordova Plugin:

– Navigate to the App settings > Cordova plugins section.

– Enable the Push Cordova plugin to add push notification capabilities.
3. Configure iOS Binary:

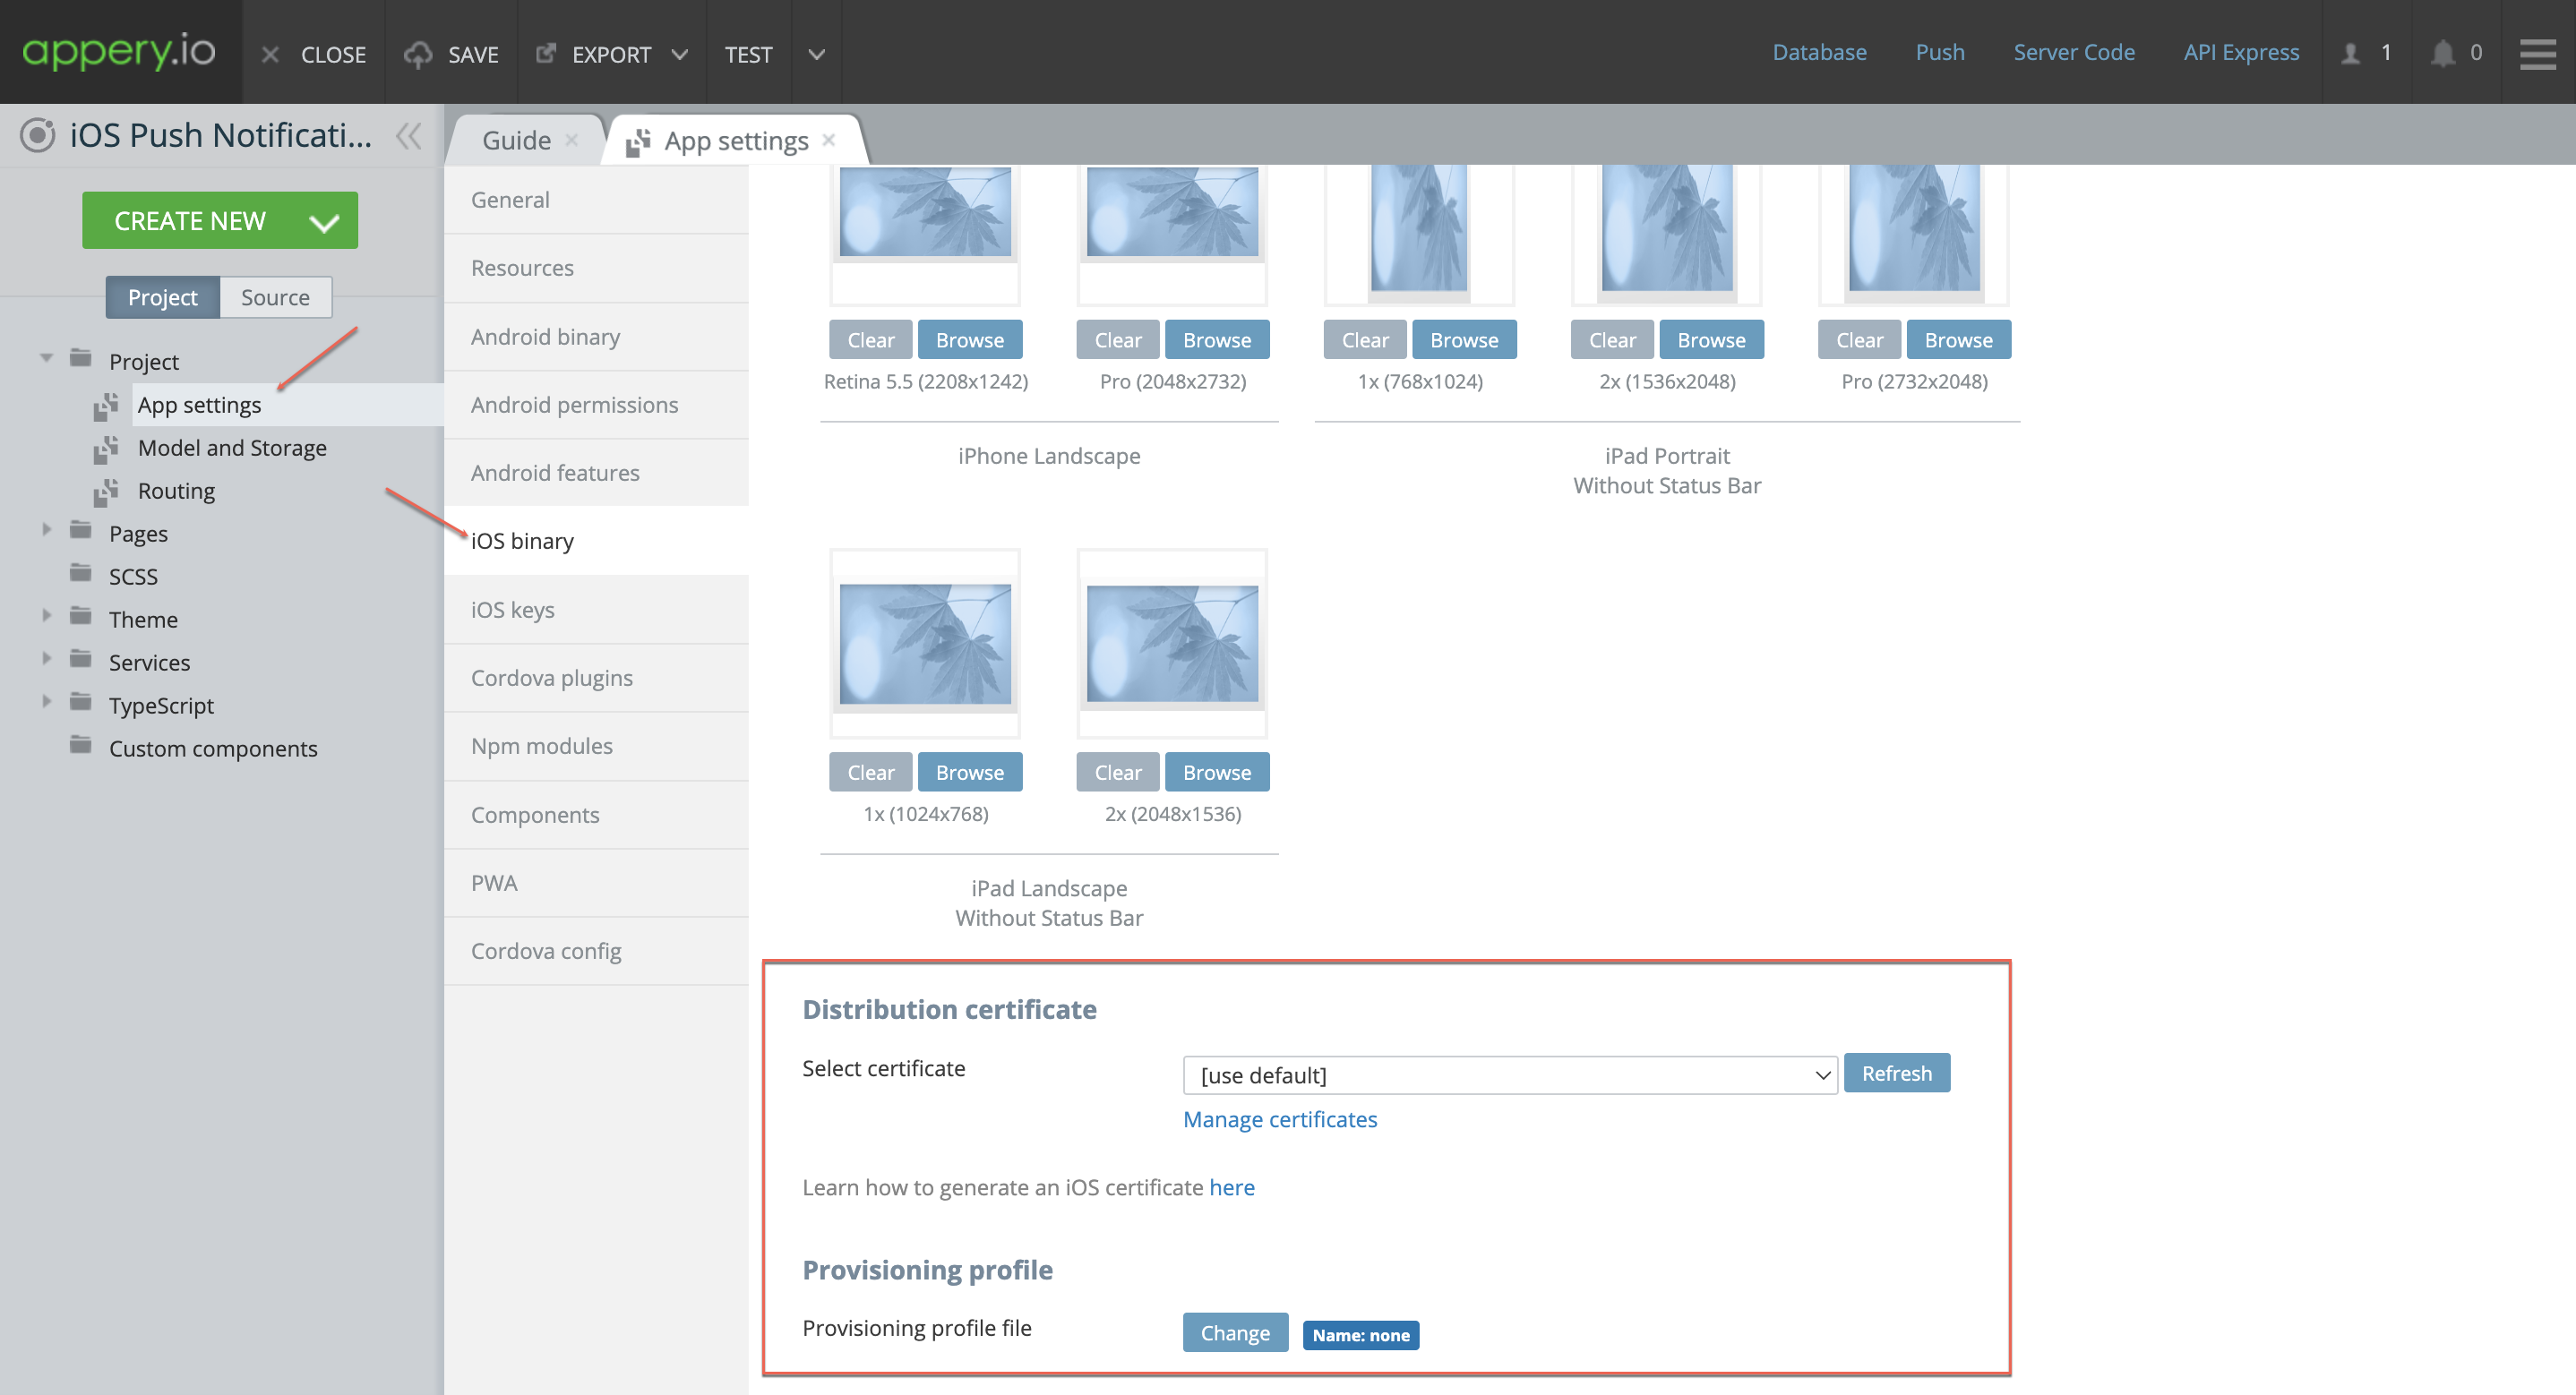
– Go to the iOS binary section and note that the app already has a bundle ID that is required for setting an app for iOS.
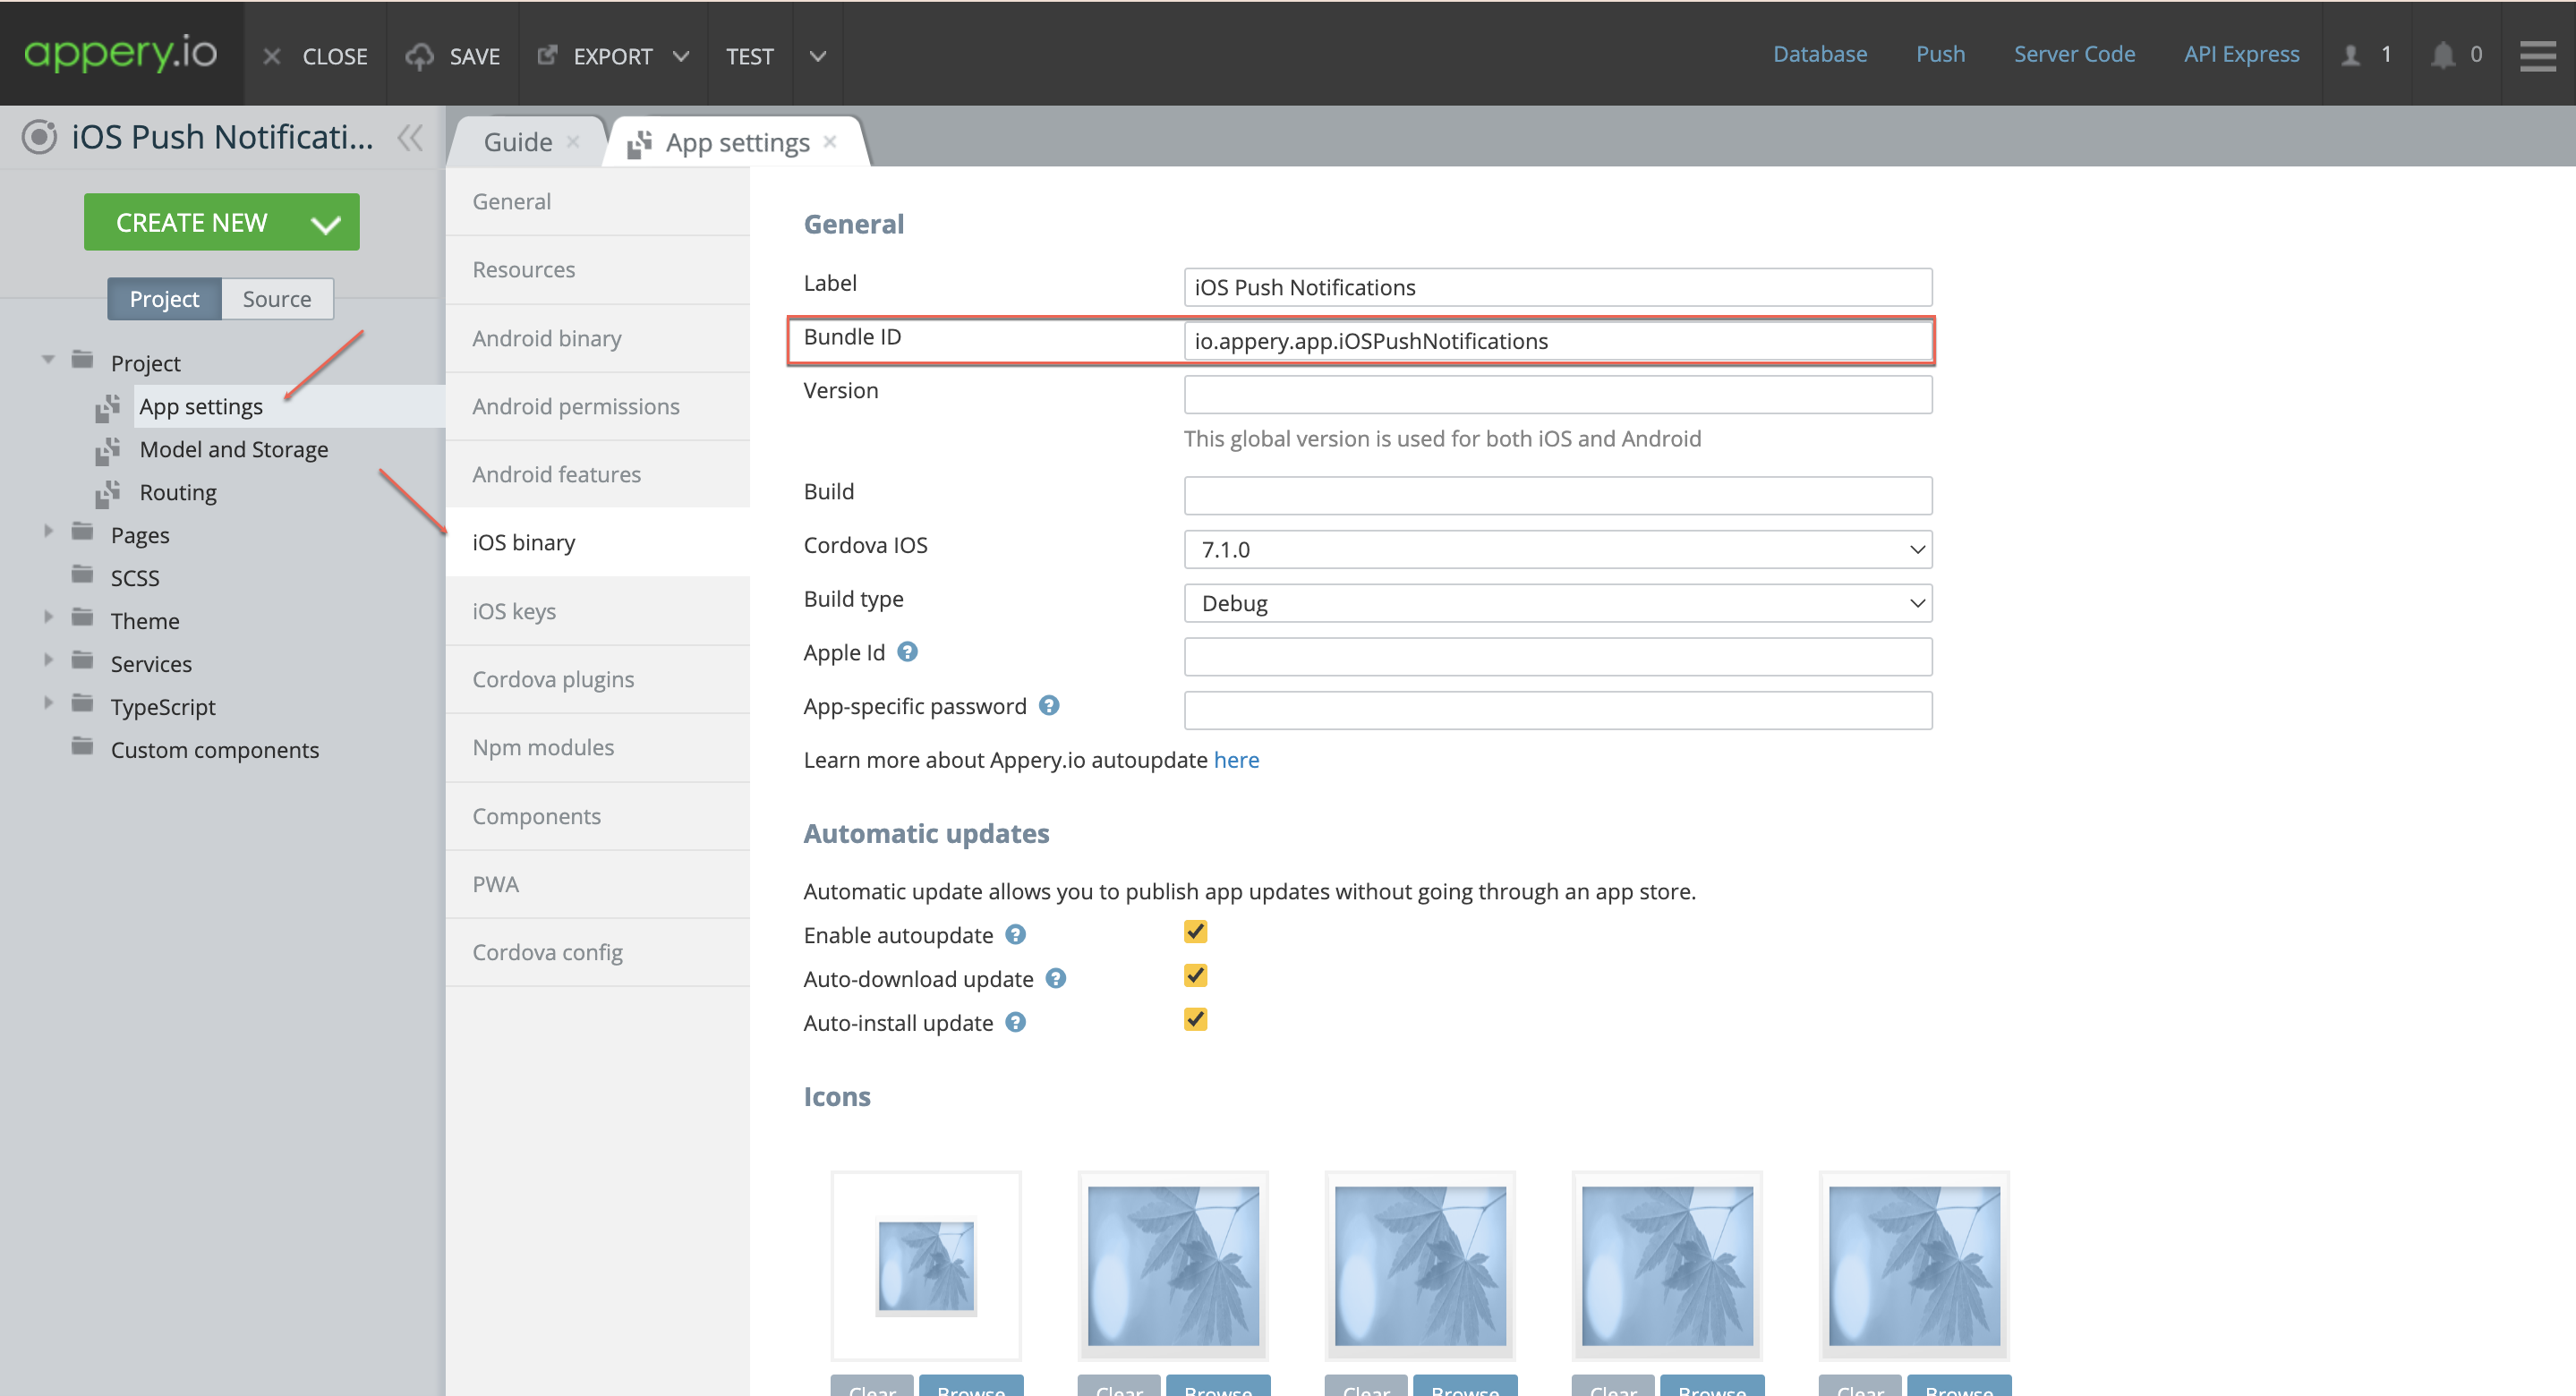
Note that the build type indicated is Debug which means the app is created for testing purposes. When building an app to be uploaded to the App Store, select the Release option instead.

– However, due to Apple’s policies, you need a a distribution certificate and provisioning profile to install apps on iOS devices.
Setting Up Your Apple Developer Account

Setting up your Apple Developer account is a must if you plan to develop for iOS. So, if you have no account, you need to create it. When done, you are ready to start with configuring your Apple Developer Console.

1. Create a Certificate:

– Log into the Apple Developer Console, click the Identifiers link.
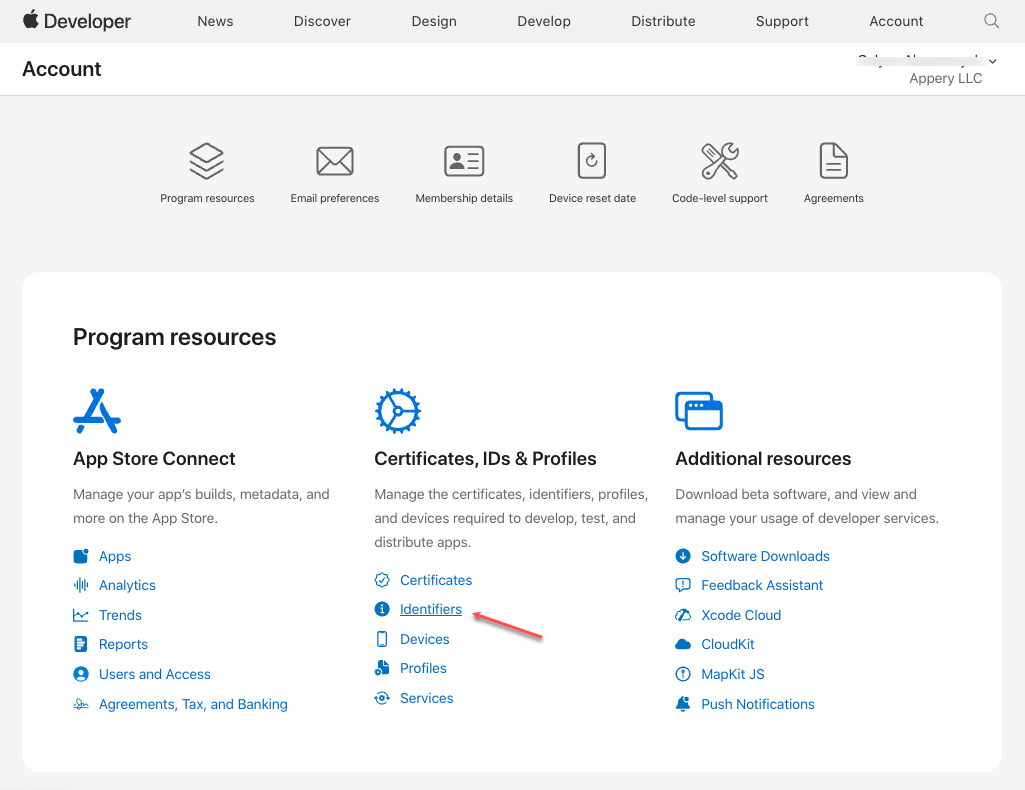
– Create an identifier for your app by clicking the button, specifying it as an App ID (paste the Bundle ID you copied before) and adding the description.
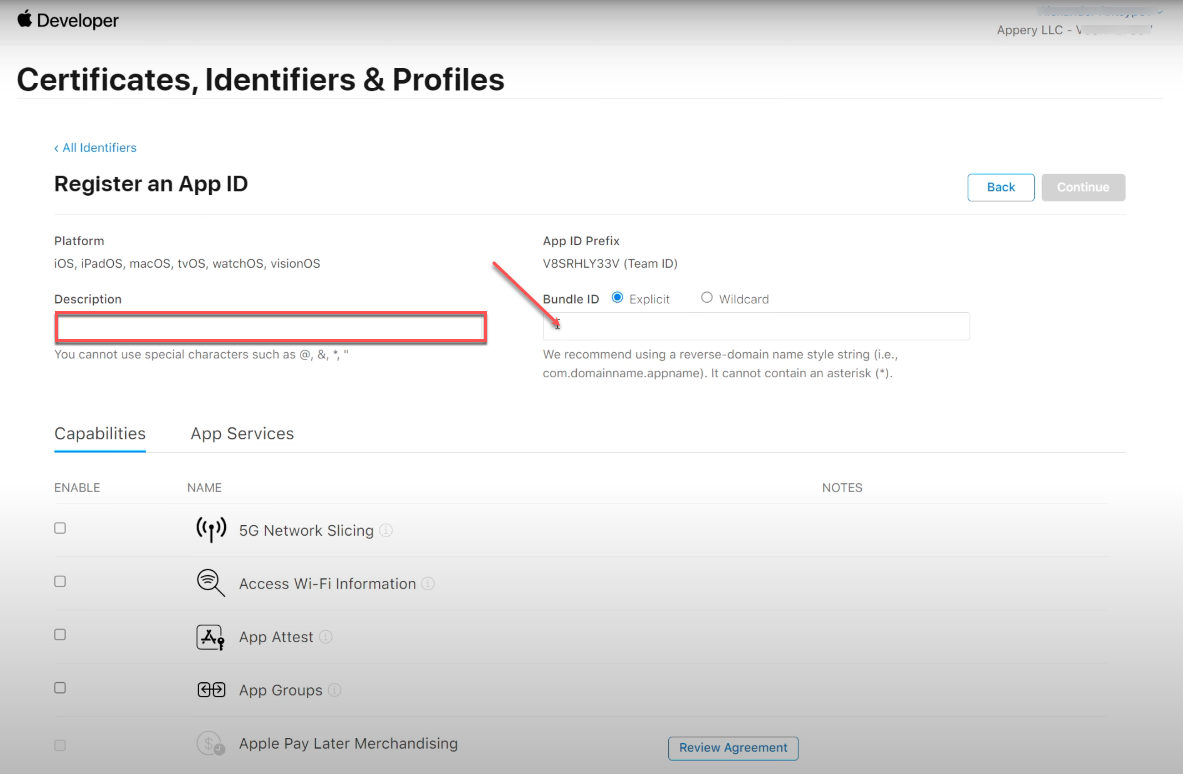
– Scroll down to enable the push notifications capability and register your new app.
– Switch to the Certificates section and click + to create a new Apple Development certificate, then click Continue.
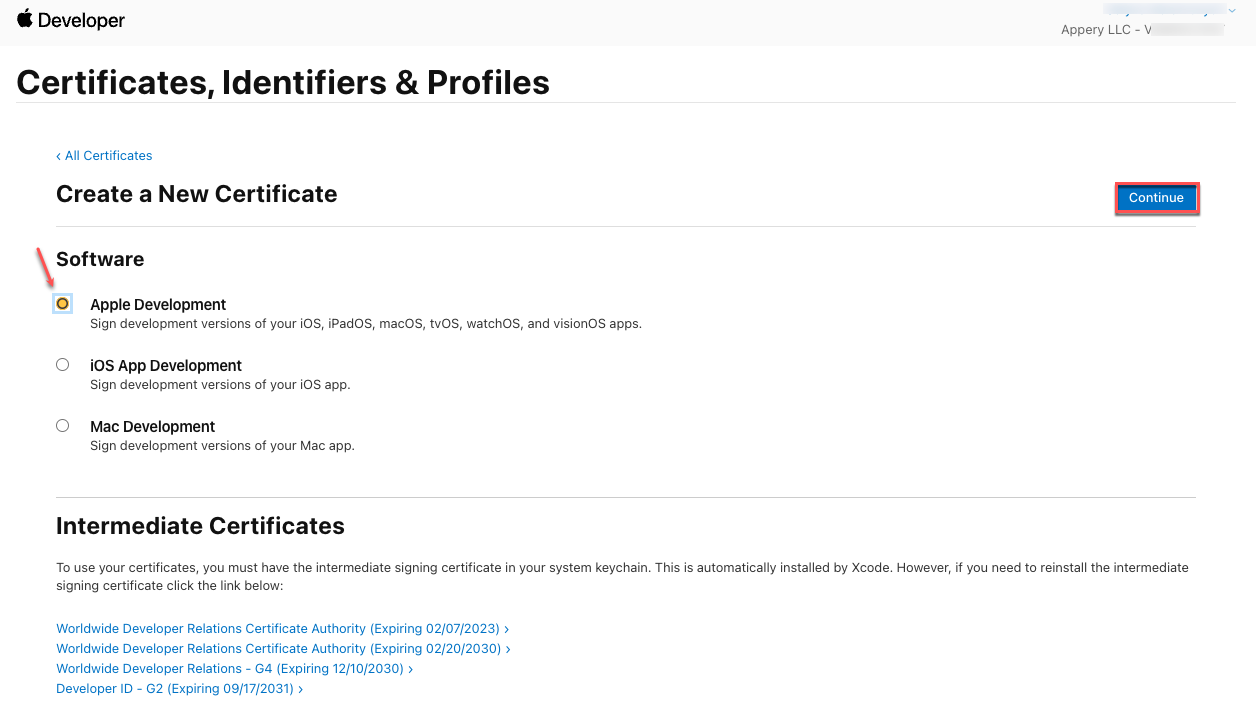
Note that the Apple Development certificate type can be used for development purposes only! If you are planning to publish your app with the App Store, the build type iOS Distribution is required!

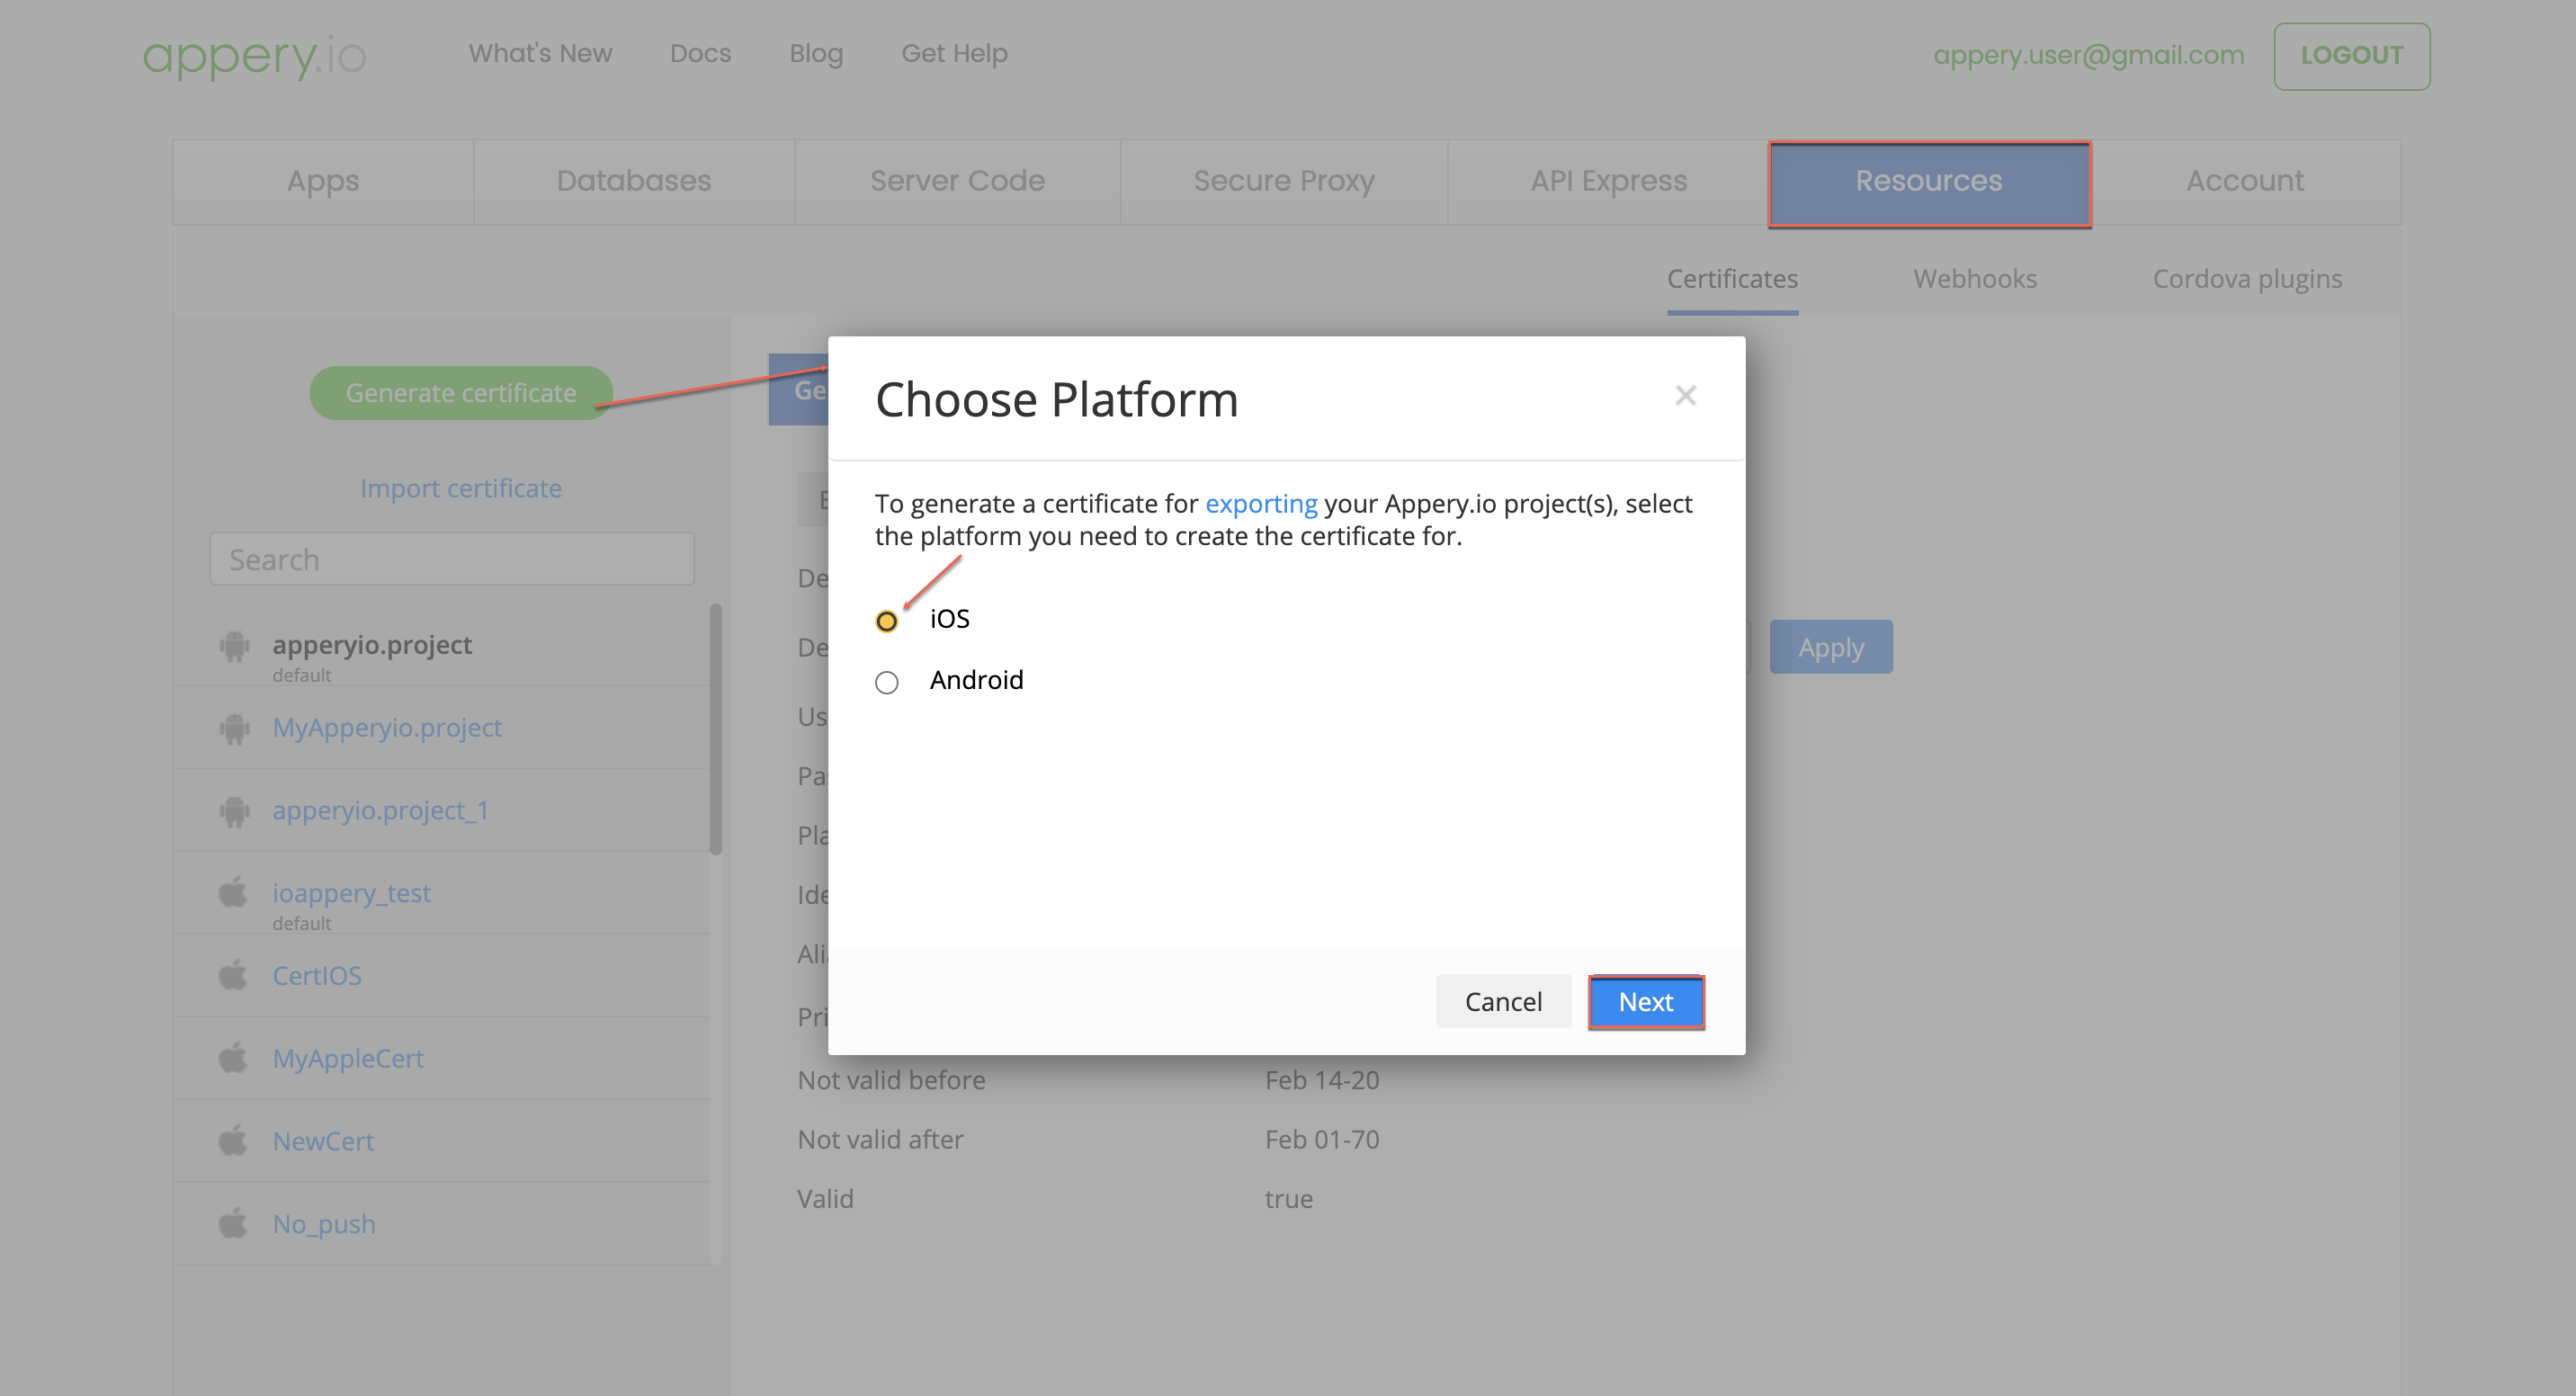
– In the next page, you must upload a Certificate Signing Request. To get it, go back to Appery.io Resources tab. Click Generate certificate, for Platform select iOS, and click Next.
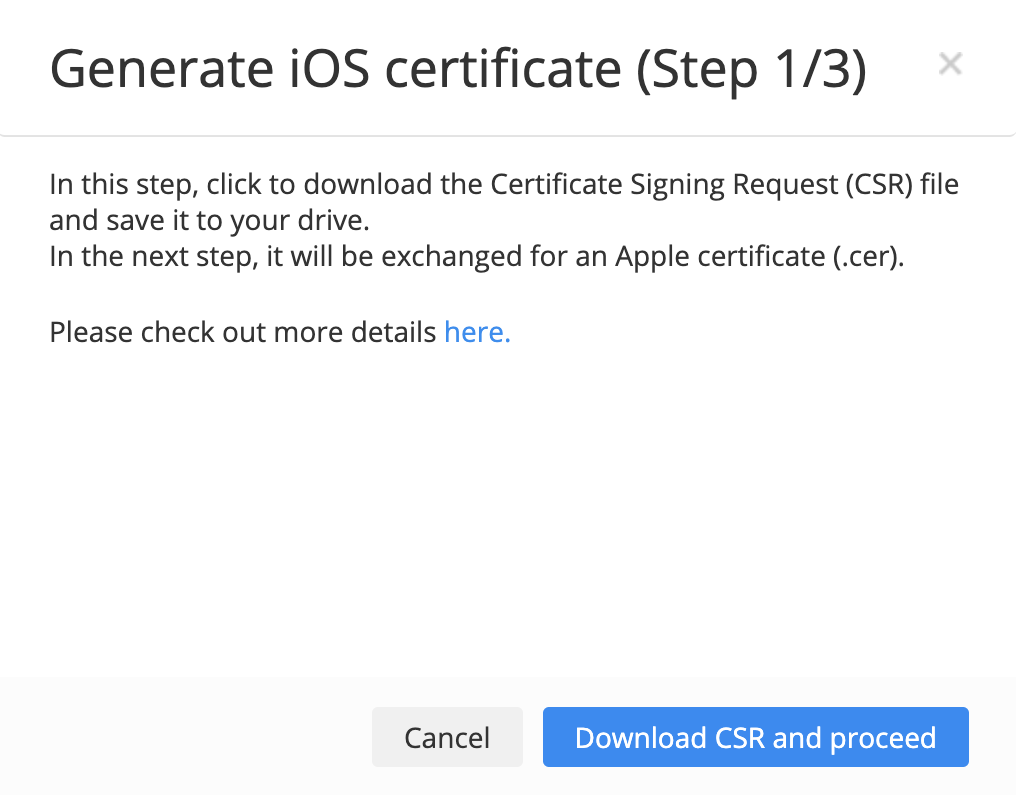
– The Generate iOS certificate wizard opens. In Step 1/3, download the CSR file to your drive.
  

– In Step 2/3, the instructions are displayed how to exchange the certificate signing request (CSR) you just downloaded for an Apple certificate (.cer).
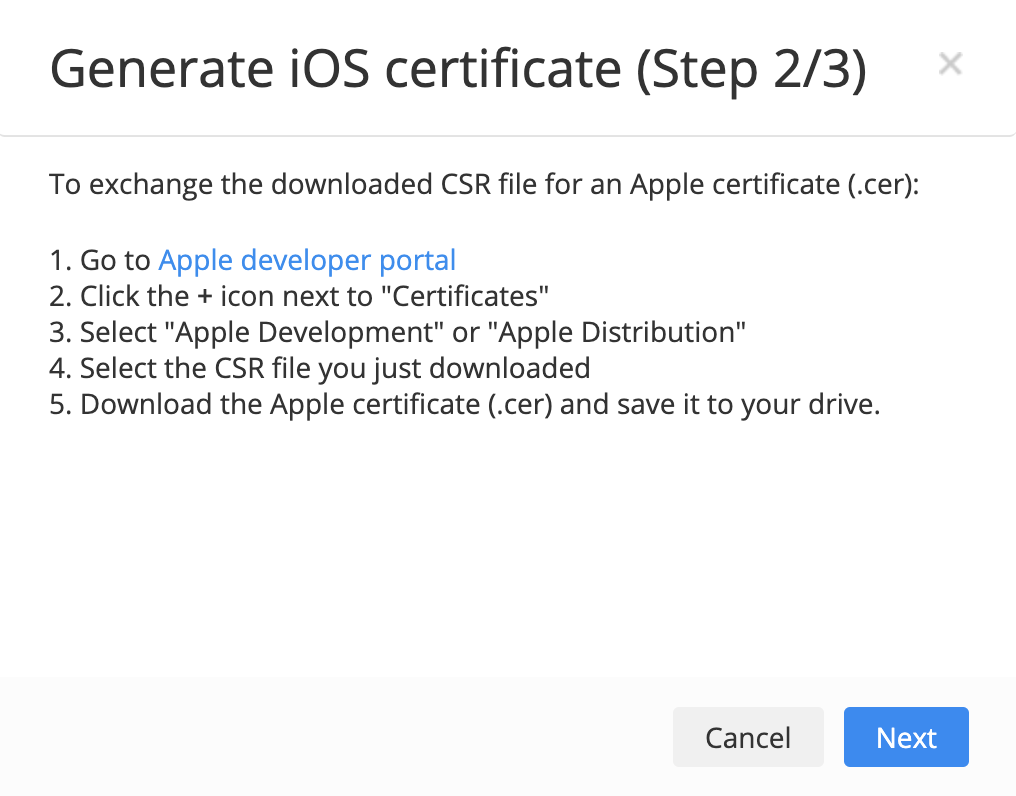
 

– For this, go back to the Apple Developer Console Certificates section and click Choose File to select and upload the downloaded CSR file. Click Continue.

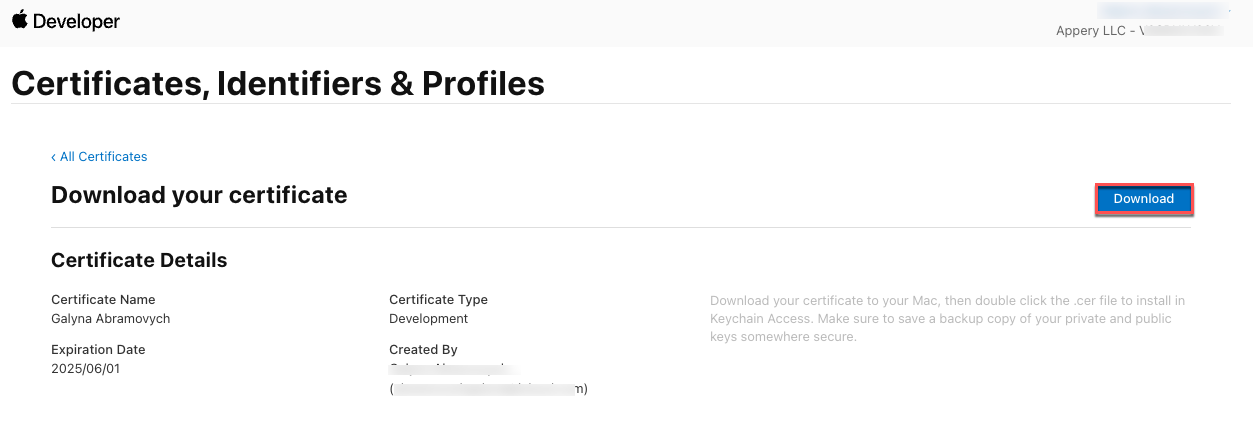
– Download the generated certificate in the next step.
 

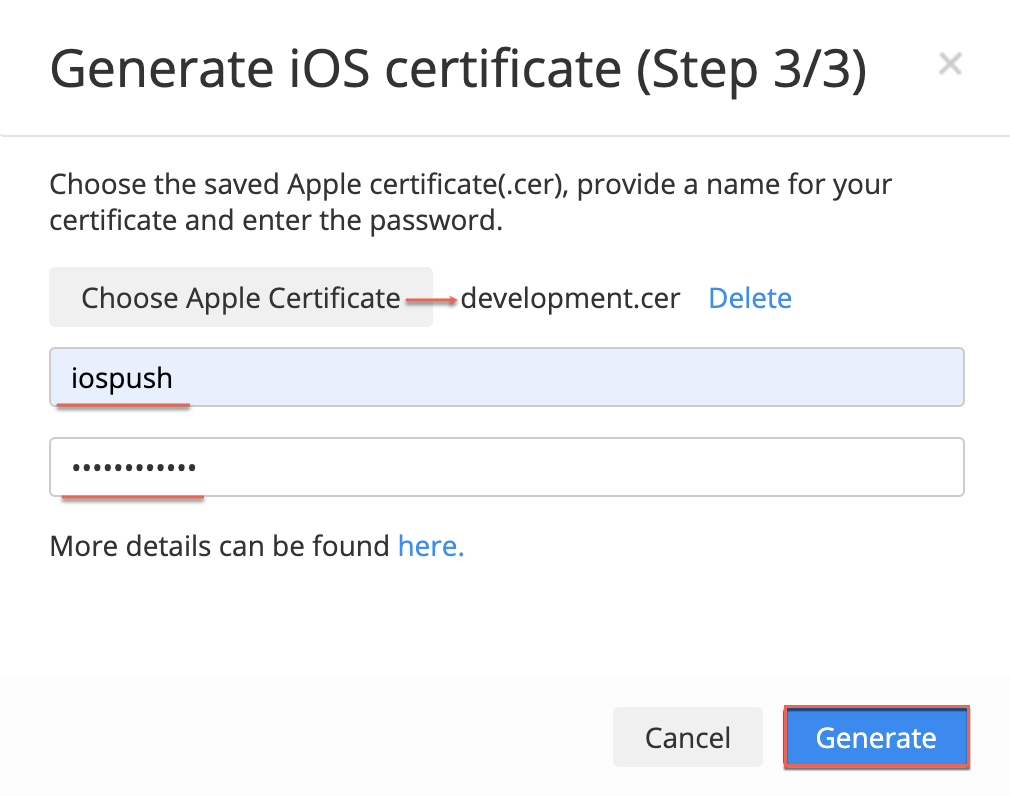
– Go back to Appery.io and in Step 3/3 of the Generate iOS certificate wizard, choose it, enter the name and password for your certificate, and click Generate.
 

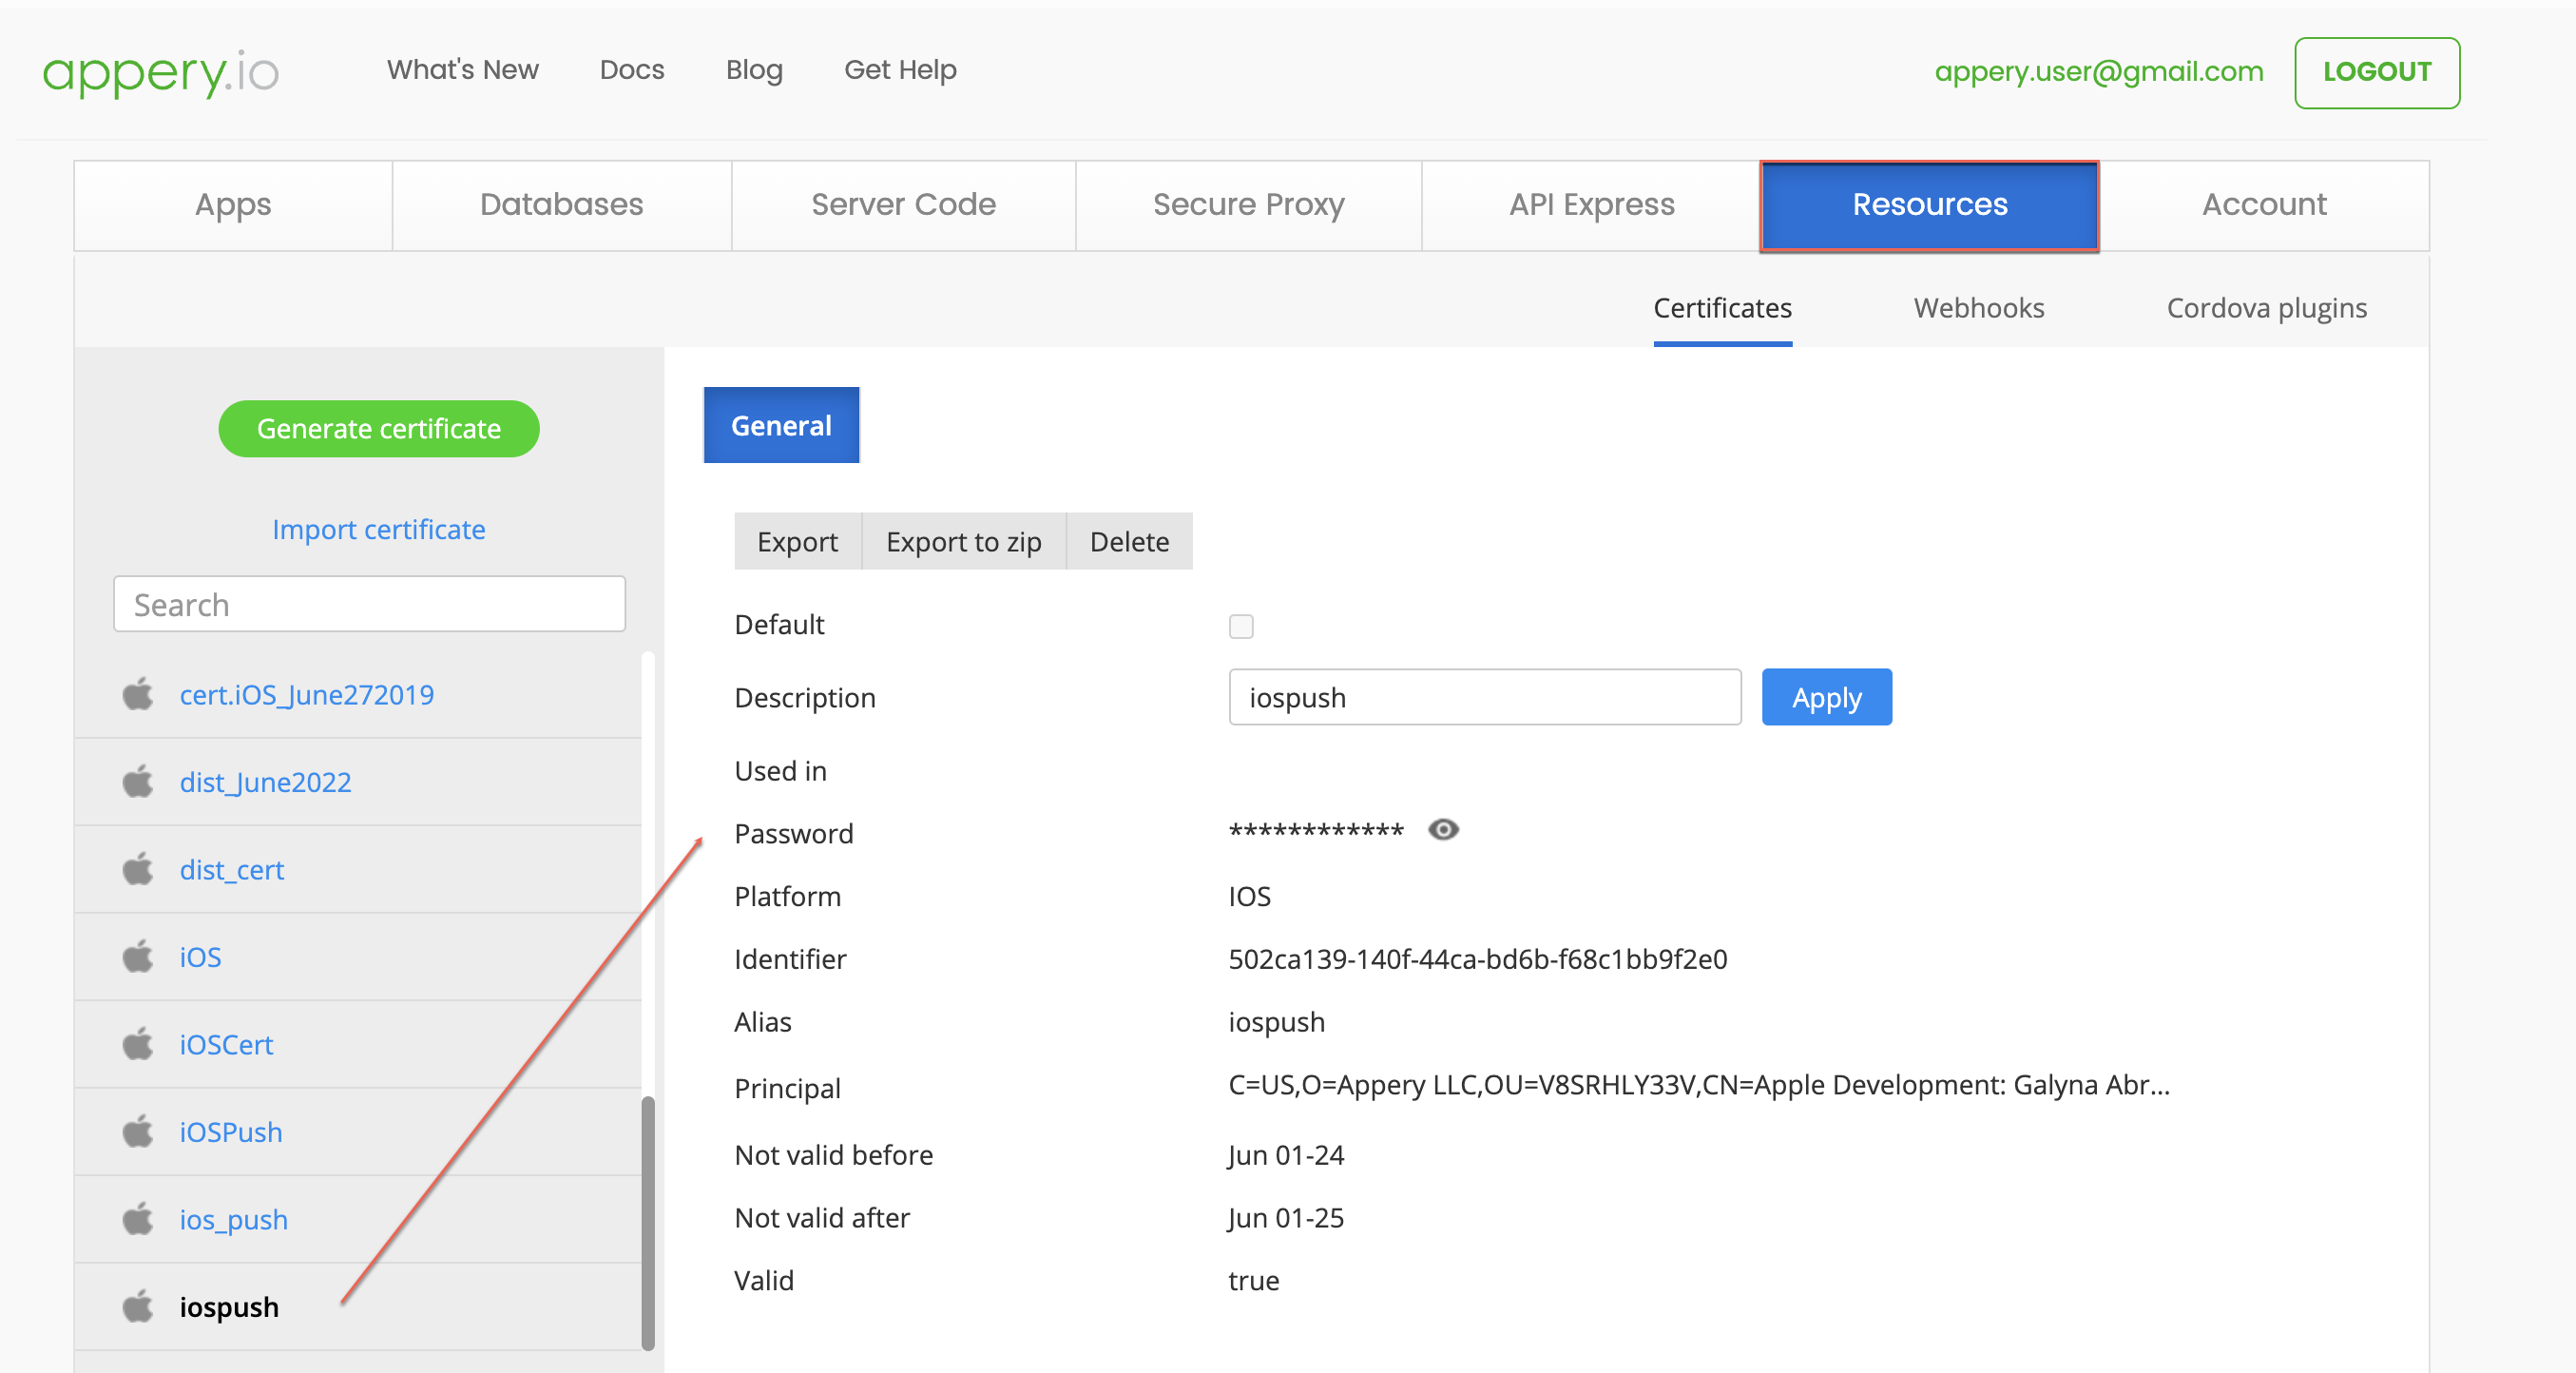
The development certificate is generated successfully.
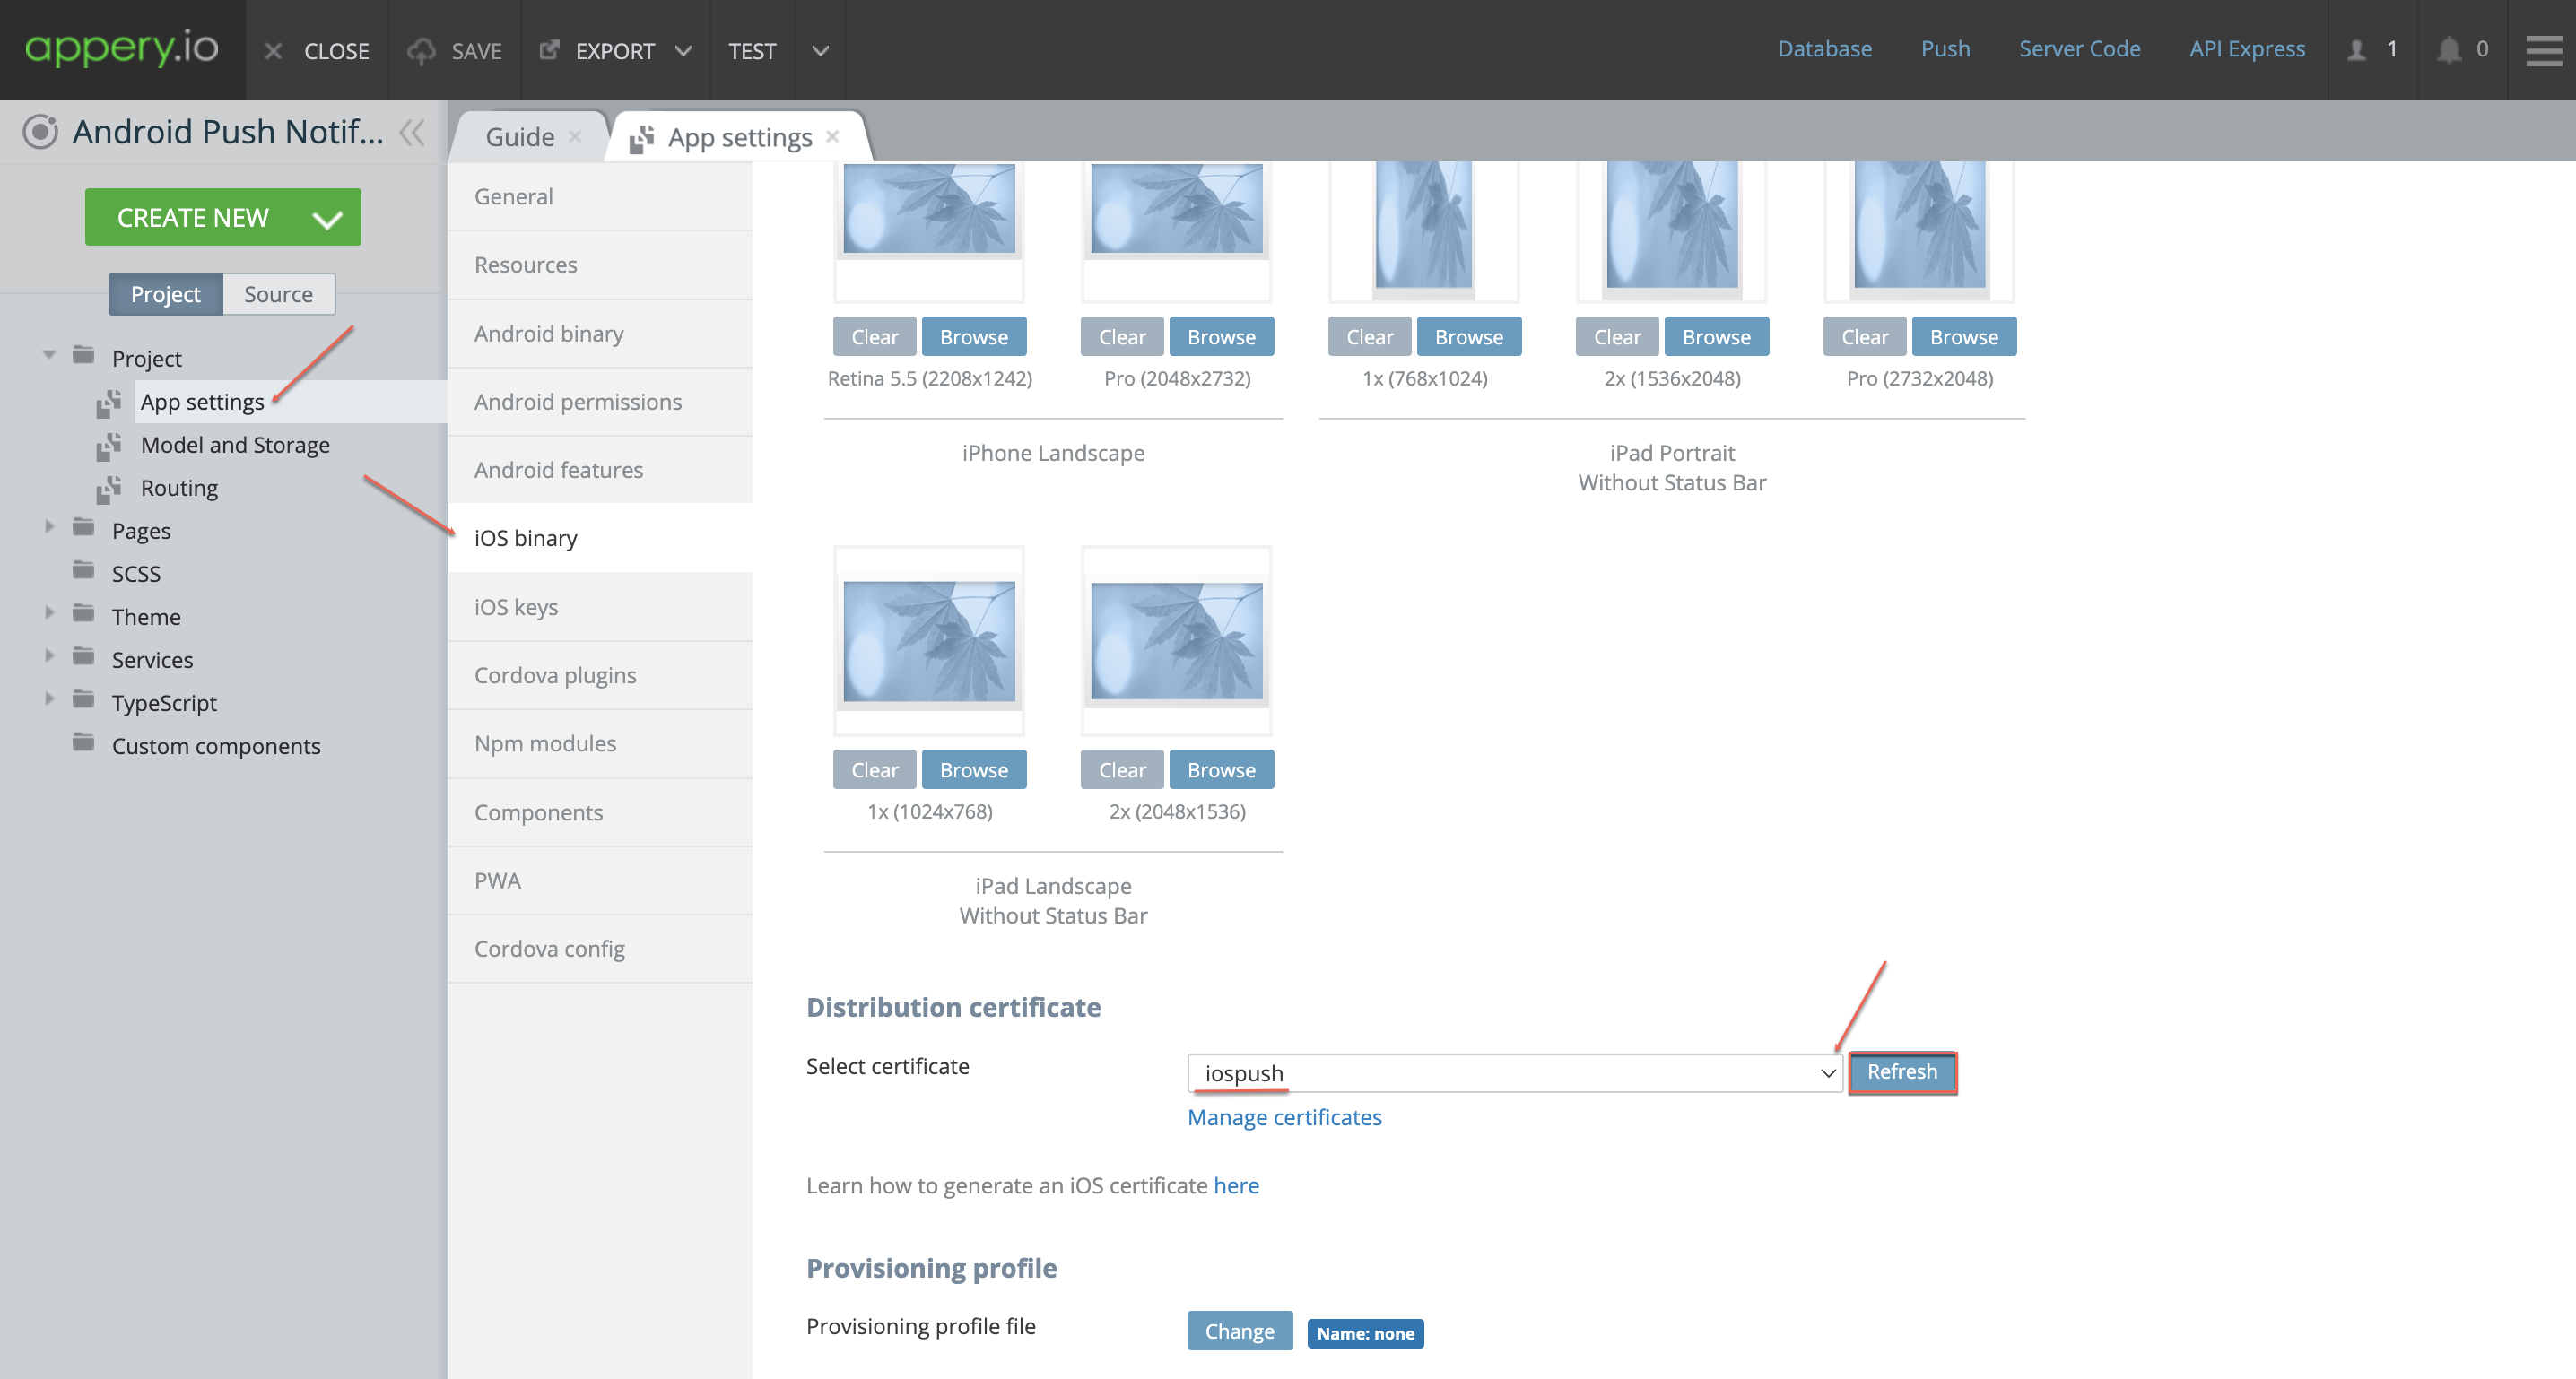
  • Now, you can add it to the Appery.io app App settings > iOS binary tab. To do it, scroll down to the Distribution certificate section, and select the iospush certificate you just generated (refresh the list if the certificate cannot be found).
2. Create a Provisioning Profile:

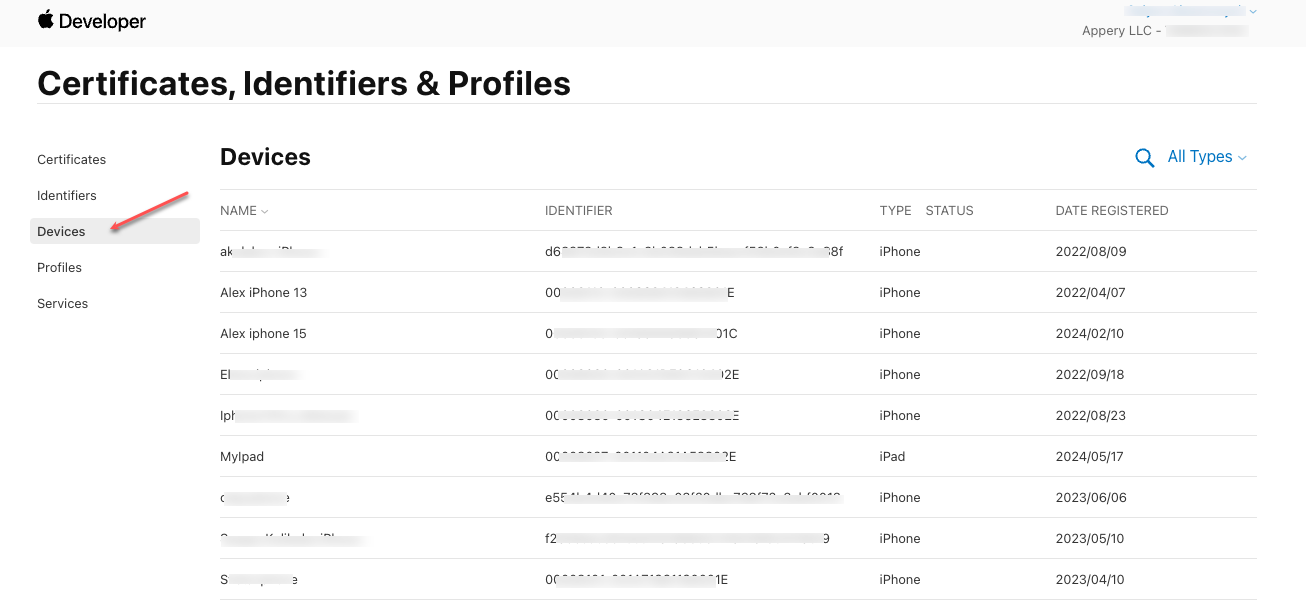
– Now, we need to create a Provisioning profile. For this, in the Apple Developer Console, register your device in the Devices section. You will be asked to add your device UDID. To find it, start iTunes, go to the Summary section, and click the device info panel several times until the UDID appears.
– Next, go to the Profiles section and create a new profile.
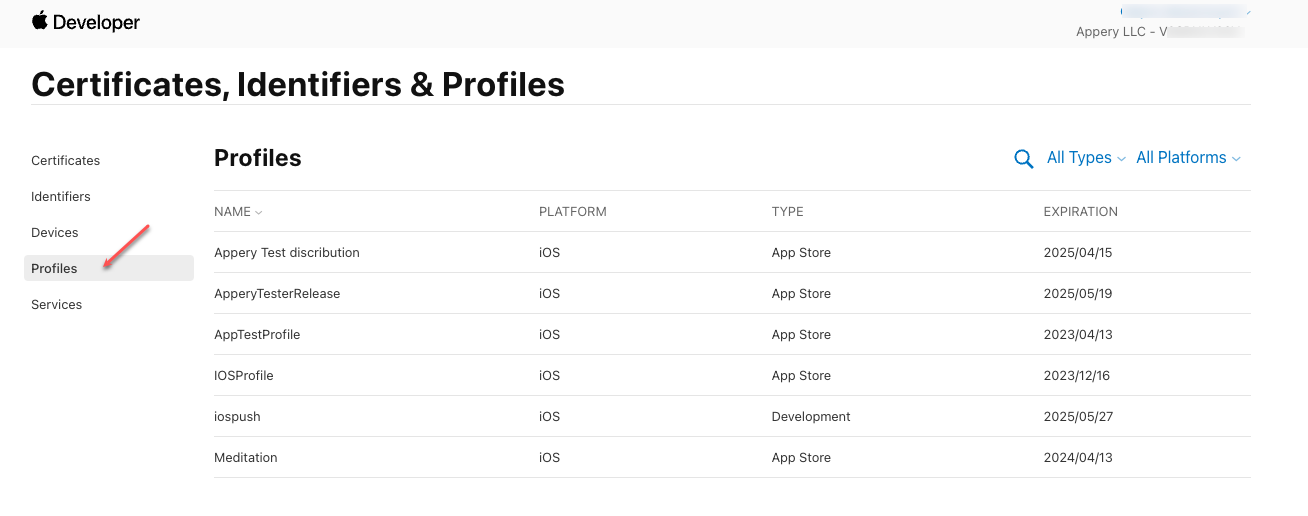
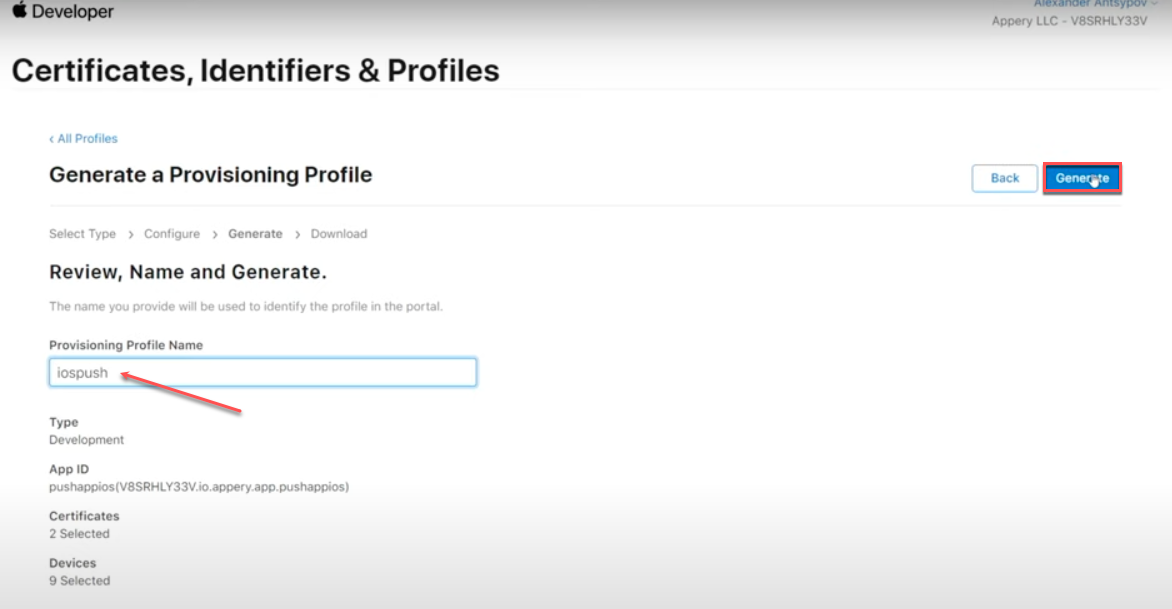
When specifying it, indicate it is of the iOS App Development type, then proceed to selecting an App ID from the list, then selecting your certificates and devices (you are free to select all the available certificates/devices).

– When done, enter the Provisioning Profile Name, click Generate and download it to your drive.
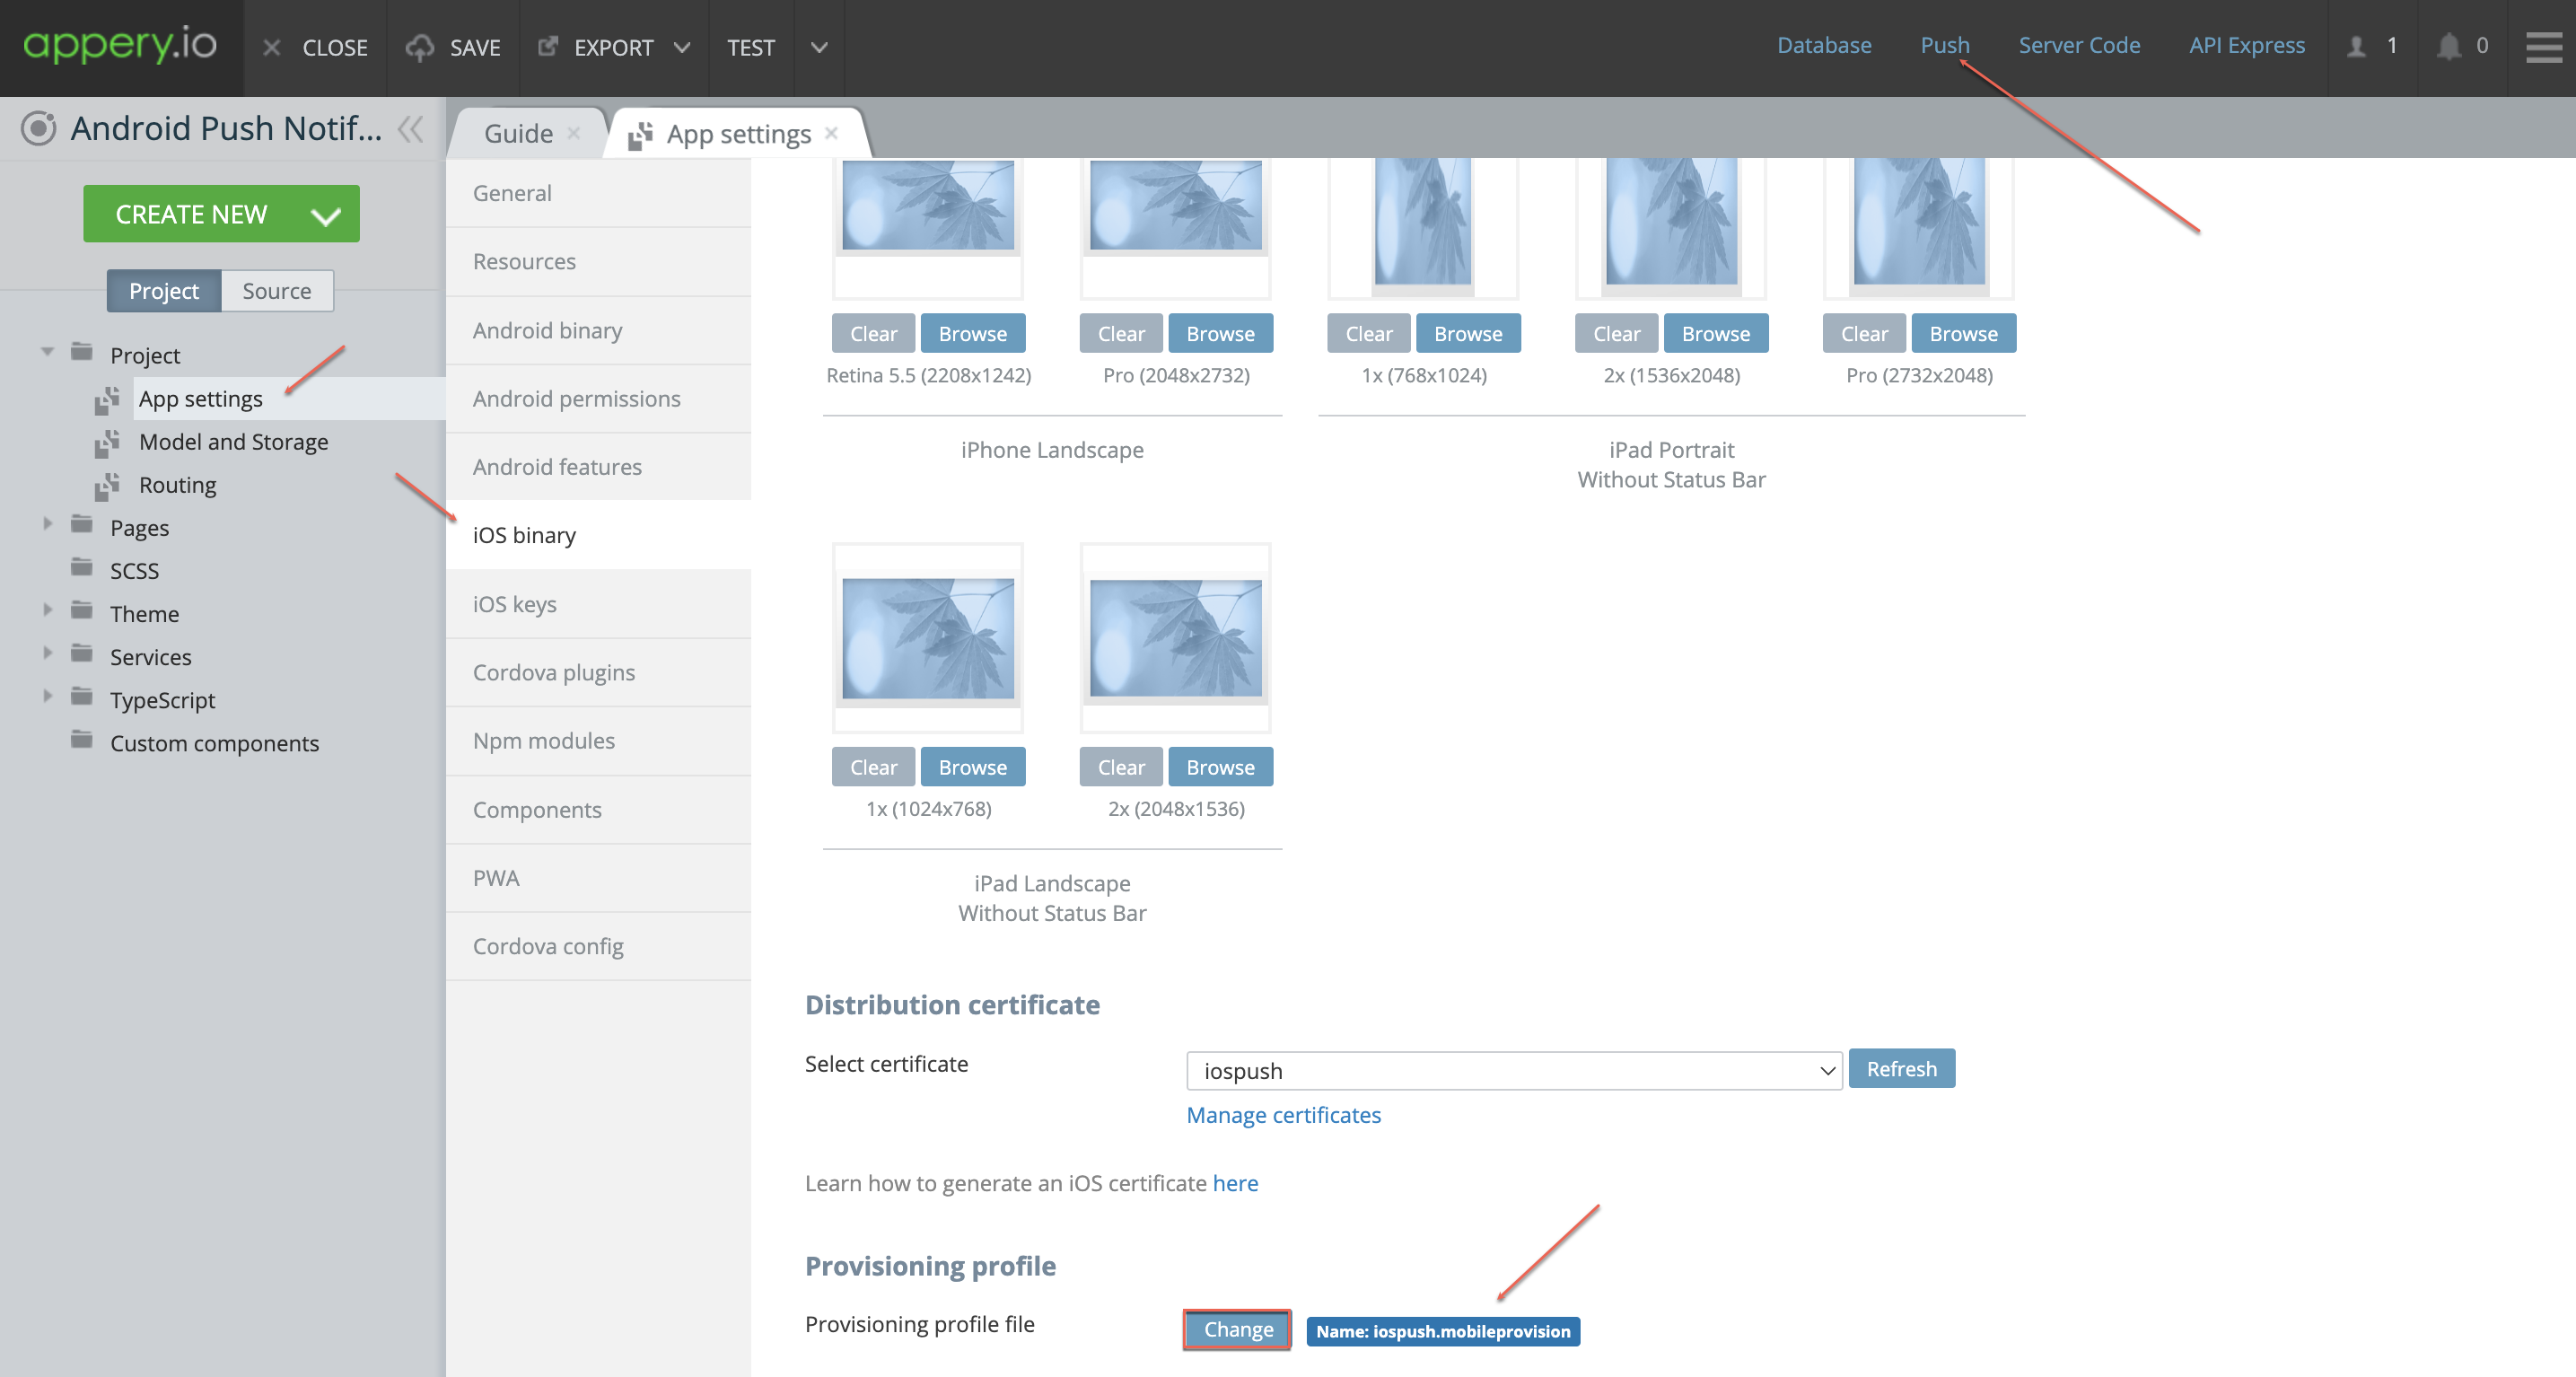
– You can now upload it to Appery.io. Go to the App settings > iOS binary tab, scroll down to the Distribution certificate section, and click the Change button to upload the file you just generated using the Media Manager tool. Then, click the Push link in the header to open the Push Notifications tab.
Set Up Push Notifications in Appery.io

Now, let’s configure push notifications within Appery.io:

1. Enable Push Notifications:

– In your project, go to the Push Notifications > Settings section and enable the Push Notifications checkbox.
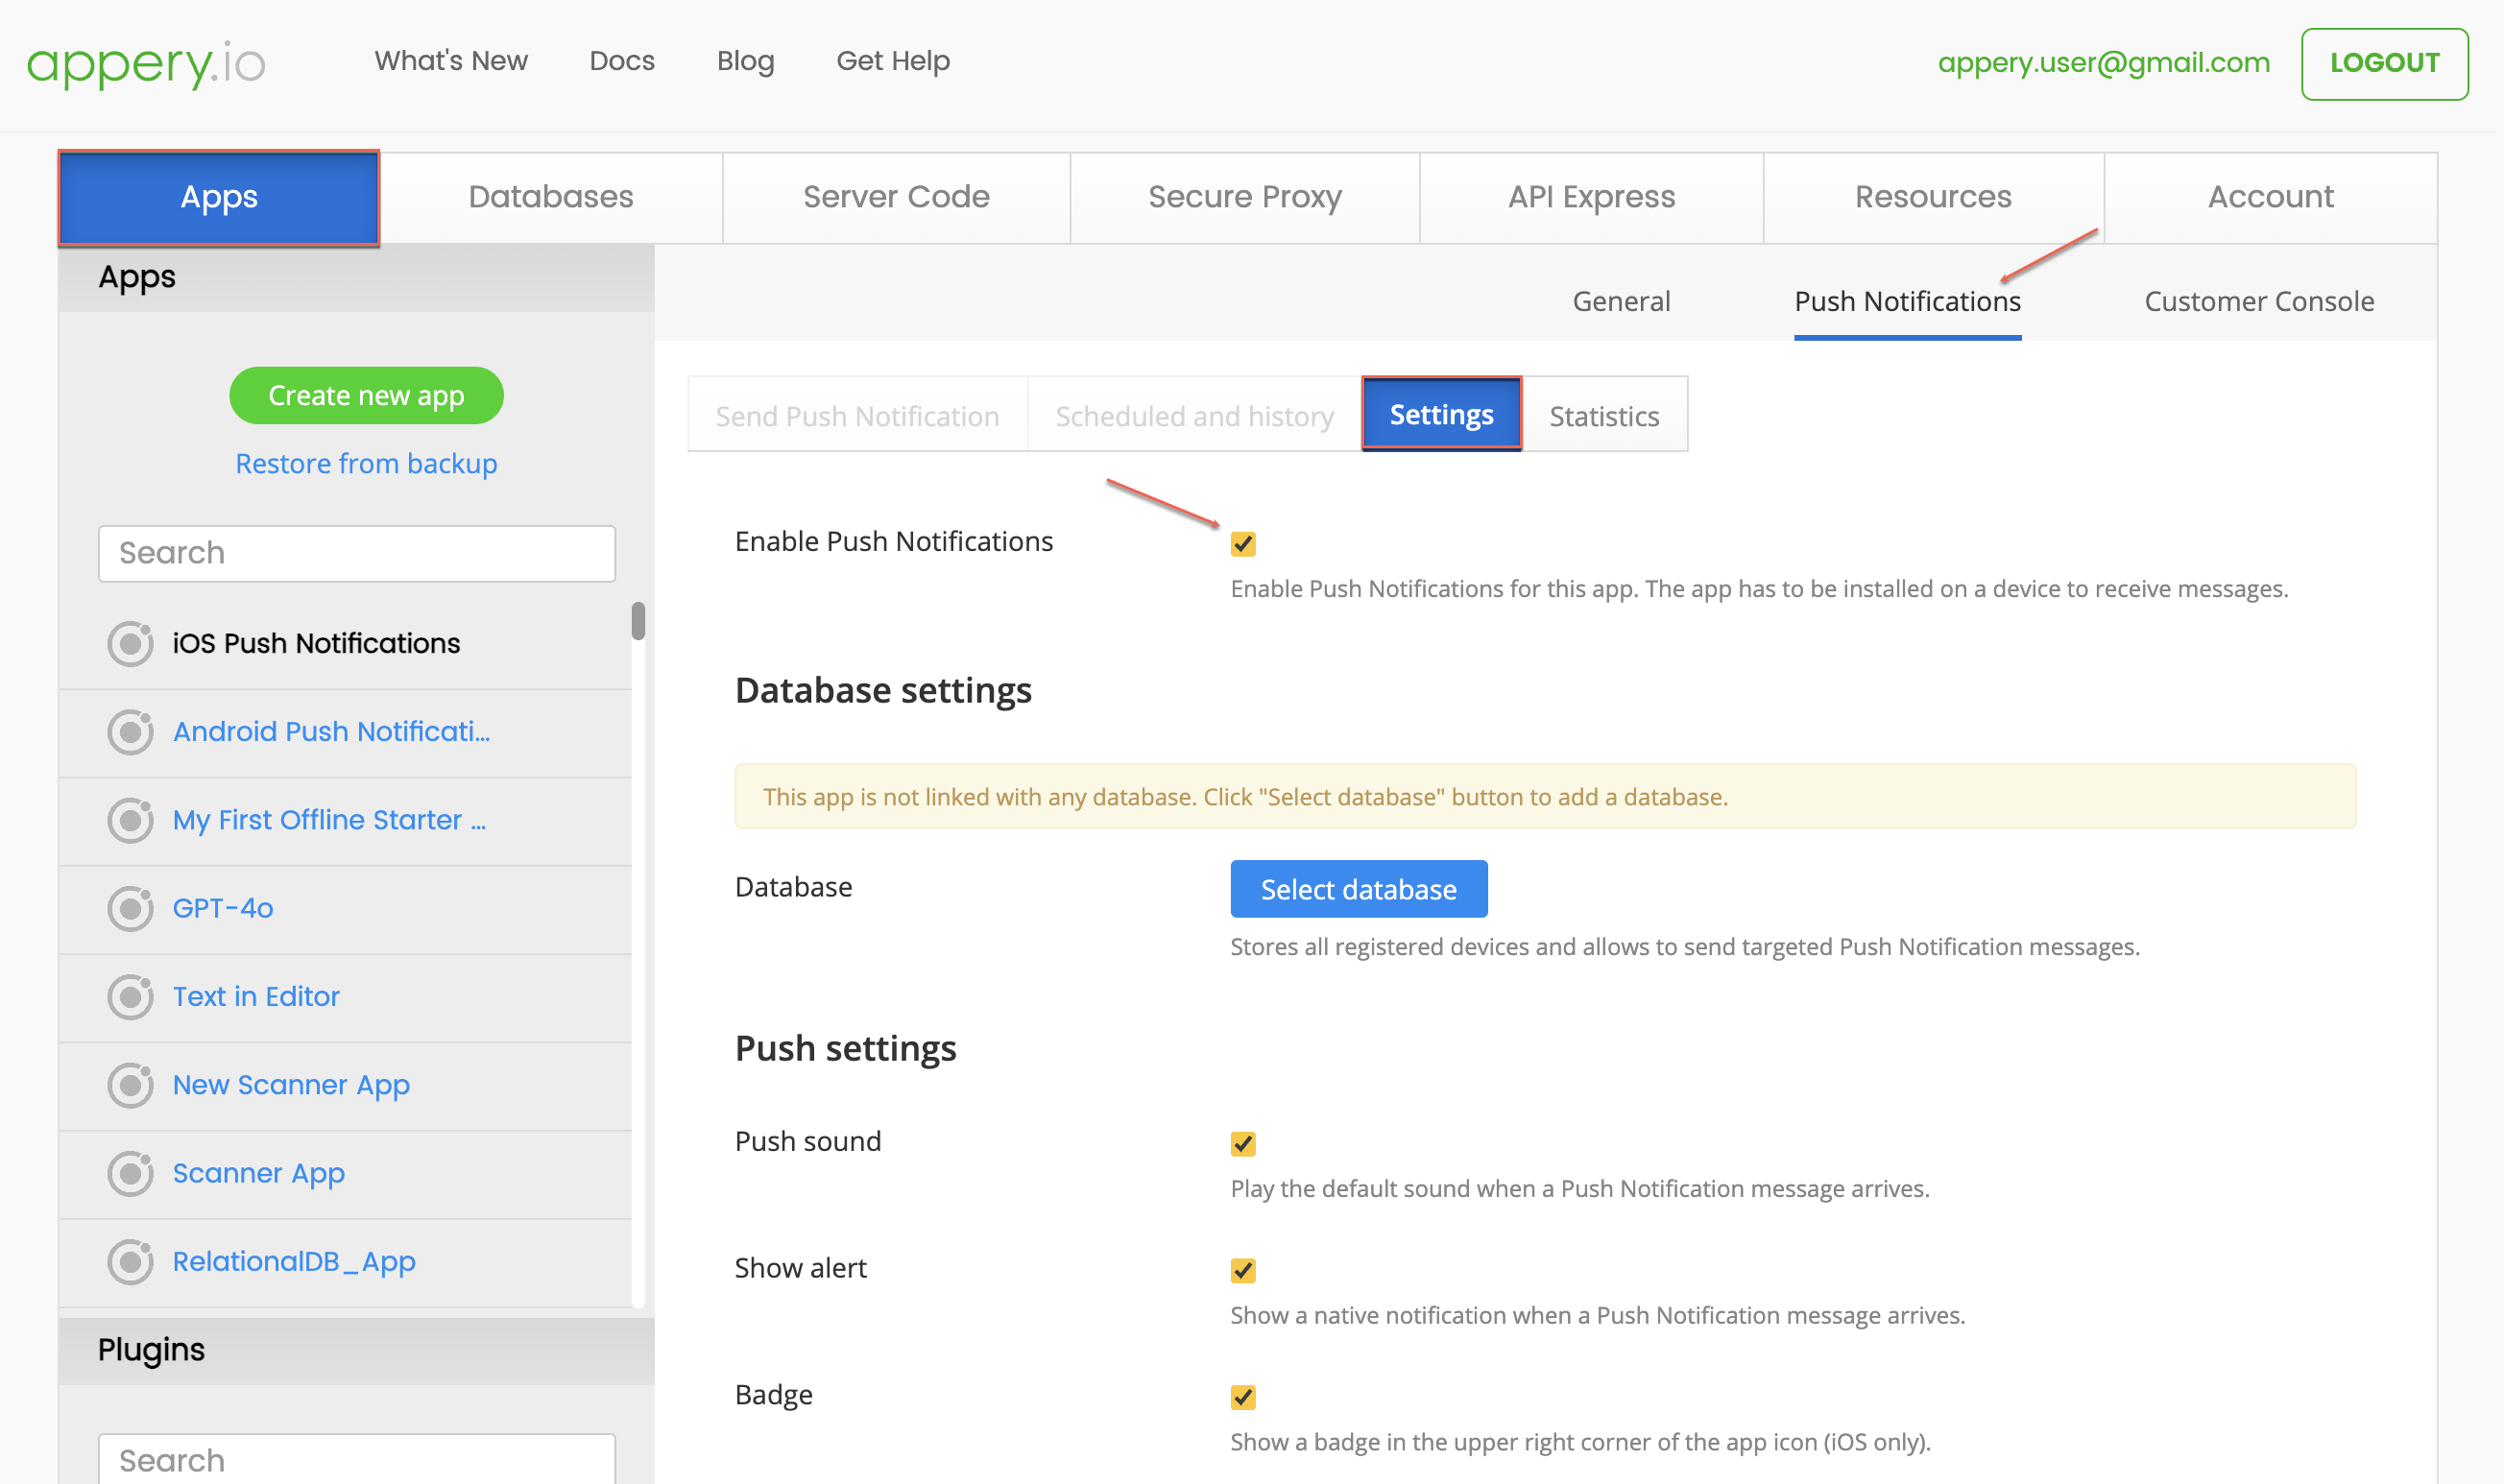
2. Configure the Database:

– In the Database settings section,  select a database where device tokens will be stored. You can use any existing database or create a new one.
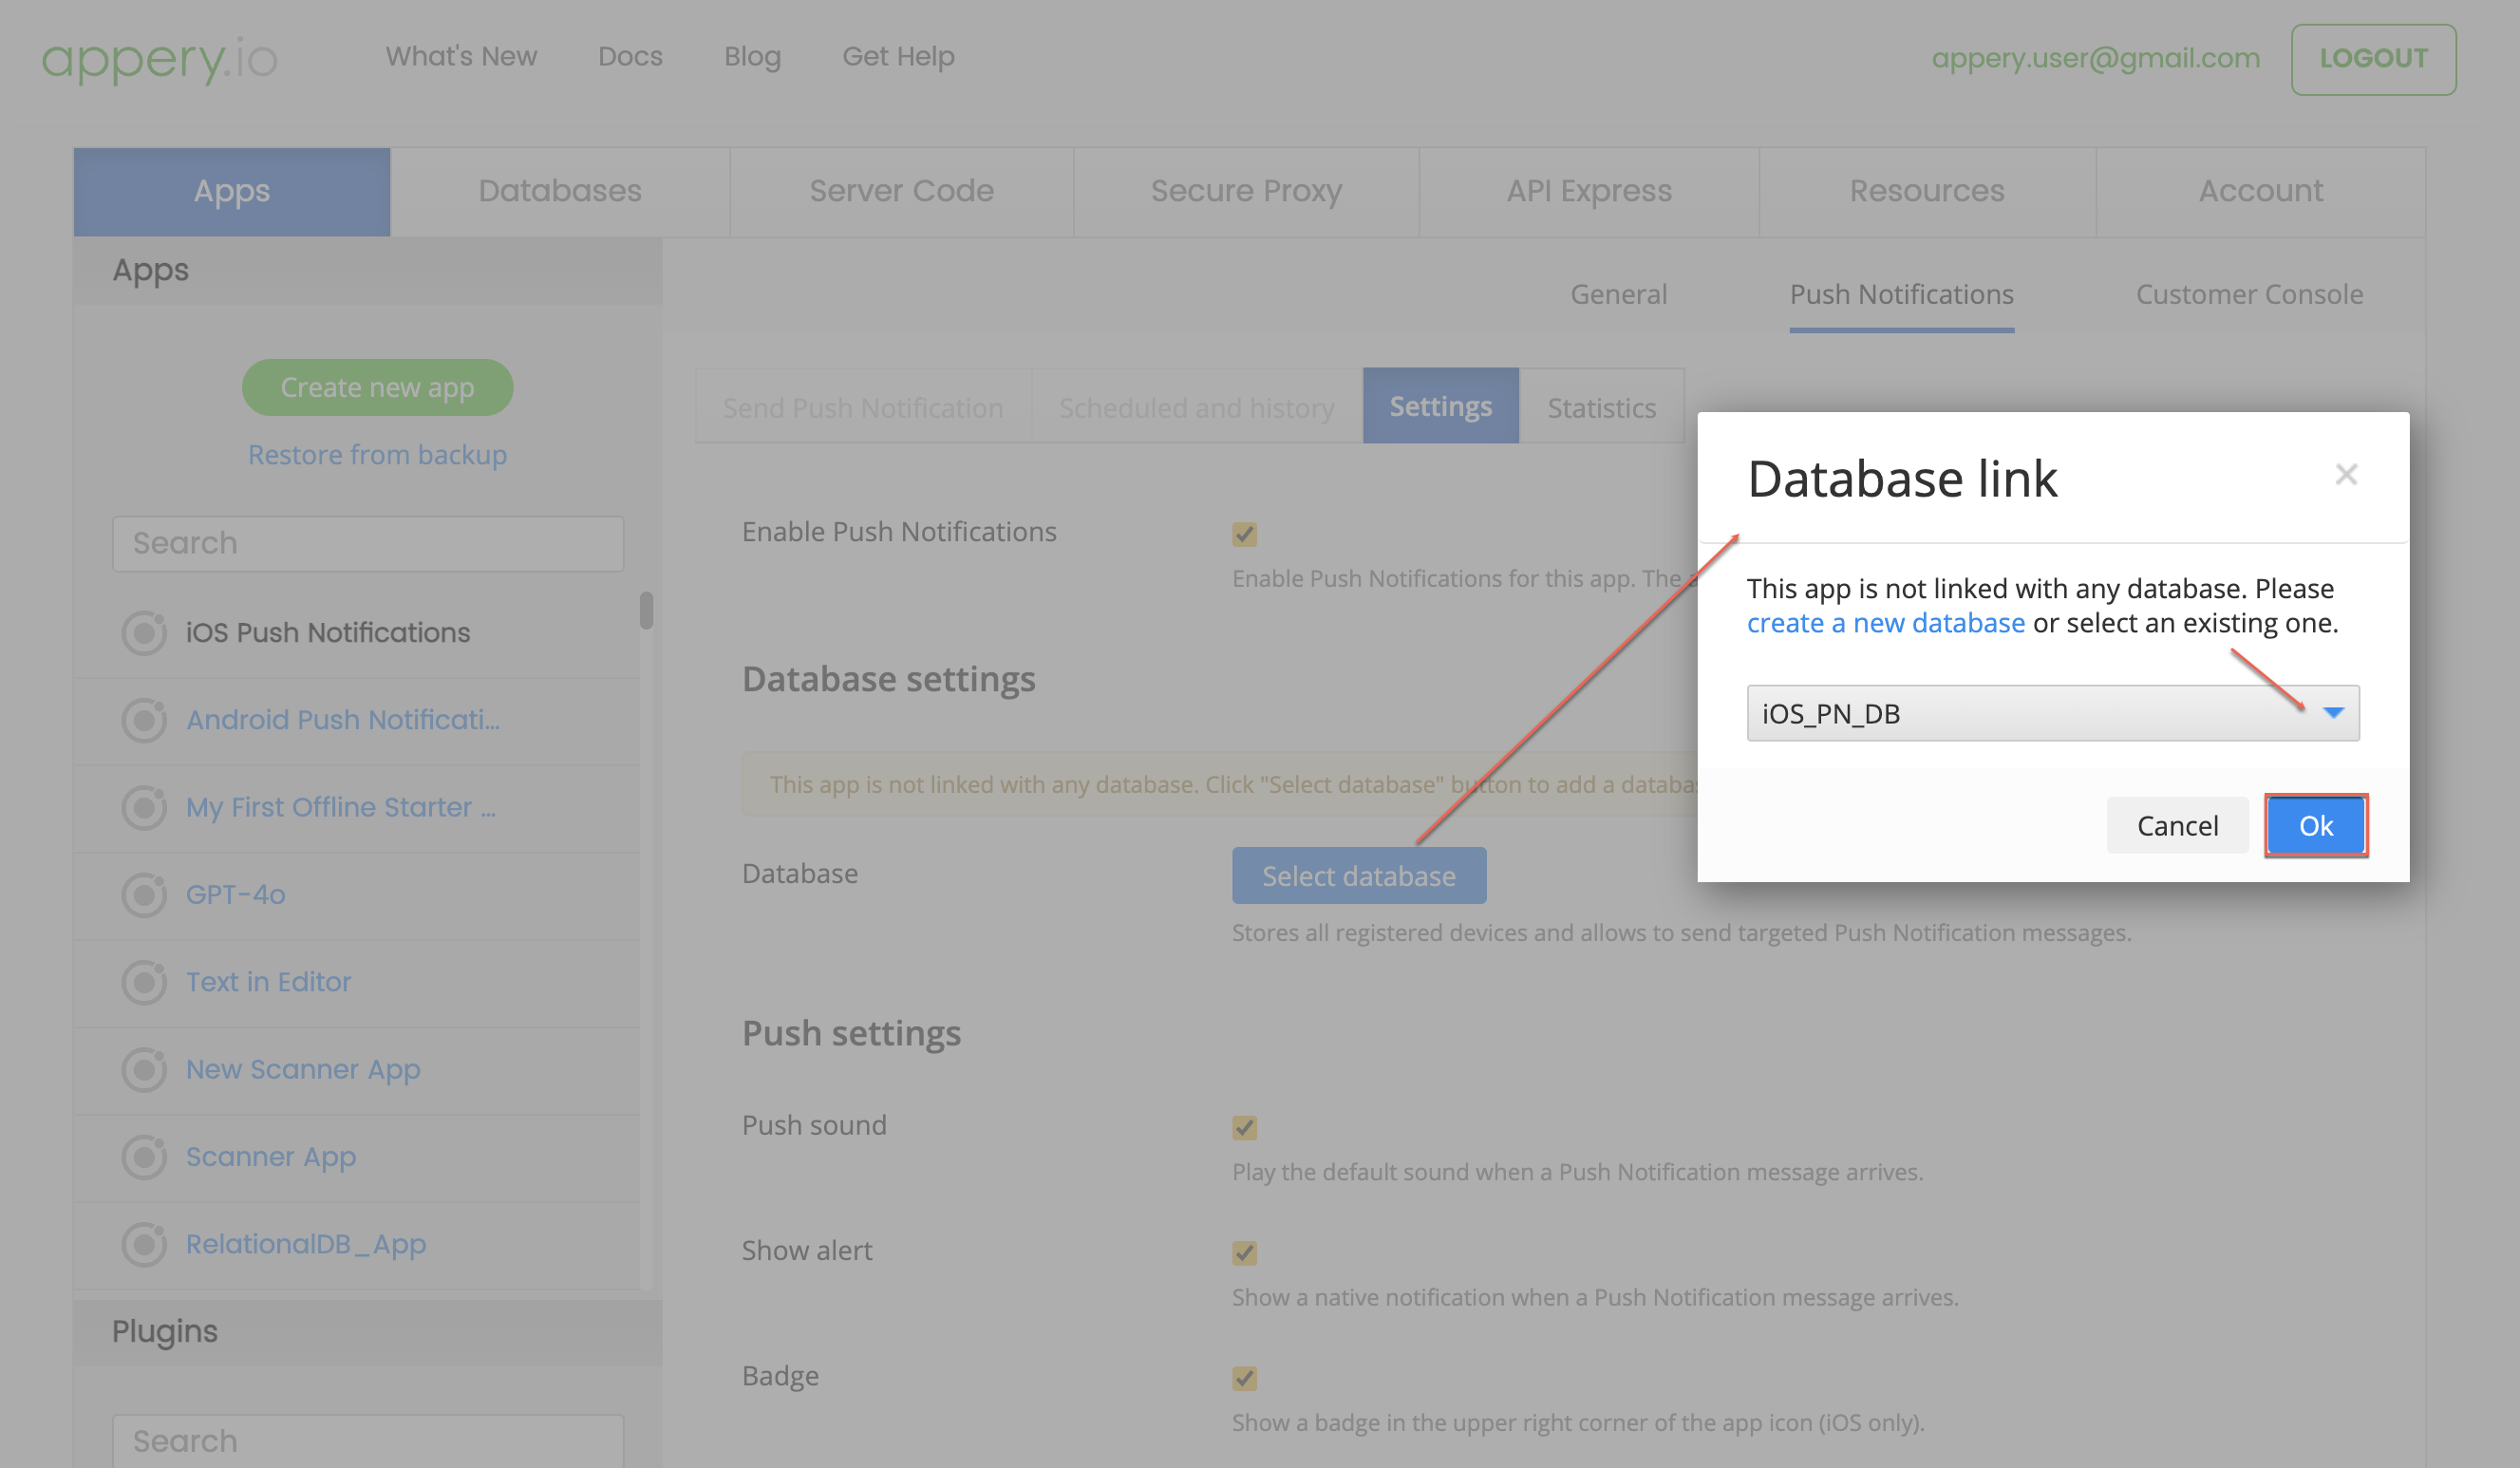
– When you scroll down, you will see that you will also need to provide the Push Certificate to make you app send pushes.
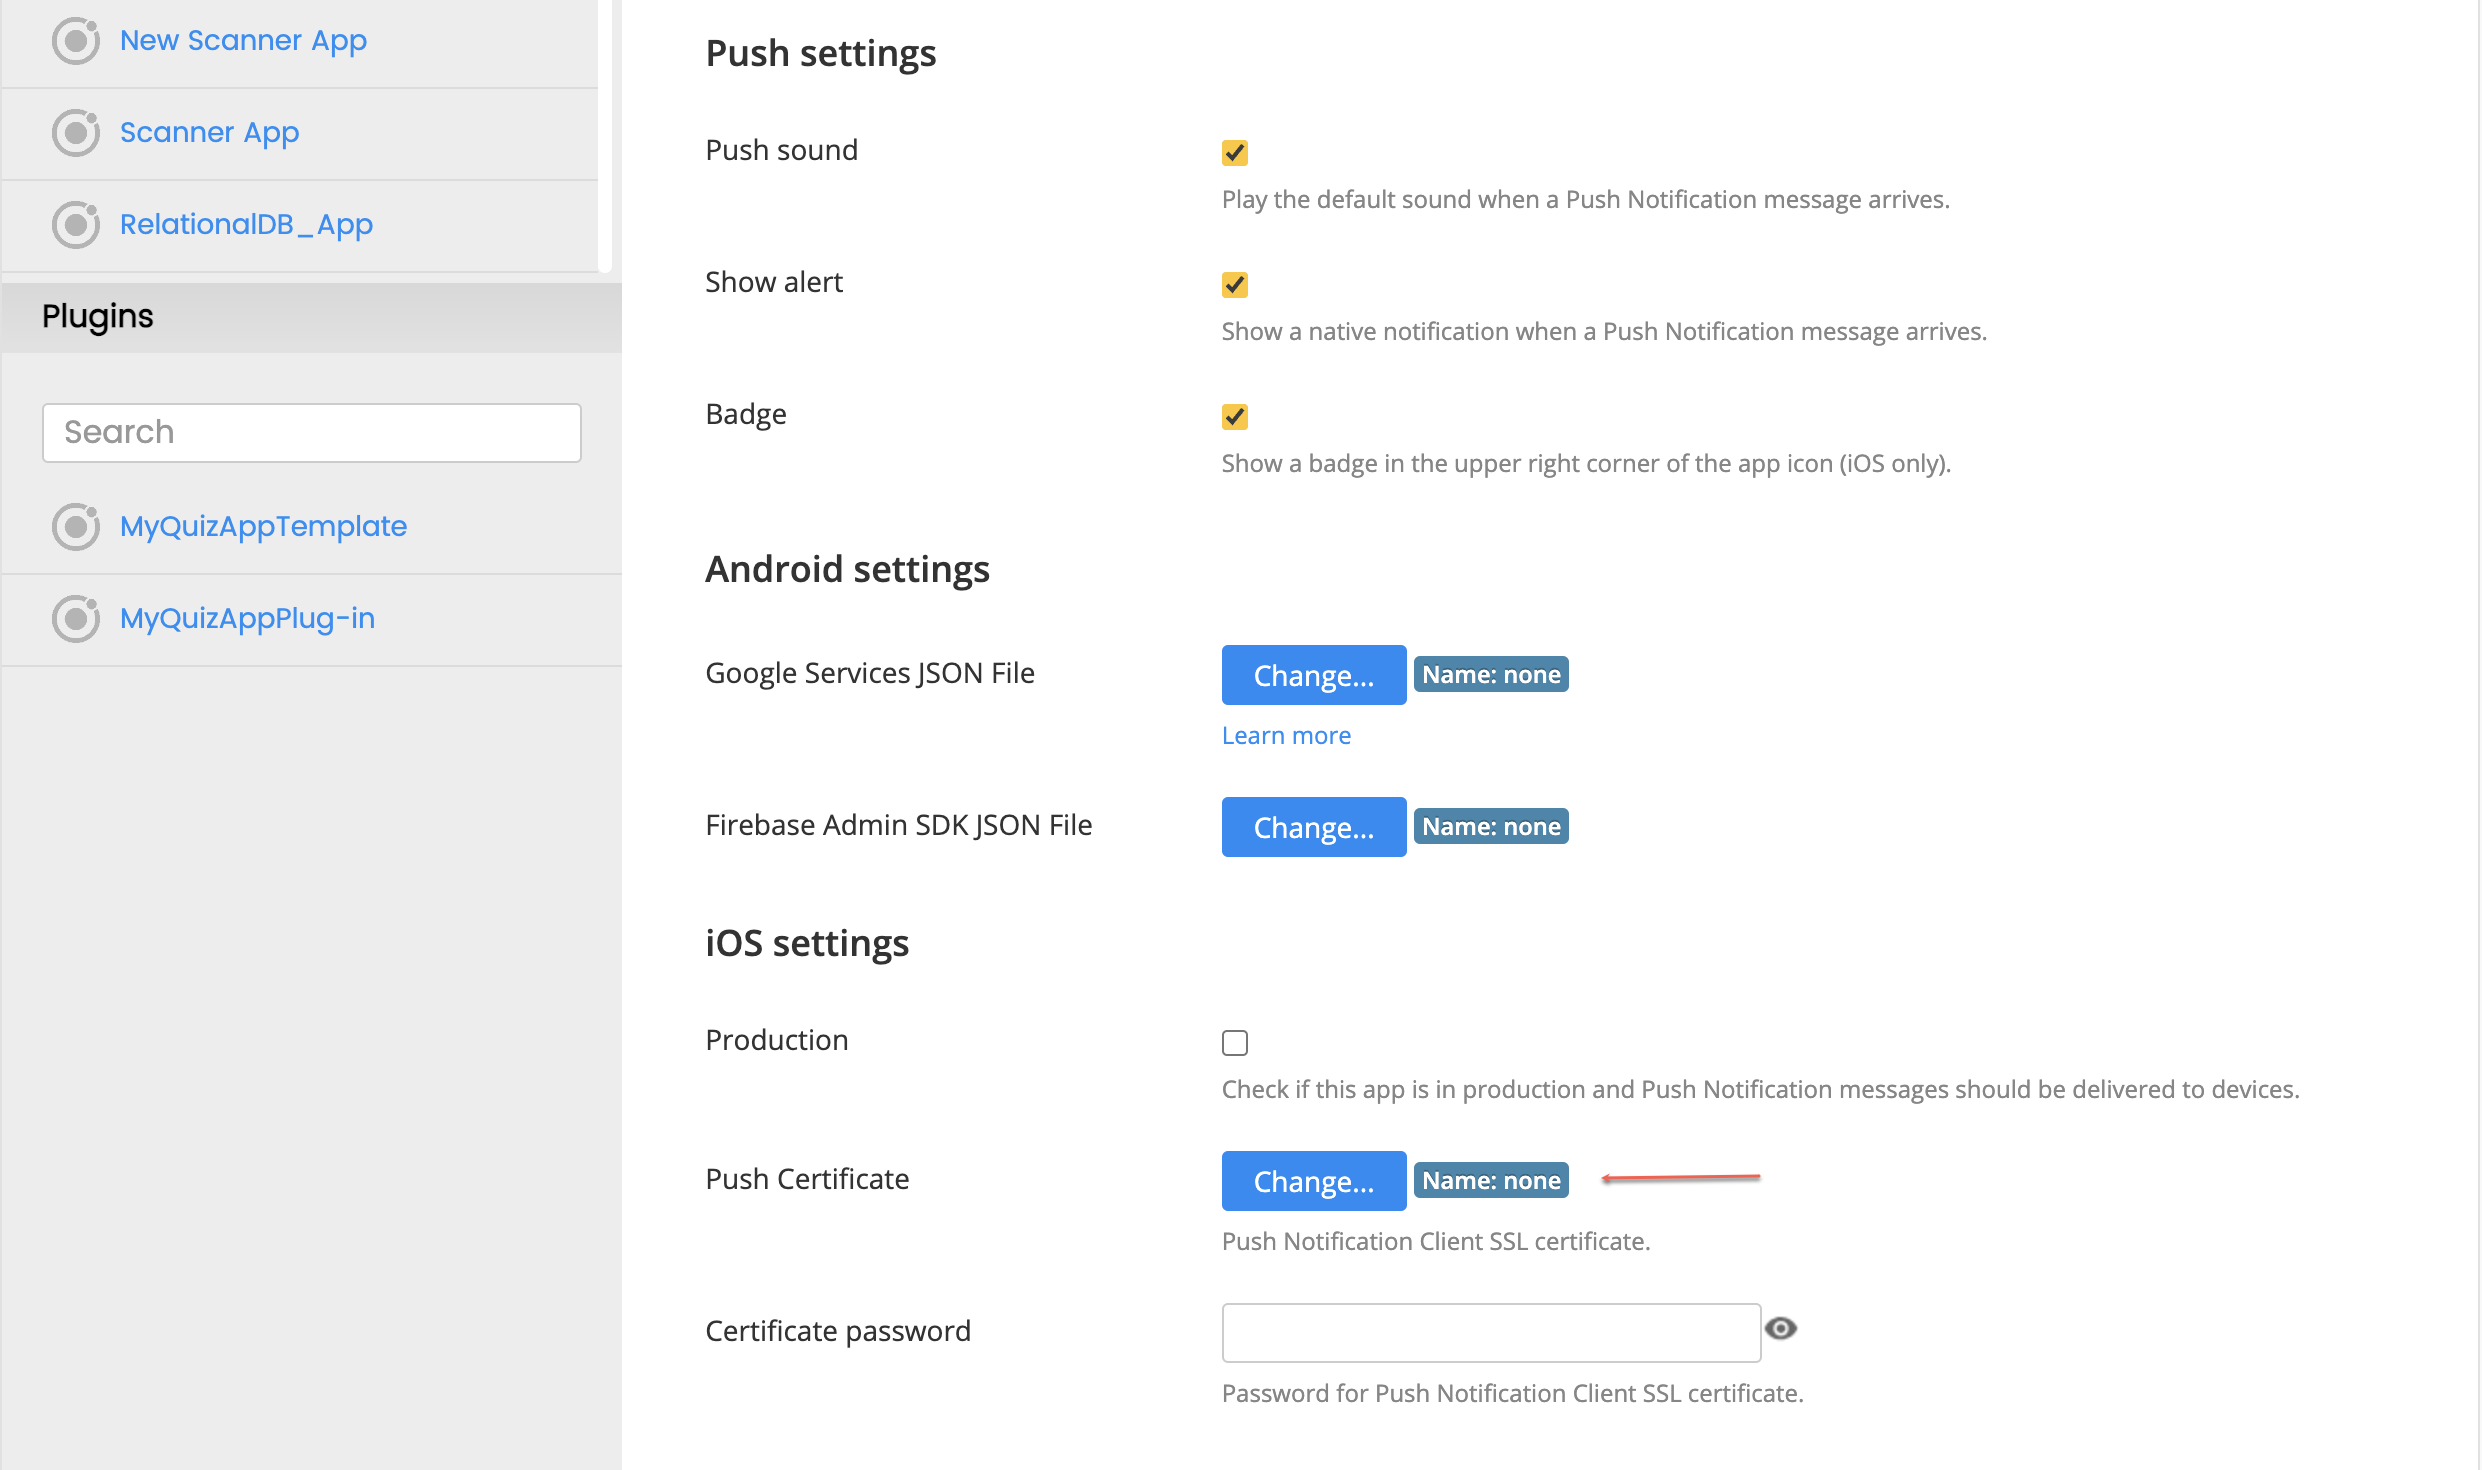
3. Upload Push Notification Certificate:

– To generate and download a push notification certificate from the Apple Developer Console, go to the  Identifiers section, select the pushappios identifier created earlier and, in the Edit your App ID Configuration page, scroll down to the Push Notifications app service item, and click the Configure button.
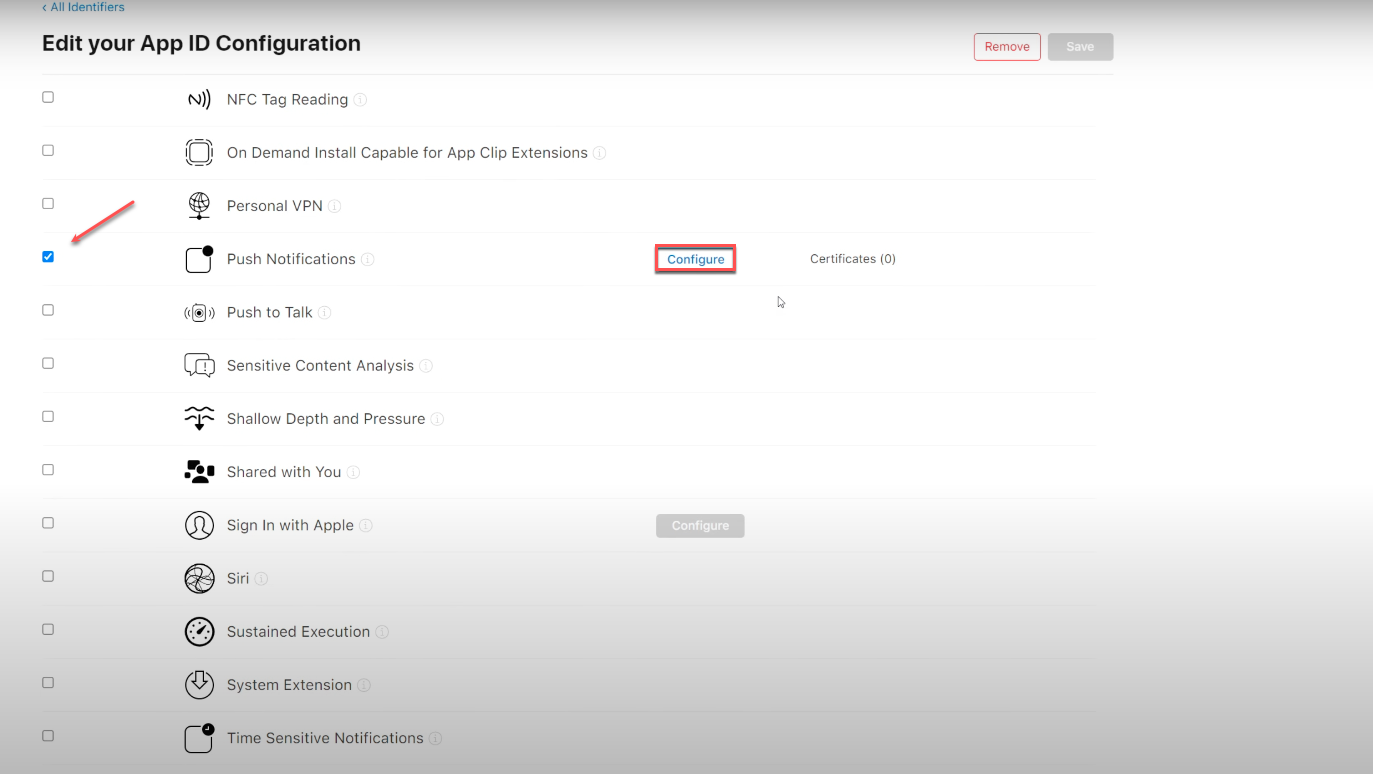
– Select Development SSL Certificate and click Create Certificate.
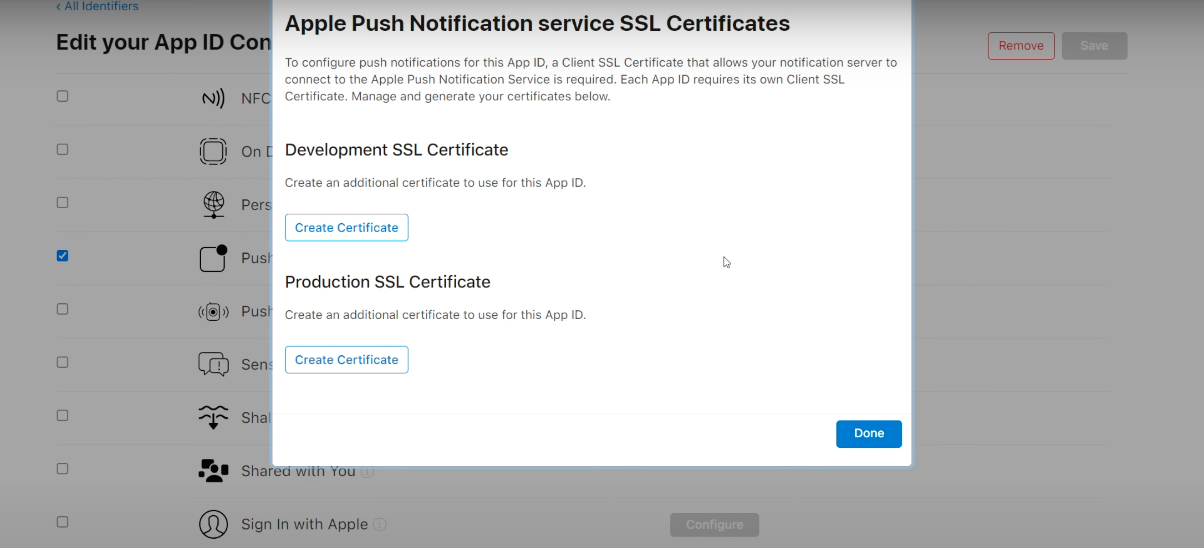
 – Next, you need to generate and upload a certificate signing request for Apple Push Notification service SSL. To do this, go back to the Appery.io app and, in the Resources tab, generate a new request it by using the Generate iOS certificate wizard. When ready, the certificate signing request can be uploaded to Apple: for this, just select the file you just downloaded and upload it.
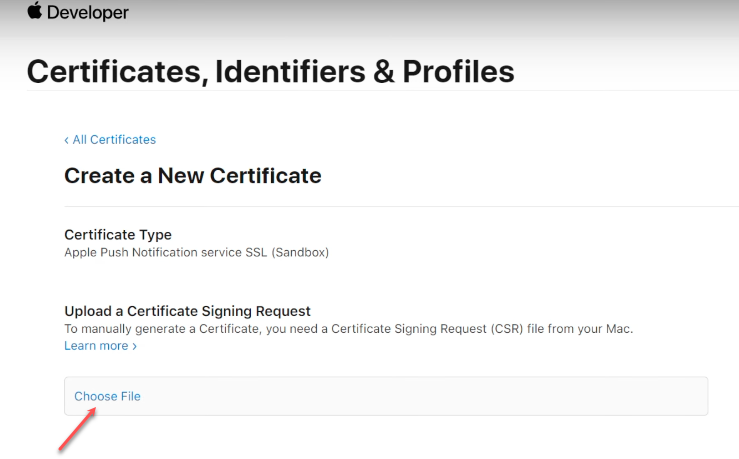
– After Apple has processed this request, you can finally download the push certificate and then upload it to Appery.io for use in your app.

– Go back to the Generate iOS certificate wizard, choose the certificate from your drive, then provide the name and password for your it. Click Generate.

In the Resources > Certificates tab, find the the iospush certificate, and click the Export button.
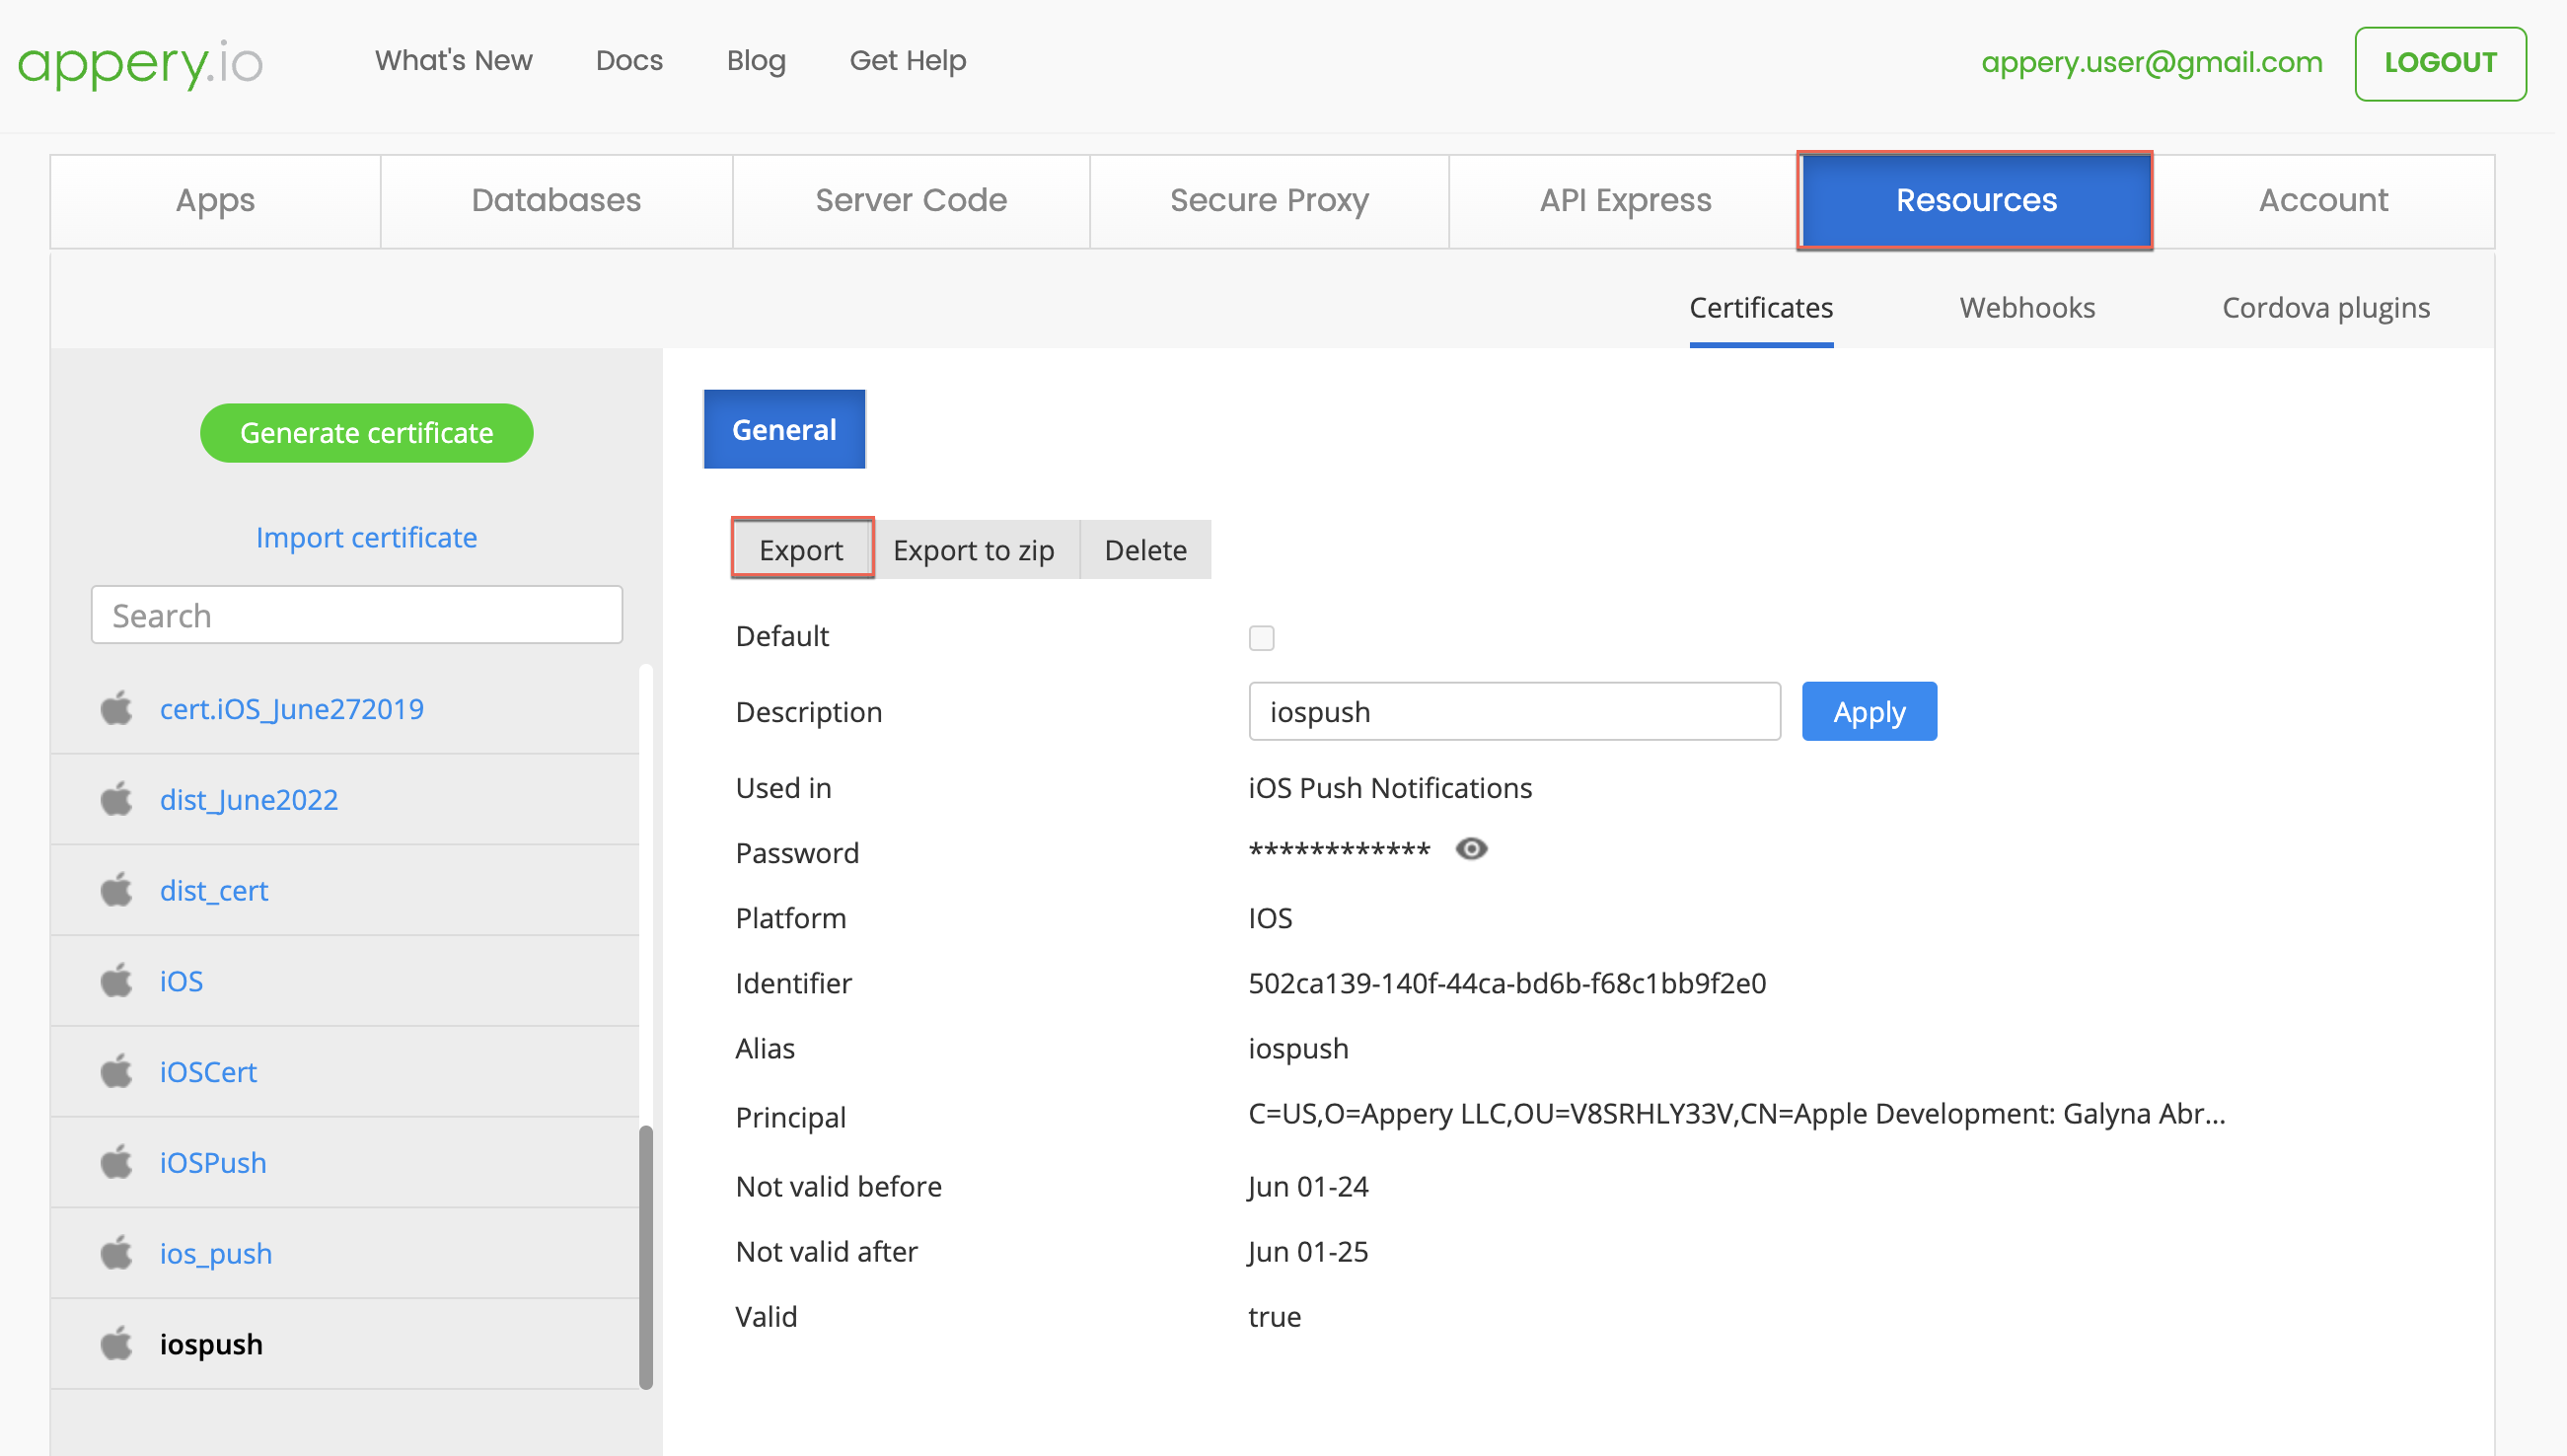
– We can finally specify it for the app. Go to the Push Notifications > Settings page, scroll down to the iOS settings section and upload the certificate you just downloaded in the .p12 format.
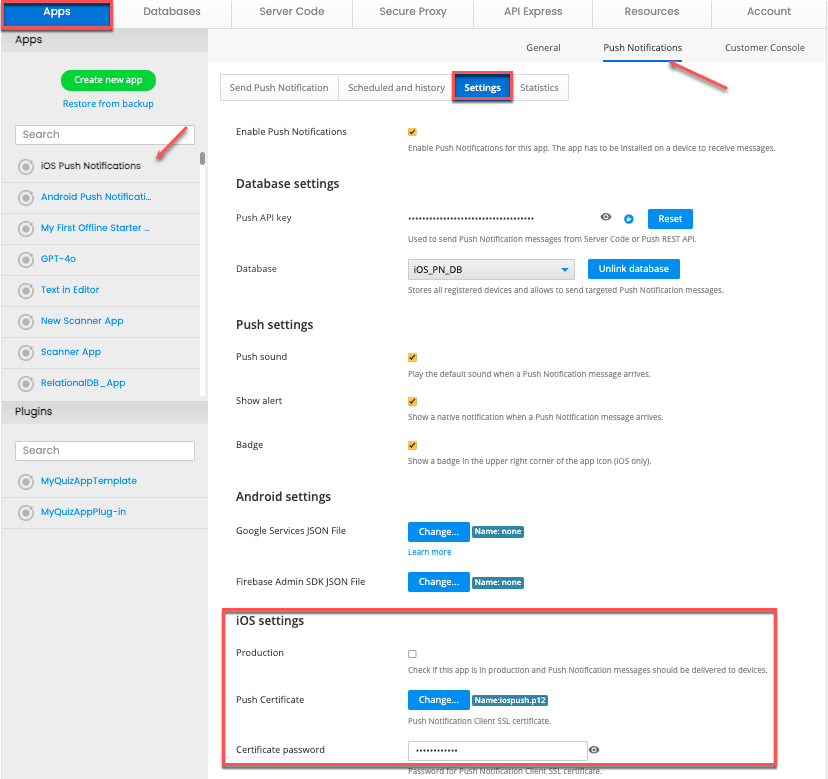
4. Build and Install Your App:

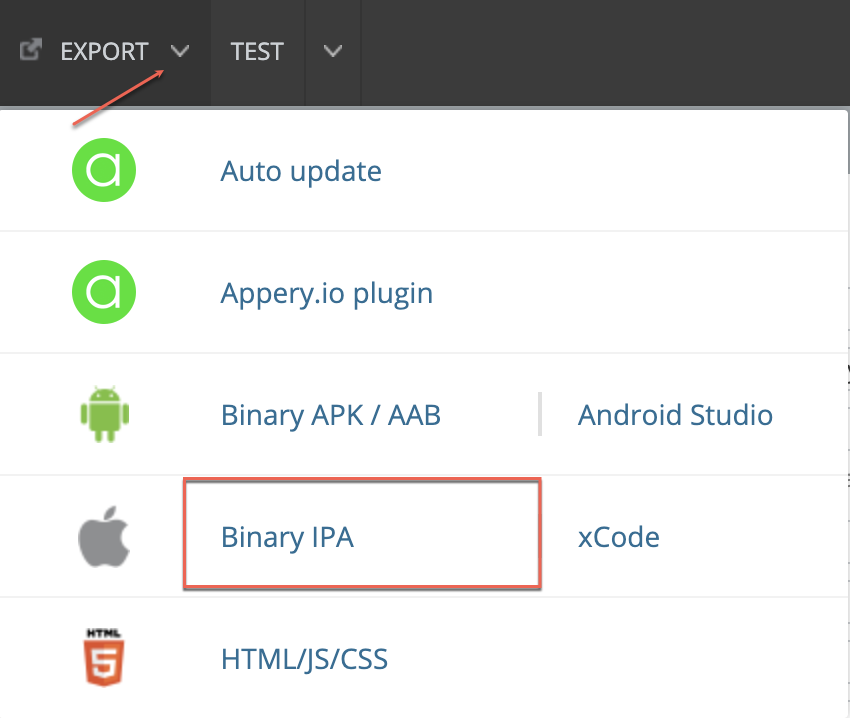
– Build your app’s binary IPA file: EXPORT > Binary IPA.
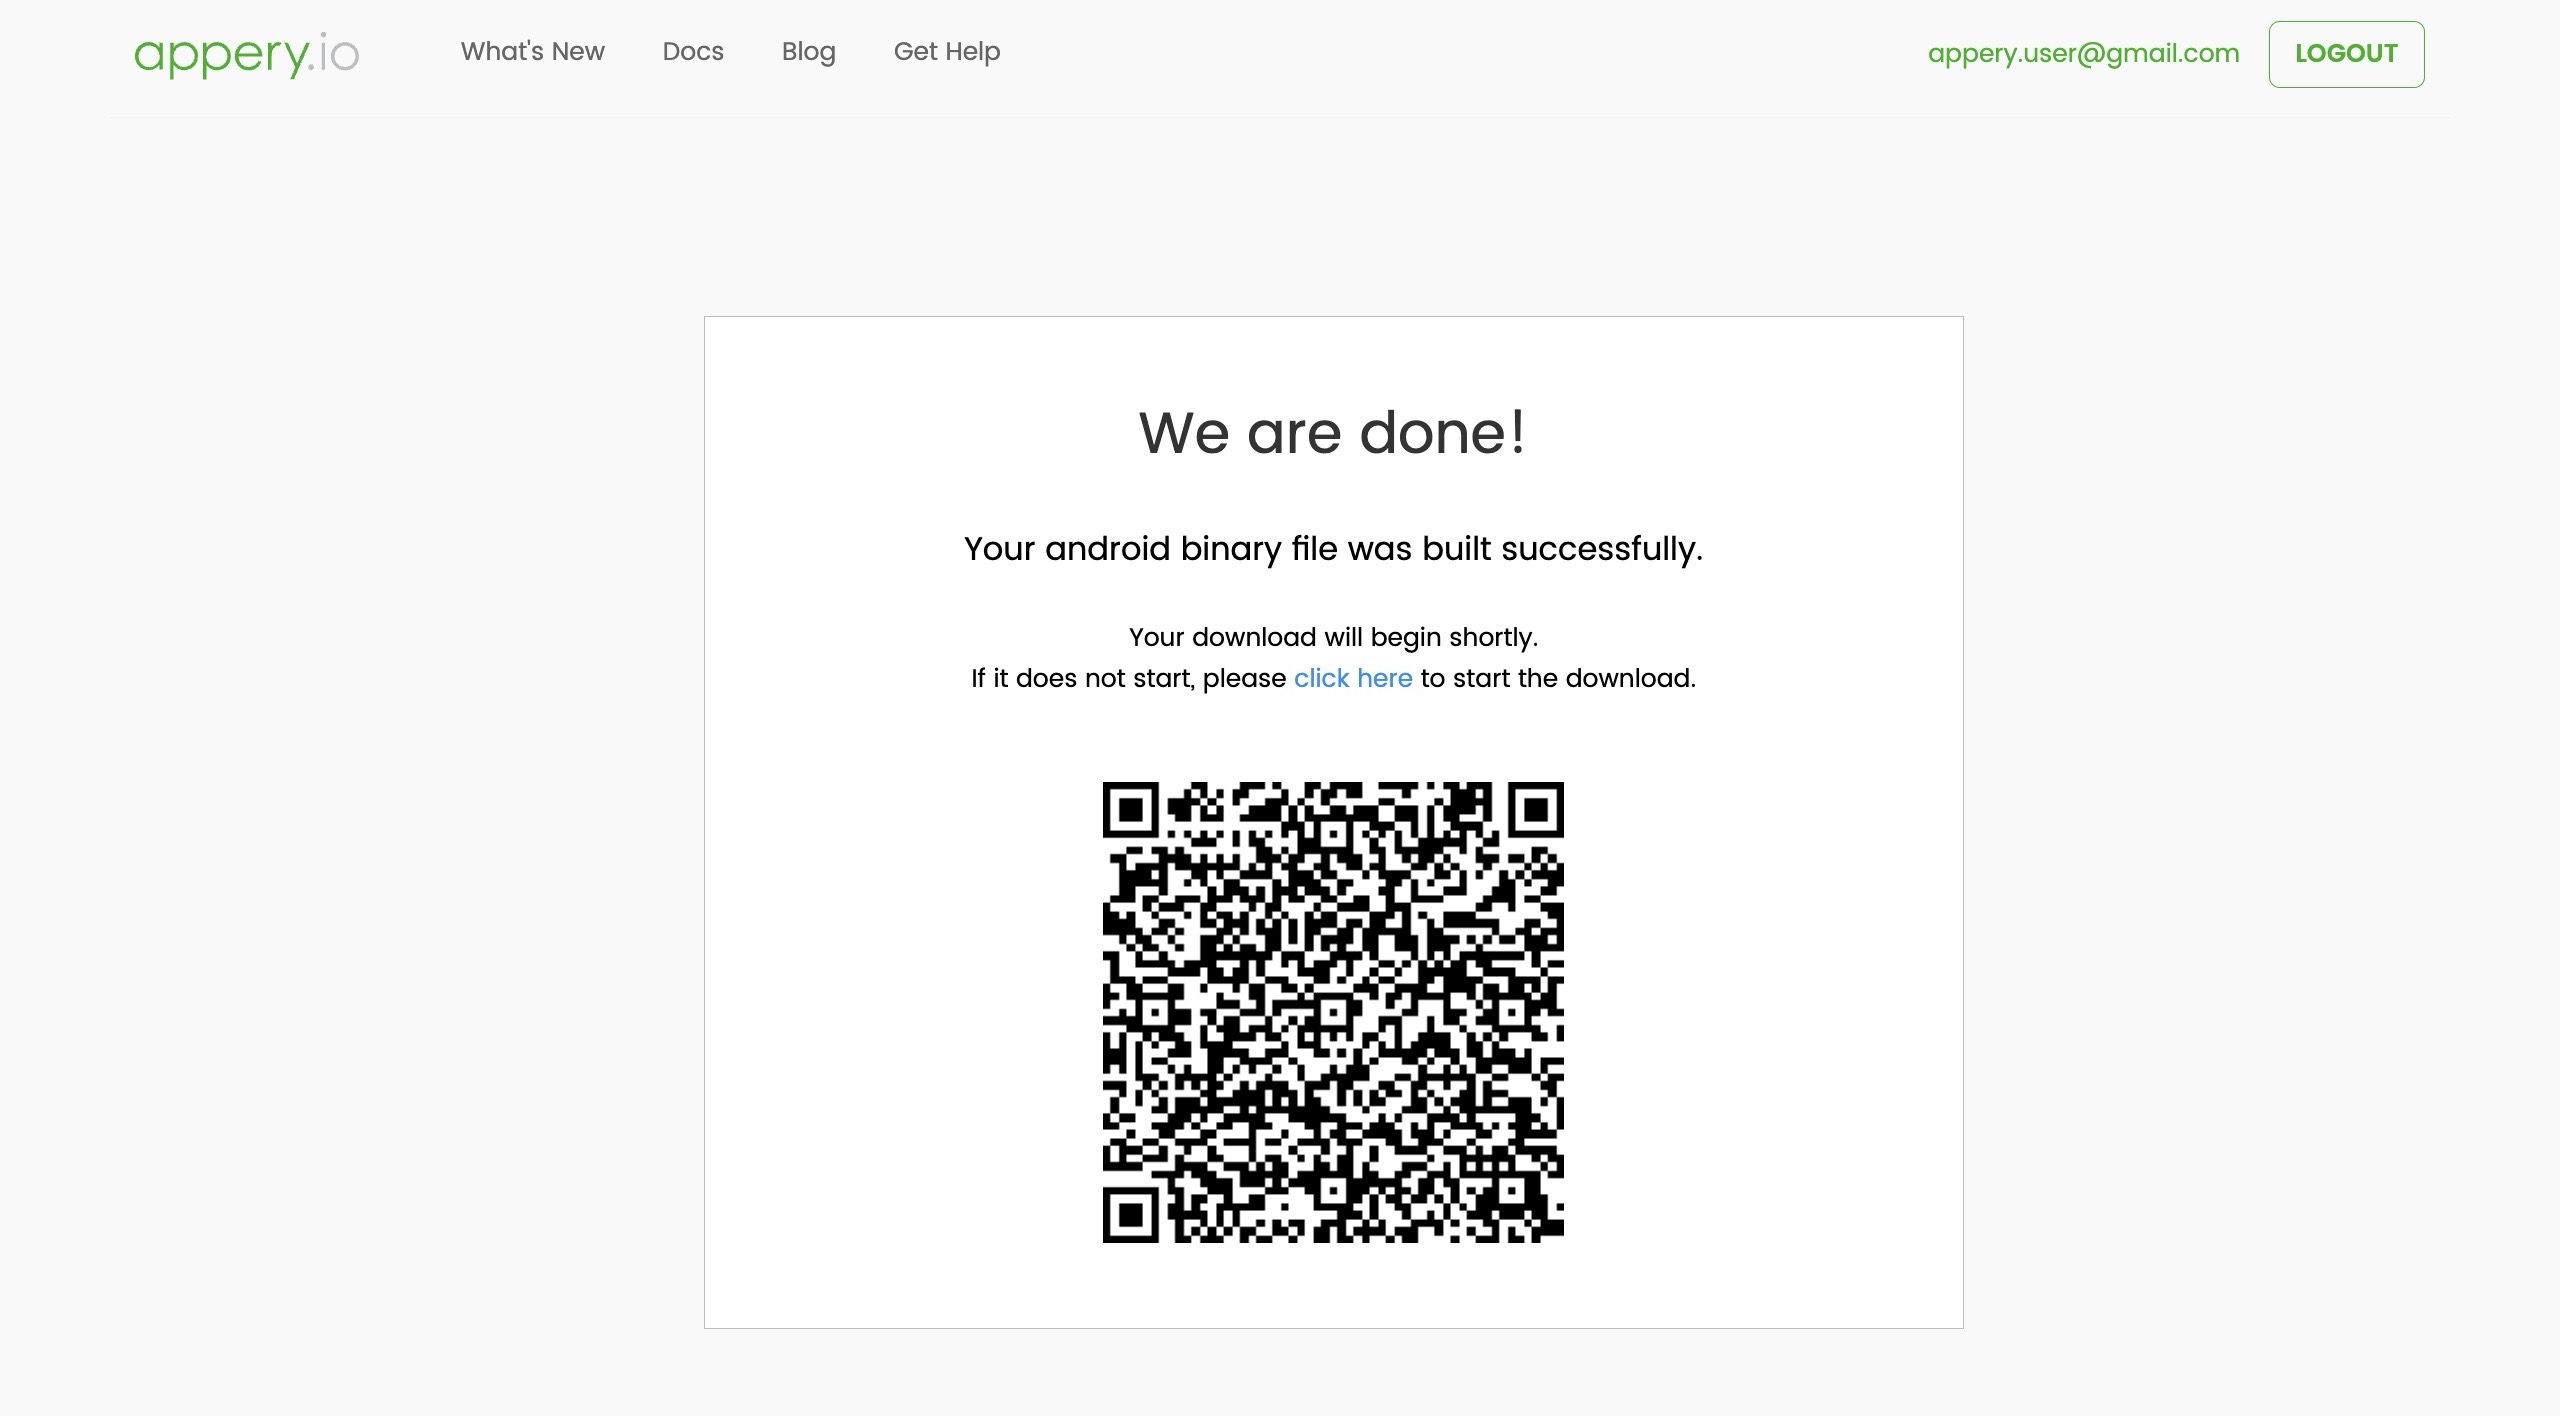
– After the app is built, install the app on your device by scanning the QR code provided and grant permission to receive push notifications within the app.

5. Test Push Notifications:

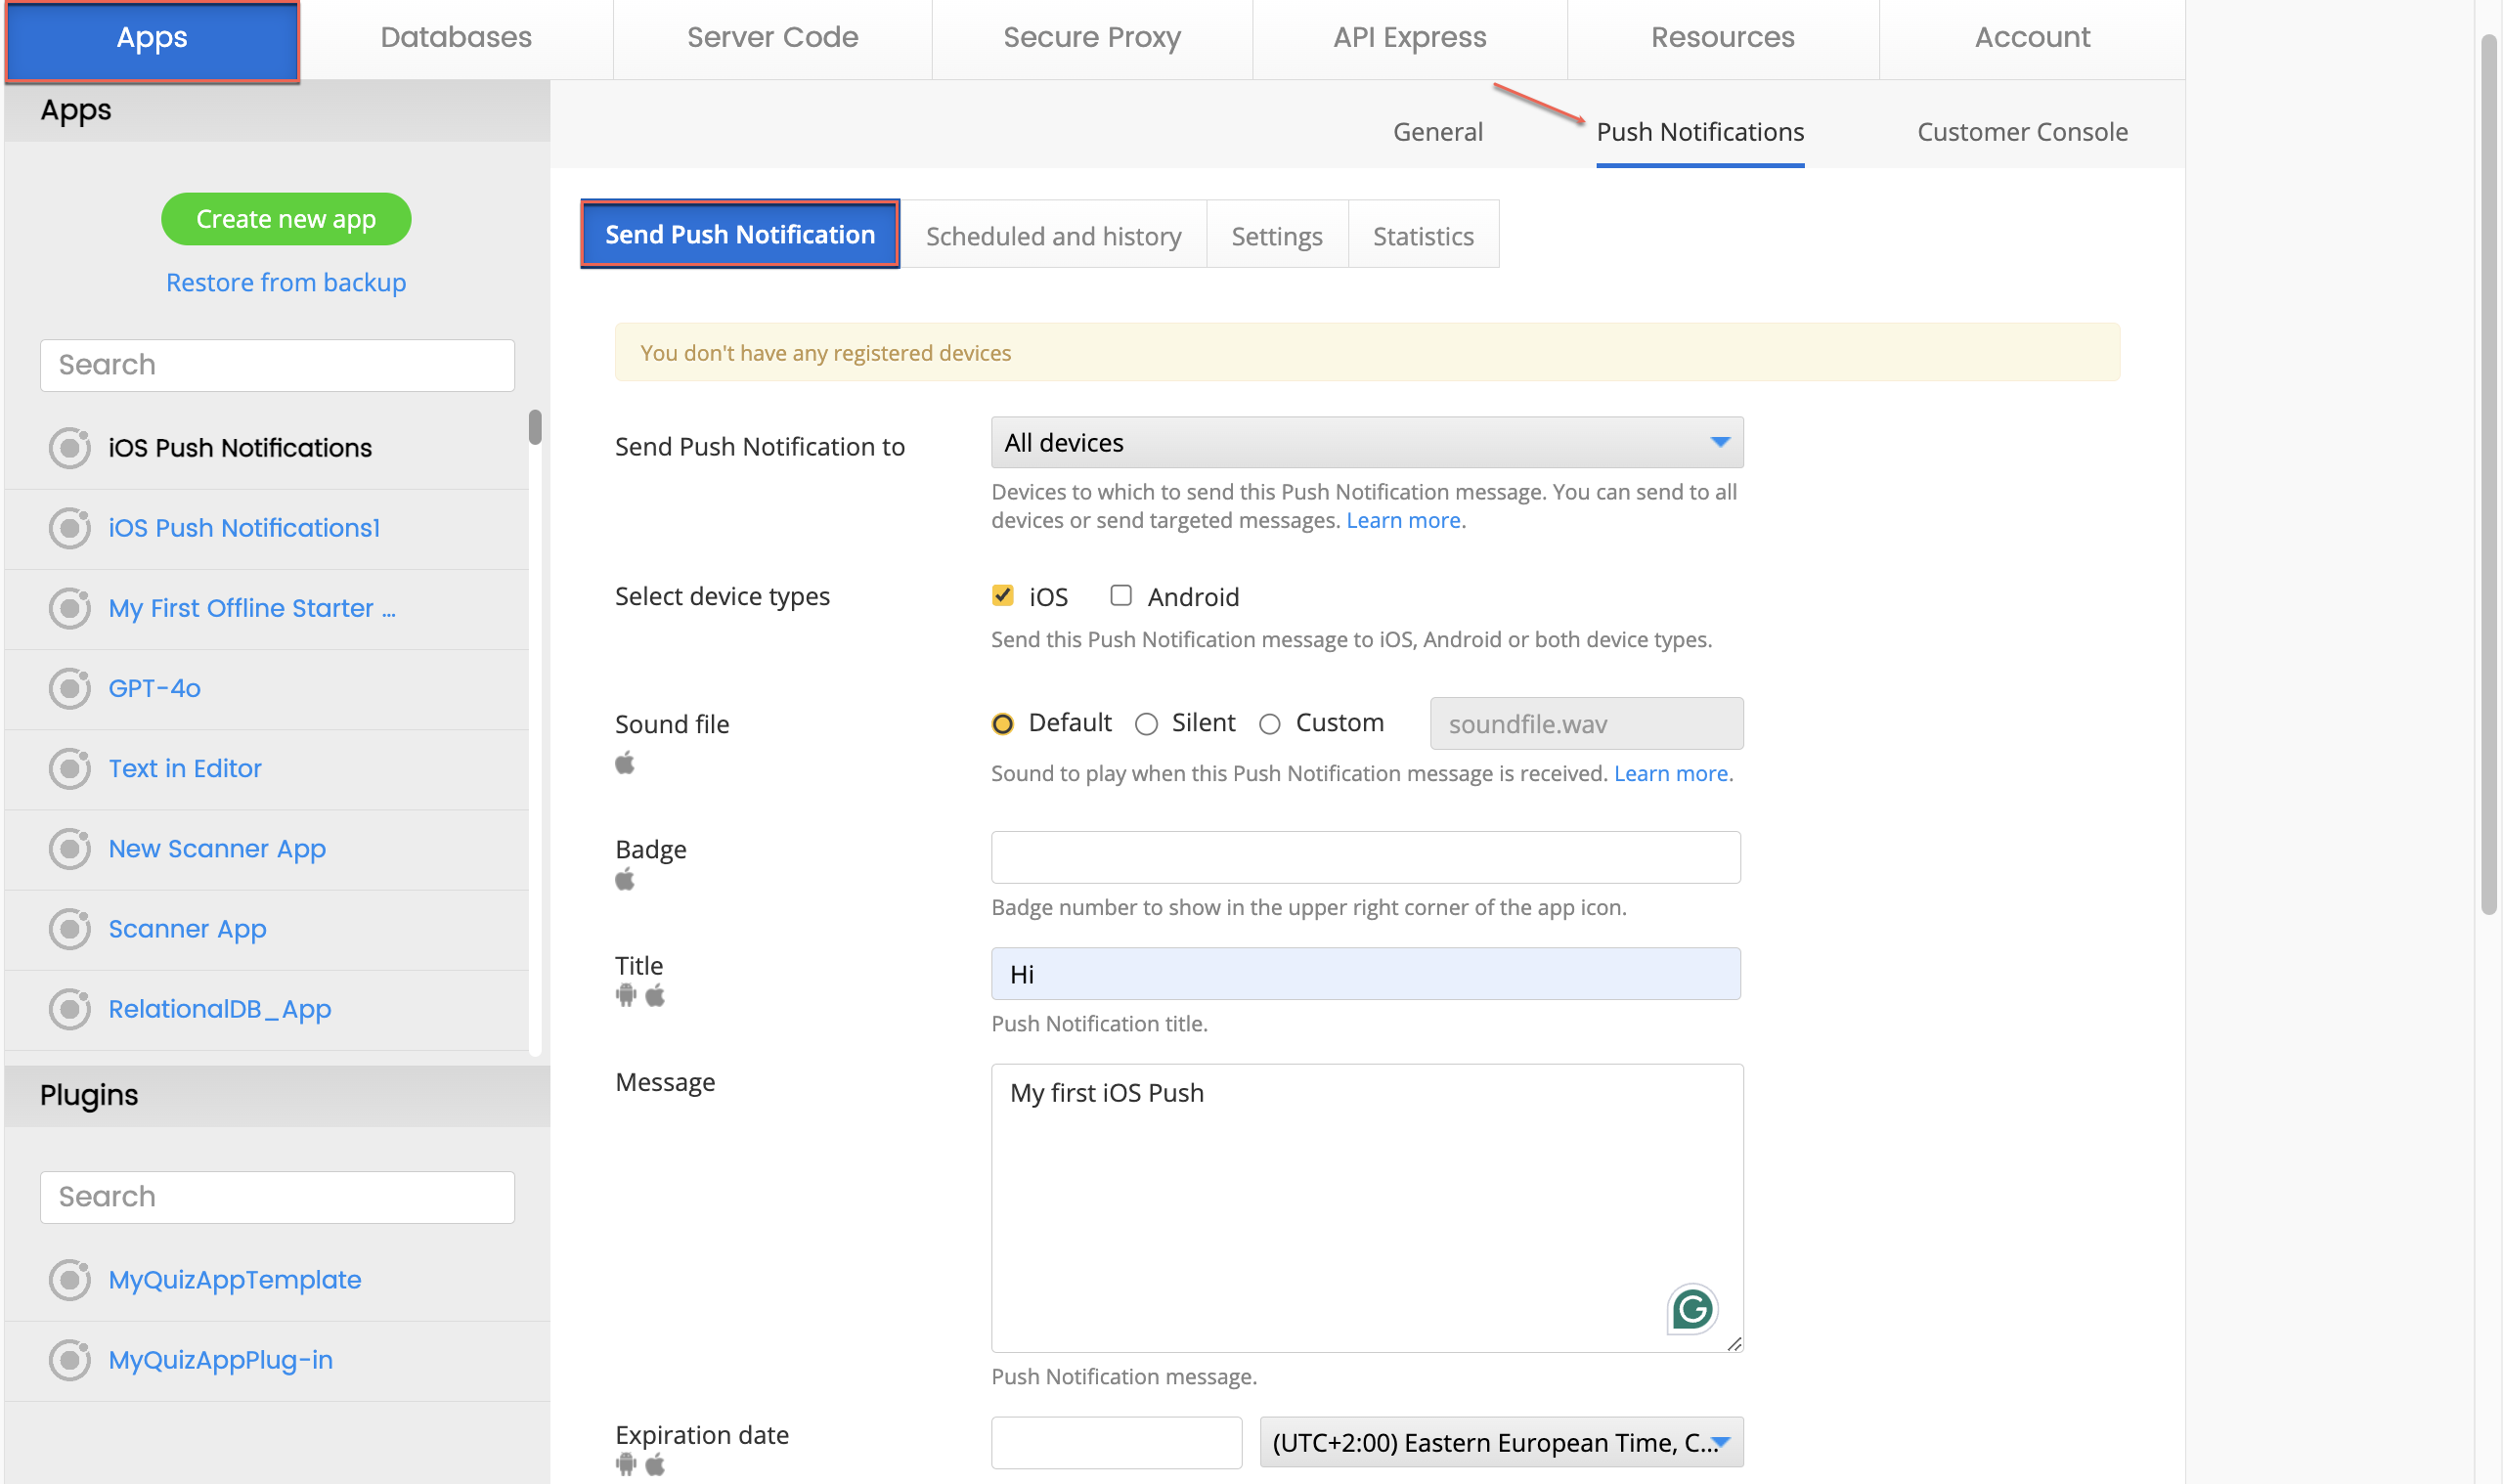
– Go to Push Notifications > Send Push Notifications tab, choose your device type (iOS), specify the title and message of the push notification and click Send.
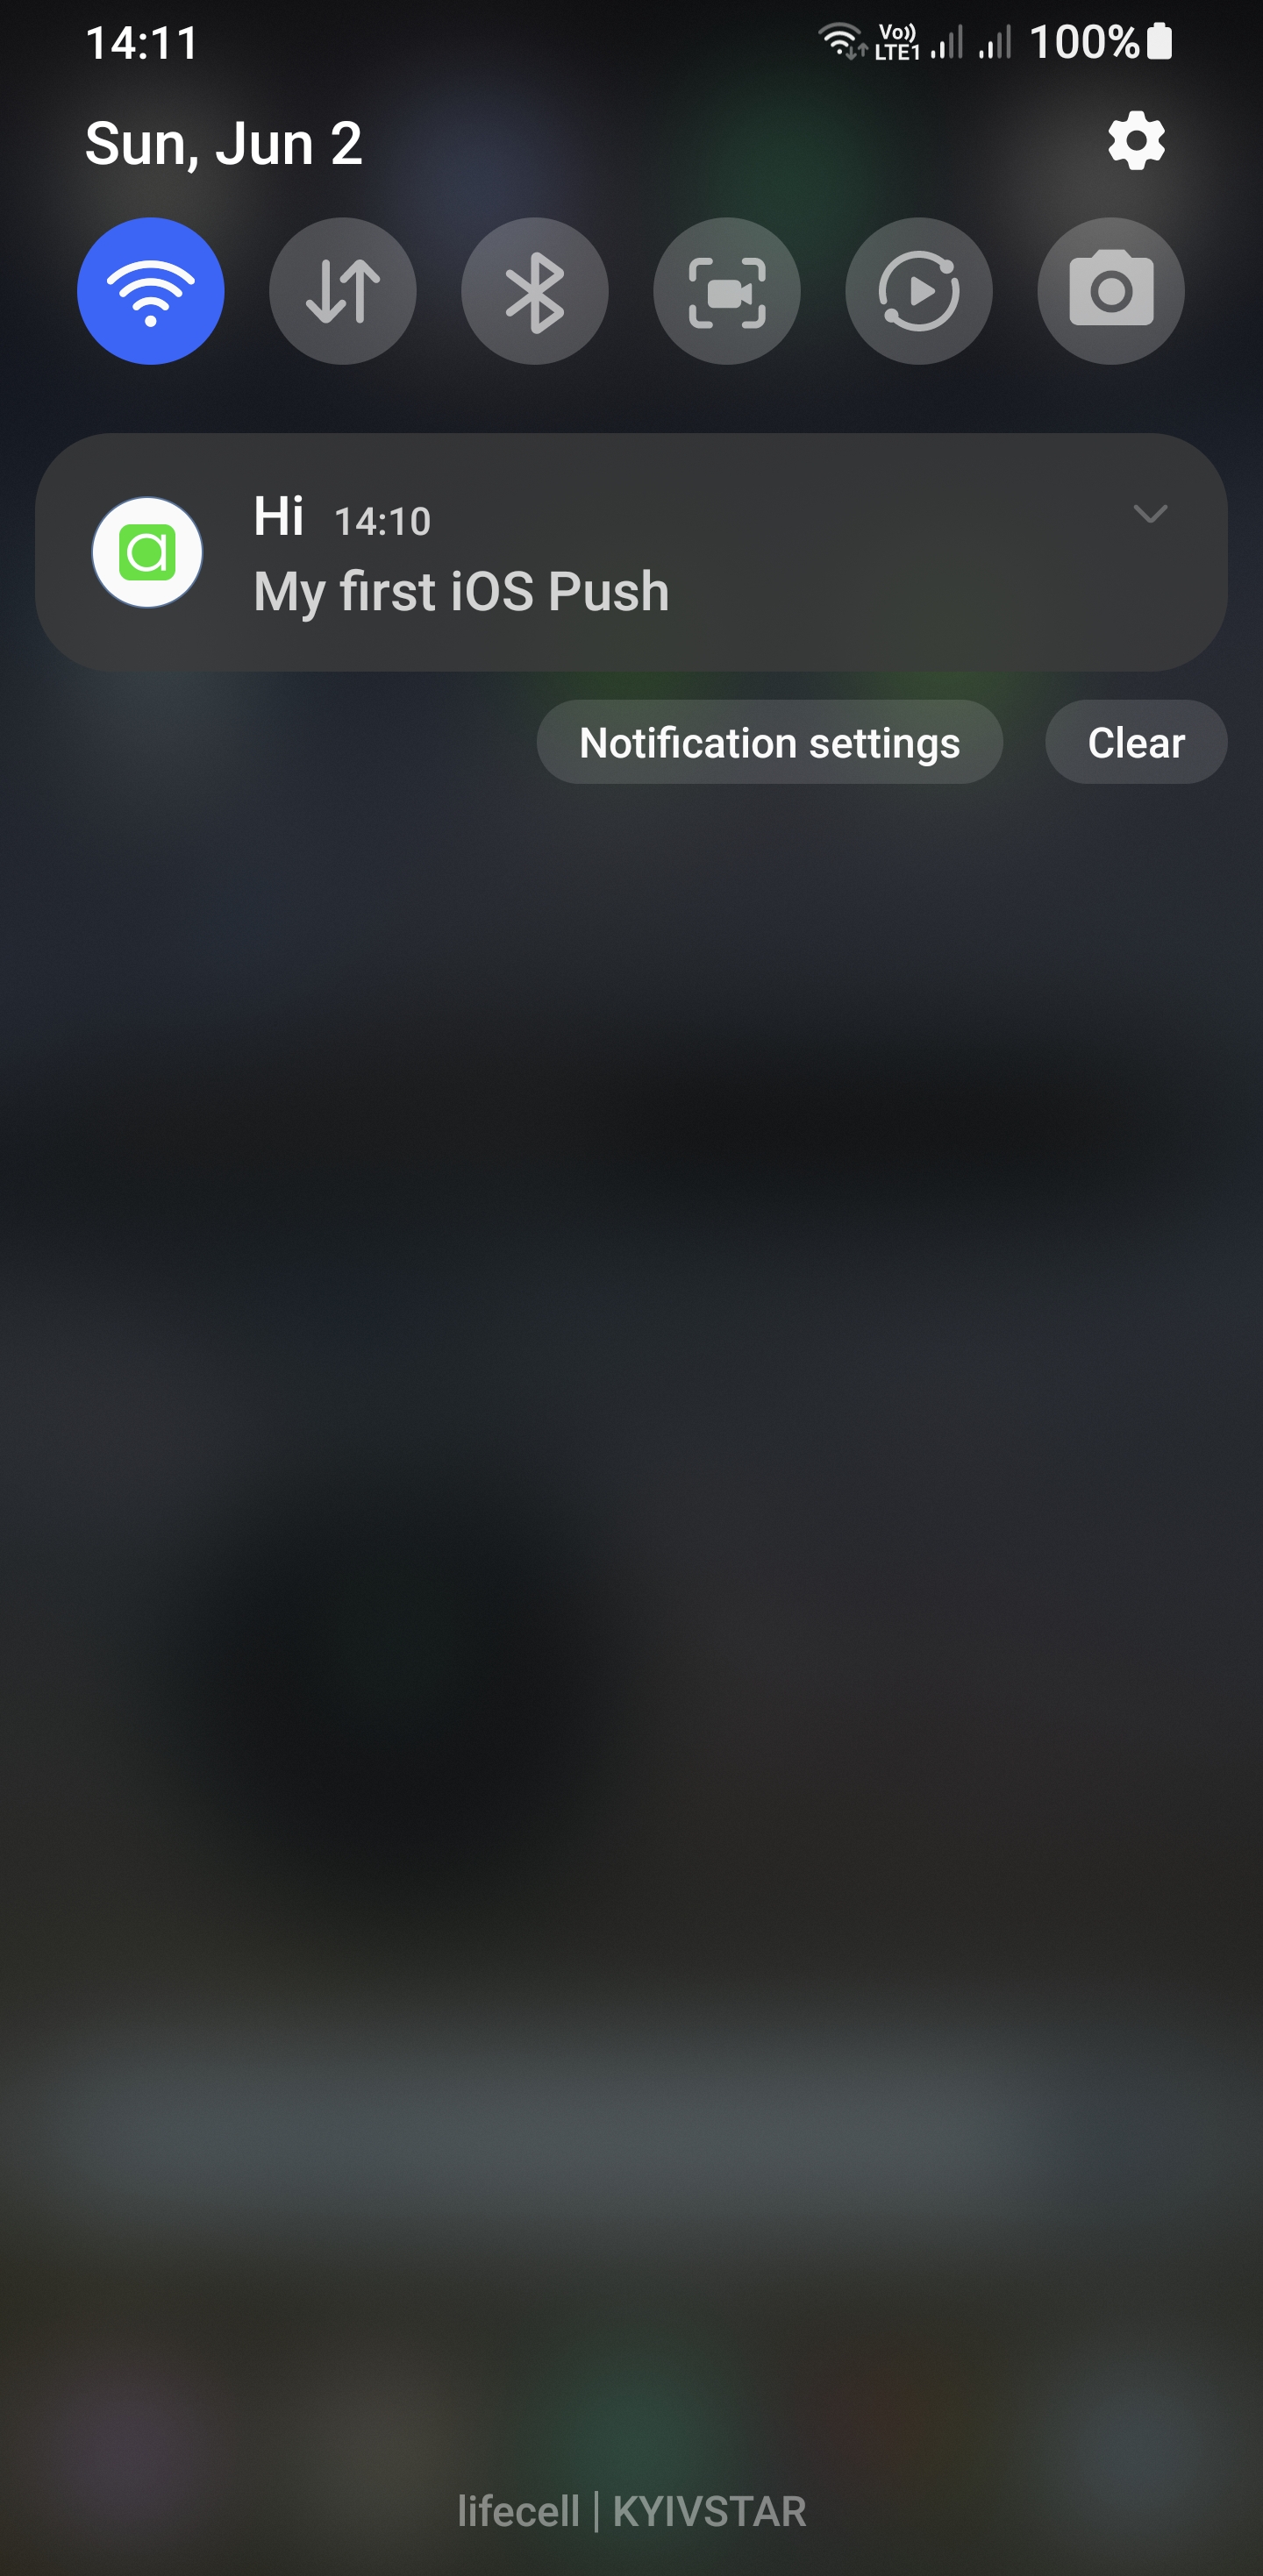
– Confirm it appears on your iOS device.
Conclusion

By following the above steps, you can effortlessly integrate Push Notifications for iOS into your app using Appery.io. This low-code platform simplifies app development, allowing you to focus more on great user experiences and less on coding complexities.

Ready to enhance your mobile app with push notifications? Start your journey with Appery.io today and keep your users engaged like never before!

Easily Integrate Stripe Payments: Step-by-Step Guide

Welcome, developers! Today, we’re thrilled to walk you through the seamless integration of one of the most popular payment systems into your app using our Stripe Shop template. Follow us along as we break down the process into easy-to-follow steps, empowering you to enhance your app’s functionality and user experience.

Step 1: Accessing the Appery.io App Builder To begin, head over to the Appery.io platform and access the App Builder. Here, you’ll find a range of templates to choose from. Select the Stripe Shop template to kickstart your journey towards integrating Stripe payments into your app effortlessly.

Step 2: Exploring Predefined App Pages and Services Upon selecting the Stripe Shop template, take a moment to familiarize yourself with the predefined app pages and services it offers. These include the Products, Details, Success, and Cancel screens, designed to streamline the shopping experience for your users.

Step 3: Leveraging Linked Backend Services Our Stripe Shop template comes equipped with linked backend services, including a database and server code, preloaded with test data. This allows you to test your app’s functionality immediately, providing a solid foundation for further customization.

Step 4: Customizing Your App Now it’s time to make the template your own. Utilize the App Builder’s intuitive interface to customize your app according to your unique requirements. Add new products, update existing ones, and tweak the design to align with your brand’s identity seamlessly.

Step 5: Integrating with Stripe API The heart of your app lies in its ability to process payments securely. With Appery.io’s Stripe Shop template, integrating the Stripe API is a straightforward process. Follow our clear instructions to replace the default Server Code keys with your own, ensuring seamless payment processing for your users.

Step 6: Testing Your App Before deploying your app to the masses, it’s crucial to thoroughly test its functionality. With Appery.io’s Tester app, you can easily test your app on your own device. Simply scan the generated code from the TEST menu, and you’re ready to put your app through its paces.

Ready to take your app to the next level? Dive into Appery.io’s Stripe Shop template today with our free trial period. Experience firsthand the power of low-code app development combined with seamless payment integration.

Need Assistance? If you encounter any roadblocks along the way, fear not! Appery.io offers comprehensive support, including step-by-step tutorials and direct assistance through the Get Help link in the App Builder. We’re here to ensure your success every step of the way.

Stay Informed Stay up-to-date with the latest tips, tricks, and tutorials by subscribing to our YouTube channel. Join our community of developers and unlock your app development potential with Appery.io.

Conclusion: With Appery.io’s Stripe Shop template, mastering Stripe integration has never been easier. Follow these steps, and you’ll be well on your way to building a feature-rich shopping app that delights users and drives business success. Happy coding!

Effortless App Mastery: Unveiling Appery.io’s Admin Secrets

Hey there, app enthusiasts!

Welcome back to another insightful journey into the world of app development with Appery.io. In our previous video, we took a deep dive into customizing our Menu app template (You can check here if you missed the post). Today, we’re stepping up the game with a focus on a particularly handy feature for admins.

Imagine being able to tweak your app’s content or adjust prices without the hassle of logging into complex interfaces. Well, with Appery.io, that’s not just a dream—it’s a reality. Let’s explore how you can wield this power right from your device.

Accessing Database User Records:

Before diving in, we need to set up a few things. Head over to the App Builder and navigate to the Database link. Within the Menu_DB database, locate the Collections tab and access the Users collection. Here, you’ll set your password or email address for easy access.

Routing for Admin Convenience:

Next, let’s streamline the admin experience. Within the App Builder, navigate to Project > Routing. Set the default route to the Login page, ensuring swift access for admins. Don’t forget to save your changes—it’s the small steps that lead to big convenience gains!

Testing Made Easy:

Now, for the exciting part—testing your app. Sure, you could export it for Android or iOS, but why not take a quicker route? Enter the Tester app, a free gem available for both platforms. Fire it up, scan the generated code, and voila! You’re in.

Admin Delight:

Once logged in, you’re greeted with the Menu management page, your gateway to culinary control. Edit, reorder, or add new meals with a few taps. It’s intuitive, it’s efficient—it’s a game-changer.

Smooth Sailing:

With edits made and changes applied seamlessly, your app is ready for prime time. Hide the Controls menu for a clutter-free interface, ensuring a seamless user experience.

The Finishing Touch:

With everything in place, it’s time to share your masterpiece with the world. Save your app, click Close, and head over to the Hosting section. Name your project, hit Publish, and watch as your app goes live. It’s that simple.


Bon Appétit!

Print that QR code, place it on your tables, and let your guests indulge in the convenience of browsing your menu in their preferred language. With Appery.io, satisfying appetites has never been easier.

If you found this guide helpful, don’t forget to subscribe to Appery.io to try more handy tips and tricks. And hey, if you’re loving what we’re doing, why not join us on our YouTube channel?

Until next time, happy app building!


Introducing Our New Starter App Template for Your Mobile App

We’re excited to present our latest creation: the Starter App Template. It’s built to be the strong base for making modern mobile apps that users will love.

Starter App Template: Main Features

  • Flexible Design: Works smoothly on all devices for a great user experience.

  • Easy Logins: Choose between traditional or FaceID/Fingerprint logins for security and convenience.

  • Simple Sign-Up: Quick feedback on usernames and passwords to get started easily.

  • Password Recovery: Easy steps to recover access if needed.

  • User Control: Customize settings and privacy to match individual preferences.

  • Language Choices: Supports multiple languages for a global audience.

  • Personalized Profiles: Users can create and edit profiles for a tailored experience.

  • Dark Mode: A comfortable theme option for low-light settings.

  • Secure Confirmation: Double verification via email or SMS for added security.

Who Can Benefit?

This template suits startups and businesses in social networking, e-commerce, health & fitness, education, and more. It’s perfect whether you’re starting big or testing ideas.

Start Building Today

Ready to transform your app development? Explore the Starter App Template now! Create a strong foundation and focus on what users need most.

Don’t miss out—embrace innovation and enhance your mobile app experience with our Starter App template tutorial.

Stay tuned for updates and added features as we continue to improve this template!
Ready to begin?

Great News: “Autoupdate” Plug-in is added to Appery.io Apps

There is another great news we are happy to share with you today: the Autoupdate plug-in has been added to all Appery.io apps and is ready to be used.

Adding this plug-in is simple and requires zero effort on your part to set it up. But when added, it just gets the job done. 

The idea behind it is as simple as it can possibly be:

  • You add the plug-in to your app and publish it so that your users can install it on their devices.
  • Next time you need to make changes to your app you just make them and push the app updates.
  • With the next app run on the device, the plug-in automatically detects there is a new update on the server and lets the end user make decisions on whether to download it from the server and then install it on their device or postpone this action:
Autoupdate plug-in

Autoupdate plug-in on the device

Please check out our document here to learn how to work with the Autoupdate plug-in.

How to Create Your Own ChatGPT App from Template

ChatGP technology is on everyone’s lips nowadays and we are happy to let you know that Appery.io is the first no-code mobile app maker platform introducing the ready-to-use and easily customizable template for creating a ChatGPT-based app. Using the template is extremely simple and just in several minutes, you will be able to test your own ChatGPT application without having to write a single line of code. Isn’t that a wonder?

Note, that you can try using the platform for no charge, and if you are new to Appery.io and interested, click here to subscribe for our 2-week Free trial.

When in the platform, go to the Apps tab, select the predefined ChatGPT App template, and confirm:


In a moment, the app will be created with the autogenerated name. If you like, you can rename your project later under its General tab or do it now.

Well … it’s all set and you can proceed with testing your app.

Testing ChatGPT Template from Appery.io

Click the TEST button to open the app preview in the browser and play around with its different options. There are three of them that are available for adjusting: ModelCreativity, and Max Tokens.

In short: the quality of chatbot responses will vary depending on the options settings. But if you need more details, please refer to the OpenAI official documentation site.

Important!
To test this AI technology, obtaining an API key from the OpenAI portal is required. So, open this link (or go to the API Access section of your OpenAI account dashboard) and either generate a new API key or manage your existing API keys.

When done, copy and paste it into the API Key field and you are ready to test the template. Click the START button to begin. Note, that the template also has integrated text-to-speech and speech-to-text capabilities, so you are free to experiment with both entering text and dictating it:

While testing different options, note how the quality of responses is impacted by setting different values for ModelCreativity, and Max Tokens.

Modifying Template

To modify the template to create your own ChatGPT-like app, follow several simple steps below:

  1. Delete the Home page. After you have defined what values of ModelCreativity and Max Tokens settings work for you best, loading all the parameters’ selections page becomes redundant. So, go to the App Builder Project view on the left, left-click to open the Home page menu, and delete it:

2. Modify the parameters’ default values. Open the Model and Storage > Storage tab and replace the default values with the ones that best work for you.

3. Save the app by clicking the SAVE button in the Toolbar.

Ready! Now, your app has been customized and you can install it on a device.

Installing your own GPT-based App

There are several options you can select from to review your own ChatGPT app on the device and below, you will find the most popular:

  1. Export the app binary. To do it, click the EXPORT button in the Toolbar and select the type you prefer: Android or iOS:

Note that installing on iOS requires that you have an Apple developer account.

However, if you simply want to test how your app behaves on a device, be it an iPhone or an Android device, use our Appery.io Tester – it’s free and simple.

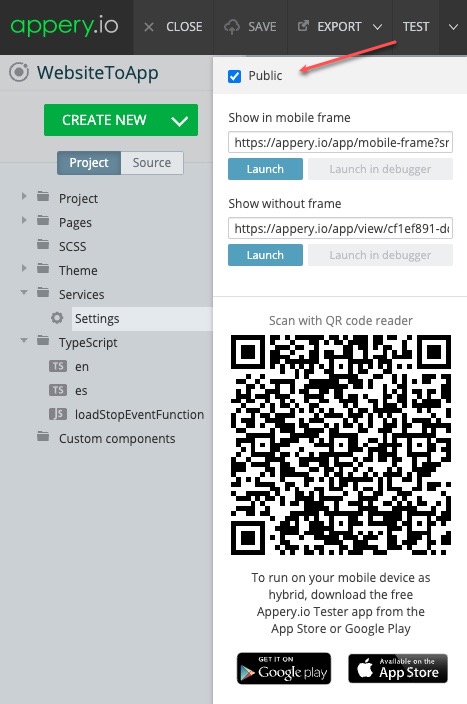
2. Test with the Appery.io Tester – the best option for quick testing your apps without needing to register your Apple or Android developer accounts. The app is free and can be installed on any device in a matter of several clicks. The links and instructions can be found on the preview page, you just have to click TEST again:

Select the needed option in the drop-down to download and install the testing app on your device. This should take less than a minute of your time.

When the app is installed, click the SCAN button and scan the QR code that was automatically generated for your app:

Here is what the app chatting looks like on a device when installed:

 Publishing as a web page widget

You might already know that any app that you build in Appery.io can be published as a mobile web app. This means the app will be hosted on a server and can be accessed from any browser on a mobile device.

But have you already tried adding the published app to any site of your choice as a widget? This is not difficult to do and can be very useful for your personal or business and look perfect. Please check this link to review what it can look like.

Please, visit this page for more details on modifying and customizing your ChatGPT-template.

Conclusion

If you’re looking to create a professionally-looking application that integrates with a 3rd party API, using no-code platforms like Appery.io can be a perfect choice.

With Appery.io, you can simplify the development routine even further by adding ready-to-go templates and predefined plug-ins! And our new-code ChatGPT template is another example of how building apps can be enjoyable and stress-free.

Developing IOS Mobile App On Windows? Easy with Appery.io!

One can hardly argue with the fact that developing for iOS and especially publishing to the App Store can be extremely tricky and demanding in terms of dedicated hardware. 

But we, at Appery.io, are happy to be able to give you a hand with sorting that out.

So, if you are the kind of person who:

  • is interested in developing for iOS but has no Mac,
  • doesn’t want to spend too much of your precious time performing difficult testing and publishing operations but is still interested in getting your app published to the App Store,
  • or just has a great app in mind but lacks an idea where to start from,

then you will definitely like our new detailed how-to video that has just been uploaded to our YouTube Channel:

Developing iOS Application and Publishing it to App Store on any Platform: Windows, Linux, or Mac

In this video, we show how easy it is to create an iOS mobile app right in the browser using one tool only: the Appery.io platform.

You will see that developing for iOS is not only possible by using a Windows desktop but is actually not even that complicated. And this means …. that you should not be restricted to using a Mac anymore and can try creating your very first iOS app right now.

Even more than that: in this video, we not only create the app for iOS but also show how to install it on an iPhone for testing and then publish it to the App Store.

We did our best to make the video as detailed as possible. But if you still have any questions left or would like to suggest more instructional video ideas, please feel free to contact us at support@appery.io or leave your comments under the video.

PS And.. just in case you did not know: any app created with Appery.io can as easily be exported for Android.

Happy holidays from all of us, at Appery.io!