New Appery.io Release: App Building Power with Appery.io’s Latest Features

When it comes to creating mobile apps, Appery.io is a name you need to know. In this article, discover how our latest features can transform your app development process. Appery.io is all about making app building easier and faster.

Enjoy our Search

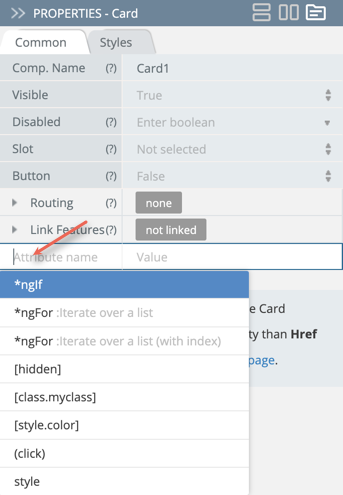
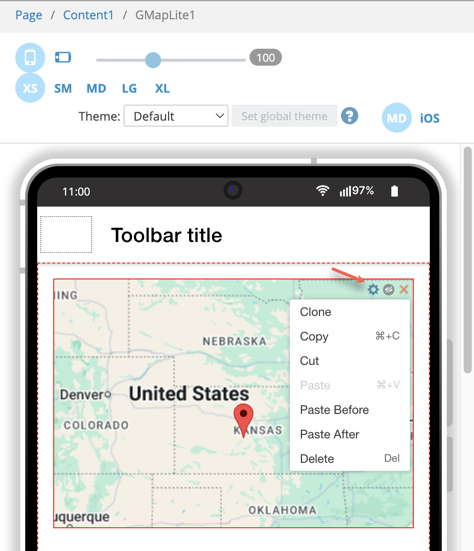
First, let’s talk about our new search functionality. This tool lets you find anything in your project, whether it’s code, styles, or components. With a quick search, you save time and avoid frustration. You can focus on the creative aspects of your project.

Use our latest feature, Search, all over the project.

Methods ngOnInit and ionViewWillEnter are now at Hand

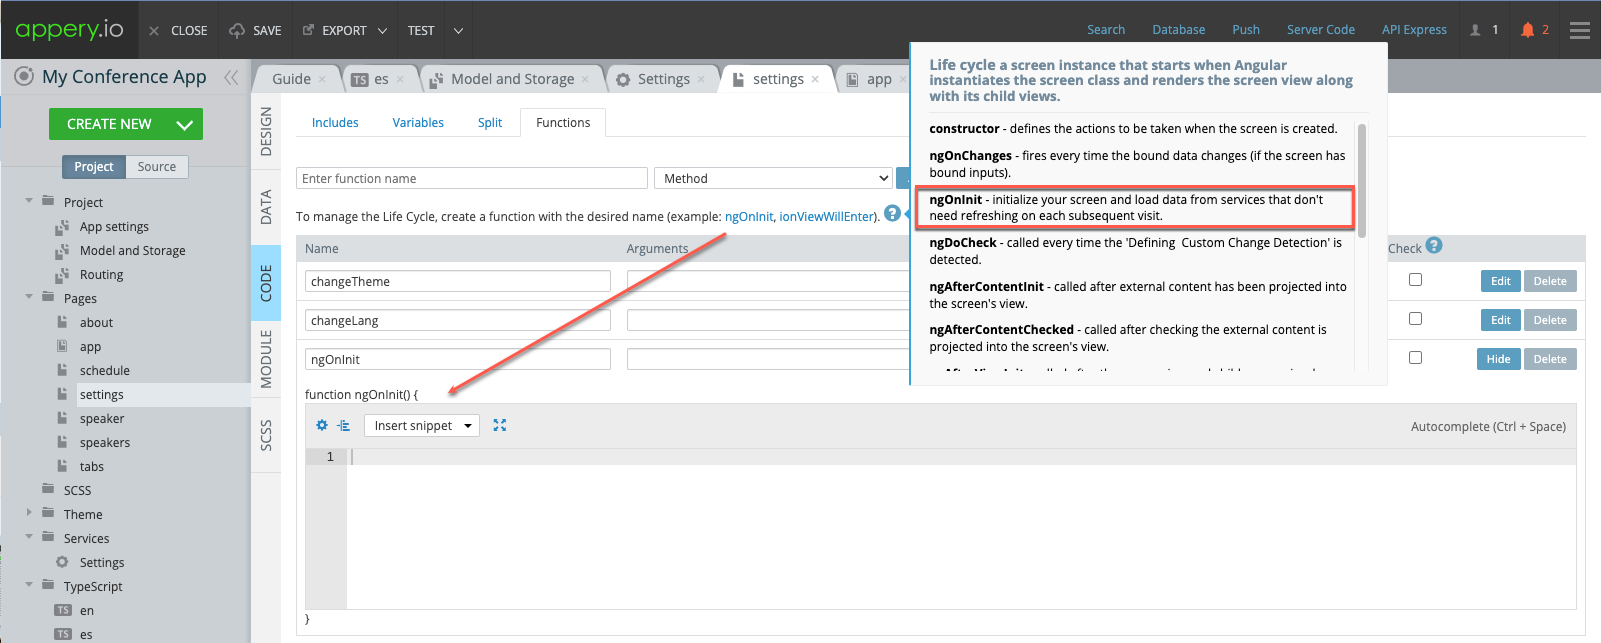
Next, our editor now includes hot adding of the methods that are common in app development: ngOnInit and ionViewWillEnter. Previously, setting them up took time. Now, Appery.io has automated this. You can set up your project with one click on the needed method. This means less manual work for you.

Add the 'ngOnInit' and 'ionViewWillEnter' methods with one click.

Using Alerts is Simpler Now

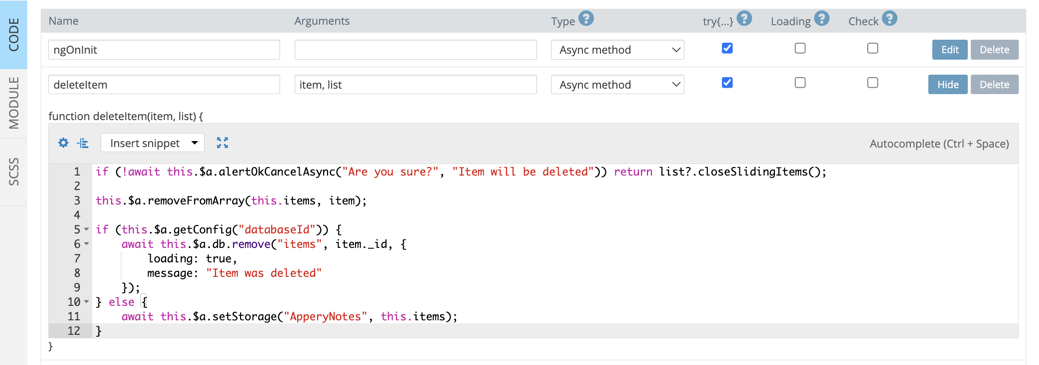
Another exciting update is in user alerts. Handling these interactions used to be tricky. Now, our system streamlines the process. The code is clear and easy to read. Managing user prompts is now a breeze, enhancing your app’s user experience.

The updated code with Alert: smart, elegant, and easy to understand.

DB Queries Caching is Here Too

Performance is key in any app. That’s why our caching feature is a game-changer. For this, two new parameters have been added to our arsenal: cache and saveInCache.

This feature stores database queries so apps run smoothly, online or offline. It improves speed and ensures data is always there, even when the internet connection isn’t.

Add our new database caching functionality to your projects by using 'cache' and saveInCache' parameters.

With these tools, Appery.io empowers developers at every level. You’re free to focus on what matters. The platform is evolving. Our commitment is to support your creative journey. We provide the tools you need to build apps that stand out.

To learn more about these new features, see our detailed Youtube video:

You’re not alone. Join the Appery.io community. Together, let’s bring your app ideas to life. Explore our tutorials, templates, and intuitive editor. We’re excited to see what you will create!

Building a Killer Conference App with Appery.io

Mastering the art of building a conference app opens a realm of engagement and efficiency in event planning. A well-crafted app can fundamentally transform how attendees experience an event. Appery.io, known for its robust app development capabilities, offers a comprehensive platform for constructing impactful conference apps.

Well, this article draws insights from a detailed video that walks through leveraging Appery.io, presenting strategies and features to elevate your conference planning.
Getting Started with Appery.io

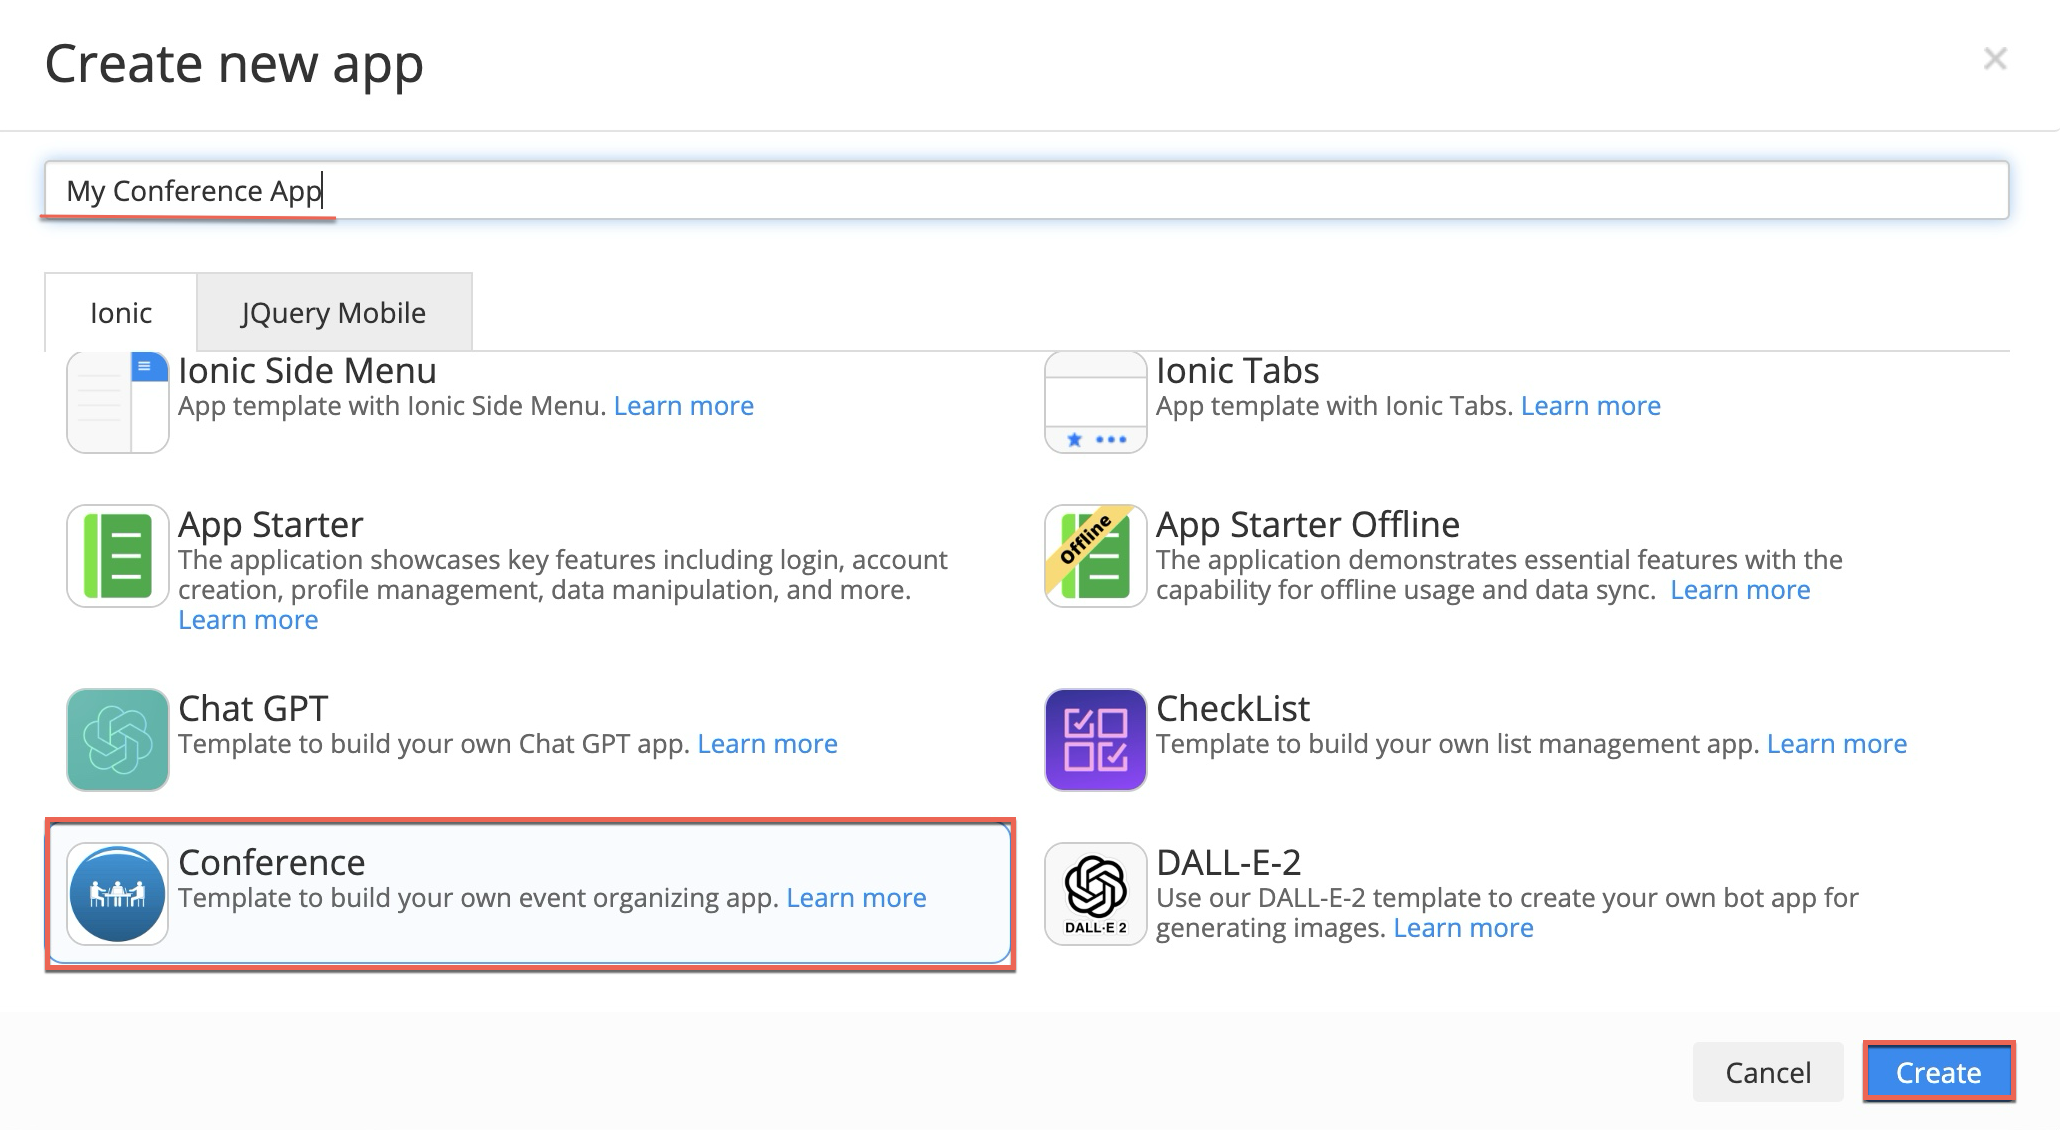
To embark on your journey with Appery.io, begin by creating an account—a gateway to a myriad of development tools. Navigate the intuitive user interface, which provides seamless access to various features and templates. Among these options, you’ll find the specialized Conference template, setting a solid foundation for your project.
Crafting the Perfect Conference Schedule

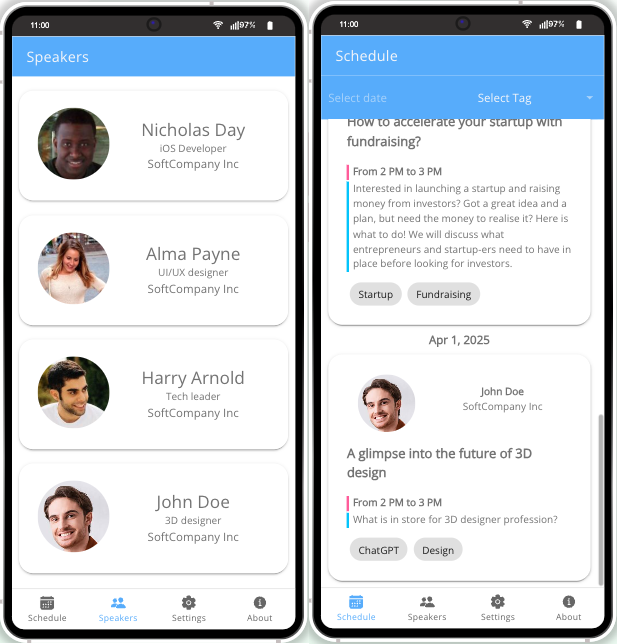
A dynamic conference schedule is the cornerstone of any successful event. Customize features like renaming the app, changing the template color themes, launch icons and screens, customizing app pages to match your event’s branding and facilitate easy attendee navigation. A well-organized schedule ensures participants can effortlessly engage with relevant sessions.

If interested, check out the instructions in the Customizing App section or watch watch our YouTube video to learn how to use our template:

Elevating the Speaker Experience

Distinguish your app by featuring detailed speaker profiles. These provide attendees with speakers’ backgrounds and related works, enriching their experience. Additionally, maintaining real-time updates ensures attendees have the most current information at their fingertips.
Engaging the Audience through the App

Interactive features within the app foster attendee engagement, transforming passive participation into active involvement. By integrating social media, you extend the event’s reach and facilitate broader interaction. A thoughtful user interface design further enhances this engagement, ensuring the app is both intuitive and visually appealing.

Customization Features at Your Fingertips

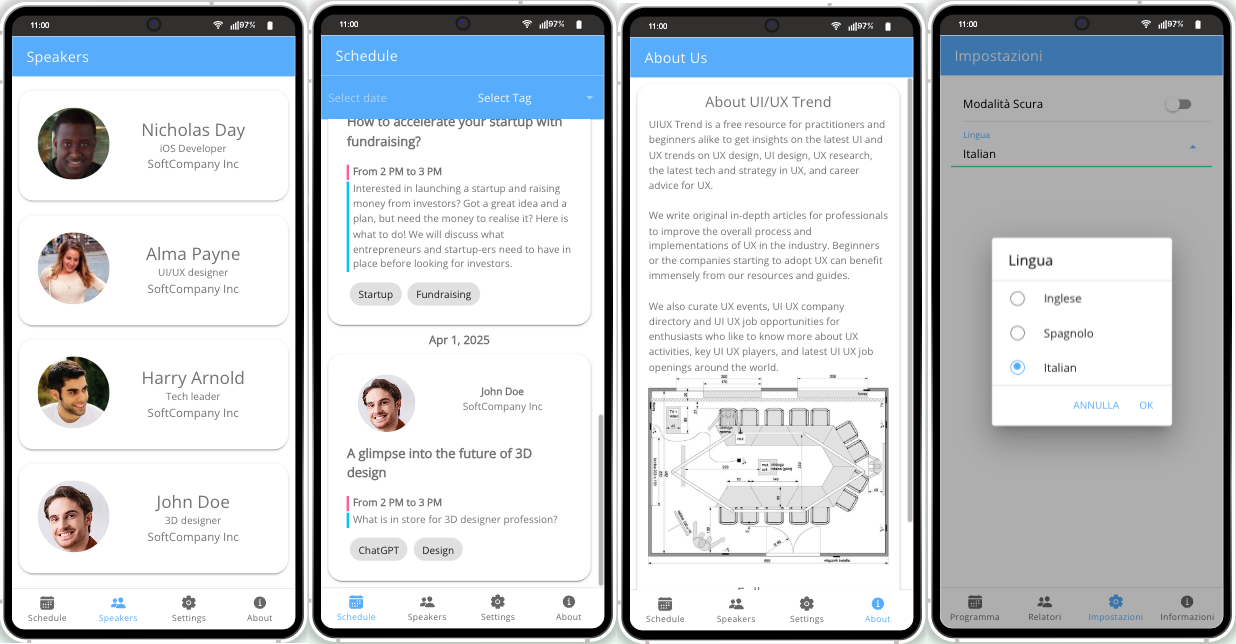
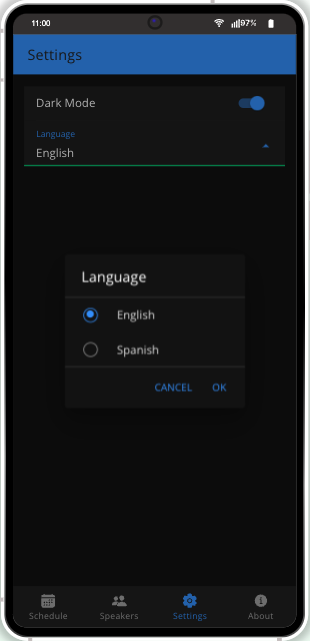
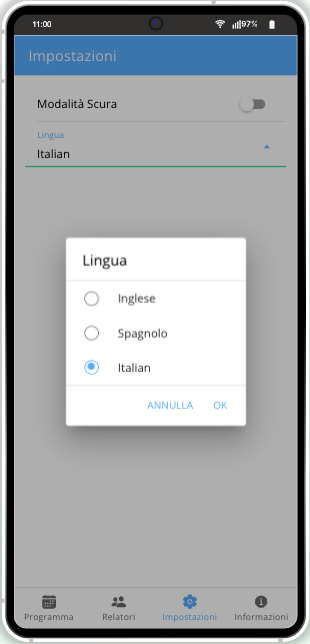
Tailor the app to meet specific audience preferences through features like language settings and dark mode. Customizing the app’s aesthetic not only enhances the user experience but also subtly reinforces brand identity.
Seamless Offline Functionality

In the digital age, providing offline functionality is a strategic advantage. Proper data caching allows users to access schedules and speaker details without internet connectivity, maintaining engagement and utility in various situations.

Tailoring Your App’s Branding

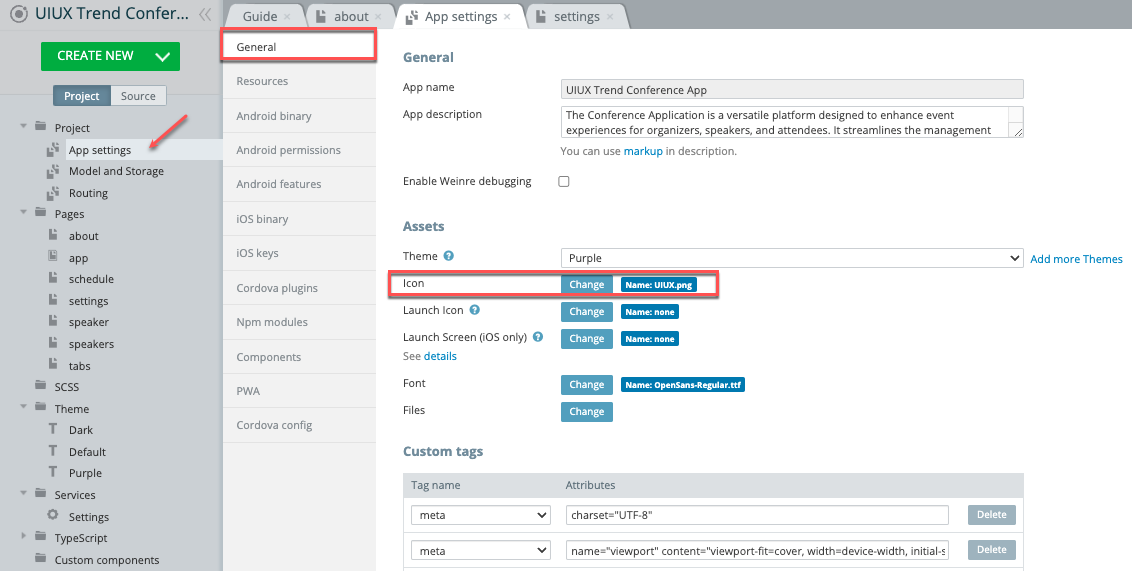
Strengthen your app’s impact by personalizing elements such as the name and icon. Aligning the app with your brand’s digital presence ensures consistency and recognition across different platforms.
Expanding Language Options

Broaden your reach by incorporating multiple languages. Appery.io facilitates this through tools like Angular and TypeScript for translations.
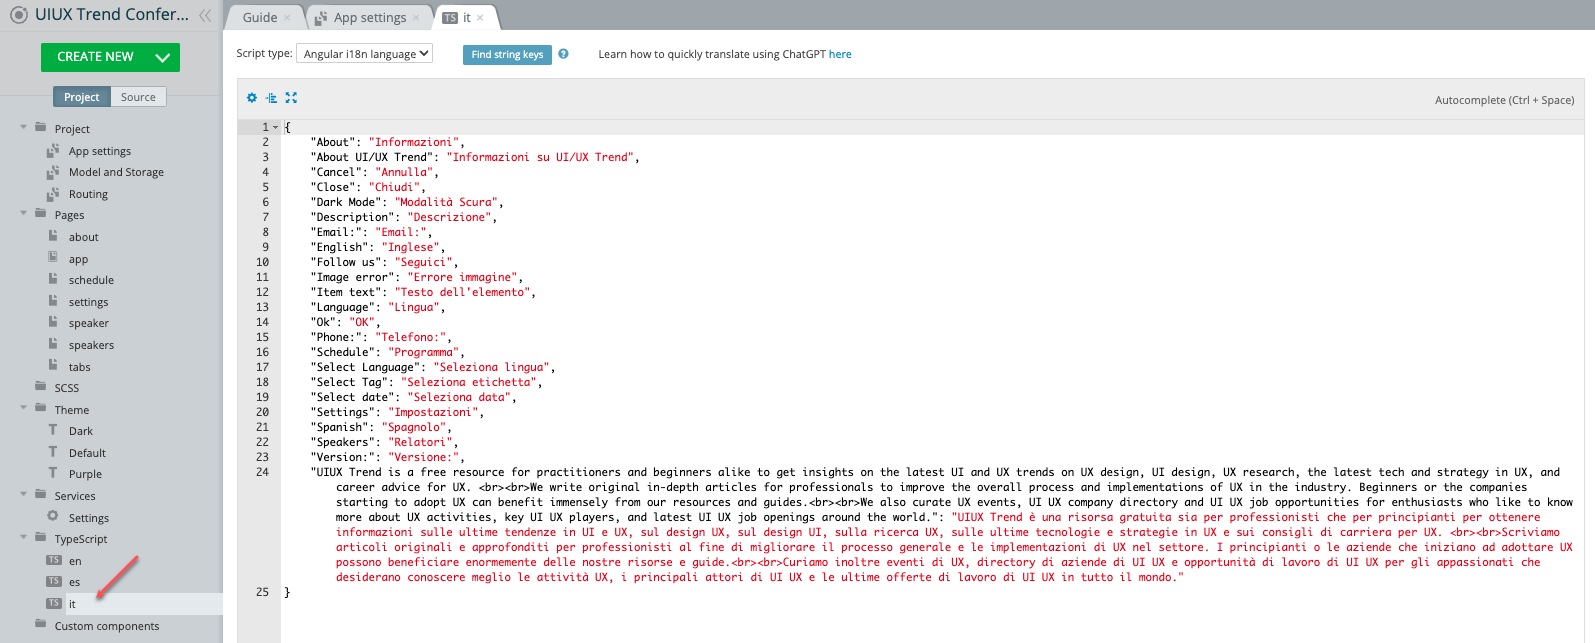
Comprehensive localization caters to diverse audiences, adding a layer of inclusivity to your event.
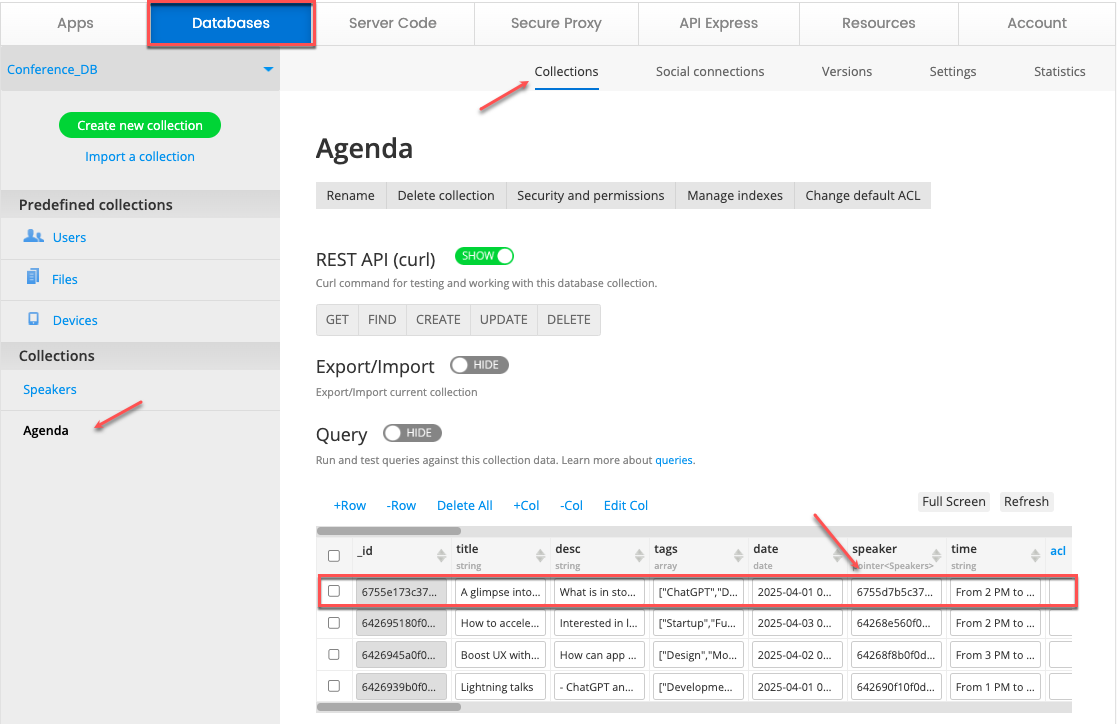
Simplifying Content Management

Efficient content management is essential for a streamlined user experience. Leverage the conference database to manage speaker details and agenda items effectively, ensuring all content is readily accessible and easily editable.
 

Final Preparations for Launch

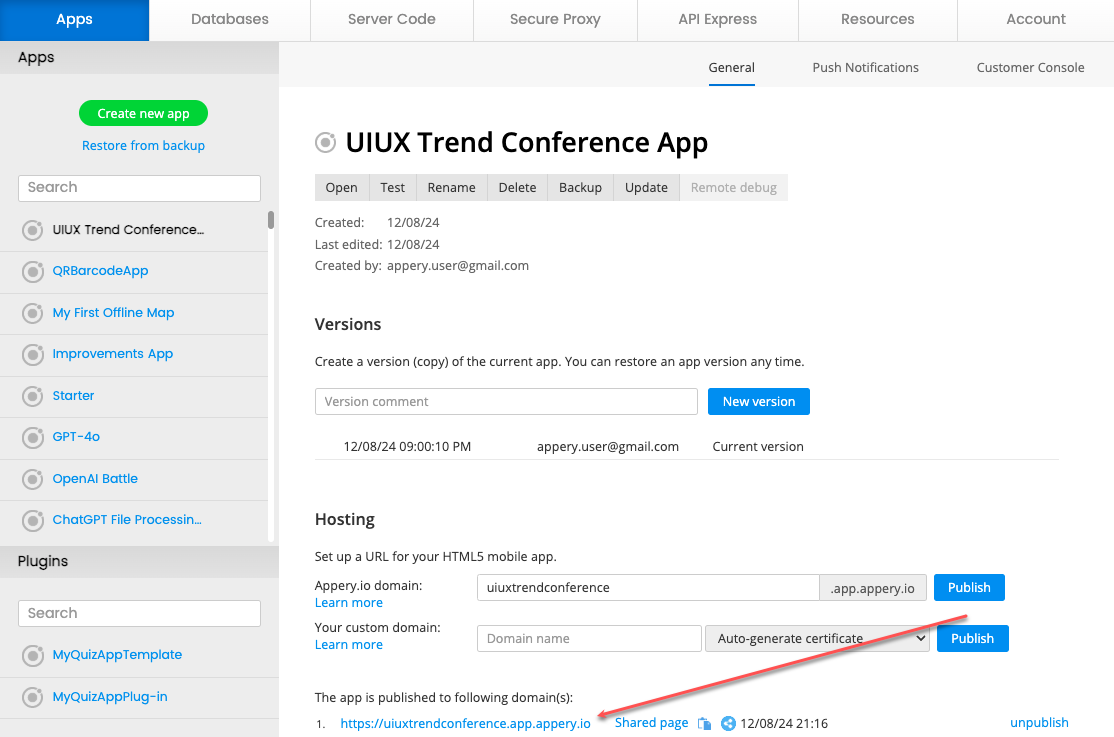
Once your app is polished and ready, export it for publication. Whether you choose the Google Play Store, the App Store, or a web application, ensure you select platforms that best serve your audience. Consider Progressive Web App (PWA) options for extended functionality and reach.

Ultimately, crafting a conference app with Appery.io is about more than just technology. It’s about creating a holistic experience that caters to the needs of organizers, speakers, and attendees alike. For those seeking a deeper exploration, the video provides a comprehensive walkthrough, rich in insights and practical tips to enhance your app development journey.

Supercharge Your App: Unveil the Magic of QR & Barcode Features with Appery.io

Unlock the full potential of your app development skills with our latest video guide! Dive into the world of QR and barcode technology with Appery.io and discover how easy it is to integrate these powerful features into your mobile and web applications. Our step-by-step tutorial will walk you through the process of creating, scanning, and managing codes while seamlessly connecting with a backend database. This video is packed with insights and practical tips to elevate your app projects. Watch now and transform the way you build apps!

Step into the Future of App Development

Why is QR and barcode integration a hot trend? Simple. It enhances user interaction and streamlines data processes. With Appery.io, developing these features becomes an enjoyable journey, even for beginners.

Building Blocks: Your QR and Barcode App Foundation

Start by creating a new app with Appery.io’s blank Ionic template. The goal? Add products with specific codes to your database and scan these codes for detailed information retrieval.

Step 1: Code Creation

Use Appery.io’s versatile “QR Code Generator.” Don’t let the name fool you—it handles all code types! Customizing your code is a breeze: adjust size, color, and format to suit your needs. QR codes are popular, so we’ll start there.

Step 2: Database Integration

Harness the power of Appery.io’s “List Details” plugin to manage product info linked to your QR codes. Create a database, add a collection for items, and include fields like “name” and “description.” Importing this plugin adds two powerful pages to your app, ready for data entry and editing.

Scanning and Display: Bringing It All Together

The final step? Scanning codes to display corresponding information. Appery.io offers a “QR and Barcode Scanner” plugin, adding seamless scanning capability. This integration works beautifully across mobile, web, and PWA environments.

Test and Optimize

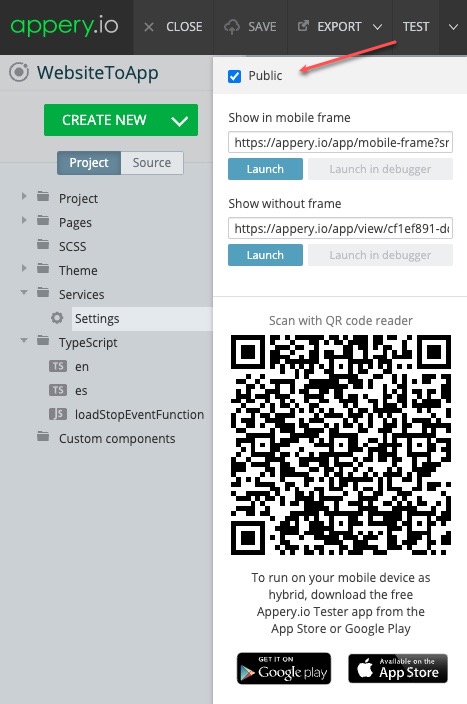
For real-world effectiveness, use Appery.io’s Tester app on your device. It’s free and straightforward: scan your generated QR code and your app is instantly mobile-ready. Play around with different code formats, test your database connectivity, and refine your user interface for the best results.

Elevate Your App Experience

Integrate navigation tabs for a polished user experience. Appery.io’s simplicity lets you focus on creativity, not complexity.

Conclusion: Become an App Maestro

With Appery.io, creating a complex app with QR and barcode features has never been simpler. It’s an exciting time to explore the possibilities, test your creations, and ultimately produce an efficient and engaging application.

Keep exploring, keep innovating, and let Appery.io guide you through the remarkable process of app development. Dive into this opportunity, and soon, you’ll be coding like a pro.

Happy coding!

Create an Offline Map App Without Knowing How to Code!

Are you ready to turn your mobile device into an offline map powerhouse?

Imagine exploring new places with no need for data connections. With Appery.io’s Offline Map app template, you can create a fully functional map app — no coding experience required. Here’s how you can get started today.

To make sure creating this app takes minimum of your time and efforts, you can watch our YouTube video:

Also, you are free to follow our detailed tutorial on using our customizable Offline Map app template. 

In short, the process can be described in the following simple steps:

Step 1: Build Your Offline Map App with Appery.io

Creating your app with Appery.io is a breeze. Simply:

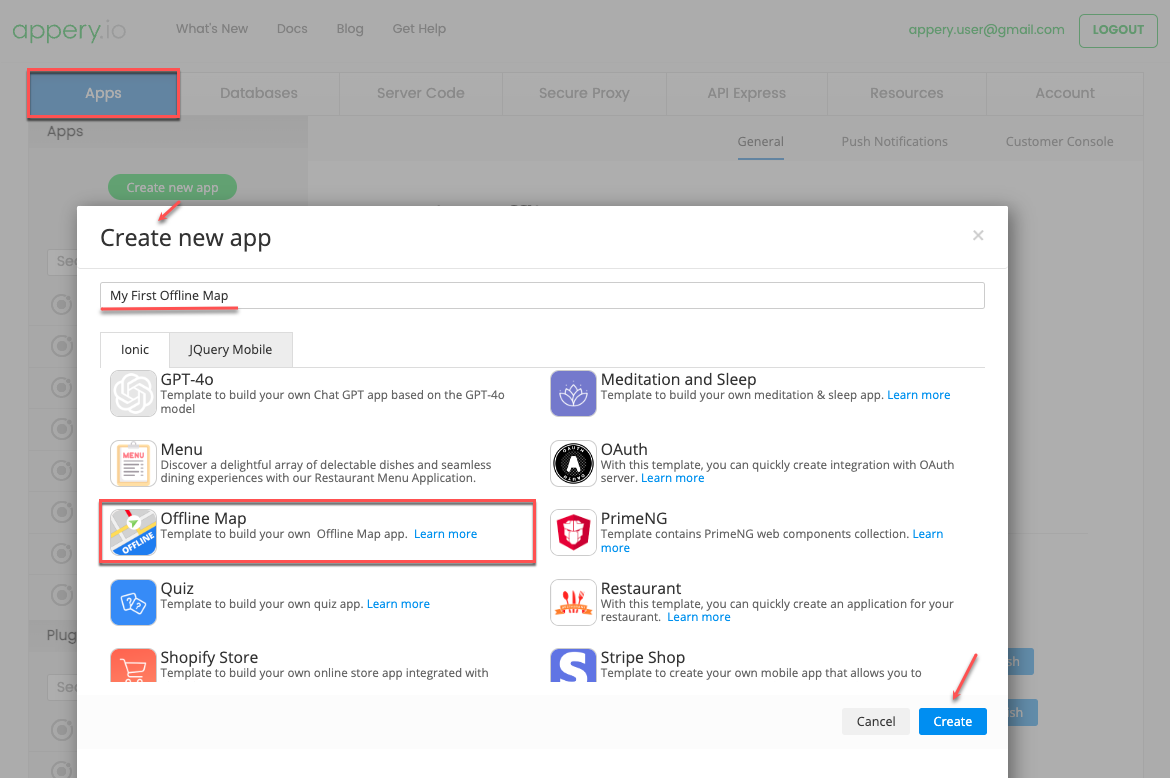
  1. Go to the Apps tab in Appery.io.
  2. Click Create new app and choose the Offline Map template.
  3. Give your app a name, click Create, and your project will be ready in seconds.

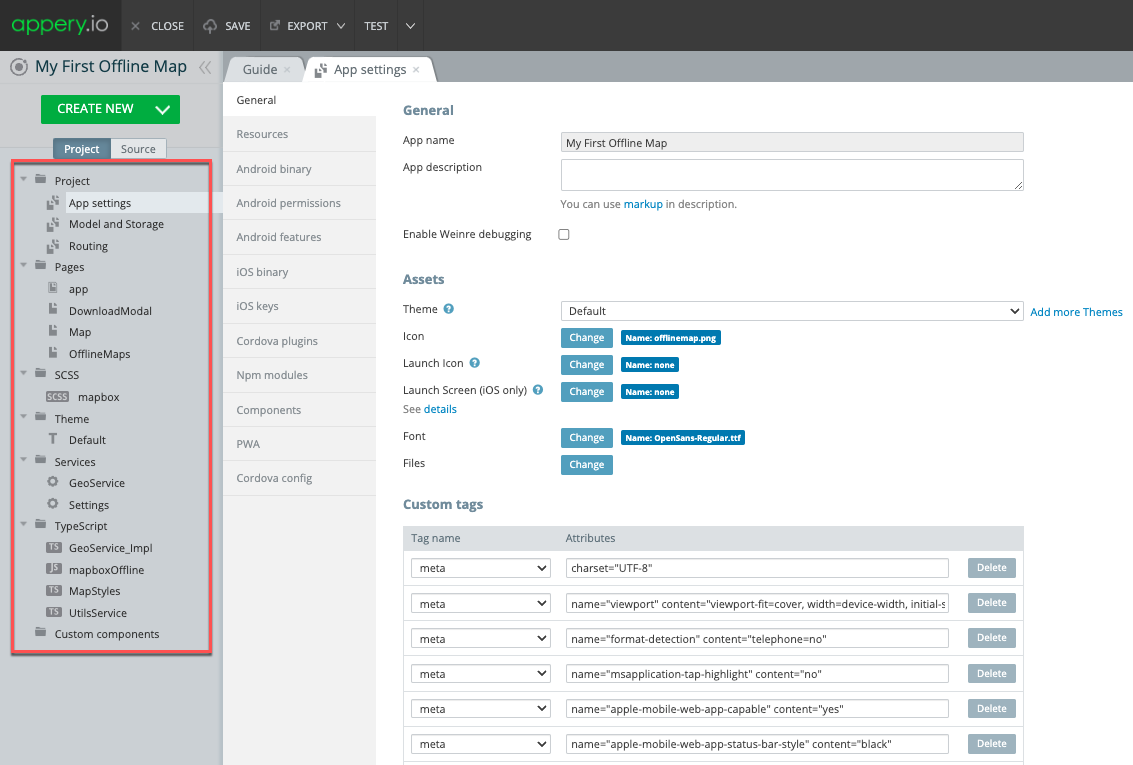
This template includes predefined data and settings to make the setup seamless. You’ll see everything organized in the Project view section, with all essential elements already in place.

Step 2: Get a Mapbox Access Token

To activate your maps, you’ll need a Mapbox access token:

  1. Visit the Mapbox’s website and generate your unique access token.
  2. In Appery.io, navigate to Services > Settings and enter your token.

This token enables the map features and gives you access to interactive, high-quality mapping.

Step 3: Test Your App on a Device

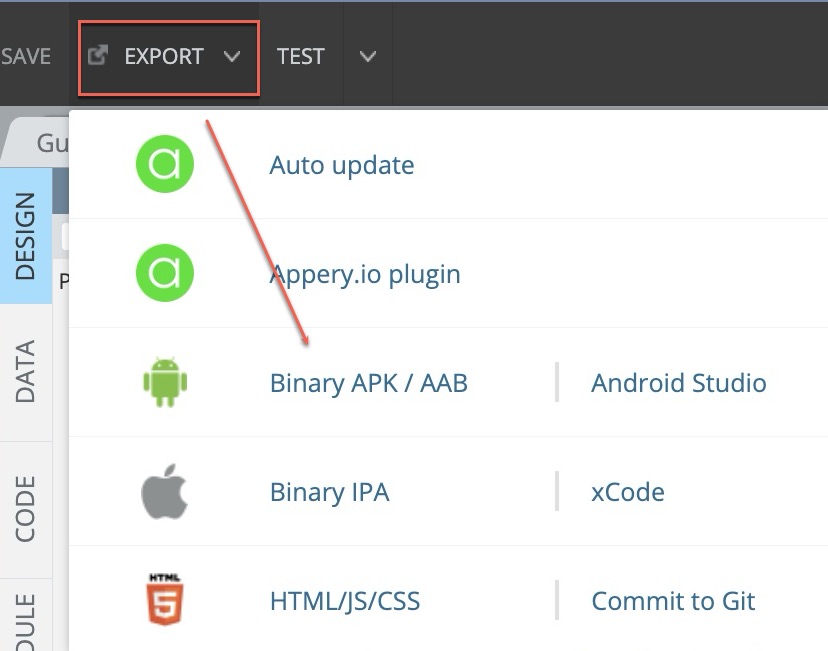
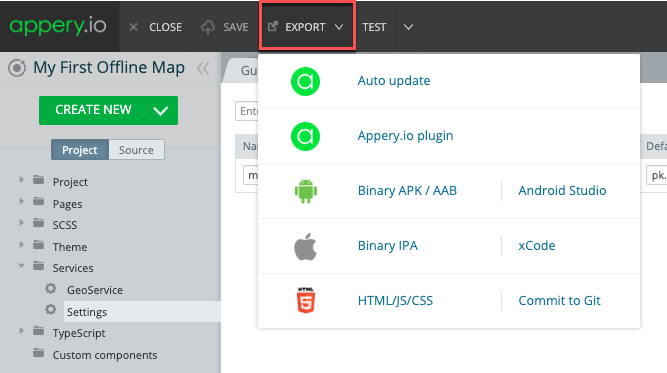
Testing in a browser won’t work due to the native APIs. To test, click to export the app as an APK (Android) or IPA (iOS), or use the Appery.io Tester app for quick previews.

Exploring the Offline Map App

Launch the app, and you’ll see a default map of San Francisco. Test the different view modes, like Streets or Outdoors, to see what suits you best.

Pro Tip: Use the Appery.io Tester app (available for free on iOS and Android) to preview your map instantly before exporting.

Want a full-screen experience? Hide the controls while using the Appery.io Tester.

To go fully offline, follow these steps:

  1. Enable online mode on your device.
  2. Click Maps to open the preloaded maps page.
  3. Download one of the maps — this is what allows offline access later.

Now you’re set to navigate without an internet connection!

Customize Your App

You’re free to modify the template to fit your specific needs. The template documentation provides insights on how to use free maps from resources like MapTiler. Whether you choose free or paid maps, you’ll find options to match your adventure.

Export Your App

When done, take your app on the road! With Appery.io, exporting is easy. For Android and iOS, follow the export guides linked in the template documentation.

Start Navigating — No Connection Required!

With Appery.io’s Offline Map app template, your mobile device becomes a robust, customizable navigation tool. Perfect for travel, hikes, and exploring remote areas, this template takes your app ideas offline with ease.

Happy navigating!

Boost Your Mobile Apps: Appery.io and ChatGPT Integration for Superior User Experience

Hello everyone!

Have you ever wished mobile app development could be more straightforward? Appery.io, a powerful low-code app-building platform, can make your dreams come true—especially when you integrate it with ChatGPT. Combining Appery.io and ChatGPT accelerates the development process and simplifies adding complex business logic to your applications.

Why Use Appery.io with ChatGPT?

Appery.io‘s intuitive builder lets you quickly create your app’s user interface (UI). And with simple tools, you can seamlessly integrate ChatGPT, an advanced AI from OpenAI. By using ChatGPT, you can add sophisticated features to your app without diving deep into complex coding.

A Simple Integration Guide

Here’s a simplified walkthrough of how you can get started:

1. Create a New App

First, open Appery.io and create a new app. In a blank Ionic app, click CREATE NEW > Page to generate a page with a predefined GPT-4o screen layout based on GPT-4o technology.

2. Obtain an API Key

For this integration, you’ll need an API key from the OpenAI portal. Just click the provided link, generate your API key, and copy it.

3. Insert Your API Key

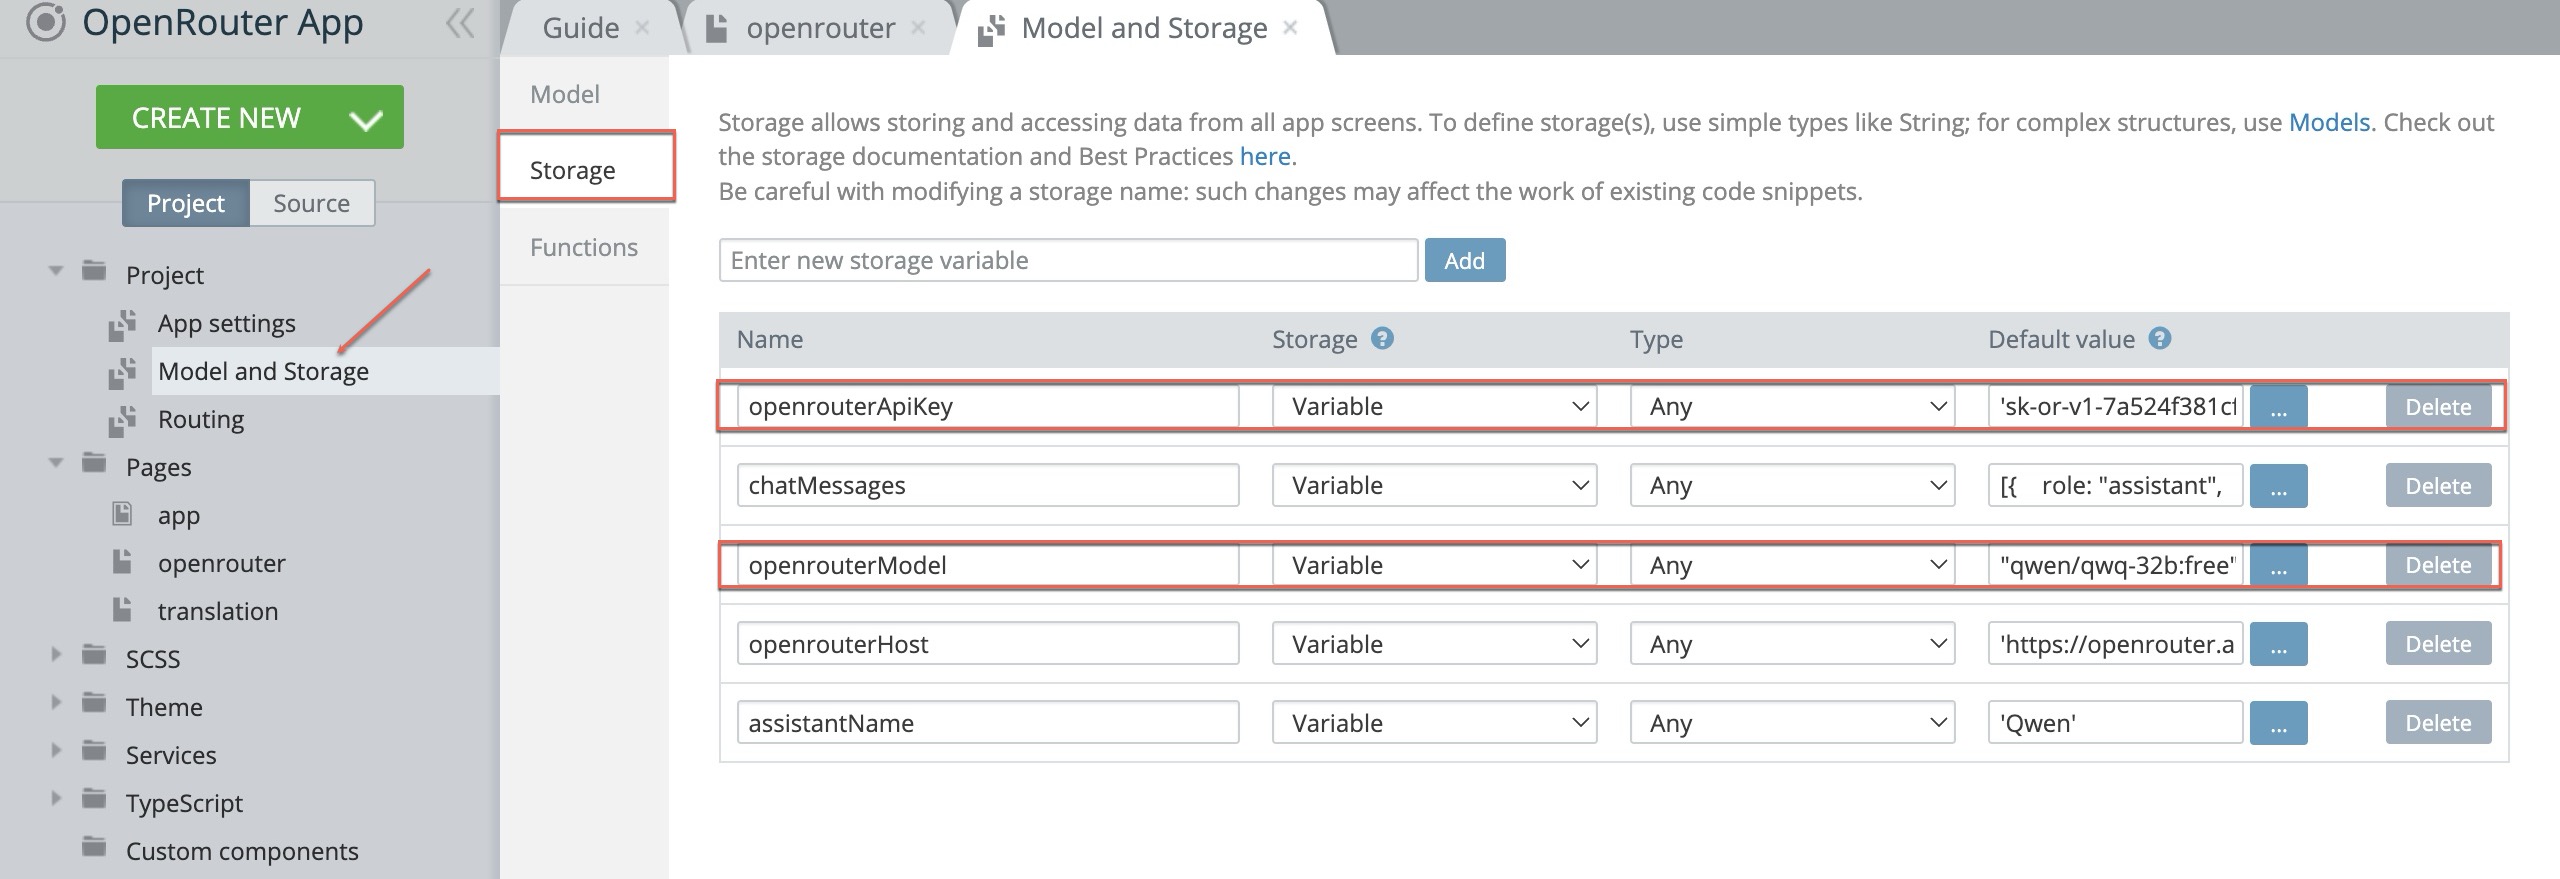
Go to Project > Model and Storage > Storage tab, and paste your copied API key. This step is essential for enabling the AI technology.

4. Build Your UI

Next, open Screen1 and create a simple UI to test your app’s business logic:

Textarea component: For entering questions, define the [(ngModel)] value as “question”.

Button component: Add a button for processing requests and name it “process”. Define its (click) method as process().

Text component: This will display the response from ChatGPT. Define its Text value as {{result}}.

5. Add Business Logic

Navigate to the CODE tab and add two variables: `question` and `result`. Also, define the “process” function as an asynchronous method.

this.result = await this.$v.openai.aioRequest(this.question);


When you included the screen layout earlier, the OpenaiModule (check TypeScript > Module) was automatically added. This module has the `openai.aioRequest` method, which you’ll use in your “process” function.

6. Test Your App

Save your app and start testing! Ask a question and see how ChatGPT responds.

7. Enhance Business Logic to Get Response in the Form of an Array 

Let’s say you want a response in the form of an array.

To get different output format response, for example, an array, you’ll need to modify your function with defining the format parameter.

this.result = await this.$v.openai.aioRequest(this.question, {

    format: {

            arr: [“”, “”, “”]

        }

    });

Also, adjust your UI accordingly by adding an *ngFor attribute with the value set to let obj of result?.arr to the Text component and replacing its {{result}} with {{obj}}.

When testing, enter a request like, “Provide a list of ten healthy foods” and click the button to process it. ChatGPT will return the requested list formatted correctly. And just like that, with minimal coding, you’ve added valuable business logic to your simple app!

That’s all for now. To discover how Appery.io and ChatGPT can streamline mobile app development by integrating AI-powered business logic explore our YouTube video guide:

Remember to stay tuned – in our next videos, we’ll demonstrate how to add image processing functionality.

How to Get Access to the List of Contacts in an Ionic App

Have you ever wondered how to make you Ionic app access the list of contacts of your device?

This blog post walks you through the steps of creating an Ionic app that can do that. Also, if you prefer watching video guides, you can follow this YouTube tutorial to create such an app:

Getting Started with Your Ionic App

First, we need to create a brand-new Ionic app. For this tutorial, we’re using the Appery.io platform, which makes the development process straightforward and efficient.

1. Create a New App:

Open Appery.io and click Create new app.

Name your app and confirm. This action creates a blank Ionic app with a predefined screen layout named Contacts.

2. Adding the Contacts Page:

Add this Contacts page layout to your app and adjust the routing to make sure it points correctly to this page.

Reviewing & Testing Your App

Your app is now ready to display contacts. This page will show names, phone numbers, and pictures of contacts. Let’s click TEST to quickly preview the app.

You can also preview what the app looks like and how it functions by using the Appery.io Tester, a native app for testing. It’s user-friendly and works perfectly!

How It Works Behind the Scenes

Now, let’s go deeper into the technical step-by-step process to understand how everything works:

Cordova Plugins:

Under the Project > App settings > Cordova plugins tab, you’ll see that the app uses the Cordova Contacts plugin, which has been automatically imported. This plugin helps fetch the contacts.

Ionic Contacts Wrapper

We utilize the Ionic Contacts wrapper for better integration. You can check its detailed documentation page if you wish to dive deeper into this.

Setting Up Variables

Open the Contacts page’s CODE tab to see the variables that were added automatically:

– `contacts`: Returns the contact list.

– `keyword`: Enables filtering.

– `SAMPLE_AVATAR`: Displays a sample picture. You can upload your custom one by using the Media Manager, if needed.

– `SAMPLE_CONTACTS`: Provides a sample list for testing in the browser.

Displaying Contacts List in the App

Now, let’s scroll to the Functions section to see how the contacts list is added in our code.

If the app runs in a browser, it uses the sample contacts from the variable above. But if the app is run on a real device, it accesses the actual contacts list via the predefined `contacts` variable.

Creating a User-Friendly UI

Here’s how to make the contacts list visually appealing and easy to navigate:

List Component:

Uses ListItem with the *ngFor attribute to iterate through the contact list and display each contact’s information.

Filtering Contacts:

The *ngModel keyword in the Search component allows users to filter contacts by name.

Using Selections:

The app lets users select contacts easily. Selected contacts have the selected property set to true.

Conclusion

And that’s how to get access to the list of contacts in an Ionic app! This straightforward guide aimed to simplify the technical aspects and provide a clear path for even beginners. Now you can easily fetch and display contacts in your Ionic apps.

Happy coding!

Introducing the App Starter Offline Template: Your Ultimate Solution for Modern Mobile Applications

We’re thrilled to announce that the Appery.io team has just released a ready-to-go template: App Starter Offline, that serves as a dynamic, adaptable, and interactive foundation for creating state-of-the-art mobile applications, fully equipped to support offline mode and accessible on any device.

Offline Mode: A Game-Changer

One of the standout features of the App Starter Offline template is its robust offline mode. Not only can you read app data when offline, but you can also modify it and synchronize changes. This ensures data consistency, even in situations where multiple users are accessing and modifying data under different online/offline scenarios. Whether your users are in a remote location with no network access or simply in an area with spotty coverage, they’ll be able to continue their tasks without interruption.

Rich Feature Set: Beyond Offline Mode

While offline mode is the star, App Starter Offline comes packed with a host of other valuable features:

Authentication Options: Robust and secure authentication methods, including options such as username & password, and FaceID.

Extensive User Settings: A comprehensive settings dashboard for users to personalize their app experience, including account preferences, notification controls, and privacy settings.

– Personalized Profiles: Enable users to create and edit their profiles with personal data and images for a unique, customized experience.

Multilingual Support: Make your app accessible to a global audience with a wide range of language options.

Dark Mode: Reduce eye strain in low-light conditions and conserve battery life, toggling between light and dark themes.

Secure Messaging for Verification: Enhance security with double opt-in sign-up and operations via email or SMS confirmation codes, perfect for password changes or new device verifications.

Detailed Guide Included!

To ensure a smooth and tailored implementation process, we’ve also provided a comprehensive guide on how to use and customize the App Starter Offline template. Whether you’re a seasoned developer or just starting, our guide will assist you in maximizing the potential of this robust template.

Bonus Time!

New How-To Video: Simplify Your Work in Appery.io Editor

In addition to the new template, we’re excited to share a brand-new how-to video on our YouTube channel . This video demonstrates how to simplify your work in the Appery.io editor using the “Text in Editor” feature, all without disrupting your app’s UI. Check it out to streamline your development process and ensure a hassle-free experience. 


Conclusion: An Essential Tool for Modern Developers

Ideal for entrepreneurs, startups, and businesses aiming to launch applications in sectors like social networking, e-commerce, health & fitness, education, or any user-centric service, the App Starter Offline template is designed to provide an impeccable user journey from the very first interaction. Additionally, whether you’re developing a comprehensive product or testing a minimum viable product (MVP), this template will be instrumental in accelerating your development process and enhancing user engagement. So why wait? Dive into the world of seamless offline experiences with Appery.io‘s App Starter Offline template today and watch your app reach new heights.

Stay tuned for more updates and don’t forget to subscribe to our YouTube channel for the latest tutorials and tips!

Easy GPT-4o Mobile and Web App Integration with Appery.io

In the digital age, integrating advanced technology into your applications can set you apart from the competition. One of the most groundbreaking technologies today is GPT-4o, a version of the AI model developed by OpenAI that can transform how we interact with software. For those who are not developers, the thought of adding such advanced capabilities to an application might seem daunting. However, with platforms like Appery.io, it’s not only possible; it’s also straightforward.

Appery.io is the first mobile building platform that offers even two options to integrate the GPT-4o model into your app:

  1. By using the GPT-4o app template for easy building your own Chat GPT app based on the GPT-4o model
  2. By adding a ready-to-go-with GPT-4o screen layout.

On top of it, our latest YouTube tutorial offers a user-friendly guide on how to either create a new mobile or web application with GPT-4o support or add it to an existing app using Appery.io, a powerful yet easy-to-use, low-code app-building platform. This video is ideal for anyone interested in stepping into the world of app development without needing to dive deep into complex programming languages. Appery.io provides a seamless environment where you can visually develop your application, integrate backend services, and include sophisticated features like GPT-4o without writing extensive code.

Whether you are looking to enhance a personal project or elevate a professional application, incorporating GPT-4o could significantly improve functionalities such as natural language understanding, automated reasoning, and personalized user interactions. This tutorial isn’t just about integrating AI; it’s about making cutting-edge technology accessible to everyone. By the end of the video, you’ll not only understand what GPT-4o can do for your apps but also how to incorporate it using Appery.io seamlessly. Embrace the future of app development – start integrating GPT-4o today and see your applications do more than they ever could before. Watch our tutorial now and take the first step towards unlocking new possibilities.

Magic of Responsive Design: Your Step-by-Step Guide to Appery.io Masterpiece

In the digital era, making your app not just functional but flawlessly adaptable across devices is the holy grail of app development. Your app’s ability to greet each user with the same elegance, regardless of the device, is not an added bonus—it’s a critical mission. Here’s your golden ticket to an enthralling journey into the world of Responsive App UI using the enchanting platform of Appery.io.

And for those ready to embark on this adventure, we highly recommend watching our detailed video guide. It’s your visual companion through each step, ensuring a captivating and successful journey into responsive app design:

Step 1: Initiate Your Adventure

Commence your quest by creating an app from scratch within Appery.io. This mystical platform doesn’t require you to be a coding wizard. It merely asks for your vision. Choose the CREATE NEW option, select Page, and embark on an exciting ride, choosing among various screen layouts that spare you tons of development time.

Step 2: Fine-Tune Your Craft

Now, dive into the heart of your design, where you will encounter multiple UI components, ready to be shaped according to your will. Quick tip for starters: head straight to the Styles tab once you select a component. Adjusting the width to 100% and setting a Max Width property ensures your app element enjoys the flexibility of a yogi, stretching comfortably across screens of all sizes.

Step 3: Play with Grids Like a Pro

The Grid component in Appery.io is nothing short of a magic canvas, allowing your creative ideas to take flight. Imagine it as your spellbook where setting the Grid property to ‘Fixed’ anchors your design firmly across realms (or screen sizes, in mere mortal terms).

Step 4: Manipulate the Grid Cells

Your quest for responsive mastery leads you next to the Grid Cell. Here lies the secret to balancing content across the screen landscapes. From the snug confines of a cellphone to the expanse of a desktop, adjusting the default sizes can transform your app’s presence dramatically. A tweak here, a nudge there, and behold—the perfect alignment!

Step 5: The Alchemy of Visibility 

Delving deeper, you encounter the power of visibility. Through the Classes option, conjure spells to show or conceal elements with a finesse that leaves users bewitched. Marvel as components appear and vanish, guided purely by the size of the screen that summons them.

Step 6: Empower Through Customization 

Before you, lies an array of customization options, your arsenal to combat monotony. Applying the sacred code of CSS, change colors as one would potions, ensuring your app’s interface remains vibrant and inviting across all screens.

Step 7: Navigating the Terrain 

Your final test of mastery beckons with the application of navigation menus. In the realm of smaller screens, the mobile navigation menu reigns supreme. However, as the landscape expands, so should your menu, transitioning smoothly to a split menu for larger vistas.

By following these sacred steps within Appery.io, you not only unlock the mysteries of responsive app UI but also ensure your creation’s journey across devices is nothing short of legendary. Embrace this guide as your torchlight in the enchanting world of app design, where every screen, no matter how big or small, becomes a window to your masterpiece.

Fortify your skills, brave developer, for the path to app enlightenment through the power of Appery.io awaits. Rise, embrace the challenge, and transform your vision into a responsive reality that dazzles and delights across the digital cosmos.

Easily Integrate Stripe Payments: Step-by-Step Guide

Welcome, developers! Today, we’re thrilled to walk you through the seamless integration of one of the most popular payment systems into your app using our Stripe Shop template. Follow us along as we break down the process into easy-to-follow steps, empowering you to enhance your app’s functionality and user experience.

Step 1: Accessing the Appery.io App Builder To begin, head over to the Appery.io platform and access the App Builder. Here, you’ll find a range of templates to choose from. Select the Stripe Shop template to kickstart your journey towards integrating Stripe payments into your app effortlessly.

Step 2: Exploring Predefined App Pages and Services Upon selecting the Stripe Shop template, take a moment to familiarize yourself with the predefined app pages and services it offers. These include the Products, Details, Success, and Cancel screens, designed to streamline the shopping experience for your users.

Step 3: Leveraging Linked Backend Services Our Stripe Shop template comes equipped with linked backend services, including a database and server code, preloaded with test data. This allows you to test your app’s functionality immediately, providing a solid foundation for further customization.

Step 4: Customizing Your App Now it’s time to make the template your own. Utilize the App Builder’s intuitive interface to customize your app according to your unique requirements. Add new products, update existing ones, and tweak the design to align with your brand’s identity seamlessly.

Step 5: Integrating with Stripe API The heart of your app lies in its ability to process payments securely. With Appery.io’s Stripe Shop template, integrating the Stripe API is a straightforward process. Follow our clear instructions to replace the default Server Code keys with your own, ensuring seamless payment processing for your users.

Step 6: Testing Your App Before deploying your app to the masses, it’s crucial to thoroughly test its functionality. With Appery.io’s Tester app, you can easily test your app on your own device. Simply scan the generated code from the TEST menu, and you’re ready to put your app through its paces.

Ready to take your app to the next level? Dive into Appery.io’s Stripe Shop template today with our free trial period. Experience firsthand the power of low-code app development combined with seamless payment integration.

Need Assistance? If you encounter any roadblocks along the way, fear not! Appery.io offers comprehensive support, including step-by-step tutorials and direct assistance through the Get Help link in the App Builder. We’re here to ensure your success every step of the way.

Stay Informed Stay up-to-date with the latest tips, tricks, and tutorials by subscribing to our YouTube channel. Join our community of developers and unlock your app development potential with Appery.io.

Conclusion: With Appery.io’s Stripe Shop template, mastering Stripe integration has never been easier. Follow these steps, and you’ll be well on your way to building a feature-rich shopping app that delights users and drives business success. Happy coding!