API Express: Transforming Mobile App Development Made Simple

In today’s fast-paced digital era, the essence of mobile applications is not just in their functionality but in the seamless integration with dynamic data sources. API Express, an integral feature of Appery.io, a leading low-code app-building platform, simplifies this aspect by connecting your app with relational databases effortlessly. For a deeper dive, we’ve crafted a comprehensive video that walks you through every step of this transformative process.

Bringing API Express and Relational Databases Together

API Express acts as the bridge between your mobile app and a relational database. But what’s a relational database, you ask? Imagine a vast warehouse of tables filled with connected data. With API Express, accessing this warehouse becomes as simple as tapping a button on your app. Our video tutorial, available on Appery.io, showcases this with clarity and detail, ensuring you grasp every aspect of the process.

A Video Guide That Makes Integration Easy

Why sift through complicated documents when you can watch a step-by-step video? Our tutorial breaks down everything from setting up PostgreSQL on Amazon Web Services (AWS) to crafting data services within your app through API Express. Here’s a sneak peek at what the video covers:

  1. Starting Your Database: Create and configure a PostgreSQL database on AWS. It’s the first step towards building a data-driven app.

  2. Managing Data with Ease: Use pgAdmin to manage your database—creating tables, organizing data, and preparing everything for your app.

  3. Seamless Connection via Appery.io: Step into the world of Appery.io and begin a new API Express project. This part of the video vividly shows how you can connect your database to your app without breaking a sweat.

  4. Customizing Your Data Service: Our video tutorial goes beyond basics, teaching you how to design a data service that tailors your app to utilize database information efficiently.

  5. Live Testing: The final step involves testing your setup within Appery.io, providing live feedback on how your app interacts with the database, all demonstrated in the video.

Why Watch the Video?

While this article outlines the steps, the video brings them to life. Visual learners will appreciate the detailed walkthrough, and even experienced developers might discover a tip or two. It emphasizes practical steps, visual cues, and expert advice to ensure your path from a database newbie to a mobile app developer is as smooth as possible.

Dive Deep with Our Video Tutorial

We invite you to watch our video on API Express and Appery.io. Whether you’re developing an app that captures user input, displays real-time data, or manages inventory, integrating with a relational database has never been easier. This video isn’t just a tutorial; it’s your gateway to mastering mobile app development.

Curious about building an app with this setup? Stay tuned. The next video will guide you through creating an app using the service we just crafted.

Magic of Responsive Design: Your Step-by-Step Guide to Appery.io Masterpiece

In the digital era, making your app not just functional but flawlessly adaptable across devices is the holy grail of app development. Your app’s ability to greet each user with the same elegance, regardless of the device, is not an added bonus—it’s a critical mission. Here’s your golden ticket to an enthralling journey into the world of Responsive App UI using the enchanting platform of Appery.io.

And for those ready to embark on this adventure, we highly recommend watching our detailed video guide. It’s your visual companion through each step, ensuring a captivating and successful journey into responsive app design:

Step 1: Initiate Your Adventure

Commence your quest by creating an app from scratch within Appery.io. This mystical platform doesn’t require you to be a coding wizard. It merely asks for your vision. Choose the CREATE NEW option, select Page, and embark on an exciting ride, choosing among various screen layouts that spare you tons of development time.

Step 2: Fine-Tune Your Craft

Now, dive into the heart of your design, where you will encounter multiple UI components, ready to be shaped according to your will. Quick tip for starters: head straight to the Styles tab once you select a component. Adjusting the width to 100% and setting a Max Width property ensures your app element enjoys the flexibility of a yogi, stretching comfortably across screens of all sizes.

Step 3: Play with Grids Like a Pro

The Grid component in Appery.io is nothing short of a magic canvas, allowing your creative ideas to take flight. Imagine it as your spellbook where setting the Grid property to ‘Fixed’ anchors your design firmly across realms (or screen sizes, in mere mortal terms).

Step 4: Manipulate the Grid Cells

Your quest for responsive mastery leads you next to the Grid Cell. Here lies the secret to balancing content across the screen landscapes. From the snug confines of a cellphone to the expanse of a desktop, adjusting the default sizes can transform your app’s presence dramatically. A tweak here, a nudge there, and behold—the perfect alignment!

Step 5: The Alchemy of Visibility 

Delving deeper, you encounter the power of visibility. Through the Classes option, conjure spells to show or conceal elements with a finesse that leaves users bewitched. Marvel as components appear and vanish, guided purely by the size of the screen that summons them.

Step 6: Empower Through Customization 

Before you, lies an array of customization options, your arsenal to combat monotony. Applying the sacred code of CSS, change colors as one would potions, ensuring your app’s interface remains vibrant and inviting across all screens.

Step 7: Navigating the Terrain 

Your final test of mastery beckons with the application of navigation menus. In the realm of smaller screens, the mobile navigation menu reigns supreme. However, as the landscape expands, so should your menu, transitioning smoothly to a split menu for larger vistas.

By following these sacred steps within Appery.io, you not only unlock the mysteries of responsive app UI but also ensure your creation’s journey across devices is nothing short of legendary. Embrace this guide as your torchlight in the enchanting world of app design, where every screen, no matter how big or small, becomes a window to your masterpiece.

Fortify your skills, brave developer, for the path to app enlightenment through the power of Appery.io awaits. Rise, embrace the challenge, and transform your vision into a responsive reality that dazzles and delights across the digital cosmos.

How to Spice Up Your Appery.io Starter App with a Custom Database Collection – Easy Peasy!

Hey there, friends!

🌟 We are back again with yet another fun and informative dive into the world of Appery.io. If you’ve been hanging out with us for a while, you know we’ve already covered some pretty cool features, like user registration via SMS and beefing up security with two-factor authentication. What’s on the agenda today, you ask? We’re going to get our hands dirty by adding a custom database collection to our Appery.io App Starter project. It’s going to be epic, trust me! So buckle up, and let’s roll.

Kickstarting Your Database Collection

First off, we need a sweet spot to keep all our app data cozy and organized. Here’s the lowdown on setting up your very own database collection:

  • Jump into your Appery.io account and open your project.
  • Click your way to the database tab and say hi to your Starter_DB.
  • Feeling adventurous? Let’s create a new collection by hitting “Create new collection” and teasing it with a catchy name (like “Tasks”).
  • Don’t forget to tick the “Secure collection” box under “Security and Permissions” for that extra layer of protection. Because, of privacy, right?
  • Save those settings, then shake things up a bit by adding some columns: namedatepriority, and userId.

Tweaking the App to Perfection

With our database set up, let’s give our app some flair:

  1. Page Creation Fun – Need more pages? Easy! Duplicate an existing one and dub it “Tasks”. It’s like magic, but you’re the wizard.
  2. Jazzing Up the Tasks Page – Time to get creative. Tweak your page to reflect your shiny new database. Think of it as giving your app a mini-makeover.
  3. Design Time – Head over to the DESIGN tab and let your inner artist loose. Rename stuff, add cool Text components for dates and priorities, and have a blast while you’re at it.

Making Tasks a Breeze

Let’s ensure adding or tweaking tasks is smooth as butter:

  • Clone a page for task management, and simply call it “Task.” Slick, huh?
  • Update labels and fields to make sure they’re talking about the right stuff—dates, priorities, you name it.

The Grand Finale: Testing and Tweaking

All set? Let’s hit that TEST button and take your masterpiece for a spin. Register or log in (if you haven’t already) and try adding some tasks. Edit them, delete them, dance with them – it’s your party!

After your testing fiesta, don’t forget to check your database to see your beautiful tasks resting there. It’s like sending your kids off to college – so proud, yet so emotional.

And That’s a Wrap

Look at you, rocking the Appery.io scene with your custom database collection! Keep playing with it, mix things up, and find what makes your app heart sing.

I hope you had as much fun reading this as I had writing it. If you dig what we’re doing, smash that subscribe button and hang with us for more app-building adventures. Catch you on the flip side, and thanks a gazillion for watching! 🚀✨


SMTP Settings For Confirmation Email Delivery: A How-To Guide

Hello, Appery.io users!

Recently, we released a video introducing our latest Starter App template, sparking numerous inquiries about configuring SMTP server settings for sending confirmation emails. We’re thrilled to announce that we’ve created a comprehensive YouTube tutorial demonstrating the process. For illustration, we’ll utilize the app built from the beloved Appery.io‘s Starter App template:

Below, for your convenience, we’ll additionally walk you through the process step by step for easy understanding.

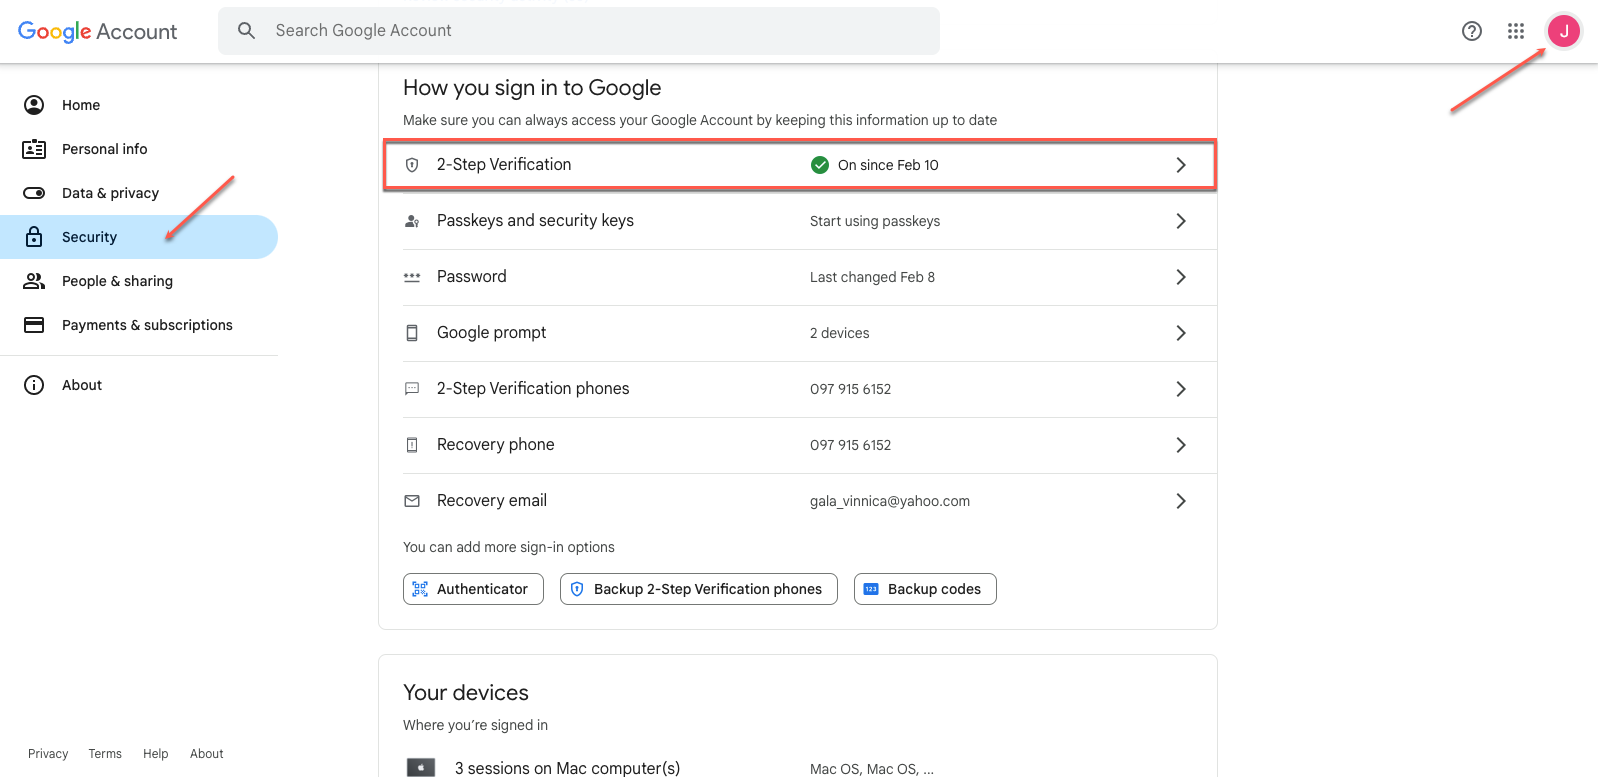
Step 1. Configuring SMTP Settings: Set up SMTP server settings by enabling 2-step verification in your Google account settings. Then, generate an app-specific password.

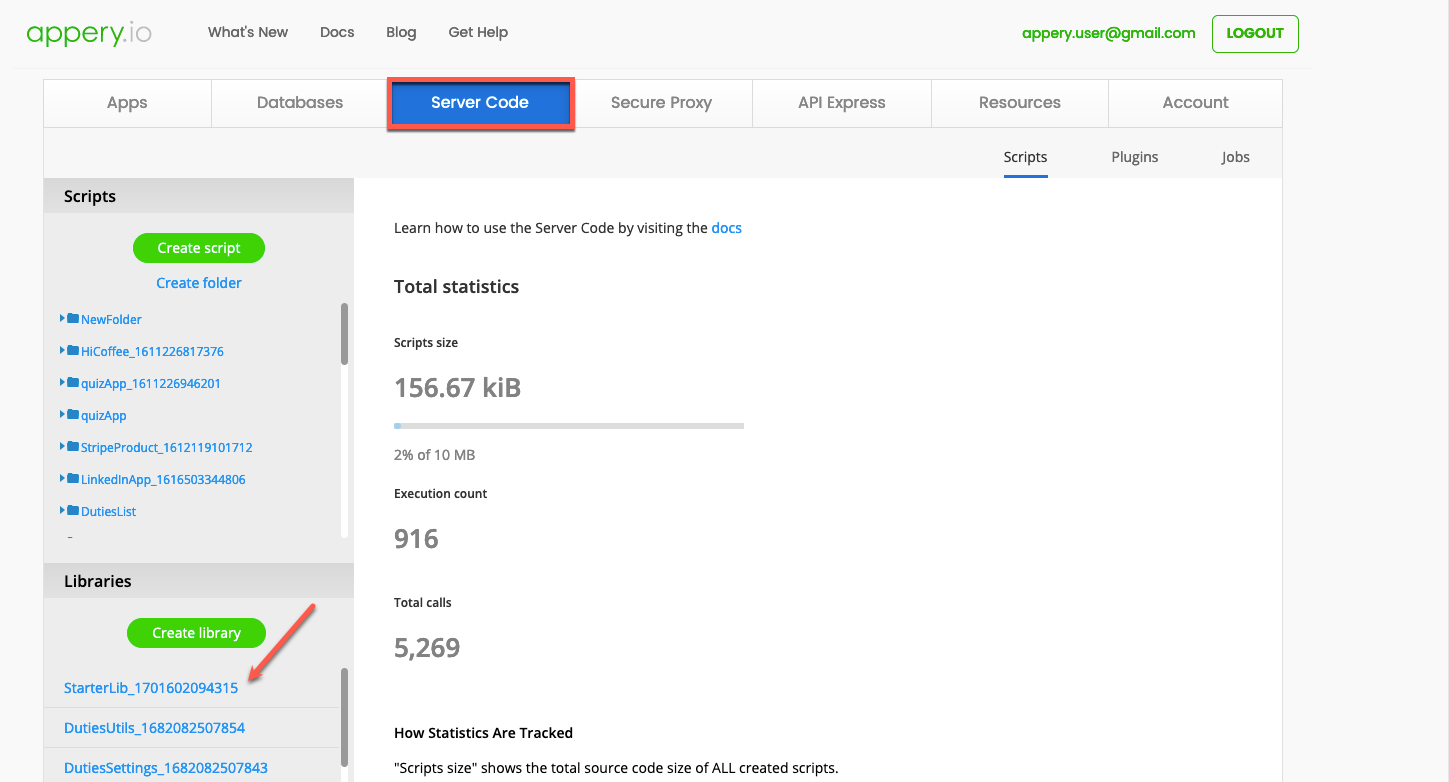
Step 2. Accessing App Builder: Head over to the Appery.io App Builder and create a new app using the Starter App template. Go to the Server Code tab and open the StarterLib library.

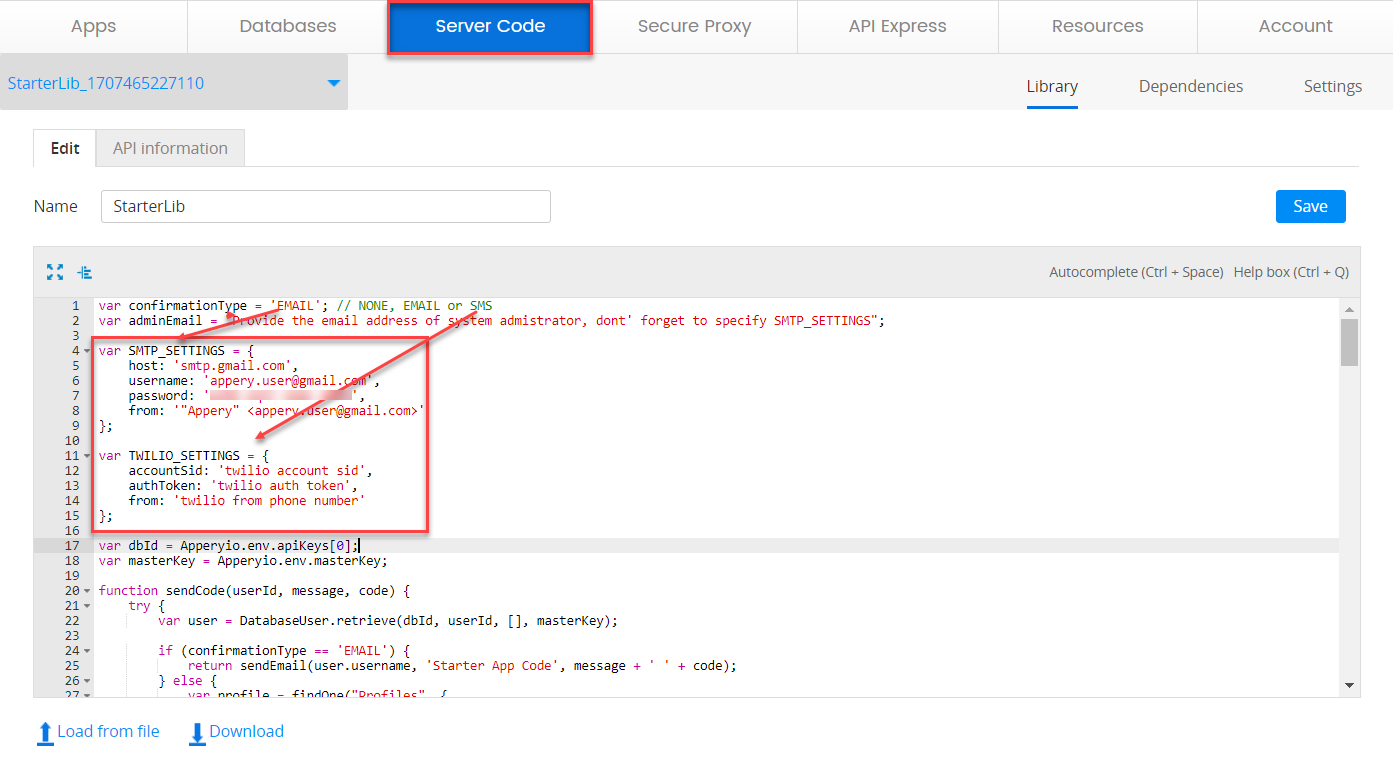
Step 3. Defining Email Confirmation: In the library, define email as the confirmation type. Enter your email address, paste the app-specific password you just generated, and fill in the from values. Save the changes.

SMTP Configuration Settings

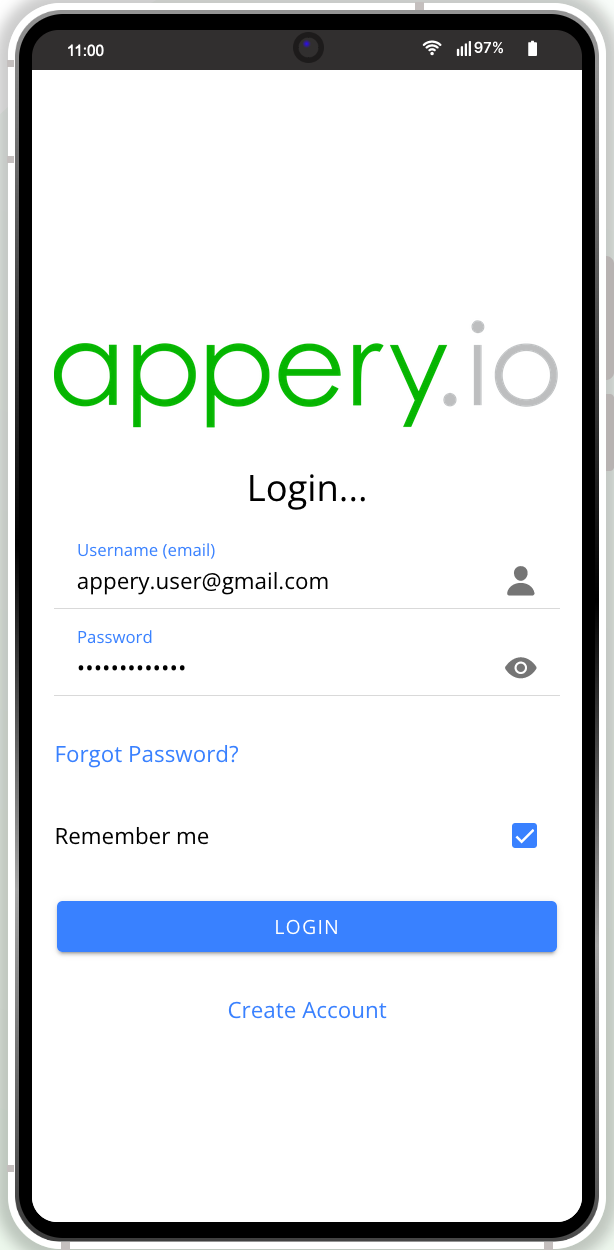
Step 4. Testing the Configuration: Click TEST in the App Builder to ensure everything works smoothly. Fill in the registration details in the app, check your inbox for the verification code, and copy it. 

Step 5. Confirming Registration: Paste the verification code into the app to complete registration. Verify the user record has been added to the app database to ensure accuracy.

Step 6. Final: Log into the app to verify successful registration and explore its features. You’ve now configured SMTP settings for confirmation emails!

Conclusion: That’s it for our guide on configuring SMTP server settings with Appery.io. Stay tuned for our next video where we will show how to set up Twilio for confirmation messages.

Try our Starter App Template and subscribe to our channel for more updates.

Thank you for using Appery.io and Happy Developing!

Your Appery.io Team