PayPal Secure Payments for Your Ionic & AngularJS App

paypal_logoPayPal API is one of the most popular Appery.io plug-ins, and now it’s also available for Ionic & AngularJS!

Our users have frequently requested the ability to add payments to their Ionic & AngularJS mobile apps more quickly, for example, to create an online shop. Now, with the help of this plug-in, you could build an online shop (for instance) to be used by your Ionic & AngularJS app really easily.

A few notes about the security implemented in this app:

  • Authentication with PayPal occurs via a Server Code script. It takes your PayPal app credentials and sends XHR to PayPal. The token is stored to the database.
  • By using the Secure Proxy feature, the actual token value will be substituted on the server side. This way any PayPal API can be triggered.
  • Because of the server-based authentication, sensitive data such as the client secret or token value will never be shown in the app, which eliminates the possibility of theft.

Finally, a few, more general, notes:

  • The flow implemented in this plug-in is similar to PayPal’s flow.
  • We have a PayPal API plug-in tutorial here. Check it out to configure the plug-in.
  • The plug-in is configured for a test environment, so use the PayPal guide too see what you need to do when going live.

Development Tip: Managing Your App Images With Media Manager

media_manager

The Media Manager allows you to work with image files in the App Builder. You can upload, rename, and delete images, as well as select them as assets for the Image component. You can open the Media Manager by clicking “additional menu” (the “three lines” button) in the upper-right corner of the builder and select “Media Manager”:

media_manager_icon

Opening the Media Manager

For example, you can upload your image through the Media Manager and use it as a custom page background via CSS (don’t forget to add the appropriate CSS class to the page):

.background
{
    background-image: url('../files/images/background.png');
}

Learn more in our documentation, and make sure to check out all of our mobile development tips.

Do you want to build apps fast? Start developing with our trial plan!

Development Tip: Displaying and Centering a Spinner in an Ionic App

With Appery.io and Ionic, you can easily add a spinner to a page:

  1. Drag’n’drop the spinner component to a page.
  2. Provide an expression for ng-show in the properties panel. It could be a variable that returns true or false.
  3. To vertically and horizontally center the spinner do the following:
    1. Add a centered-spinner class to Class in the properties panel.
    2. Create new CSS by going to CREATE NEW > CSS > Create CSS.
    3. Add the following code to create the CSS file:
.centered-spinner {
    width: 28px;
    height: 28px;
    position: absolute;
    top: 50%;
    left: 50%;
    margin-top: -14px;
    margin-left: -14px;
}

.scroll
{
    height:100%;
}
spinner
Ionic spinners

Your spinner is ready to use! Don’t forget to change the variable provided for ng-show to true when you need to show the spinner, and to false when you need to hide it.

You can find related information here or here.

Make sure to check out all of our mobile development tips.

Do you want to build apps fast? Start developing with our trial plan!

Development Tip: Coding Less With Function Snippets

snippets

There’s a set of time-saving snippets available to you when you’re writing app logic in AngularJS. They are located on the right side of the function editor window.

For example, you can generate REST service-invoking code by clicking on “Invoke service” snippet. Then, all you need to do is change the "service_name" to your actual service name.

Another popular snippet is “Open modal page” – the snippet will generate code to open the modal and modalOptions object as well.  As with the “Invoke service” snippet, you’ll have to change modal_name to your modal name. Then you can execute this function when needed (on button click, for example) and the modal will be opened.

Make sure to check out all of our mobile development tips.

Do you want to build apps fast? Start developing with our trial plan!

Development Tip: Adding Cordova Plug-ins To Your App

import_cordova_plugins

With just a few quick steps, you can easily add any 3rd-party Cordova plug-in to your Appery.io app:

  1. Go to the Github page of the plug-in and download the latest stable version by clicking “Download ZIP.” It’s important to download the latest stable version.
  2. Go to Resources > Cordova plug-insand click Import Cordova plug-in, then: Choose file, locate the downloaded file and click Import plug-in The plug-in will appear under Cordova plug-ins

To manage all of the Cordova plug-ins for a particular app, go to Project > App settings > Cordova plug-ins and you’ll see the list. You can quickly enable or disable any plug-in.

Learn more in our documentation, and make sure to check out all of our mobile development tips.

Do you want to build apps fast? Start developing with our trial plan!

Development Tip: Managing Device Contacts with an Appery.io Plug-in

icon-contactsBy using the Appery.io Contacts plug-in, you can conveniently manage contacts on a user’s device. The plug-in is based on the Cordova API and can be imported into your Appery.io app like any other plug-in. Just click CREATE NEW > From plugin, select Apperyio Contacts Service and click “Import selected plugins.” There is a set of services you can use to perform the operations, such as find, remove, create, edit and more.

We’ve also prepared a detailed tutorial on how to use this plug-in, as well as a simple demo app (you can create it from the attached backup), that allows you to find, create and save contacts. Find it here.

Make sure to check out all of our mobile development tips.

Do you want to build apps fast? Start developing with our trial plan!

Quickly Import Any Cordova Plugin, New API Express Components to Simplify Enterprise Integration, AngularJS App Builder Updates and More In This Big Appery.io Update

Easily import any Cordova plugin

You can now easily add any 3rd party Cordova plugin to your app. This has been one of the most requested features. No more sources digging and long step-by-step guides. This is how quickly you can add any Cordova plugin to your app:

  1. Go to the Github page of the plugin and download the latest stable version by clicking “Download ZIP”. It’s important to download the stable or Release version.
  2. Go to 
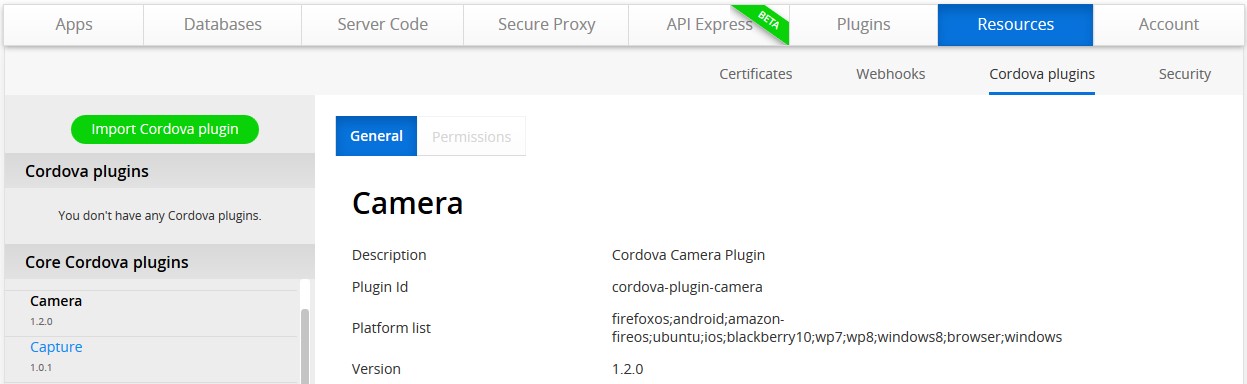
Resources > Cordova pluginsand click Import Cordova plugin, then: Choose file, locate the downloaded file and click Import plug-in The plug-in will appear under Cordova plug-ins

And you are done — it’s that’s easy.

cordova_plugins_list

Quickly add any Cordova plugin

To manage all Cordova plugins for a particular app go to Project > App settings > Cordova plugins and you’ll set the list. On this page you will also see the Core Cordova plugins – these plugins are automatically available in your app. From this page you can easily manage the plugins. You can quickly enable or disable any plugin.

We think it’s a very nice capability that you will like. To learn more, please read the documentation for more details.

API Express enhancements

API Express allows quickly exposing a relational database via REST APIs. In this update we have added a number of important features.

New service builder components

The API Express Service Builder – a visual tool to build your custom services has a number of new components. These components simplify building your service logic.

condition-component

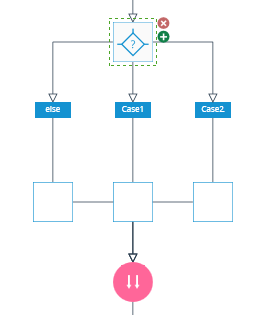
Easily build custom services with new logic components

You can learn more about the new components here.

Comparison query operators 

A set of comparison query operators were added to Find operation to make your requests more effective. Here is the operators list:

  • $eq – Matches values that are equal to a specified value.
  • $gt – Matches values that are greater than a specified value.
  • $gte – Matches values that are greater than or equal to a specified value.
  • $lt – Matches values that are less than a specified value.
  • $lte – Matches values that are less than or equal to a specified value.
  • $ne – Matches all values that are not equal to a specified value.
  • $in – Matches any of the values specified in an array.
  • $nin – Matches none of the values specified in an array.

Learn how to use these operators in examples.

API Express project import & export

Now it’s possible to save your API Express project locally by backing it up.The project can be restored from the exported backup as well. It’s really simple, so you have to go to API Express > Settings and click “Export Backup” to save your API Express project locally. Click “From backup” when creating new API Express project and choose previously stored backup to create a project from the backup. A little bit more about these features is here.

Quickly add a REST API to a controller with drag and drop

invoke_service_snippet

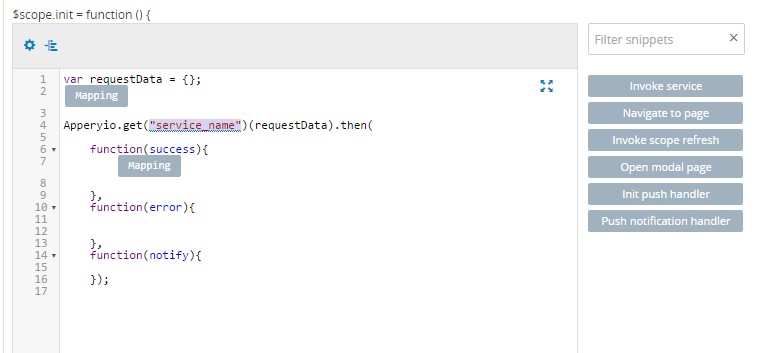
A faster way to add a REST API to an AngularJS app

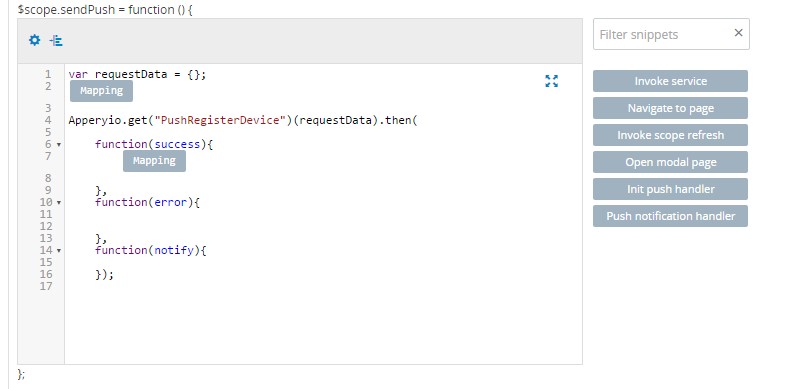
When building an AngularJS app, there are useful snippet called “Invoke service”. The code to execute a REST API service will be added to your scope function when clicking on it. All you have to do is change “service_name” to your actual service name:

services_drag_n_drop

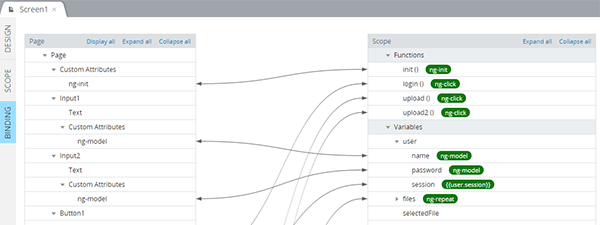
Drag and drop a service into an AngularJS controller

We now made it even simpler to add a REST API to a function. Just drag and drop the needed service from Services folder (to the left of the screen, where project tree is located) to your function and you’re done! Even the service name will be automatically substituted:

Edit scheduled pushes for faster development

You can now easily edit scheduled pushes. This means you no longer need to delete a scheduled push in order to make a change. There are few ways in Appery.io to send a Push Notification:

  1. By sending the REST request using the Push Notifications API.
  2. By calling the appropriate methods in Server Code.
  3. By using the web console.

All three methods support scheduling pushes. From now, Server Code and Push Notifications API’s were complemented with new methods to get the list of scheduled notifications and to remove them.

By using the web console you can achieve more functionality when editing scheduled pushes. You can remove them as well, but you can also change notifications content and lot of other options including push message, its sound and devices. Read the doc for details.

Push Notifications API changes

If you built an AngularJS app or jQuery Mobile app (library version 3.0), please make sure you are aware of these API changes:

New version of Appery.io Push Notification plugin has different way to read the message. The changes only concerns AngularJS apps and jQuery Mobile app with libraries version 3.0. If you ever wrote the event.notification.aps.alert code, you should replace it with new variant. So, find your code that looks like:

event.notification.aps.alert

And replace it with the next string:

event.detail.message

That’s all if your making the jQuery Mobile app, but for AngularJS one more step should done. Find PushRegisterDeviceImpl JavaScript file (under JavaScript folder) and replace the entire file with the code provided here.

Happy app building with better Appery.io!

Mobile Tip: Dynamic REST API URLs in AngularJS Apps

dynamic_urls

Dynamic URLs are very common in any mobile app. When building AngularJS apps with Appery.io there are few ways to make parts of the URL (or even the entire URL) dynamic. We’ll use this URL for our example: http://mywebsite.com/name/{id}/edit , where the {id} part should be dynamic.

  1. First of all, you can use the Settings service to perform dynamic substitutions:
    1.  Create a new Settings service (if you don’t have one yet) by going to CREATE NEW > Service > Settings (REST settings).
    2. Then, create a new id parameter in the newly-created Settings and provide a value for it.
    3. Now, go to your REST service, and change the dynamic part of your URL to {MySettings.id} where MySettings is the settings service name, and id is the name of the parameter. Your URL should look like:           http://mywebsite.com/name/{MySettings.id}/edit
  2. Alternatively, you can create request parameters directly in the REST service. They will be automatically substituted if names coincide. You can use this approach if you need visual Mapping for dynamic parameters:
    1. Go to your REST service Request > Query String.
    2. Create the new id parameter and provide a value for it.
    3. Change the REST service URL to http://mywebsite.com/name/{id}/edit.
    4. Because the value of the id parameter will be automatically inserted to the {id} placeholder, it won’t be added to the end of the URL as a query string.

Read more about the REST and Settings services in AngularJS.

Make sure to check out all of our mobile development tips.

Do you want to build apps fast? Start developing with our trial plan!

Mobile Dev. Tip: Quickly Map Data Between Services and UI Using Visual Mapping and Binding Editor in AngularJS Apps

apperyio_binding

There are two powerful and convenient ways to use data flow management in Appery.io: Mapping and Binding.

Mapping

When a REST service is invoked, it usually requires input data. In most mobile apps, the data comes from the page (user-entered) or from storage (previously saved). When the service is invoked, it returns the data you want for further actions with it. This is when Mapping comes really handy — you can map input and output data via a simple and intuitive drag&drop system. You can also modify the incoming and outgoing data on-the-fly by adding custom JavaScript to a needed element.

Binding

AngularJS apps support automatic data synchronization between the model and view components. When the model changes, the view reflects the change, and vice versa. It’s called data-binding. Appery.io provides Binding — the visual tool for managing the connections between UI components and scope. By going to the BINDING tab you can see an overview, and add or remove connections via the simple drag&drop system.

Make sure to check out all of our mobile development tips.

Do you want to build apps fast? Start developing with our free plan.

Mobile Dev. Tip: Geolocation Plug-in for AngularJS Apps

geolocation-plugin

Geolocation functionality is one of the most popular features in mobile development. In Appery.io, a geolocation plug-in is available out-of-the box and can be configured in minutes to use in your mobile app. Recently, we’ve updated the geolocation plug-in for AngularJS apps (both Ionic and Bootstrap) and now it is even more intuitive and faster to use. In the geolocation plug-in docs you can find out how to add the plug-in to your Appery.io app, so you can retrieve the current position and start\stop watching position.

Make sure to check out all our mobile development tips.

Do you want to build apps fast? Start developing with our free plan.