Learn How to Show Information in Ionic Pop-ups

In this post, you will learn how to add information to a pop-up in an Ionic application.

Setting Up the App

To start with, let’s create a new Ionic app.

  1. From the Apps page, click Create new app > Ionic, give it a name, and click Create.
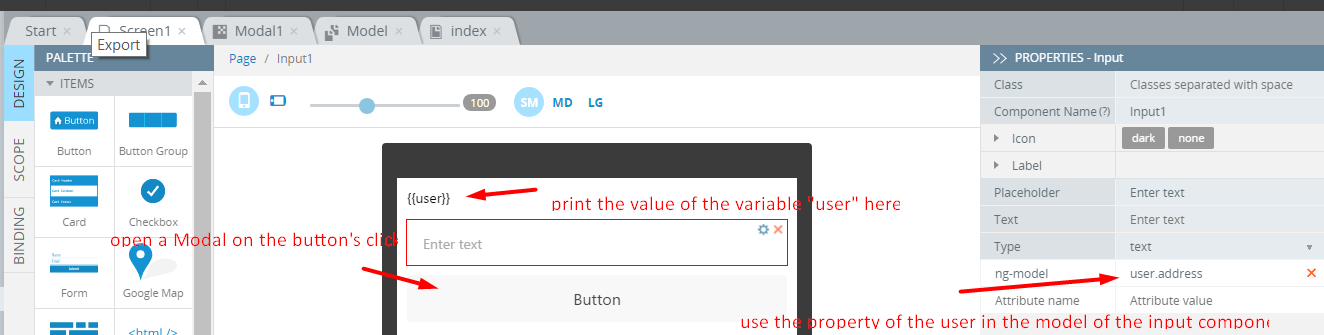
  2. Open Pages and go to Screen1. Under the DESIGN tab, add a Text component to the page, select it, and define its Text property as Username: {{username}}.
  3. Next, drag and drop an Input component to the page and set username as its ng-model.
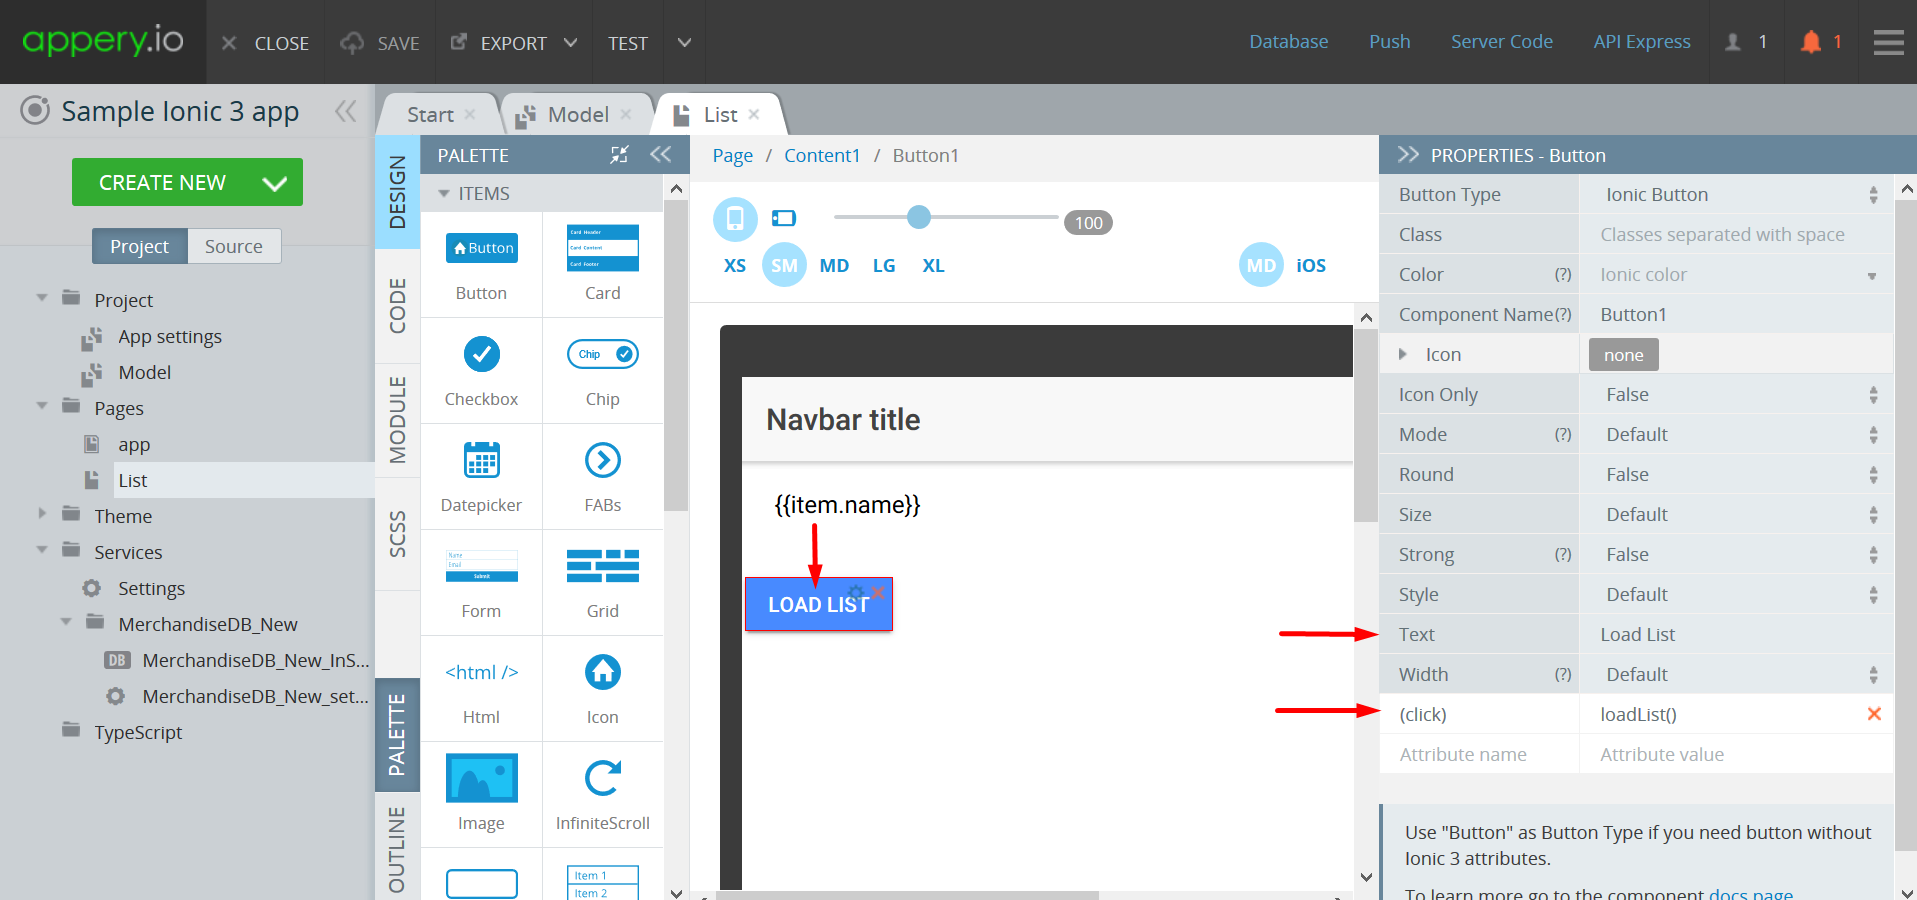
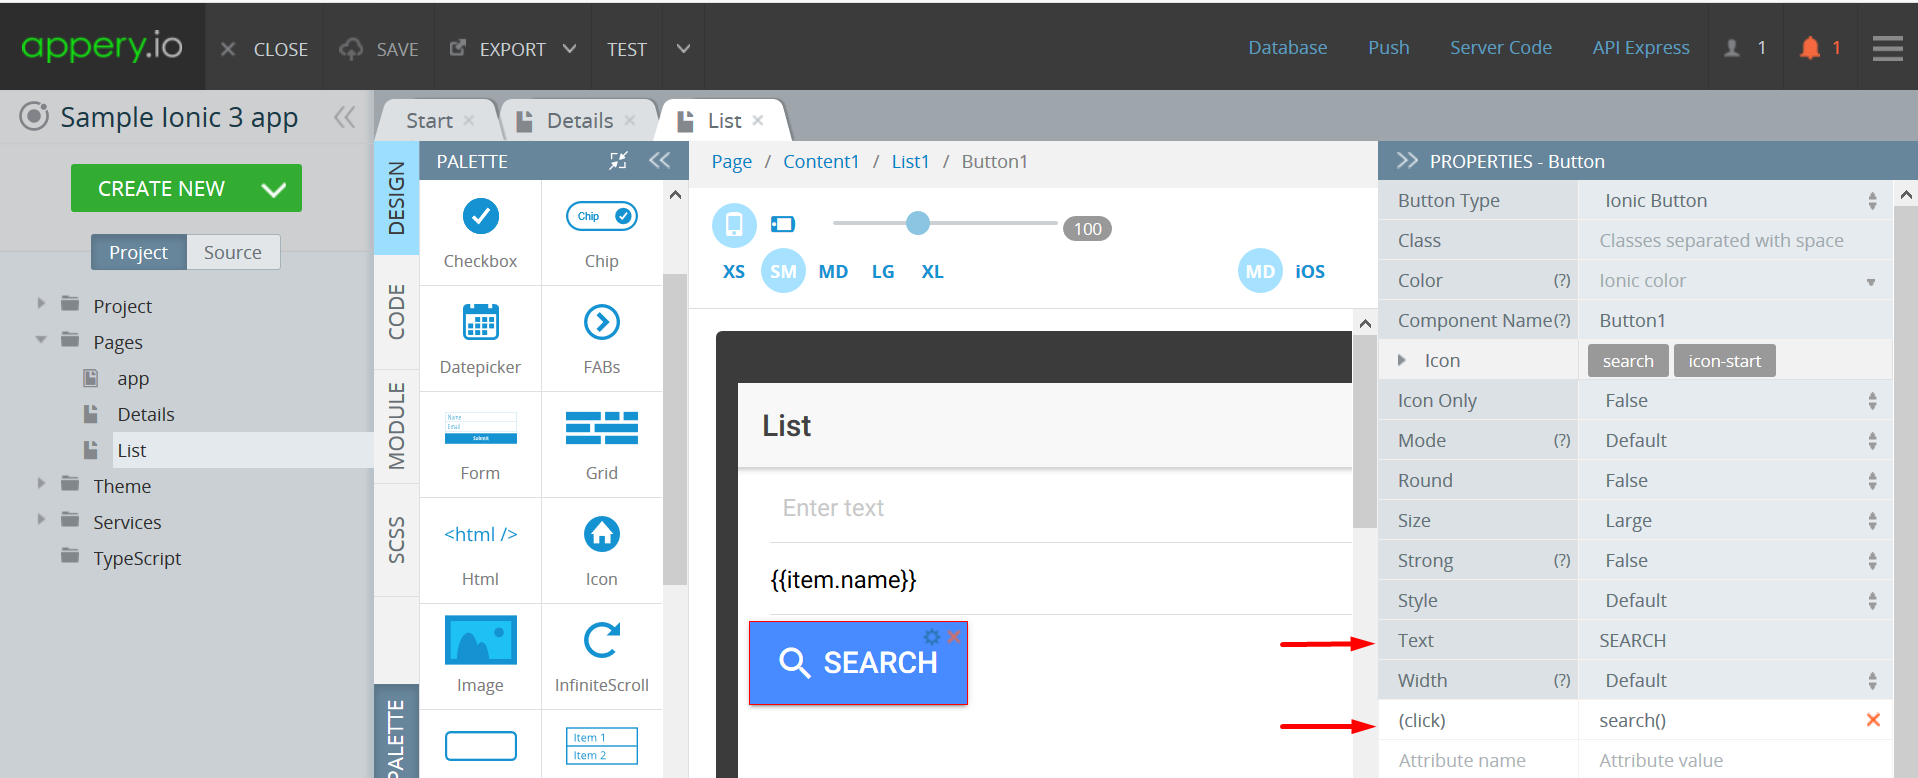
  4. Add one more component to the Screen1 page, a Button with Text: Edit and ng-clickedit().

   The page UI should look like this:

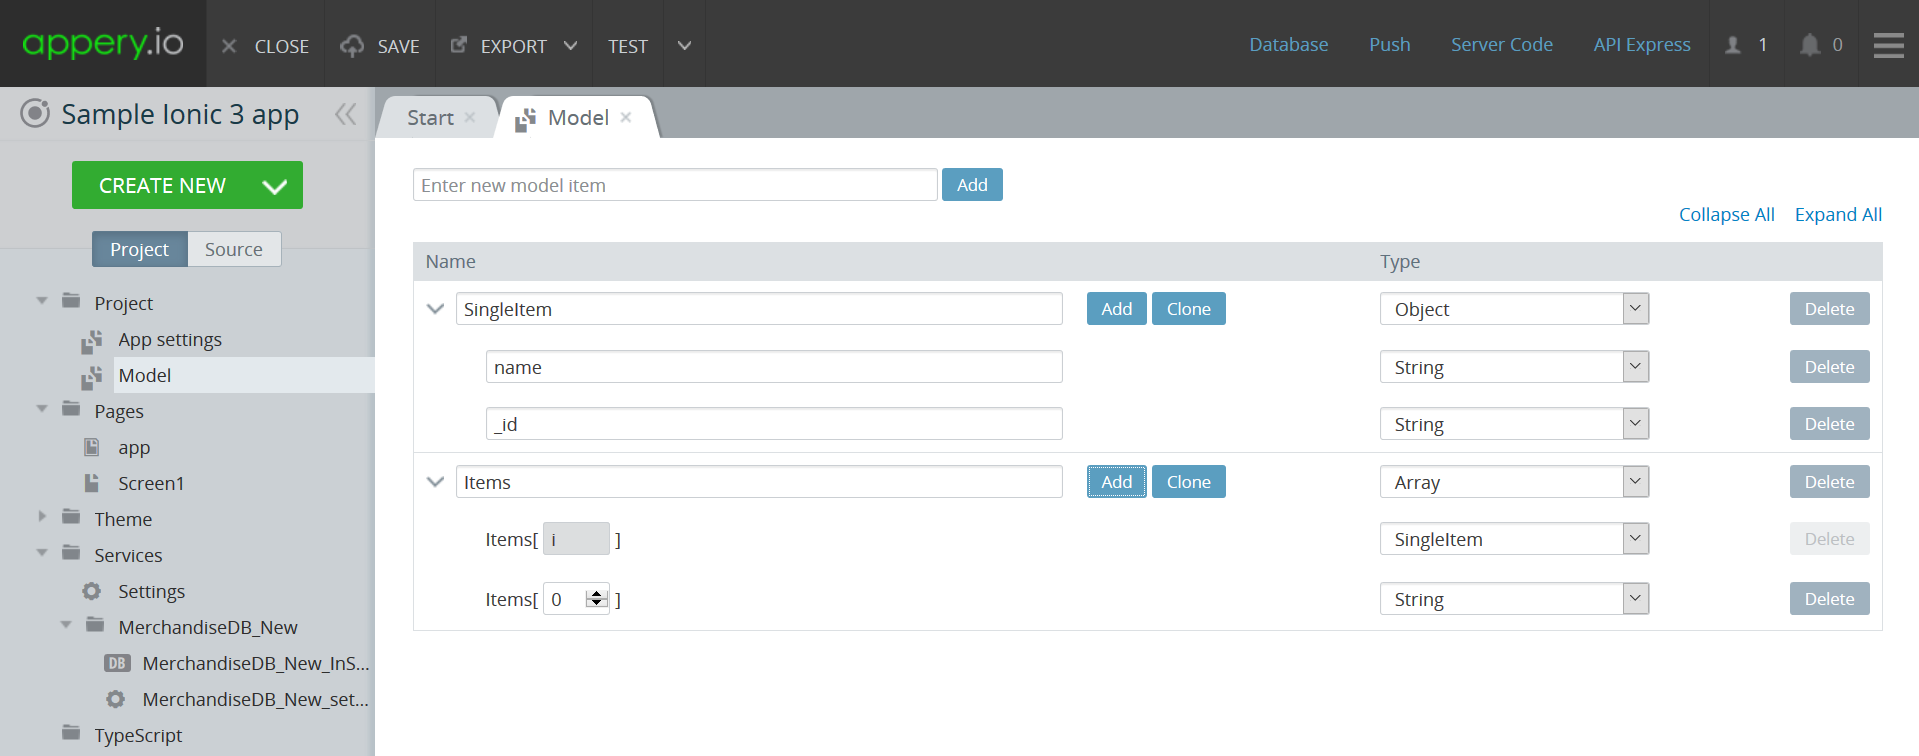
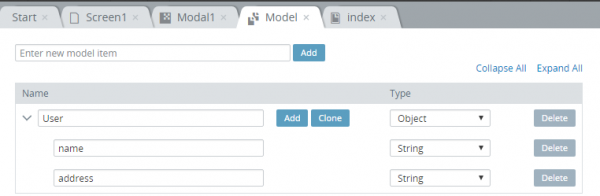
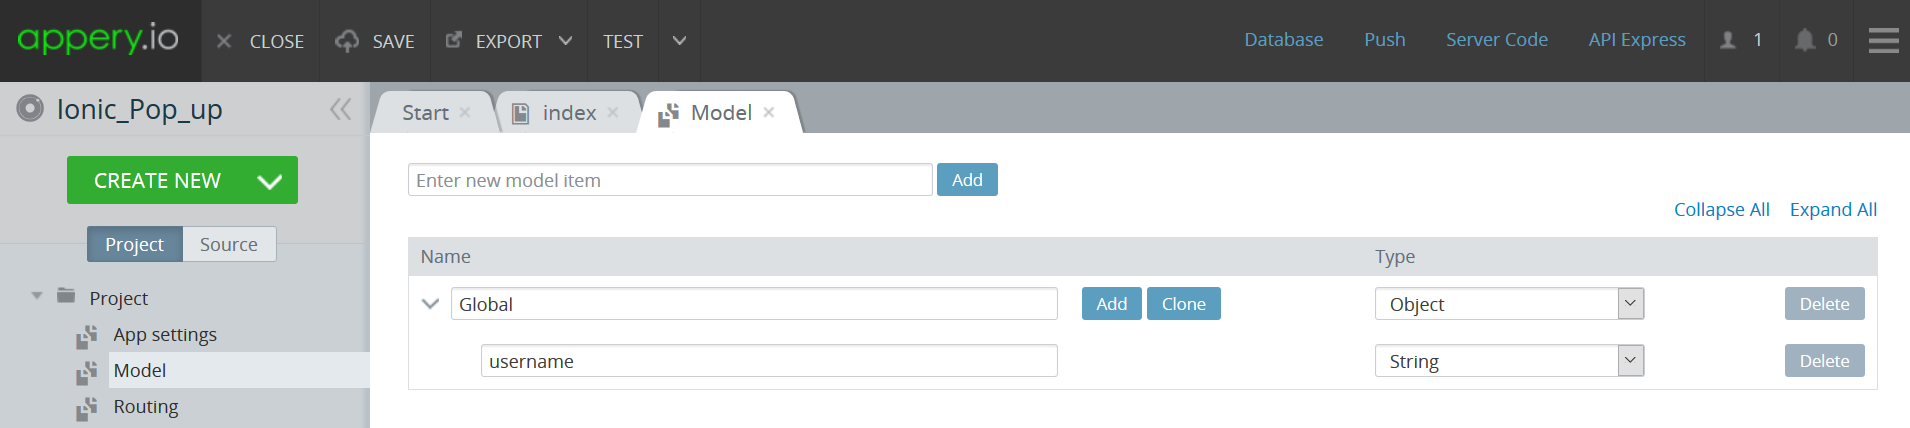
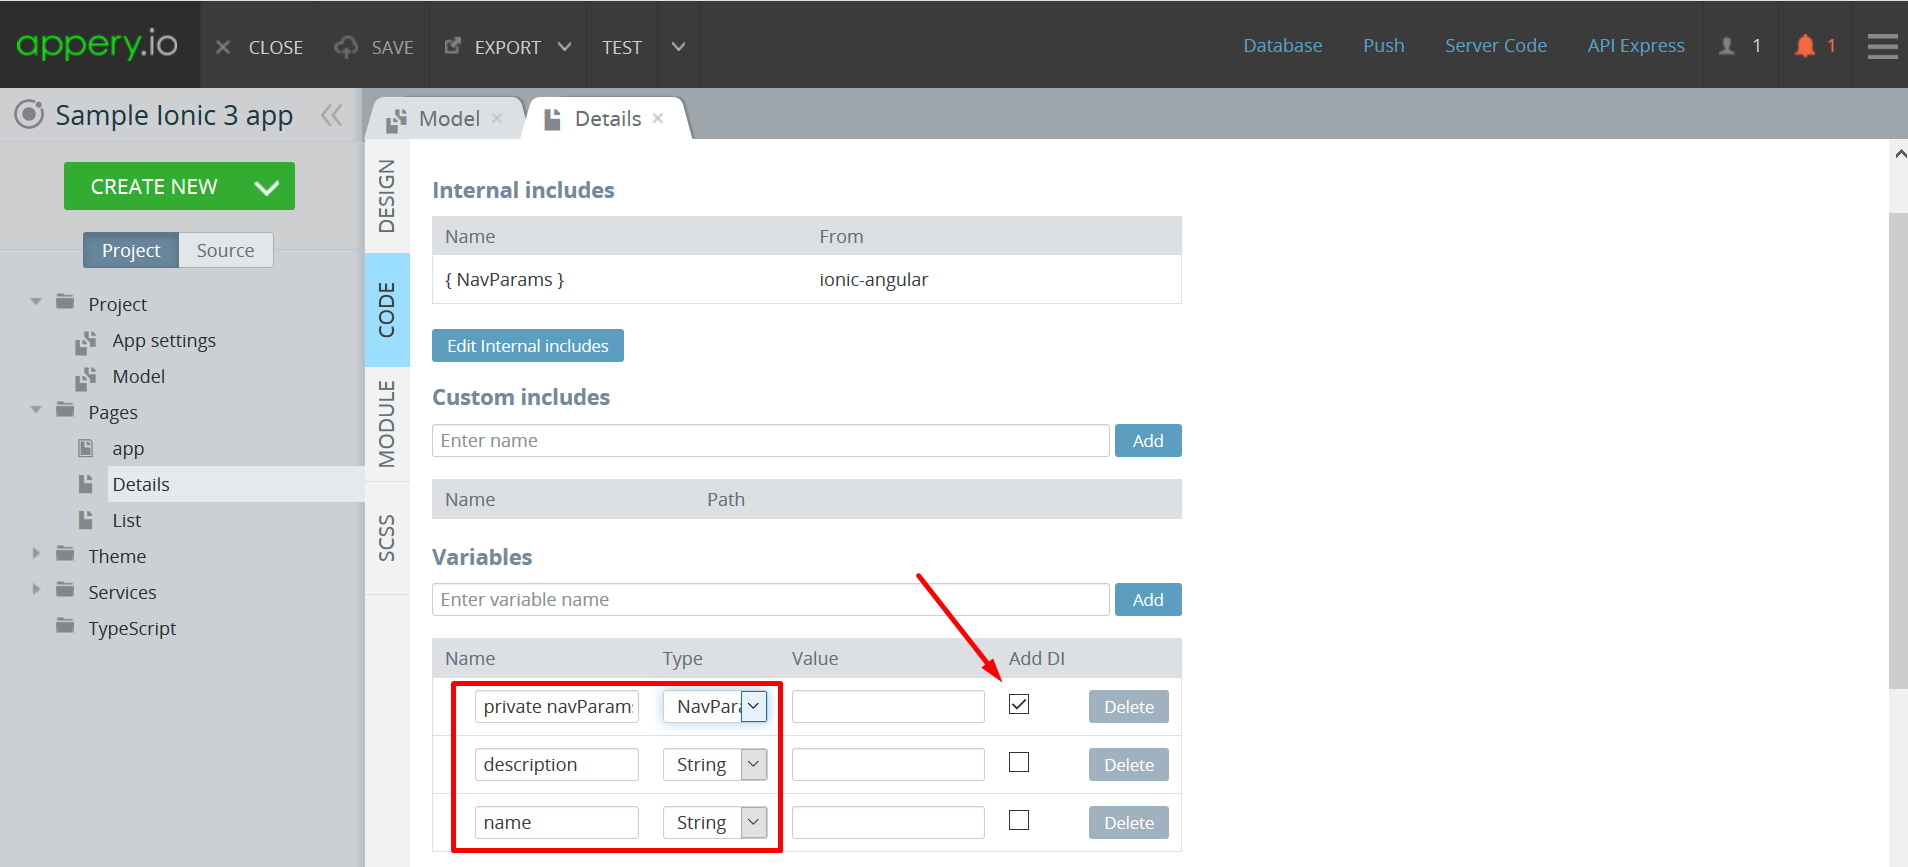
  1. Now, in the Project view, open the Project > Model tab, create a new model of Object type, and name it Global. Add a string parameter to it named username
  2. Next, add a new variable, name it global, and select Global for Type under the SCOPE tab of the index page: 
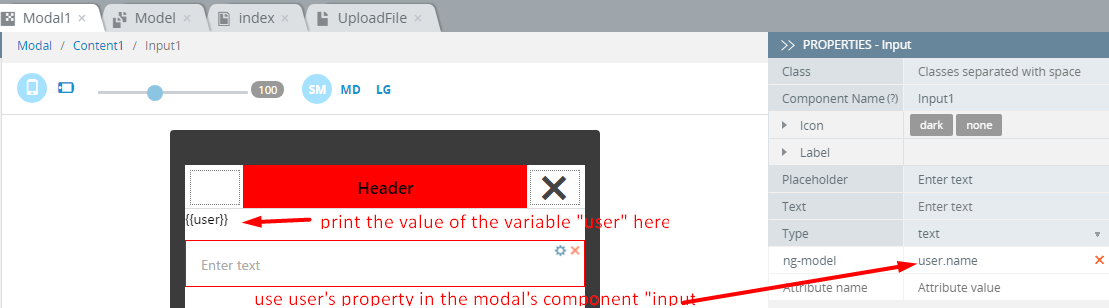
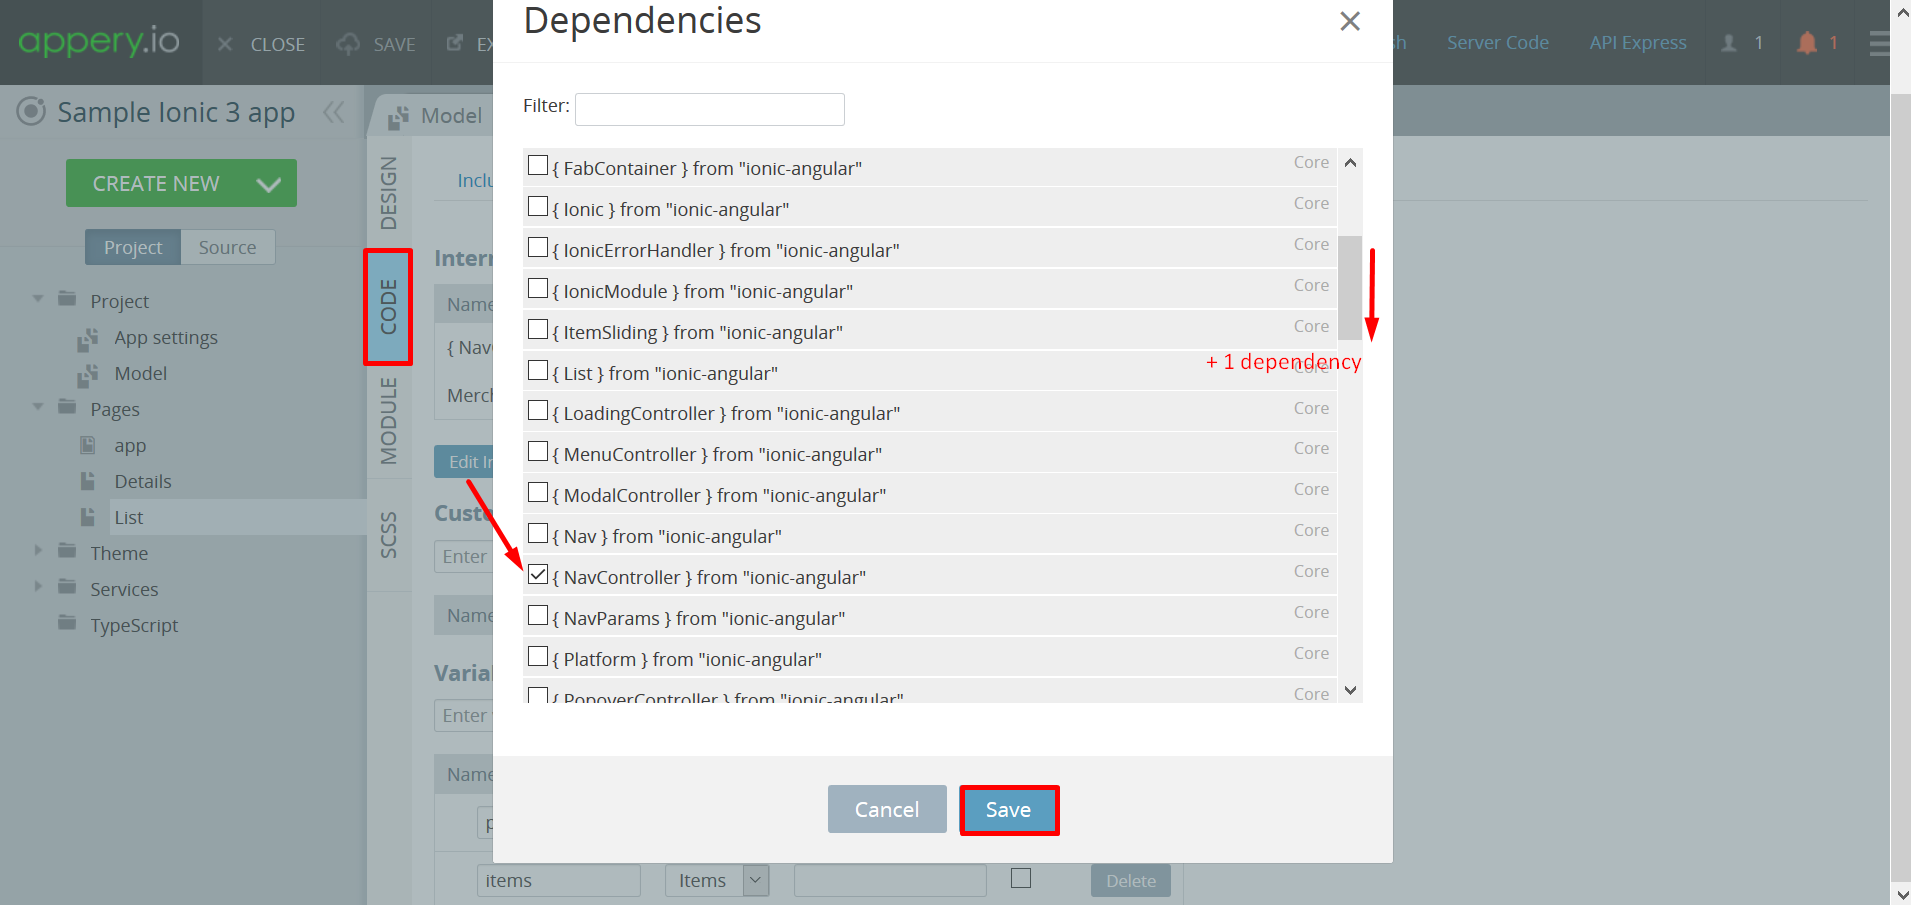
  3. After that, switch to the Screen1 page, and under the SCOPE tab, add a new scope function named edit and provide it with the following code where the added global variable in the template of the popup is defined:
    $scope.global.username = $scope.username;
    var $ionicPopup = Apperyio.get("$ionicPopup"); 
    var alertPopup = $ionicPopup.alert({ 
        title: 'Edit username',
        template: '<input type="text" ng-model="global.username"/>',
        scope: $scope,
         buttons: [{
            text: 'OK',
            type: 'button-positive',
            onTap: function() {
                $scope.username = $scope.global.username;
                return;
            }
            
        },
        {
            text: 'Cancel',
            onTap: function(e) {
                return;
            }
        }]});

    Note, that in the code, any title can be provided and any HTML code can be added for template.

And…we are done!

Using the App

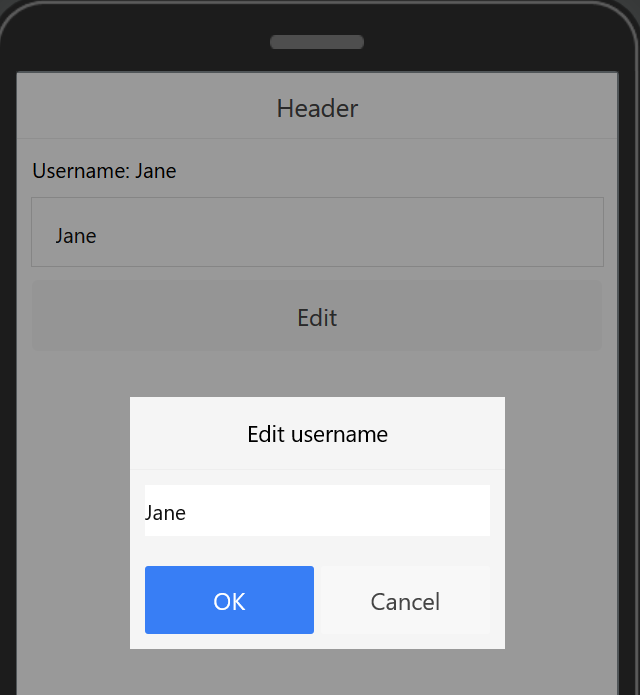
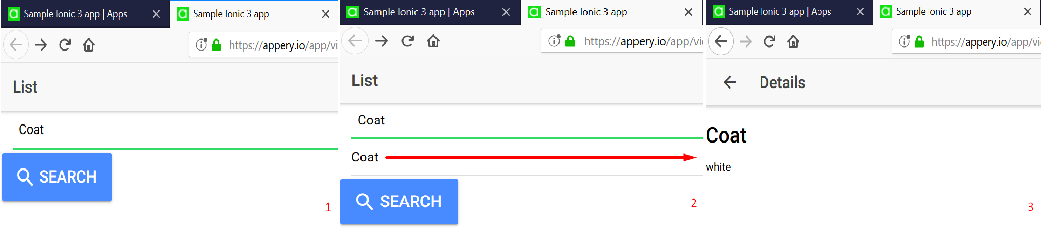
Now, to check the app, click Test. In a new window, put in Jane for Username and click Edit. The popup with this username will appear:

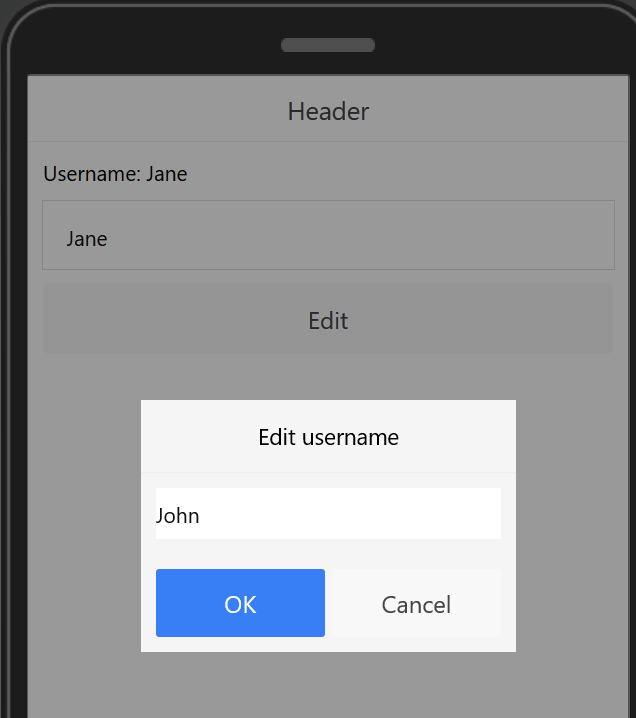
To enter a different name, just type it in and confirm by clicking OK. The local variable will be modified and the output can be instantly seen:

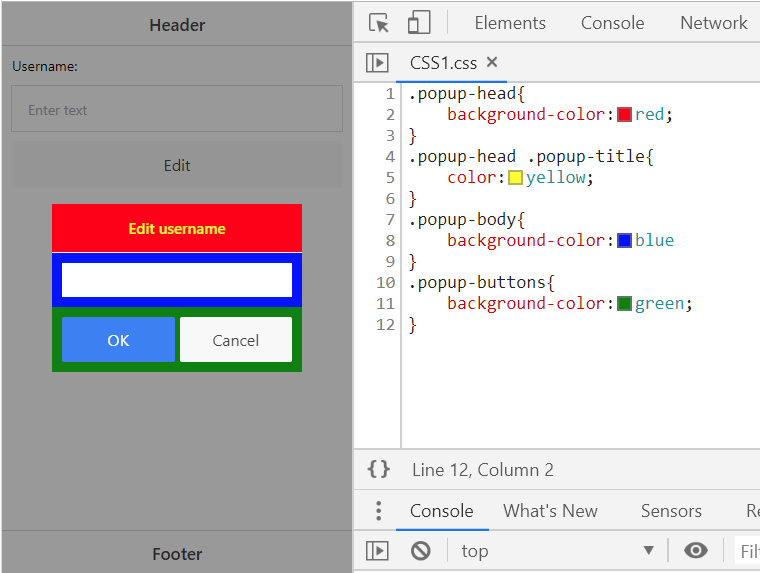
BTW: If you are into customizing your UI, here is a piece of good news. You can easily customize the looks of your pop-up:

How to Save Camera Images in an Ionic App

This short tutorial will show you how to save images from your device camera into Appery.io database.

  1. Create a new Ionic project and database.
  2. Add the Camera Service plug-in and File Upload App plug-in into the project by going to Project > CREATE NEW > From Plug-in, in the Builder.
  3. Create a page CameraPage with 2 buttons Camera and Upload with corresponding attributes and the component Image to display the result:
  4. On the Scope tab add this code for the Camera button:
    var requestData = {};
    Apperyio.get("Camera_getPicture")(requestData).then(
    function(success){
        $scope.im.image = success.image;
        $scope.$apply(); 
    },
    function(error){
    });

  5. Then, add this code for the Upload button:
    function dataURLtoFile(dataurl, filename) {
    var arr = dataurl.split(','), mime = arr[0].match(/:(.*?);/)[1],
    bstr = atob(arr[1]), n = bstr.length, u8arr = new Uint8Array(n);
    while(n--){
    u8arr[n] = bstr.charCodeAt(n);
    }
    return new File([u8arr], filename, {type:mime});
    }
    
    var filepointer = dataURLtoFile($scope.im.image, 'test.png');
    $scope.files.push({filename:"test.png", filepointer: filepointer});
    
    
    if ($scope.files.length === 0) {
    alert('No file for upload');
    return;
    }
    
    var requestData = Apperyio.EntityAPI('FileDB__files_upload_service.request');
    var user_scope = $scope.user;
    var files_scope = $scope.files;
    var formData = new FormData();
    requestData.data = _.pluck($scope.files, 'filepointer');
    
    Apperyio.get("FileDB__files_upload_service")(requestData).then(
    
    function(success){
    alert('All files has been successfully uploaded.');
    },
    function(error){
    
    },
    function(notify){
    
    });
  6. Finally, enter tour database_id and master_key in  FileDB_settings:

And, that’s it! (Please remember that this app should be tested on a real device.)

How to Build a Sample Ionic 3 Search App

This is a continuation of the post How to Build a Sample Ionic 3 List App. In this document, we will provide step-by-step instructions on modifying your Ionic 3 list app so that data can be shared between its pages.

Remember, you can only proceed with the steps in this post only after you have made sure the application from the previous post works as expected.

  1. To begin with, go to the Databases tab and open the database to be used in the app. Make sure the needed collection has a column of string type named description. If needed, create it by clicking the +Col button and filling it with data:
  2. Once done, switch to the Apps tab and open the Sample Ionic 3 app created in the previous blog post. In the Project view tree, click Model. There, define the models so that they look like the following (note that, here, the SingleItem model is renamed to Item):
  3. A Query service from the collection should be imported in this step: Create new > Database Service; in the new window, select the database and check the Query service checkbox of the needed collection. Click Import selected services to confirm: The subfolder with the corresponding name should now have been added to the Services folder in the Project view tree.
  4. It is time to add a new pageCreate new > Page, set the page name to Details, and confirm by clicking Create Page.
  5. Under the PROPERTIES tab, change the Navbar Text component to Details.
  6. Drag and drop a Text component on the page and define its Text property as {{name}} selecting h1 for the Container property.
  7. Now, add another Text component to the page and set its Text property to {{description}}:
  8. Switch to the CODE tab, click Edit internal includes, and, in the pop-up window, scroll down to find { NavParams } from “ionic-angular”. Then check it and confirm the selection by clicking Save:
  9. Then, proceed to the Variables section adding and defining variables as follows (ensure the private navParams variable is checked in the Add DI checkbox):
  10. To finish with the Details page, add a new function to it, name it constructor, and define it with this JavaScript code:
    this.name = (this.navParams.get('name') || "").toString();
    this.description = (this.navParams.get('description') || "").toString();
  11. In the next step, some changes to the existing List page should be made. So, in the DESIGN view, under the PROPERTIES tab, select the Navbar Text component and rename it to List.
  12. Now, place the Input component on the page and define its [(ngModel)] property as query.
  13. Modify the existing List item by adding a new attribute (click)navCtrl.push(“Details”, item):
  14. Rename the Button Text property to SEARCH and change its (click) attribute to search() that will initiate navigation to the other page (Details) of the app (if you decide to keep the list functionality in the new app, create a new button for search so that there will be two of them):
  15. Once done, open the CODE tab and click Edit internal includes. Check 2 dependencies: { NavController } from “ionic-angular” and your added query dependency (the last on the dependencies list) in the Dependencies pop-up window. The List service can be unchecked now if not used for the modified app.
  16. Save. The services with the corresponding names should now be added under Internal includes:
  17. After that, add 2 variables: query of type String and queryService of the type of your query service (added to Internal includes). Make sure the Add DI checkboxes for private navCtrl and queryService variables are checked. (Delete the listService variable if it will not be used in the app.)
  18. Finally, add a function to the page named search and define it with this JavaScript code (the loadList function will not be used so it can be deleted):
    let query = this.query || "";
    
    this.queryService.execute({ // change 'MerchandiseDB_New_InStock_query_service' to actual variable name//
        data: {
        },
        params: {
            where: JSON.stringify({name:{ $regex: query, $options: "i"}})
        },
        headers: {}
    }).subscribe(
        (res: any) => {
            this.items = res
        },
        (err: any) => {
            console.log(err)
        }
    )
    

    Voilà!

    The app is ready for testing. Click the arrow button next to the Test menu item. In the drop-down, select Show without frame and click Launch. The List page will be loaded. Enter the name of the item from your database collection (for example, Coat) and click SEARCH. The item Coat will be returned on the page. Then, click this item to open the Details page with the item description:

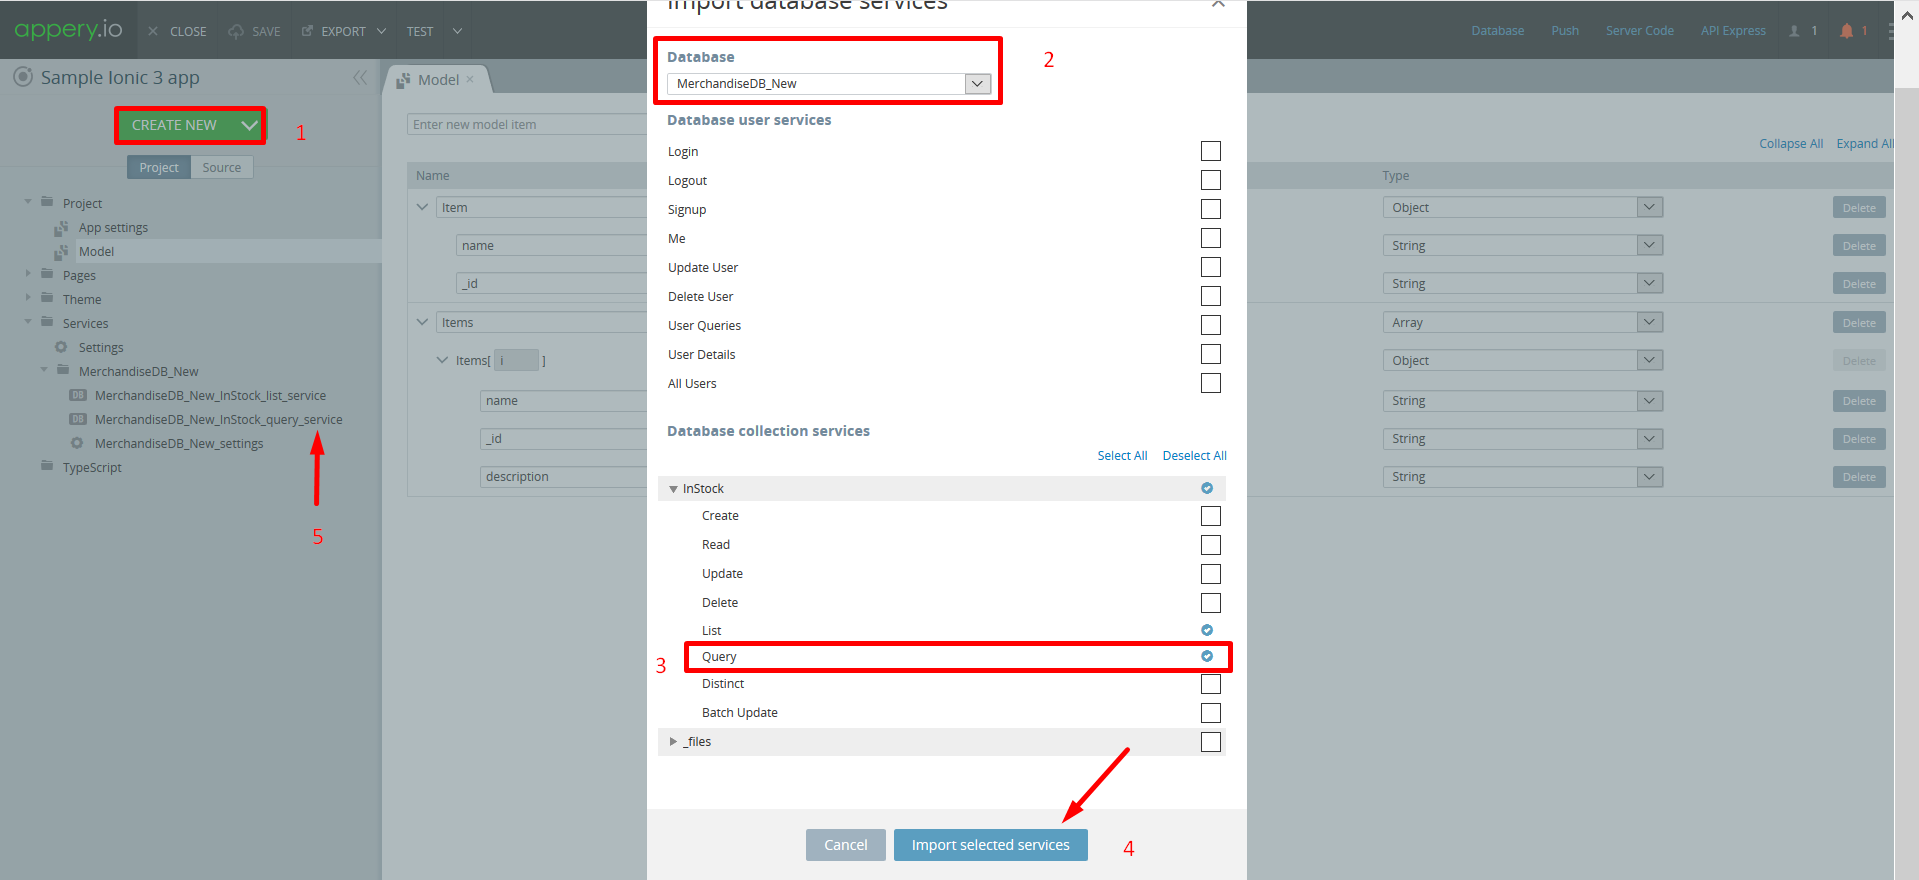
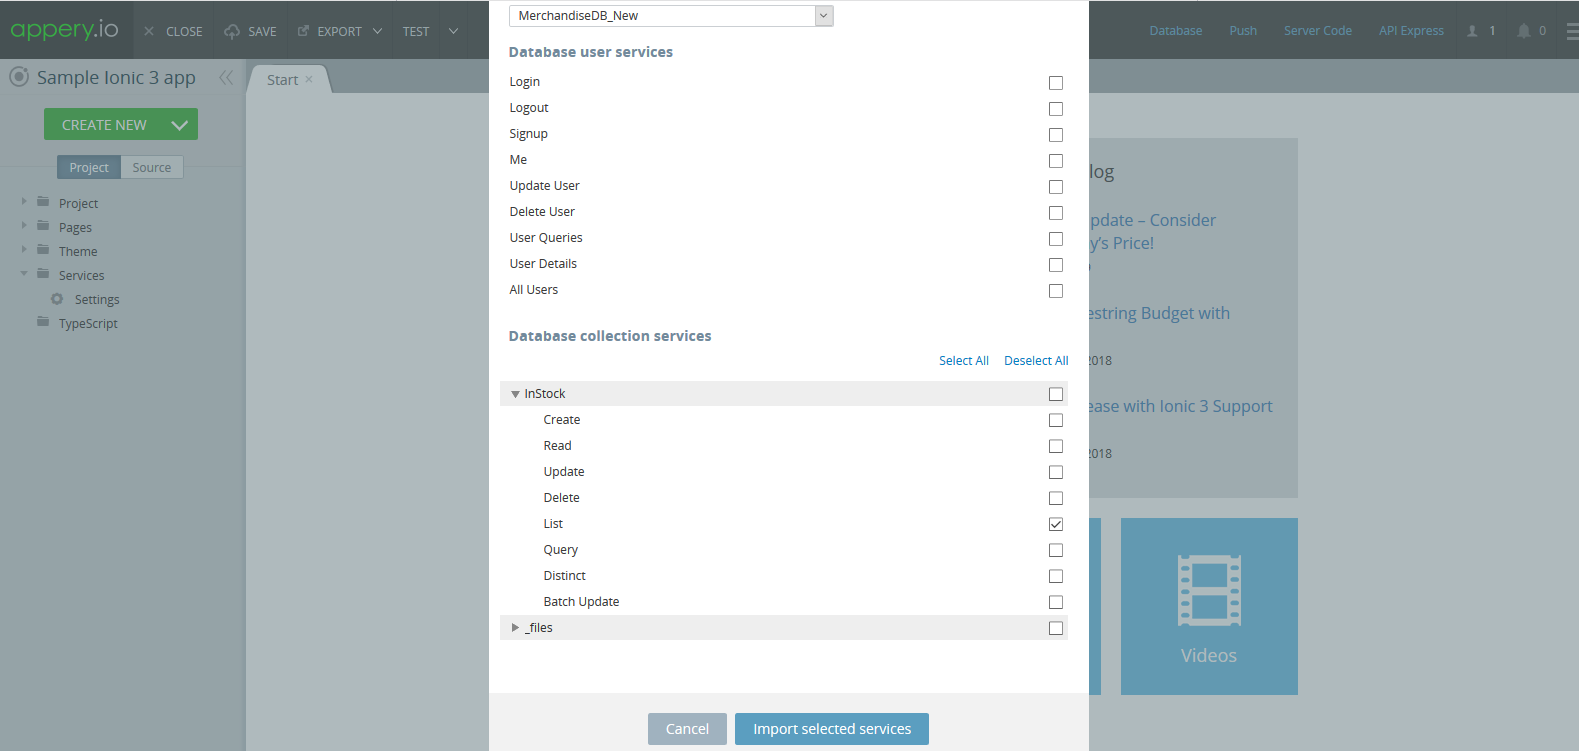
    Note: You might also want to leave the List service functionality created earlier. In this case, both List and Query services should work as expected.

Update from Google Play

We would like to inform you that Google has updated their Developer Policy to make apps published with Google Play compliant with user Privacy, Security, and Deception policy and now restricts the use of high risk or sensitive permissions, including the SMS or Call Log permission groups.

Please review these permissions in your Appery.io project(s) on the App Settings page (Project->App Settings->Android Permissions).

If such permissions are not used by your application but are enabled, please disable them. Once done, upload an updated app version to Google Play to ensure it will be allowed by Google.

If your application requests the use of such permissions, you will be required to submit the Permissions Declaration Form to receive approval from Google Play. Once your Permission Declaration is reviewed and your app is approved for policy compliance to the Google Play Developer Distribution Agreement, your application will be published.

Note:

Completing the form is required even if the application does not use such permissions, so please select any items there and add a comment like: “I’ve selected one just to submit a form, the app doesn’t require that feature”.

How to Build a Sample Ionic 3 List App

This post will describe step-by-step how to build a sample app with Ionic 3 that will retrieve a list from your database collection.

  1. Create a new Ionic 3 app. From the Apps page, click Create new app > Ionic 3 (beta), give it a name, and click Create.
  2. Import the List service from any existing or newly created Appery.io database collection. Create new > Database Service, select the needed database and check the List service checkbox confirming import.
    The subfolder with the corresponding name should now have been added to the Services folder in the Project view tree.
  3. Add a model called SingleItem of type Object and 2 attributes: name and _id. Then, add the Items model of Array type and define it in the following way:
  4. Open Pages and rename Screen1 to List using the “cog” sign.
  5. Under the DESIGN tab, add a List component to the List page and delete the 2nd and 3rd items on the list.
  6. Select the List item and add the property *ngFor=let item of items. Also, set the Text property to {{item.name}}.
  7. Now, add a Button component to the page, select it, and define its Text property as Load List and (click) property as loadList().
  8. Switch to the CODE tab, click Edit internal includes, check your added list service, and save:The service with the corresponding name should now be added under Internal includes.
  9. Add 2 variables: items of type Items and listService of the type of your list service (added to Internal includes). Check the Add DI checkbox for listService.
  10. Finally, add a function, name it loadList, and define it with this JavaScript code:
    this.listService.execute({ // change 'MerchandiseDB_New_InStock_list_service' to actual variable name//
        data: {},
        params: {},
        headers: {}
    }).subscribe(
        (res: any) => {
            console.log("res = ", res);
            this.items = res;
            console.log(res);
        },
        (err: any) => {
            console.log(err)
        }
    )
    

Voilà!

You can now test your app. To do so, click the arrow button next to the Test menu item. In the drop-down, select Show without frame and click Launch. The page will be loaded. Now, click the Load list button. The list appears loaded with the items from the database:Note: To learn how this app can be modified to search and share data across its pages, proceed with this post.

Passing Data from Modal to Parent

Today we’ll show you a small example of how to pass data from a modal to its parent.

  1. Create a model as shown in the screenshot below:

    Create Model

    Create Model

  2. Then, define a scope variable “user”, based on this model on the index page.
  3. Create a simple page to run the modal and show the global variable “user” like this:

    Screen page

    Screen page

  4. Create a simple modal with the same structure as the page above (to show the variable “user” and change its property):

    Modal page

    Modal page

  5. Open the modal you’ve created from the page of your application with the JavaScript code below:
var modalOptions = {  // About Ionic Modal: https://links.appery.io/ve-snippet-modal-ionic
  animation: 'slide-in-up',     // The animation to show & hide with
  focusFirstInput: false,       // Whether to autofocus the first input of the modal when shown
  backdropClickToClose: true,   // Whether to close the modal on clicking the backdrop
  hardwareBackButtonClose: true // Whether the modal can be closed using the hardware back button on Android and similar devices
};
Apperyio.get('Modals').loadModal("Modal1").then(
function(modalInstance) {
  modalInstance.open(modalOptions).then(function(modal) {
    modal.scope.modal = modal;
    modal.scope.user = $scope.user;
    modal.show();
  });
},
function(error) {
  console.log(error);
});

That’s it! Now you can run the application. You can change the user’s name on the page and see its value on the modal. Go ahead. Change the user’s address on the modal and see this value displayed on the page.

How to Build a Cordova App Fast

One of the core components in Appery.io platform is a cloud build service which builds a binary file (hybrid) for iOS or Android. Appery.io leverages Apache Cordova (PhoneGap) to create a binary file. Launching the build process is very simple. Right from inside the App builder, clicking the Export button you will see the option to create a binary file for iOS or Android.

Export menu

Export menu

Once Binary (.ipa) or Binary (.apk) is selected, the build process starts. The build process usually takes one minute. When the build is completed, the file is downloaded to your computer. From there you can publish the app to an app store, using the standard publishing process for each store.

Learn more about how to use Apache Cordova in Appery.io to build hybrid apps and use native APIs.

How to Add reCAPTCHA to an Ionic App

reCAPTCHA is a nice service that usually added to a registration form and helps prevent bots from registering automatically. The service usually displays a small and easy challenge to a human but which would be difficult for a bot to answer. In this blog post we are going to show you how to add reCAPTCHA to an Ionic app.

Let’s start.

  1. Create a new Ionic app based on Ionic Blank template.
  2. Go to https://github.com/vividcortex/angular-recaptcha, download vcRecaptcha.js, and unzip the file.
  3. Inside the App  Builder, go Create New > JavaScript, name it vcRecaptcha, check Upload from file and select the angular-recaptcha.js file from your drive. For type, select Angular module and click Create JavaScript.
  4. Now, open Screen1 and add an HTML component to the page.
  5. Under the Properties panel, click Edit and add the following code:
    <div vc-recaptcha key="'XXXXXXXX'" on-success="onSuccess()"></div>
    

    where 'XXXXXXXXX' is the key generated on https://www.google.com/recaptcha/admin (your key must be inside the double quotes).

  6. Switch to Scope view and add a new function, name it onSuccess, and add the following code to the editor:
    Apperyio.navigateTo("Success");

    onSuccess() is the scope function that executes when the correct Captcha is entered (here, another page will open).

  7. To demonstrate this, create a new page and name it Success. Add a Text component to the page and paste Welcome! for its Text property.
  8. Also, if you want to add a solving annotating images to your reCaptcha, go to Project > Routing, click Manage dependencies for Screen1, and check reCaptcha.

That’s it. You are ready to test your app with the reCAPTCHA.

reCaptcha

reCaptcha example.

Looking for more examples? Check out our sample apps list. Every app has preconfigured app UI and app backend for you to try.

How to Install and Use the Cordova Background Plugin for Route Tracking

Every Appery.io app comes with the Apache Cordova library automatically installed. This means you have access to default Cordova APIs such as Camera, Contacts, Geolocation, and more. Many users also wanted to add 3rd-party Cordova plugins to the app. To make this process very simple, we’ve added a simple wizard. In this tutorial you are going to learn how to upload a Cordova plugin to your app and use it. You will build an app that will track your route and draw it on a map. The app will do this in the background. (This is a popular feature in fitness apps.)

Read the rest of this entry »

How to Query a Database by Date

Screen Shot 2015-06-25 at 1.28.03 PM

Selecting a date via a Datepicker component and querying a database by date is one of the most common tasks a mobile app will do. With Appery.io’s out-of-the-box cloud database and auto-generated APIs, querying the database is fast and simple.

Read the rest of this entry »