Tip: Need a Map in Your App? Just Use Our Ready-to-Go Component

Icon for a tipAppery.io provides a Google Maps component. It’s easy to add into your app: simply drag it on the page and configure it via the properties panel like any other UI component. Then, use the Google Maps API on the component via JavaScript to show directions, place markers, add layers (such as the traffic layer), retrieve user location via Geolocation, etc.

Tell me more.

For more tips…

Tip: Use Secure Proxy to Secure Sensitive Data by Keeping It on the Server

Icon for a tipAppery.io Proxy can be used for testing in desktop browsers to avoid cross-domain security problems. The proxy reroutes requests to services, so cross-domain security isn’t triggered. But, there’s more! You can use an advanced option in this feature to protect your secret keys, credentials, etc. from being accessed by app users.

Tell me more.

For more tips…

Tip: Use the Breadcrumb to Navigate within Screens in the Builder

Icon for a tipThe breadcrumb represents the sequence of components containing components leading up to the currently selected component in the screen you’re working on in the App Builder (for example, “outermost component name > name of component inside the outermost component > name of the component you’ve selected that’s inside this component inside the outermost component“). It’s displayed above the screen. When you select the name of any listed component in the breadcrumb, that component becomes the selected component. As you can imagine, this is a very useful feature for working within complex screens.

For more tips…

Tip: Add File Uploading to Your App Instantly with an Appery.io Plug-in

Icon for a tipTwo common ways to upload files in Appery.io apps are via the browser’s FormData API and via the Cordova file-transfer plug-in. To make it really easy to add file upload to your app, we package the “wiring” for both methods in a standard Appery.io plug-in. Once you load the plug-in, you can choose which method to use.

Tell me more.

For more tips…

Tip: Add Multi-language Support to Your Appery.io App in a Snap

Icon for a tipNeed to make your app’s UI available in different languages? Sounds hard? It isn’t. Just use the i18n JavaScript library. With Appery.io’s open architecture, you can easily add it in to your app; with Appery.io’s deep documentation, we can show you exactly how easy it is to incorporate i18n with Appery.io.

Tell me more.

For more tips…

Extending the Google Map Component with Custom JavaScript

Manipulating Appery.io Components with jQuery Mobile

Do you know how to take advantage of custom JavaScript when working with Appery.io visual components? You can easily access any Appery.io component in JavaScript via the Appery.io JavaScript API and manipulate it with the jQuery Mobile API. Here is an example of how to dynamically add items to a list using JavaScript. Read the rest of this entry »

New Appery.io Component: Contacts

Appery.io Mobile Apps Builder recently added a number of new components: Contacts, Geolocation, and Google Map. Contacts and Getlocation are new native components and are located in Device palette:
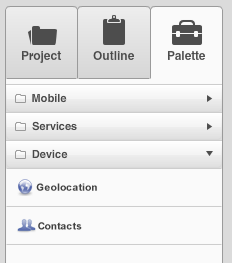
This post is going to show you how to use the Contacts component. Once a new mobile app project is created (make sure to select Blank Mobile App, from Native tab), simply drag and drop Palette > Device > Contacts component into the mobile screen. Once the component is added, it will be shown on the left-hand side.

To keep the example simple, we are only going to display name and phone number of a contact. To display the contacts, we are using a List component and placing two Labels inside it, one for name and one for phone number. It looks like this:
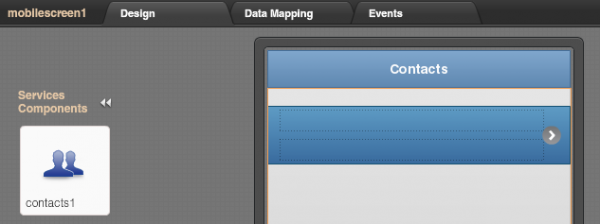
Notice that we also mapped the collection of all contacts (top most $) to the list component itself.

Next is we need to map the component output to the UI. Output mapping looks like this:
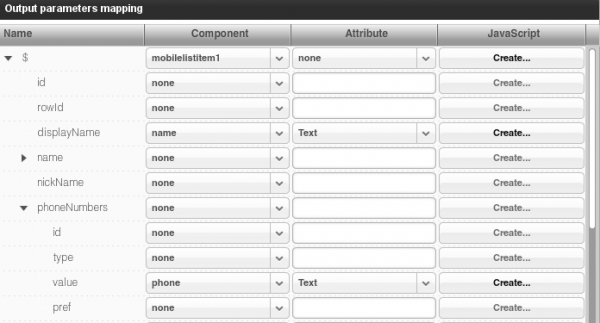
As you can see above, we are only mapping the contact name and contact email. Just a few more things left to do.

Add a button to load the contacts:

Add click event to the button and attach Invoke Service action, selecting the contacts service (contacts1).

We are ready to test. Because this is a device component, we would need to test the app on the actual device. But, there is an easier way to test this service. Open Project > Services > Contact service, then open Echo Service panel. You will see some sample date. Click Enable Echo.
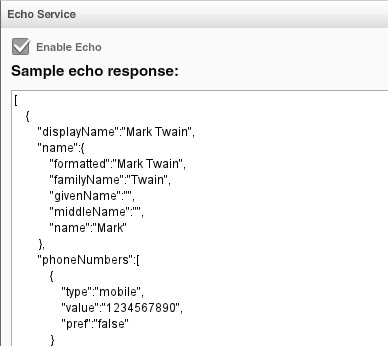
This is a sample contact data and a very simple way to test the app. Using this data we can now test this in the browser.

Click the big Test button to launch the app, the result will look like this:
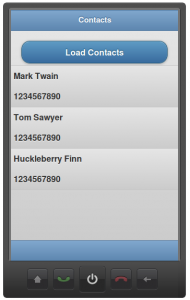
Now we are ready to try this using the contacts on the device. Simply turn off Enable Echo. Save. Now when you ran the app, it will load contacts from your device. The easiest way to run the app on the device is using Appery.io Mobile Tester.

REST API With Basic Access Authentication In Your Mobile App

In the context of mobile apps, basic access authentication is way for a Web browser to provide user name and password when invoking a REST service. A REST service that requires basic access authentication will look like this:


https://username:password@www.host.com/products

As you can see we are using https: and passing the username and password to the service.

Working with REST services (that return JSON or XML) is very easy in Appery.io Mobile Apps Builder. Appery.io comes with a service editor where you define service settings such as URL, and data format type (JSON, JSON, or XML). Request Parameters – for defining service inputs. Response Parameters – for defining service outputs.

Service properties for Twitter Search REST API:

Another very important feature of the service editor is the ability to test the service right from Appery.io. Here is an example testing Twitter search service:

From this screen you can also automatically create the service’s response parameters by clicking Populate Response Structure button.

Now, if you have a service that requires basic access authentication, you would simply enter the URL in the service settings:

The next step is usually to enter service request parameters and then test the service. But, when you test the service, the service will fail with a message like this:

Why does it fail? When you use a URL such as: https://username:password@www.host.com/products, basic access authentication is only supported by the Web browser. When you test the URL inside Appery.io, it does a regular GET request, without the basic access authentication and the service fails. When you run the actual app, everything should work, as request will be coming from the Web browser. We are looking at how to update the test feature to support basic access authentication.

What if you still want to create the service response parameters automatically? That’s still pretty easy to do. Run the service in Web browser. Copy the output. Open Response Parameters panel in service editor. Click Populate from Sample Response. Paste the response. Click Populate Response Parameters. That’s it. Again, keep in mind that when running the mobile app, everything will be working.

Setting Custom Image Background For Your Mobile App

A number of users asked us how to use a custom image as background for mobile app. We are working on this feature but a simple work around exists. We want to run a very simple jQuery CSS query when the mobile screen loads. First, add load event to the screen. Then, add Run Custom JavaScript action with the following code:

$('div[dsid="mobilecontainer"]').css('background-image',
   'url("http://www.sdcblog.com/wp-content/uploads/2011/06/italy.jpg")')

I removed the Header and Footer parts and also looking for mobilecontainer1, as this is the content where I want to set the background image.

The result (click image to view the app):


Image source: http://www.sdcblog.com/2011/06/italian-artchitecture-bellissimo/italy/