Building a Native App with Ionic, AngularJS, and Appery.io
For years, developers had to make a choice: build a single hybrid app with a so-so user experience, or build a native app for each platform with a great user experience. Developers don’t have to make this choice anymore. By integrating the Ionic SDK into Appery.io, developers can build enterprise HTML5/hybrid apps on a single code base that offer a native experience across all platforms. The Appery.io platform’s visual tooling lowers the skills barrier, empowering a broader base of developers and business analysts to create effective and intuitive mobile applications.
In this tutorial, you will use the Appery.io platform to build a mobile app. The tool set includes:
- Ionic – native-like UI components
- AngularJS – UI logic/binding
- Appery.io App Builder – cloud-based drag and drop designer
- Appery.io Backend Services – API backend for the app
What are you building?
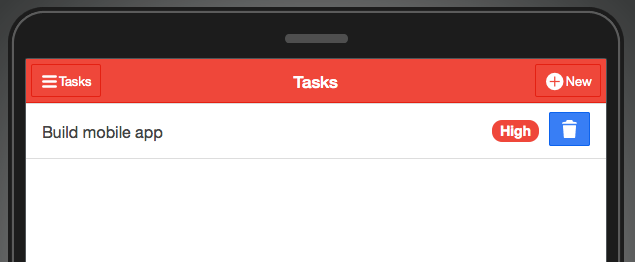
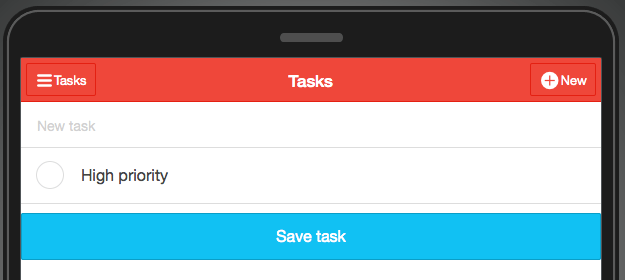
You are going to build a todo app. The app will have two pages. On the first page, you will be able to see a list of all tasks and also mark a task complete (delete it). On the second page, you will be able to create a new task. You can see how the app looks below. The first page lists all the tasks. You can also mark a task completed (delete it). On the second page you can add a new task.
-
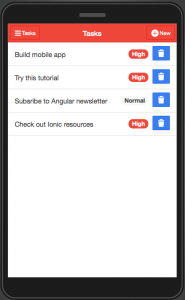
- Tasks page
-
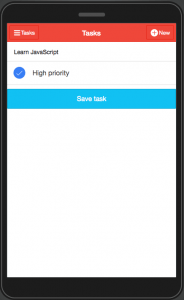
- Create new task page
Before you start
Starting is very simple. There is nothing to download or install (cool, right?). You only need an Appery.io account. If you don’t already have an account, sign up for the Starter plan (free).
Let’s get started!
The first step is to create a brand new Ionic app.
Creating a new app
Creating a new app is easy and simple, since there is nothing to download, configure or setup.
- From the
Appspage, click theCreate new appbutton - For app name, enter
TodoApp - Select
Ionic AngularJS Appand click theCreatebutton
In a few seconds, a new app will be created and you should see the following:
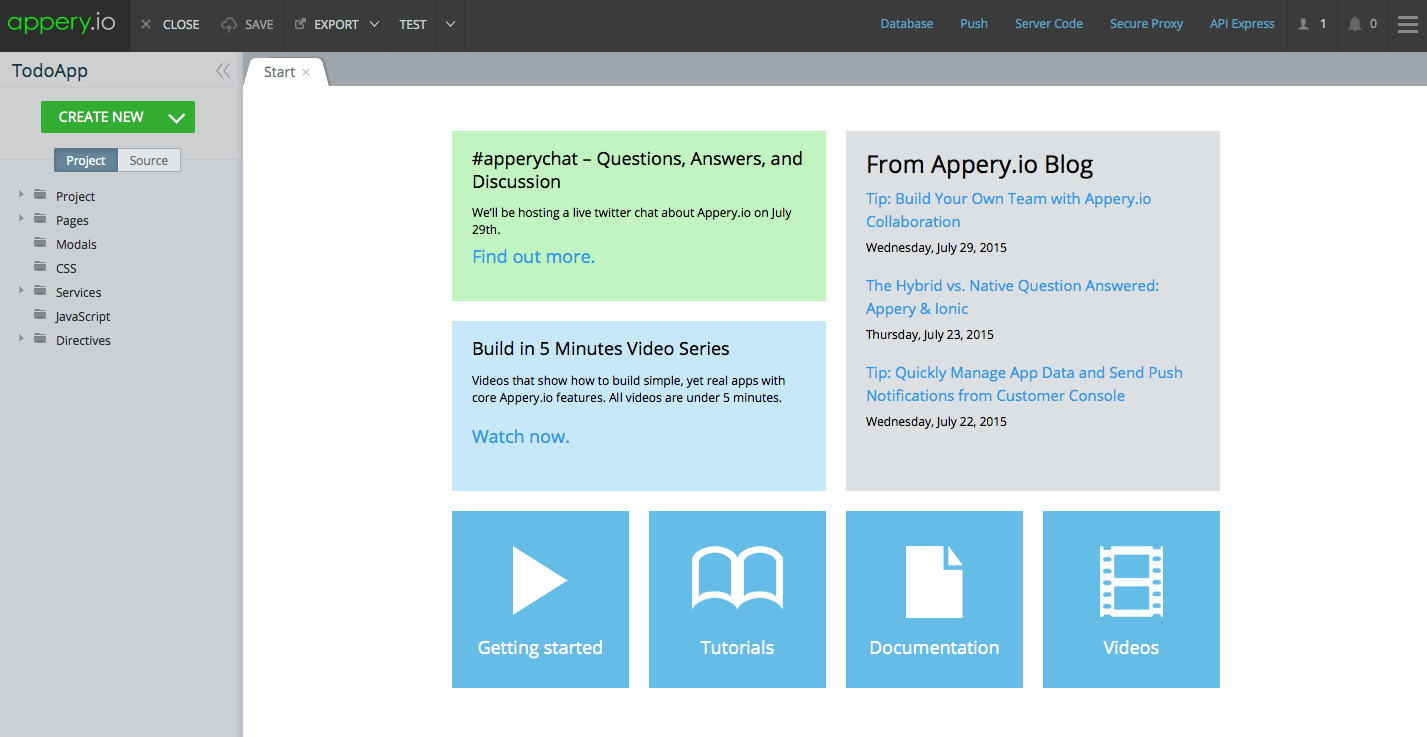
New Ionic app
Now that you have created a new app, next you are going to design the first page.
Designing the index page
Expand the Pages folder and click on the index page. The visual designer will load the page:
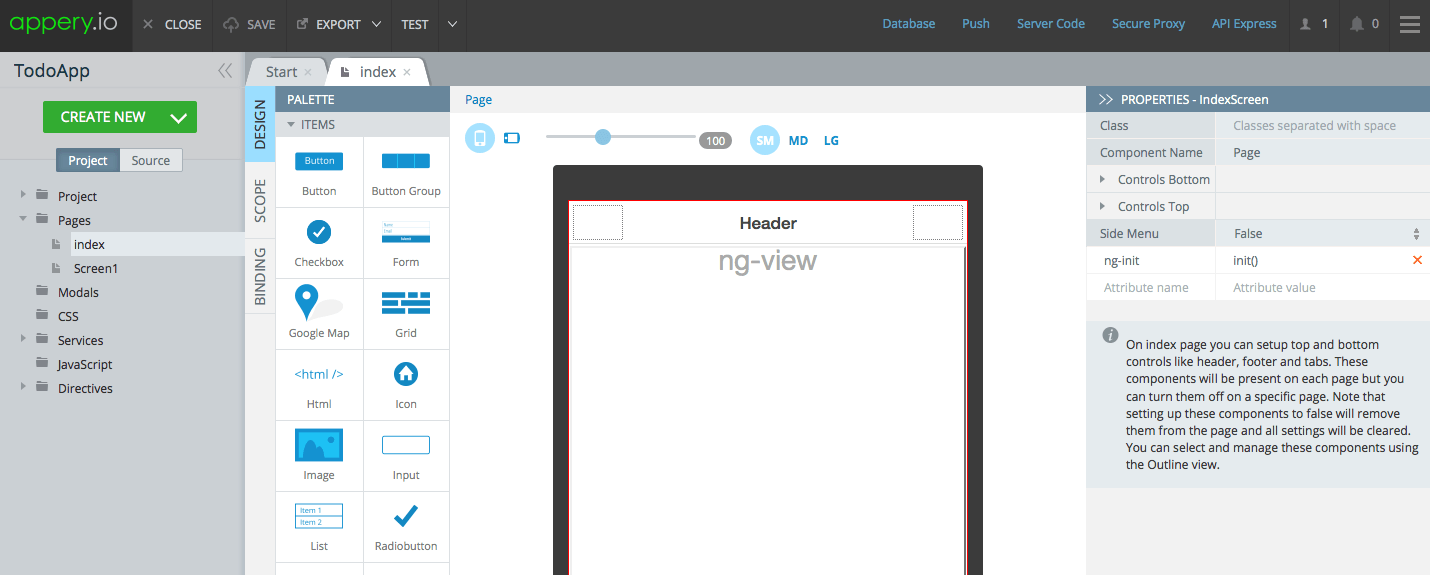
Visual designer
An Ionic/AngularJS app comes with an index page. This is the main template page that defines header and footer elements (can also define a side menu component).
This is a visual designer, so most of the app UI will be built using drag and drop. Let’s work on the header.
- Click the
Headercomponent, then inPropertiesview set theColorproperty toassertive. - Select the
Buttoncomponent and drag and drop into the left-hand box in the header. It should look like this: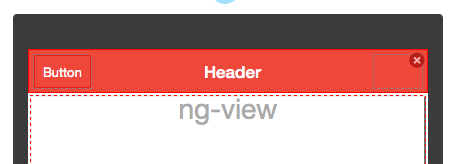
index page
- With the button selected, go to
Propertiesand change the buttonTexttoTasks. - Expand the
Iconproperty, click theNo iconbutton and set an icon for the button. Select theion-navicon-iconthat looks like this:

- Now you need to add one more button. Drag and drop another
Buttoncomponent and place it on the right-hand side in the header. - Set the button
TexttoNewand set the Icon toion-plus-circledthat looks like this:

This is how your page should look:
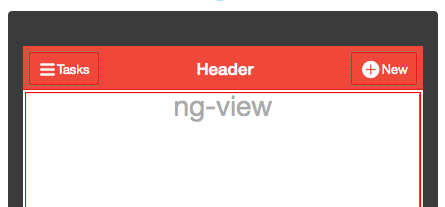
index page header
There’s just one more thing to do with the header. You want the header title to change based on the page currently loaded (the app has two pages: “tasks” and “create new task”). In order to change the title when the app is running, you need to bind the header to an AngularJS expression. When the app is running, the correct page title will be read from AngularJS scope and set in the page.
- Select the header and in
Propertiesview, set theTextproperty to{{header.title}}. This is an AngularJS expression. This means that the object header and its property will be resolved when the app is running. - Note the three tabs on the left side of the visual designer: Design, Scope, Binding. Open the
Scopeview. This view allows you to define AngularJS scope variables and functions. Theinit()function is already there. Click onEditbutton to open the function for editing. - Add these lines of code (in addition to the line already there):
$scope.header = {};
$scope.header.title = "Tasks";
This code creates an object that will be present in AngularJS scope and hold the current page name. The expression that you set above will then display the correct page name.
We are done with the index page. That was pretty simple, right?
Next you are going to work on a page that displays all the tasks.
Designing the tasks page
Every new app comes with two pages. The index page that you already worked on and also Screen1 page. First, let’s rename the page.
- Hover the mouse over
Screen1file name until you see a blue icon on the right. Click the icon and selectRename - Set the new name to
tasksand clickRename
You are ready to design this page. This page will have a list that will display all the tasks. Inside the list there will be a button to mark a task completed (delete the task).
- Open the tasks page.
- Drag and drop the
Listcomponent onto the page. The default list has three items. - As you will be loading the tasks from a database, you just need one list item. Select the third (last) list item. Two icons will appear in the upper right corner. Click on the red icon to remove this item from the list:
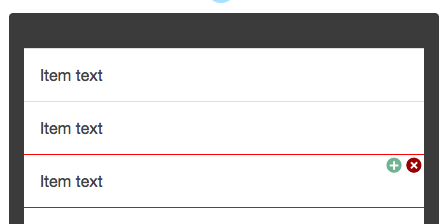
Tasks page
- Repeat the same for the the other item (leave only one list item).
You should have a list with just one item.
- Click the item, you will see two icons in the upper right corner. Click the plus icon and a button will be inserted in the list item.
- In
Properties, clear the buttonTextproperty. The expandIconand set the icon toion-trash-bicon. - Select the list item again and in
PropertiesexpandItem Badgeand set theTexttoHigh.
Your page should look like this:
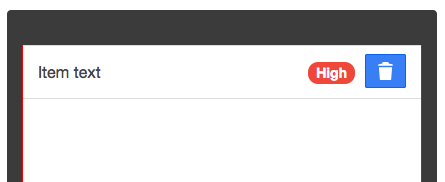
Ionic list
Testing the app: browser and device
You can test your app in the browser (desktop or mobile) and you can also test the app on device as a hybrid app.
Testing in the browser
Testing your app during development in the browser is super easy. There is a Test button in the App Builder that will launch the real app in a new browser tab. Your app should look like this:
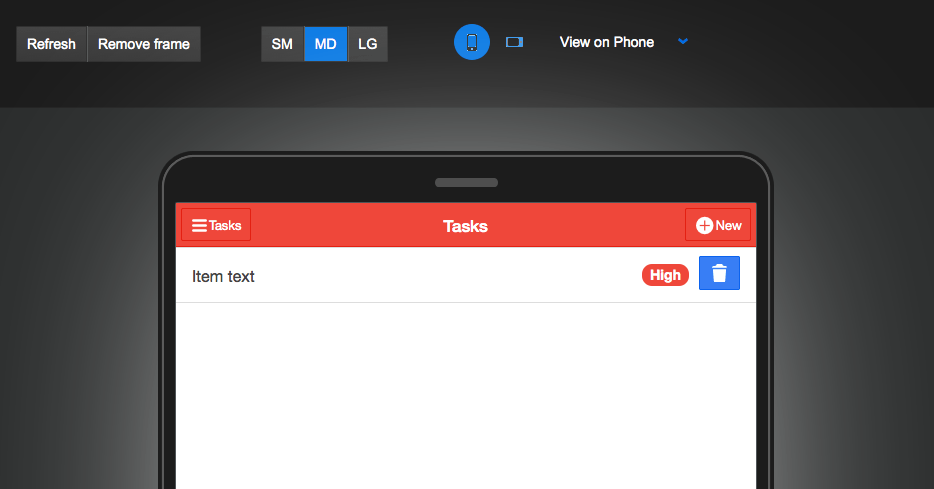
Testing in browser
Note that this is the real app running in the browser (this is not a simulator). If you would like, you can remove the frame by clicking Remove frame button.
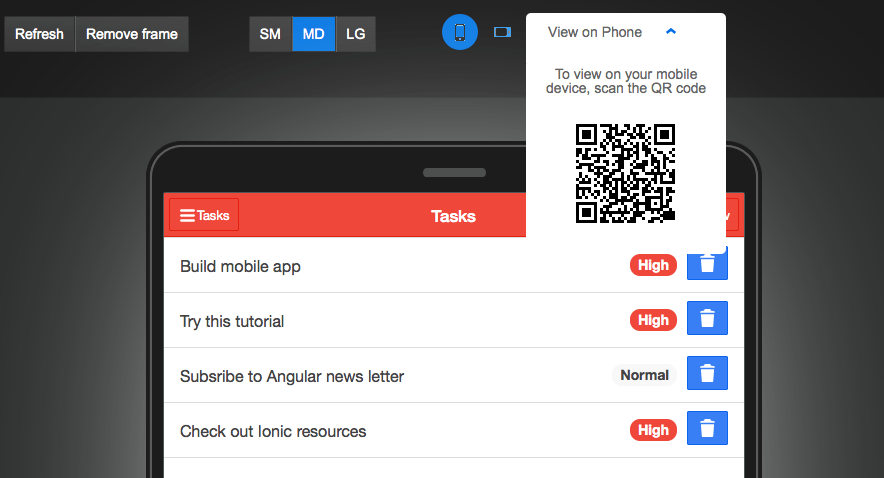
Browser on mobile device
Go back to the App Builder and expand the Test button menu. You will see there is an option to make the app public. Once you make the app public, go back to the test page and click on View on phone link. You will see a QR code. Scan this QR code with your mobile device (you will need an QR scanner app) and it will launch the app in the browser on your device.
Testing on device (hybrid app)
It’s also very simple to test the hybrid app on the actual device. To simply test on the device, install the Appery.io Tester app (available for iOS and Android). Once the app is installed, sign in with your Appery.io user name and password. You will see the app you created. Tap the app, and the hybrid version of this app will be launched on the device.
Now that you know how to test your app, let’s work on the second page where you will be able to create a new task.
Designing the new task page
On this page you will be able to create a new task, set its priority and save it.
- Select
Create new > Page. For page name enternewtaskand clickCreate Pagebutton - Drag and drop the
Inputcomponent - In
Properties, change thePlaceholdervalue toNew task - Next drag and drop the
Checkboxcomponent. Set itsTextvalue toHigh priority - Now drag and drop the
Buttoncomponent.- Set the
Textproperty toSave task - Set the
Widthproperty toBlock - Set the
Colorproperty tocalm
- Set the
Your page should look like this:
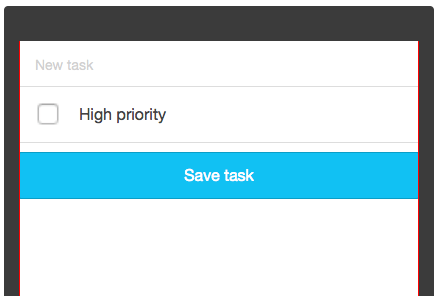
New task page
Now that you are done with the UI, next you are going to work on adding the app backend.
Adding app backend – database
You need a place to store the tasks created. For that you are going to use a cloud database.
From the App Builder, click on Database link in the upper right corner to launch the database console.
- From the main Database page, click
Create new databasebutton. For database name entertaskDBand clickCreate. - You just created a new database. Now you need to create a collection (table) to store the data. Click
Create new collection. For collection name, entertaskand clickAdd. A new collection has been created. - Now you need to add two columns to the collection.
- Click
+Col, for name entername. KeepTypeasString. - Click
+Col, for name enterpriorityand set theTypetoBoolean.
- Click
It’s very quick to enter sample collection data if you would like. Click +Row and enter any task description and select true if you want it to be a high priority task. This is how your collection should look:

Database
Now that we’ve got an app backend, let’s work on integrating this backend with the app.
Generating APIs to connect to the backend
What’s nice is that the database you just created is already exposed via REST APIs, and as you may have guessed, it’s also very simple to get these APIs.
- In the App Builder, select
Create new > Database Services. From the list of databases, select the database you just created. - Expand the task collection. Here you can select which API services to import (generate). You need three services:
Create,ListandDelete.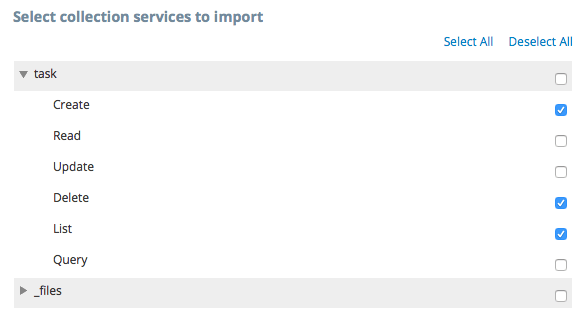
Generating API services
- Click
Import selected services.If you openServicesfolder you will see the API services you just created.
Any service can be quickly tested. Open the taskDB_task_list_service service, then open the Test tab. Click the Test button. You should see the sample data you entered when you created the collection
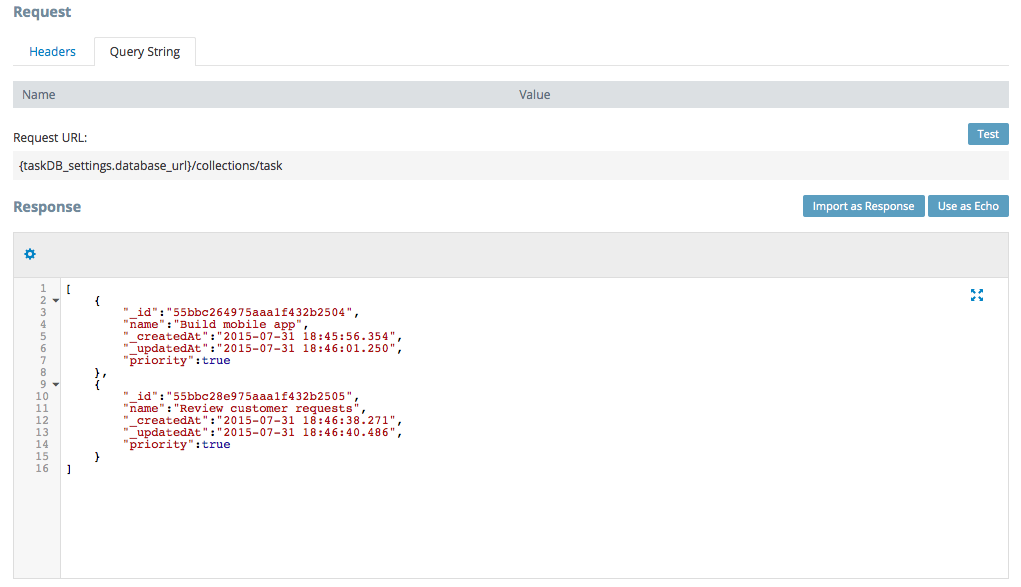
Testing REST API service
Before you use the services on the page, you also need to create the app model.
Creating an app model
An app model makes it easy to work with objects in the app that mimic the objects in the database.
- To create an app model open Project > Model.
- In the input field, enter Task and click Add.
- Now you are going to add three properties to the Task object. Click the Add button (on the right of Task) three times. Three properties will be added. Rename the properties to: _id, name, and priority. Only for priority, set the type to Boolean.
- You now need to create another object, a list that will hold a collection of tasks. In the top input field enter TaskList and click Add
- Change the Type to Array. A child element will be added.
- For the child element, change the Type to Task
Your model should look like this:

App model
You have a Task object and a list of Tasks.
Now you are ready to use services on the page.
Setting up API services on tasks page
Setting up a service on a page usually involves the following steps:
- Invoking the API from the page.
- Saving data from service into AngularJS scope.
- Using AngularJS expressions (
{{..}}), binding the page to the scope to display data.
Getting all the tasks from the database
When a user opens the app, you want to load all tasks from the database.
- Open the
taskspage. - Open the
Scopetab. The scope is where you will define scope variables and scope functions. - First you need to define a scope variable. On the left side of the scope editor, enter
tasksfor the variable name. Set theTypetoTaskList. It should look like this:
Scope editor
- On the right side of the scope editor, enter
loadTasksfunction name. Keep the type asScope functionand click Add. - Click
Editfor the function you just created. - Place the mouse cursor inside the editor and click on
Invoke servicesnippet button. Service invocation code snippet will be inserted. - Next you need to set the service name to invoke. Delete the
"service_name"(including quotes) and with the cursor between the brackets click ctrl-space to invoke code assist. SelecttaskDB_task_list_servicefrom the popup. You can also always enter the name by hand. Your function should look like this: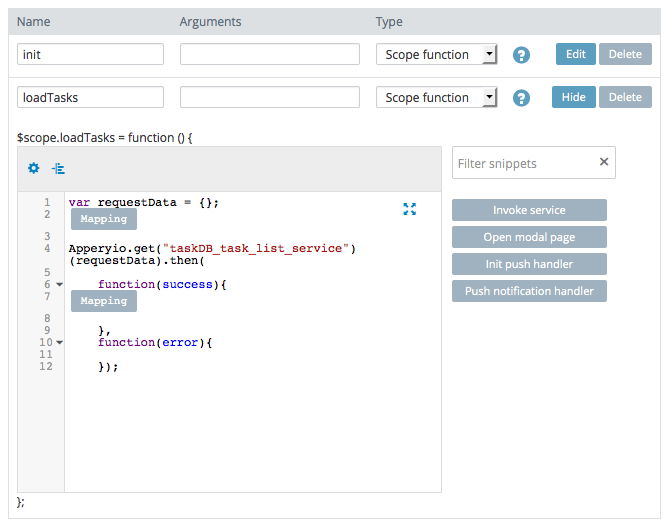
Scope editor – function
Next you are going to take the data returned from the service and map it to the scope.
You don’t need to create an AngularJS controller in Appery.io. A controller is automatically created for each page
You can quickly change how the Scope editor looks by selecting to show only Variables, Functions or both (Split). You can also position the view vertically or horizontally (default) by clicking the two buttons in the upper right corner.
Now it’s time to work on mapping.
- To save tasks into the scope, click the second
Mappingbutton the function code. This mapping is done inside the success promise. A visual mapping editor will open. Using drag and drop create the following mapping: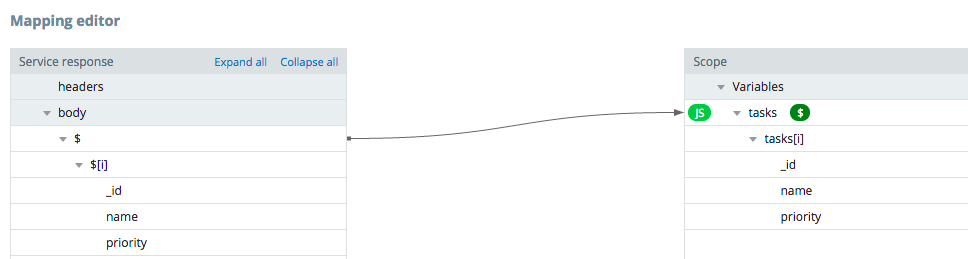
Mapping editor
- Click
Save and return.
You will go back to the function and you will see the generated code from the mapping you just completed:
var tasks_scope = $scope["tasks"];
tasks_scope = success.data;
$scope["tasks"] = tasks_scope;
This is how the complete function looks:
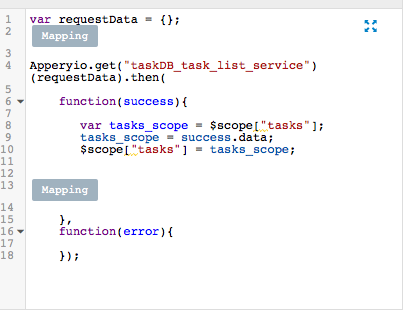
Scope function code
When you click on Mapping again, you won’t see the mapping connection that you created. In our next update, the mapping connection will stay there. If you need to make any changes to the mapping, you can delete the generated code and do the mapping again.
This is what happens:
- The service is invoked
- The data is copied to
tasksscope variable. - Once the data is in the scope, it’s available to be displayed on a page
- We don’t really handle a service (but you should in general)
Before you work on binding the UI to the scope, the init() function needs to be updated to invoke the function to load the tasks.
- Open
initfunction for editing - Add this line of code to invoke the function to load the tasks:
$scope.loadTasks();
Let’s work next on displaying this data.
- Switch back to
Designtab - Select the list item and in
Propertiesadd a new attribute by starting to typeng-, you will see a list of all available AngularJS directives. You can type the full attribute name (ng-repeat) or select it from the list. - For the attribute value, type
task inand activate code assist by pressing ctrl-space and select tasks. The complete value should be:task in tasks. - Now change the Text property of the list item to
{{task.name}}. - Expand the
Item Badgeproperty and set these values:- Set the Text property to
{{task.priority?'High':'Normal'}}. - Set the Color property to
{{task.priority?'assertive':'stable'}}.
- Set the Text property to
You can go ahead and test the app again in the browser or on the device. When you entered sample data you set both task to a high priority. Enter another task and don’t mark it as high priority. When you run the app it should look like this:
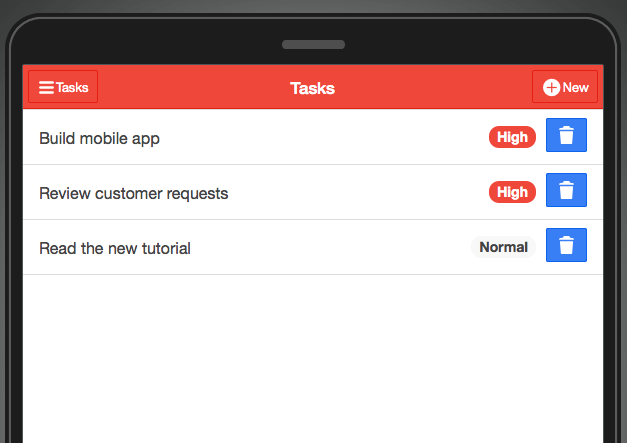
Testing tasks page in the browser
Now that the app displays all the tasks from the database, let’s work on marking a task complete – or delete it.
Marking a task completed (deleting)
When a user clicks on the icon with the trash can, the task should be deleted from the database. The first step is to create a function to delete the selected task.
- Open the
Scopeview. - Create a new function called
deleteTaskwithScope function(default) type. - To delete a task, you need to know which task to delete, thus you need to pass an id of the task to be deleted. Each function has an
Argumentsfield. For the function just created enteridin that field. - Click
Editto edit this function - If you remember, you imported a delete service to delete a task. The code to invoke the service can be quickly imported by clicking
Invoke servicecode snippet - The service requires the id of the task to be deleted so you need to pass it to the service. You will use the requestData object already there. Add this as the second line of code:
requestData = {"_id":id}; - Next you need to set the actual service name. Delete the
"service_name"value. You can use code assist (ctrl-space) to help you find the service name or enter it manually. The service name isTaskDB_task_delete_service.
Your code should look like this:
var requestData = {};

requestData = {"_id": id};

Apperyio.get("TaskDB_task_delete_service")(requestData).then(
   function(success){
   },
   function(error){
   }
);
There are two more things to do before running the app. First, when a task is deleted, you need to update the list in the app. If the delete is successful, you want to refresh the list. Add loadTasks() function in the delete service success promise. This is how the final code looks:
var requestData = {};

requestData = {"_id": id};

Apperyio.get("TaskDB_task_delete_service")(requestData).then(
   function(success){
      $scope.loadTasks();
   },
   function(error){
   }
);
Second, you need to bind the delete button to this function.
- Switch to
Designview. - Select the delete button.
- In
Properties, set the value ofng-clickattribute todeleteTask(task._id). You can use code assist (ctrl-space) to help you with function selection.
Go ahead and test the app. Try deleting an item. You are going to work on the add task functionality next. For now, you can quickly add a new item by entering it directly in the database. For example, this is how the app looks after deleting two tasks:
Testing in the browser
Now that you got the tasks page done, it’s time to wire everything for the new task page. But first navigation has to be added to the app.
Setting up navigation
There are two buttons in the header that you need to setup for navigation. Tasks button will navigate to the tasks page and New will take you to newtask page.
- To setup navigation or routing in AngularJS terms, open
Project > Routing. You will see the default route there. It shows the page to load when the index page is loaded or when you launch the app. - Instead of
Screen1default route name, change it to a more appropriate name:tasks. - Enter new route name
newtask. - For page, select the
newtaskpage and click Add.
The final routing should look like this:

Routing editor
Now that you defined navigation, let’s wire the actual buttons. As the app uses the index template, it’s easy to define navigation in just one place. Furthermore, to simply navigation, Appery.io makes a custom AngularJS directive to navigate from one page to another available called navigate-to. This directive is used like any other AngularJS directive such as ng-click or ng-repeat. You set it as an attribute.
- Open
indexpage inDesignview - Select the
Tasksbutton - In
Propertiesaddnavigate-todirective and set its value totasks(that’s the route name). For directive name you can use code assist (ctrl-space) or just type the entire name. - Repeat the same
Newbutton, setting the route name tonewtaks.
You can test the app. When you click on New button you should see the newtask page:
Testing newtask page
You are almost done. Next you are going to work on saving a new task into a database.
Setting up API services on newtask page
Here you will get the data from the page, pass it to the service which in turn will save it into the database. Once the save is successful, you will navigate to the tasks page to see the newly added task.
- Open
newtaskpage and switch toScopeview - Create a scope variable to hold the input form the page. Name it
taskand set type toTask.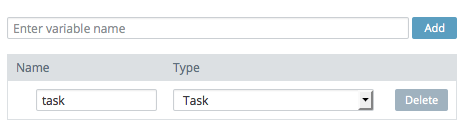
Scope editor – variables
- Now it’s time to add a function. Add a function called
addTaskwith defaultScope functiontype - Open the function for editing
- Insert
Invoke servicecode snippet - Change the service name to
TaskDB_task_create_service
Now you need to map the data from scope and pass it to the service. As before, instead of writing code, you can use a visual mapping editor.
- Click on the first Mapping box inside the code editor. A visual mapping editor will open
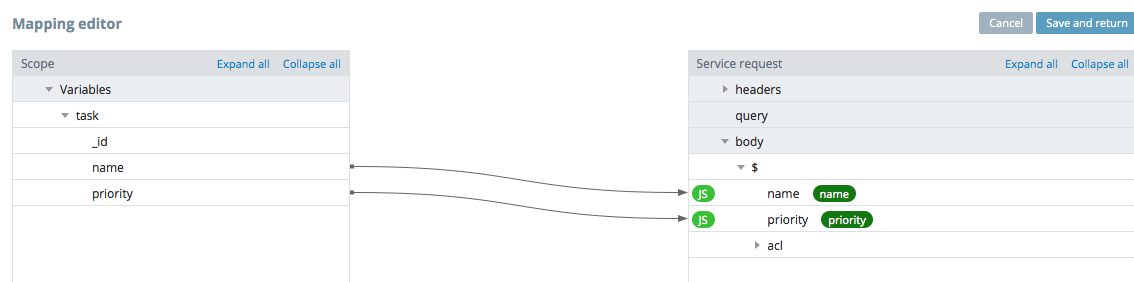
- Using drag and drop, create the following mapping:
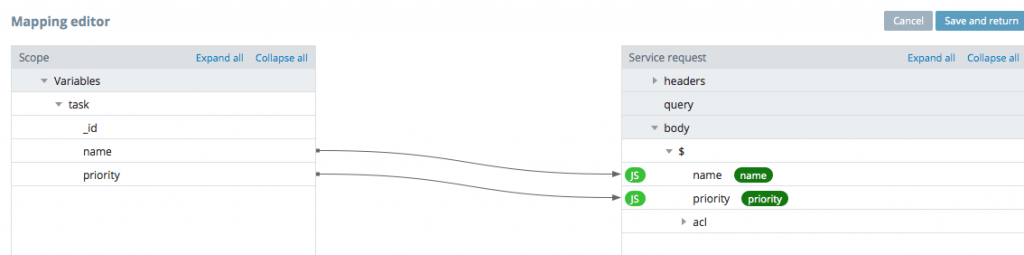
Mapping editor
- Click
Save and returnto go back to Scope editor. The mapping code is automatically generated. - You want to navigate to the
taskspage once a new task has been successfully added. To do that, addApperyio.navigateTo("tasks");in the services’ success callback.
Your final code will look like this:
var requestData = {};
requestData.data = Apperyio.EntityAPI('TaskDB_task_create_service.request.body', undefined, true);

var task_scope = $scope["task"];
requestData.data.name = task_scope.name;
requestData.data.priority = task_scope.priority;

Apperyio.get("TaskDB_task_create_service")(requestData).then(

   function(success){
      Apperyio.navigateTo("tasks"); // navigation
   },
   function(error){}
);
Now you need to bind the page to the scope, as well as the button.
- Switch back to Design view.
- Select the input field and set its
ng-modelattribute totask.name. This will bind the input to the Task object in scope. - Select the check box field and set its
ng-modelattribute totask.priority. - Select the button and set its
ng-clickattribute toaddTask().
Just one more thing left to do: when you navigate to newtask page, the header title says Tasks. It should say New task.
- Switch to Scope view and open the init function for editing.
- Add this line of code to change the header title:
$scope.header.title = "New task";
Now you are done and ready to test the app.
Testing the app
You are done with the app and would like to run it. As we mentioned earlier in this tutorial, there are a number of ways to run this app.
Via the browser
You can quickly test in the browser by clicking the Test button.
To simplify launching the app on the device in the browser, you can scan a QR code (requires a barcode scanner app) and test the app on your device.
Launching the app via QR code
Don’t forget to make the app public inside the App Builder when testing on the device.
As hybrid app, on device
Ionic is the missing SDK for native apps and so you want to test the app on the device. That’s easy to do with the Appery.io Tester app. The app is free and available for iOS and Android. The tester app allows you to test the native apps and any native APIs without installing the app on the device. This is how the app looks when testing on Android:
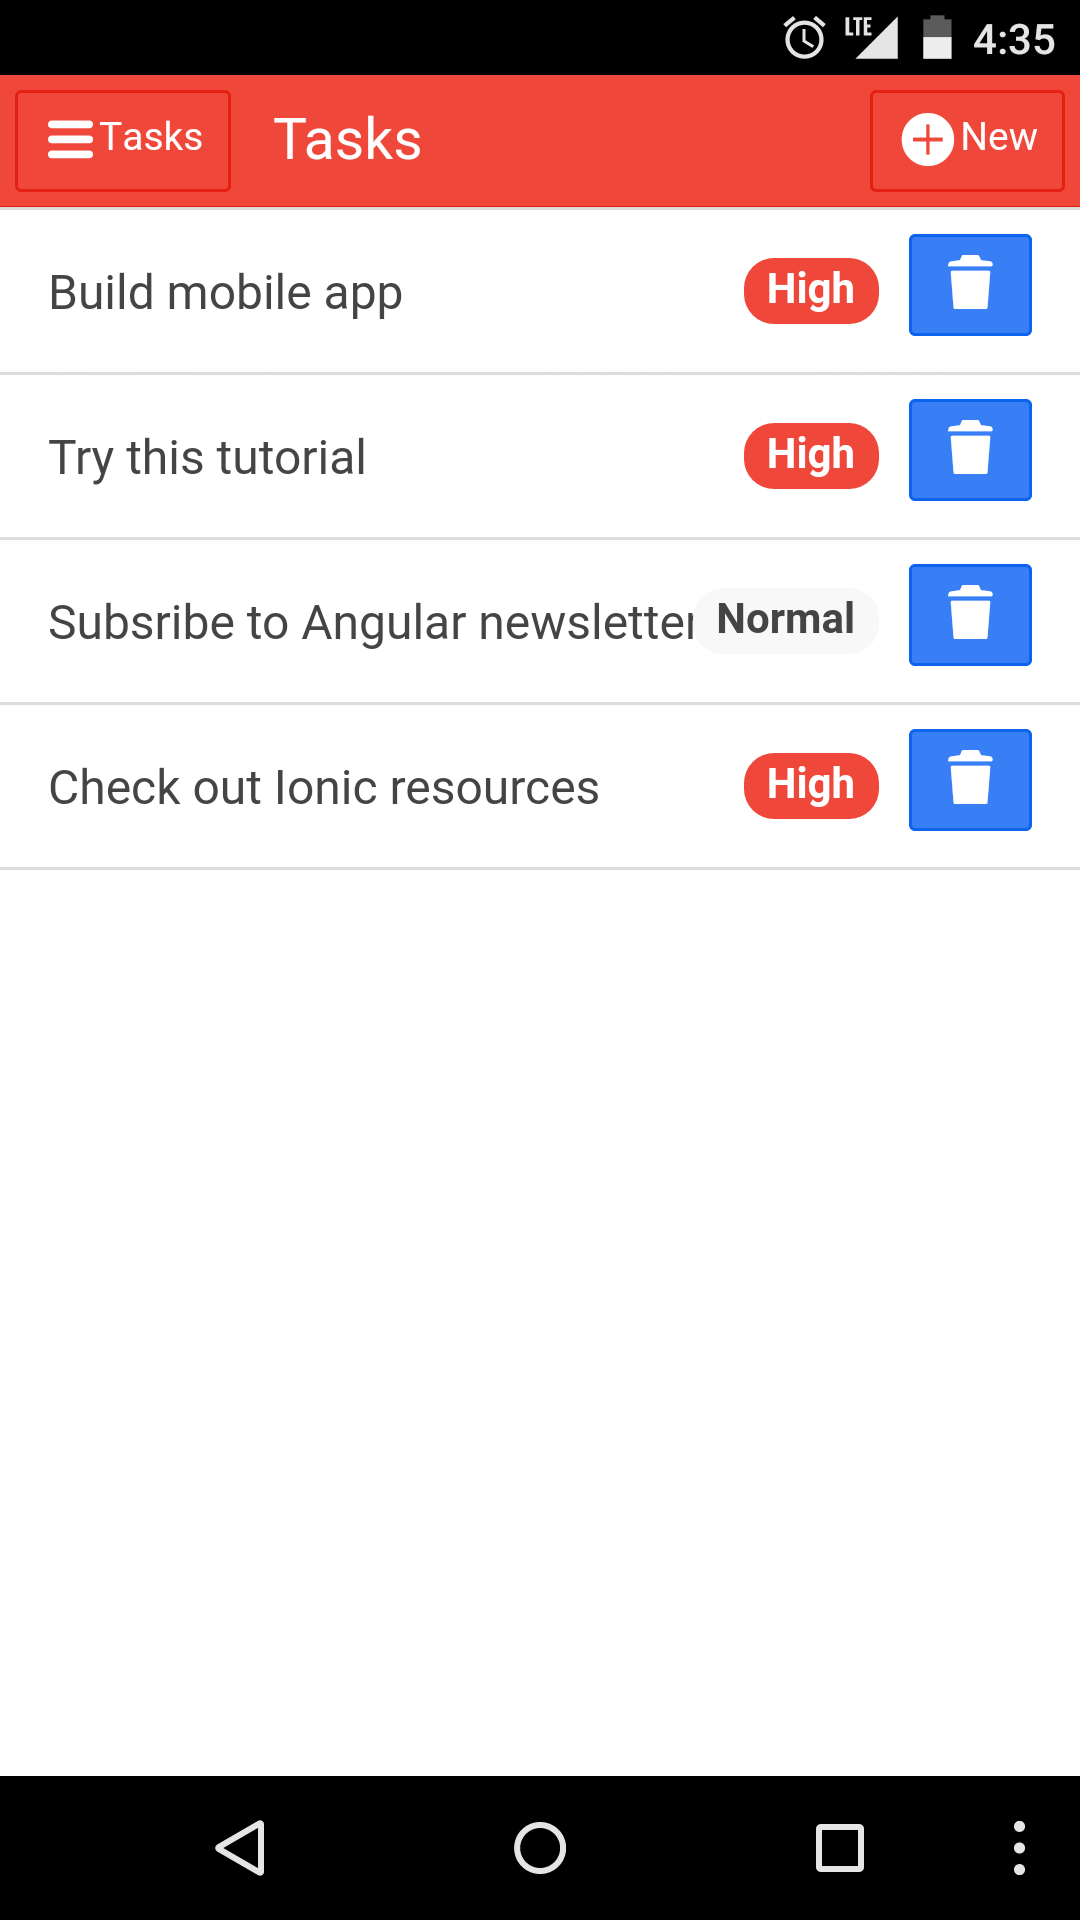
Testing on device
Installing on the device
Another option is to install the app directly on the device. That’s also pretty simple to do, since Appery.io will create a binary file that’s ready to be installed on the device. To create the binary file, click Export in the App Builder:
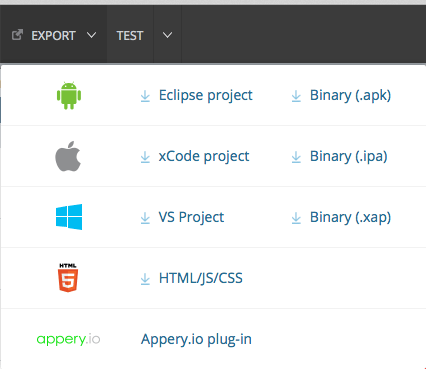
Export menu
The Appery.io cloud build service will quickly build a binary file that’s ready to be installed on a device or uploaded to the app store.
Every Appery.io apps bundles Apache Cordova. This means you can also use any Cordova APIs such as Camera, Contacts and others.
As you can see, building an app with natives APIs is also simple.
Getting app backup
We hope you will try this tutorial, but if you would like to try this app right away, you can download the app backup and create a new app from it (Create new app > From backup). Please complete the database setup as described in this tutorial. In the database console, go to Settings tab and copy the database API key. In the App Builder, open Services > TaskDB_settings and paste the API key for database_id.
Summary
This tutorial has showed you how to quickly build an app with a native user experience with Ionic, AngularJS, and Appery.io.