How to Build Mobile Apps Fast with Appery.io and Instant API
![]()
Instant API is a true API-as-a-Service which makes it easy and cost-effective to build an API. Instant API has simplified all of the key areas of an API’s lifecycle, covering API creation, hosting, management, discovery, monetization, and documentation.
For example, let’s say you have information and services or data and services you want to expose through an API that can be used internally for BYOD initiatives or externally by developers or your business partners. With the API deployed, you still don’t have a mobile app. That’s where the Appery.io platform comes in. Appery.io makes it very easy to build mobile apps with any API. Combine the Instant API exposed APIs with the Appery.io cloud-based development platform, and you get a fast way to build a complete solution and deploy the mobile app.
In this post, we are going to show you an example of how to do that, but first here’s the info for an upcoming webinar in which Appery.io and Instant API will demo this process in action.
Webinar
Sign up for our joint webinar for a live demo and Q & A:
How to Build and Deploy a Complete Mobile App with Appery.io and Instant API
Tuesday, Mar 10, 2015 11:00 AM – 12:00 PM PDT
An Example of How It’s Done
In the rest of this post we are going to show you an example of how to expose a relational database via REST API and then use Appery.io to build a mobile app with that API.
Getting started
The first thing is to sign up for Appery.io and Instant API accounts (if you already have an account you can skip to the next section)
- Sign up for Appery.io Starter plan (free)
- Sign up for Instant API (free)
- If your account is not instantly activated, please email team@instantapi.co to get priority access
Creating an API with Instant API
The first step is to expose a database via REST API. Instant API makes it very easy to do this. We will first connect to a database and then define a REST API. That database we are going to use holds information about nutrition/energy drinks.
Connecting to a database
- From Instant API dashboard select API Creation > Backend Services
- Click Add Data Silo
- Select My SQL database
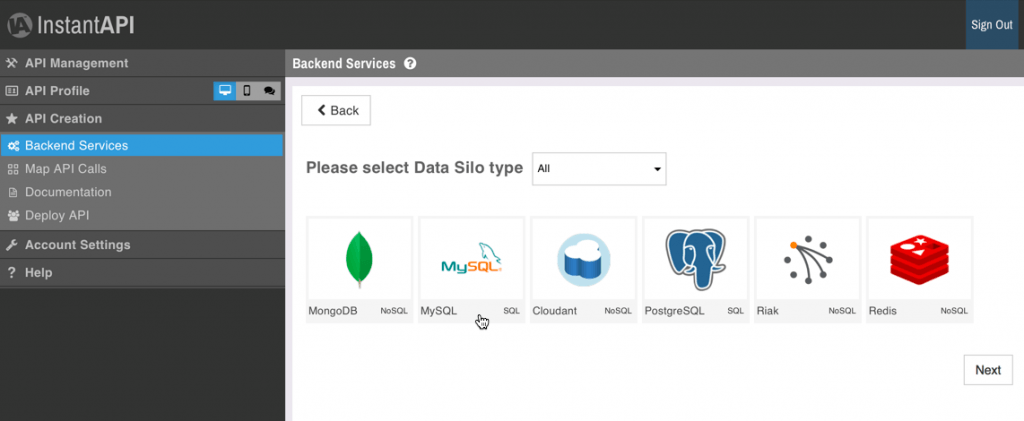
- Next enter the following information:
- Name: nutrition
- Address: http://mysql.demo.instantapi.co
- Port: 3306
- Username: iademo
- Password: iademo
- Database name: nutrition
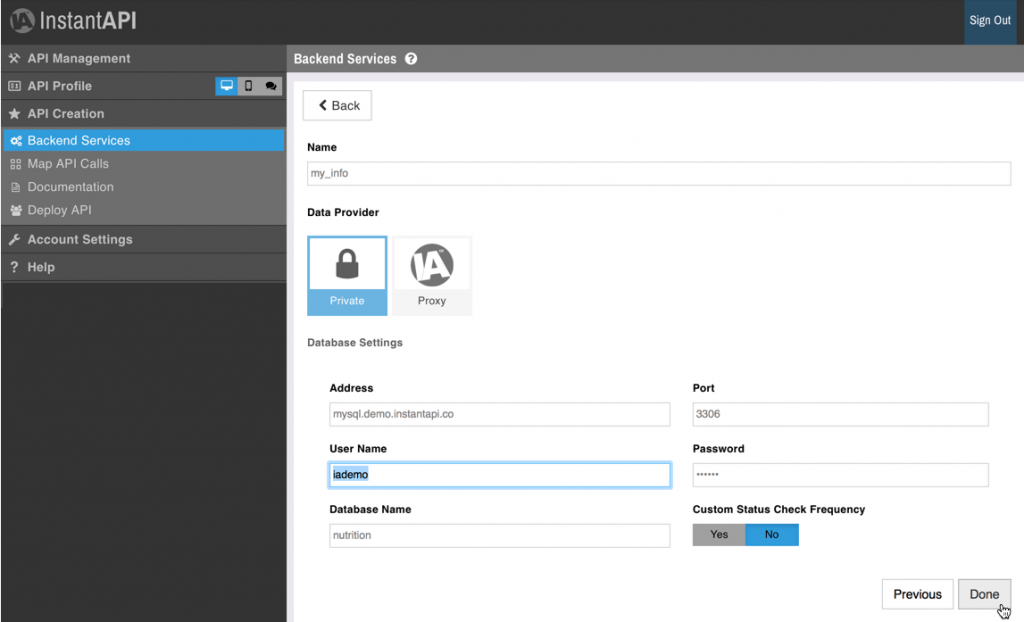
- Click Done, and a quick connection test will be made, if successful your data silo configuration will be saved and ready for use.


Creating an API
Now that we have connected to a database we can create an API
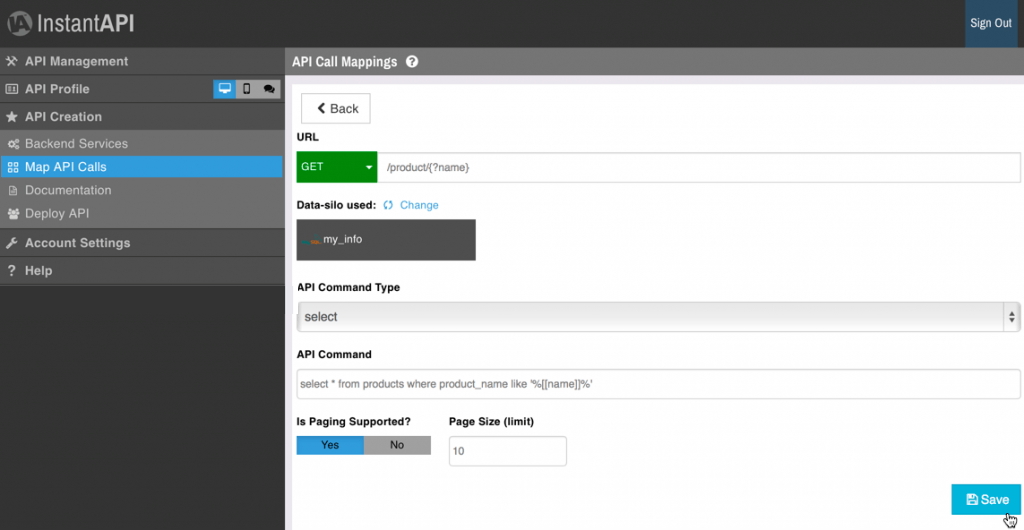
- From the dashboard, select API Creation > API Call Mappings
- Click Add API Call
- Next enter the following information:
- URL end point enter: /product/{?name}
- Click on the data silo created in the previous step: my_info (that’s the data source which has a connection to our database)
- Command Type: select
- For the actual query Command set: select * from products where product_name like ‘%[[name:string]]%’

- Click Save to save this API and its mapping to the database
- Should you want paging support, you can turn it on by selecting Paging support
Deploying the API
Now that we have created an API, the next step is to deploy the API.
- From the dashboard, select API Creation > Deploy API
- Click Deploy > Create New Version
The API is now deployed.
Testing the API
With the API deployed, we can run a quick test.
- From the dashboard, select API Creation > Documentation
- Select API tab (at the bottom)
- Click on the API end point, then click on Make API call
- For name enter: monster, click Continue. You should see a result with 14 records found. You can try another drink, such as red bull
To summarize, we connected to a relational database, created a REST API service that’s mapped to a SQL query, deployed and tested the service. With the REST API up and running, we are ready to build a mobile app that uses this API.
Building a mobile app with Appery.io
In this section we are going to show you how to build and publish a mobile app with the just created REST API
Creating a new app
The first step is to create the app
- From the Appery.io Apps tab, click Create new app.
- For app name enter: NutritionApp and click Create
Building UI to search for drinks
- Once the visual app builder loads, open Pages > startScreen.
- Using drag and drop visual app builder create the following UI:

- Page header set in caption
- Input component with placeholder set to Search
- Button (inline option on)
- List (with one item)
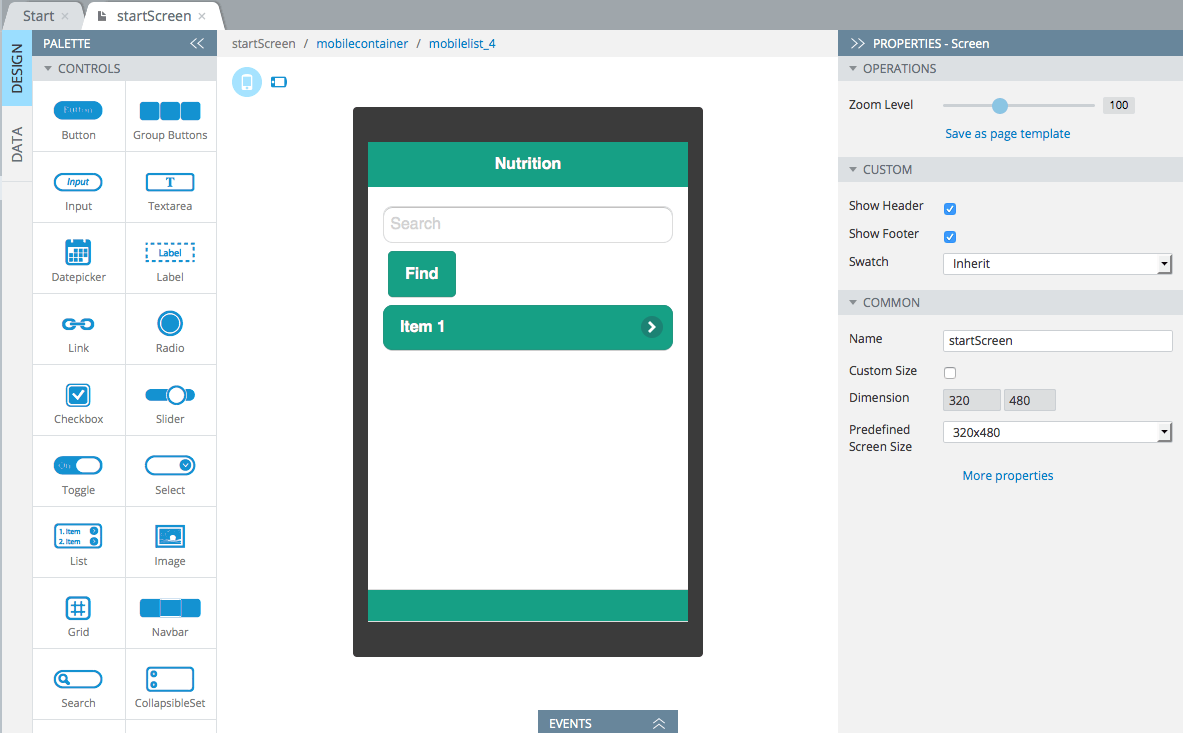
That’s all for the first page.
Testing the page
Testing the app is incredible easy. Simply click the Test button in the menu to launch the app in the browser. If you would like to test the app on a mobile device, expend the Test menu and click Public. You can now scan the QR code to launch the app on a mobile device.
Creating the drink details page
- Click Create new > Page. For page name enter: details and click Create
- Using drag and drop visual app builder create the following UI:
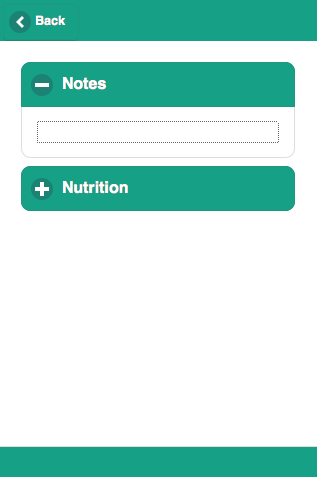
- Delete caption – we will display the selected drink name there
- Turn on the back button
- There are two Collapsible components, both include a Label component
- Optionally, you can collapse the Nutrition block (select the component root and set Collapsed to on)
We are done with the second page. Next we are going to work on defining data model in the app
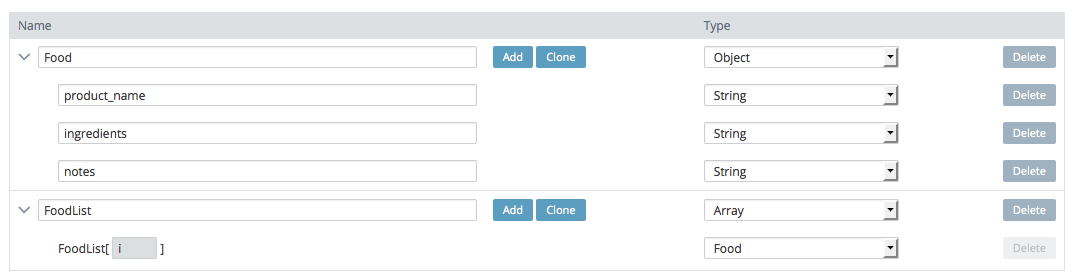
Creating app model
Before we define REST API services in our app, we are going to create a model. The app model allows us to mimic the database design and will simply app development. For instance, we will be able to load all the data for a particular search and store it in the app.
- Inside Appery.io app builder, open Project > Model and Storage
- Inside the Model tab define the following objects:
- Food (Object)
- Food object has the following properties:
- product_name (type: String)
- ingredients (type: String)
- notes (type: String)
- FoodList (type: Array). This array will host a lost of Foods
The result should look like this:

- As we will be storing the data in local storage, we need to create local storage variables. Switch to Storage tab
- Inside the Storage tab define the following objects:
- foodList (type: FoodList)
- selectedFood (type: Food)
We are done. We just defined the app model and are ready to define the REST API service.
Defining REST API
Let’s go back to Instant API and look at the service Curl command to help us define the service in Appery.io builder.
- From the dashboard, select API Creation > Documentation
- Click on the API end pointed we defined earlier (/product{?name})
- Click Make API Call
- Enter: Monster and click Continue
- You will see the response in the Response tab. Switch to Sample Code tab to see the Curl command that will help us define the service
- In Appery.io app builder, click Create New > Service
- For service name enter: NutritionInfo and click Create
- In service editor Settings tab enter the following values:
- URL: https://api.instantapi.co/v1/product
- Switch to Request tab and enter the following values:
- In Query String tab: name (leave Value blank)
- Switch to Headers tab and create: apikey
- We need to set the API key value. From Instant API dashboard select API Management > Dashboard > API Keys. Copy and the API key and set it as value for apikey header parameter
- We are ready to test the service. Switch to Test tab, enter Monster and click Test. You should get the service response (14 records)
- Click Import as Response to define the service response based on the response JSON.
We are done defining and testing the service.
Binding the service to the page
- Open startScreen and switch to DATA tab
- For datasource select Service > NutritionInfo, click Add
- Rename restservice1 to info_service
- Next we need to map the service input. Click Mapping for Before Send event
- Define the following mapping:

- Click Save and return
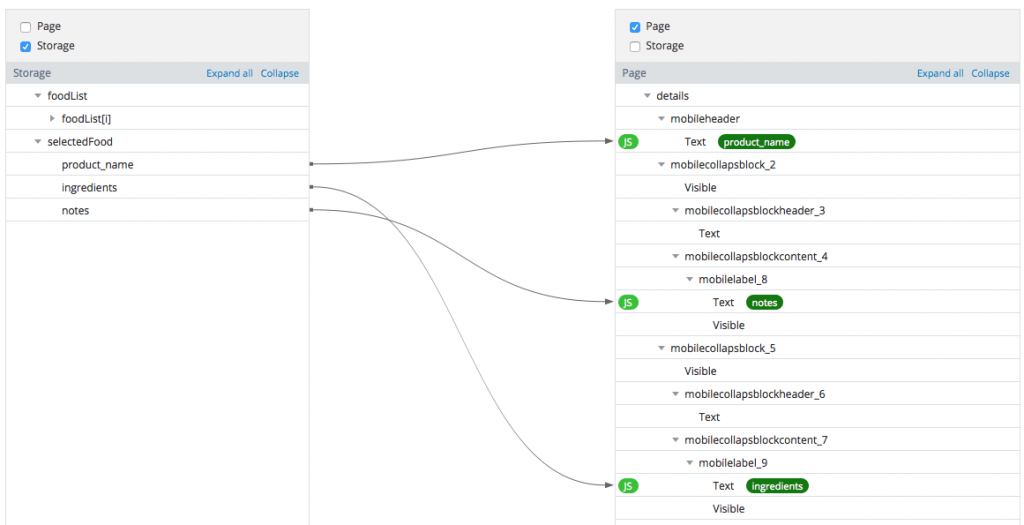
- Open Mapping for Success event
- Define the following mapping (check Storage option on the right side):
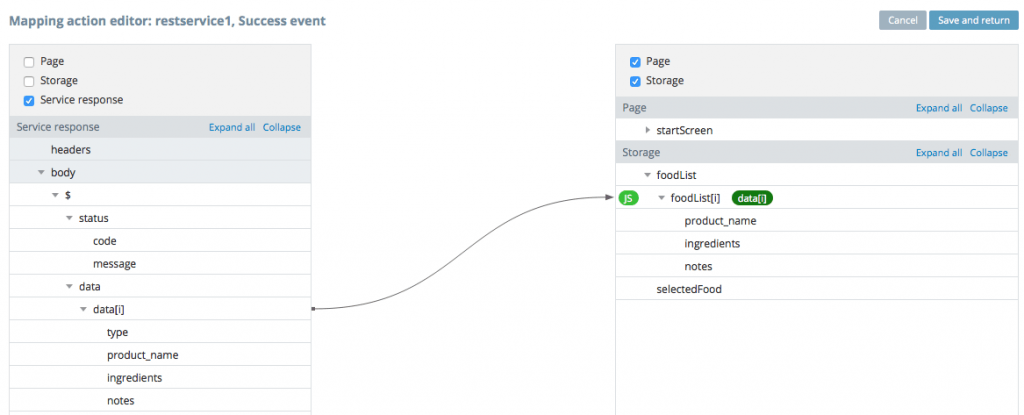
- When the service is invoked we save the search result into local storage (the model we defined earlier)
- Click Save and return
- Once the data is in the model we want to display on the page. In Success event row, click Add > Mapping.
- Define the following mapping:
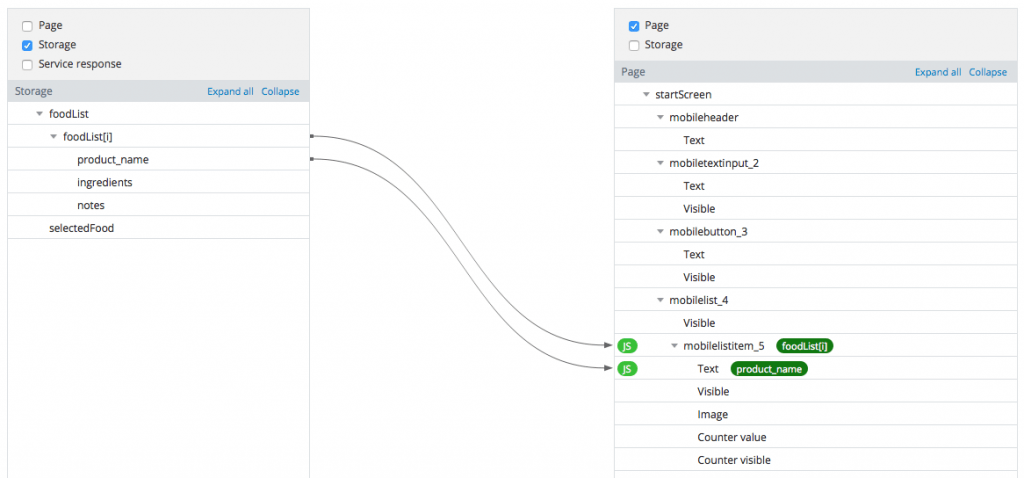
- Note that mapping is done from the Storage to the page
- Click Save and return.


Just one more step before we can test the app
Invoking the service
- Switch to DESIGN tab
- Select the button (Find) and open the Events tab
- Add the following action (button and event should already be selected):
- mobilebutton_x > Click > Invoke service > nutrition_info > Save
Testing app
Click Test to launch the app in the browser. Enter monster for input and you should see the result displayed in a list
Displaying item details
All is left is to display drink details on the second page. First we need to know which item was clicked in the list. To do that we are going to add a small JavaScript snippet.
- Open startScreen > DATA > click second Mapping in Success event
- Click JS icon for the first connection (mobilelistitem_x)
- Enter the following code:
element.on(“click”, function () {
Apperyio.storage.selectedFood.set(value);
});- This code adds a click action to each item and when the item is clicked we will store the item into local storage variable (we defined it earlier)
- Apperyio.storage — is a wrapper on top of local storage API
- Click Save and then Save and return
- Switch to DESIGN tab
- Select the list item and open Events tab
- Add the following action (listitem and event should already be selected):
- mobilelistitem_x > Click > Navigate to page >details > Save
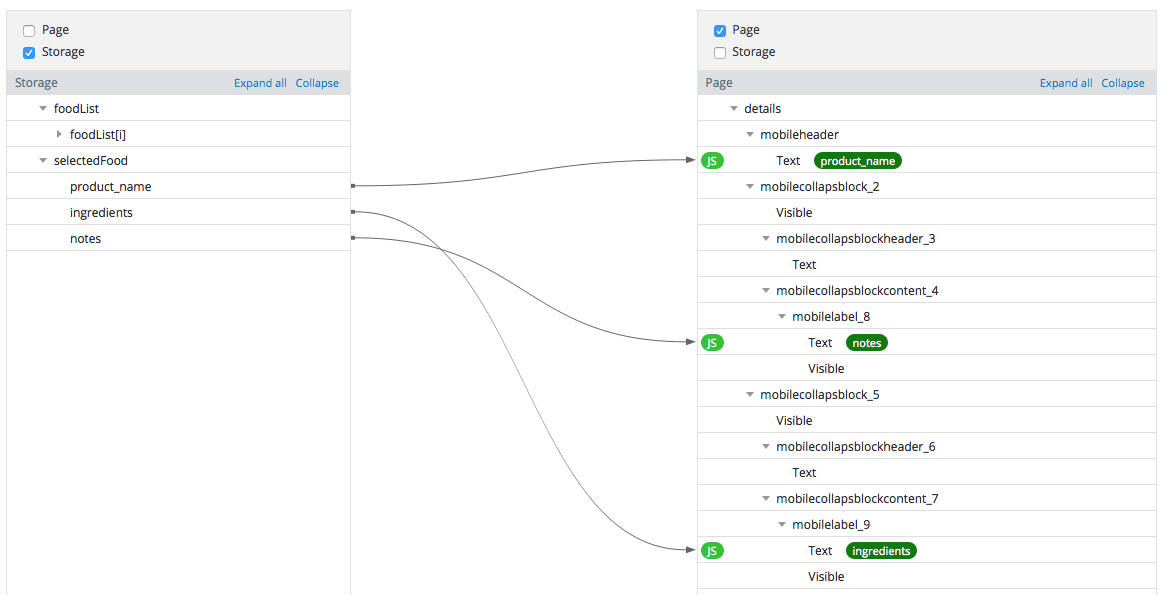
- Open details page
- Select details in breadcrumbs
- Open Events tab
- Add the following action (note that we change the event from Load to Page show):
- mobilebutton_x > Page show > Mapping
- Define the following mapping:
- We are mapping from a value saved in local storage to the page
- Click Save and return
Testing the app
Click Test to test the final app in the browser
Publishing the app
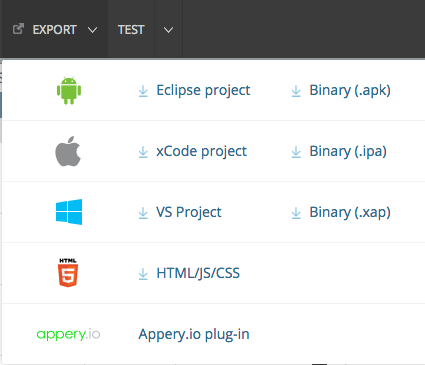
Now that you are done with the app you can build a binary for iOS, Android or Windows Phone. To package the app for one of the platforms click the Export button:
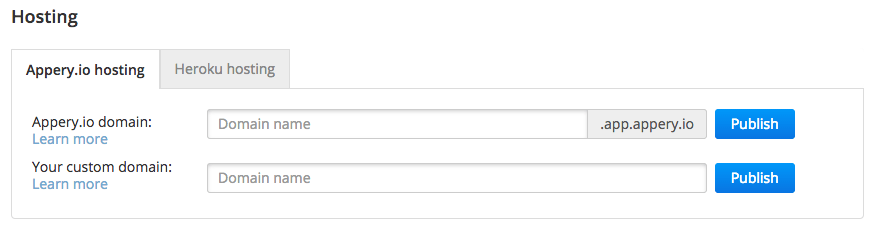
Alternatively, you can publish the app as mobile web app that has a custom URL. To do this exit the app builder and go to Hosting section. You can us an appery.io domain or enter a custom domain name:
Summary
Instant API is an easy-to-use and cost-effective service for creating and managing APIs. Combine it with Appery.io development tools — and you get a high-productivity platform for creating enterprise mobile apps.
Learn More!
Sign up for our joint webinar for a live demo and Q&A:
How to Build and Deploy a Complete Mobile App with Appery.io and Instant API
Tuesday, Mar 10, 2015 11:00 AM – 12:00 PM PDT