Appery.io + Pollfish: How to Integrate a Pollfish Survey into Your App
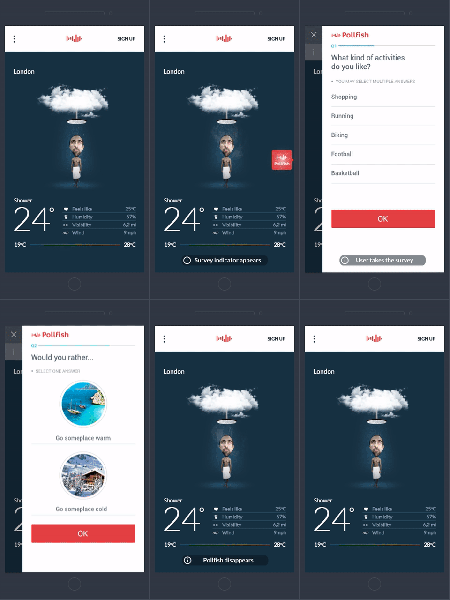
Our friends at Pollfish, a survey platform company, created this guide to help you monetize Appery.io apps with Pollfish surveys. Integration takes only a few minutes and can boost your revenue up to 20x more compared to any other traditional advertising format out there.

Check out the steps below to create a Pollfish app and integrate it with Appery.io Ionic app.
1) Obtain a Developer Account at Pollfish
Register as a Publisher at: www.pollfish.com/publisher
2) Add new app in Pollfish panel and copy the given API Key
Login at http://www.pollfish.com/publisher and add a new app at Pollfish panel in section My Apps and copy the given API key for this app to use later in your init function in your app.
3) Download Pollfish plugin
Go to Pollfish plugin page and download it as a zip file.
4) Uploading Pollfish Plugin to Appery.io
As described on Custom Plugin’s Documentation page on Appery.io () you need to upload Pollfish plugin first.
- From the platform main dashboard (not in the App Builder), go to Resources > Cordova Plugins.
- Click Import Cordova plugin.
- Click Choose file and upload the Pollfish plugin file you downloaded in previous step.
- Click Import plugin. The plugin will appear under Cordova plugins.
5) Enabling Pollfish Plugin in your app
The Pollfish plugin you just uploaded is available to any app. Before you can use it in an app you need to add it first to the plugins of the app.
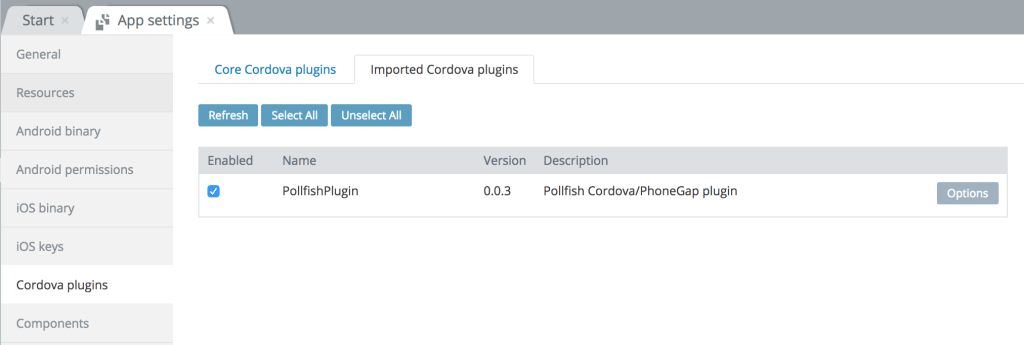
- Inside an app go to App settings > Cordova plugins > Imported Cordova plugins.
- To enable Pollfish plugin for the current app, check the box for the plugin.

That’s the entire configuration you need to do to get access at Pollfish plugin in your app.
5) Showing Pollfish surveys in your app
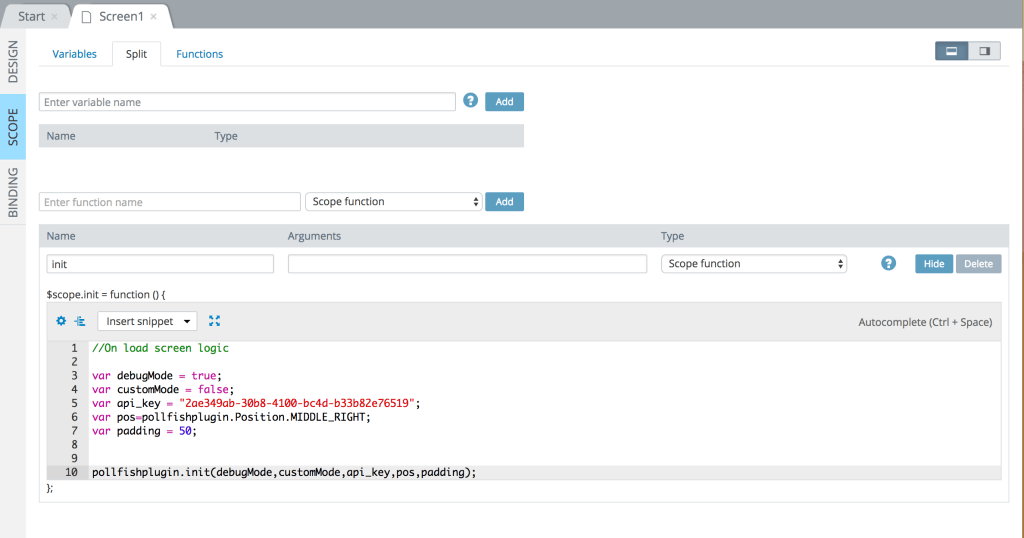
In order to show Pollfish surveys within your app you just have to visit the screen where you want to show Pollfish surveys and place the following code in the SCOPE section/tab in the init() scope function.
The init function takes the following parameters:
- debugMode: – Choose Debug or Release Mode
- customMode: – Init or custom init
- api_key: – Your API Key (from step 2)
- pos: – The Position where you wish to place the Pollfish indicator. There are four different options {Position.TOP_LEFT, Position.BOTTOM_LEFT, Position.MIDDLE_LEFT, Position.TOP_RIGHT, Position.BOTTOM_RIGHT, Position.MIDDLE_RIGHT}
- padding: – The padding (in dp) from top or bottom according to Position of the indicator specified before (0 is the default value – |*if used in MIDDLE position, padding is calculating from top).
You can read more on the available options for initializing Pollfish here.

Initialization example:
var debugMode = true;
var customMode = false;
var api_key = "YOUR_API_KEY";
var pos=pollfishplugin.Position.TOP_LEFT;
var padding = 50;

pollfishplugin.init(debugMode,customMode,api_key,pos,padding);
You can see Pollfish test surveys in debug mode true.
6) Release app to store – Start making money
You are now ready to release your app with Pollfish surveys. Just turn your app to debug mode=false and upload to the relevant store to start receiving paid surveys and start making money!
If you have any question about this integration, please feel free to reach Pollfish at support@pollfish.com.
