Building Mobile Apps With the Appery.io Development Platform and Orchestrate Database
Gone are the days when you could afford to take months to build an enterprise mobile app. In today’s fast market, you need to be able to prototype the app in a few days (or even hours), release the first version in a few weeks, get feedback, fix bugs, release the second version. Repeat.
To help you meet this challenge, Appery.io and Orchestrate have collaborated to create this step-by-step tutorial on just how fast you can build a real mobile app. The app is built in the Appery.io visual development platform, connected to an Orchestrate database via REST APIs, tested, and deployed. (If you’re new to Appery.io you can start with the Building your first mobile app tutorial.)
In addition, Appery.io and Orchestrate will hold a joint webinar titled “Building Enterprise Mobile Apps Fast with the Orchestrate Database and Appery.io Development Platform” covering this material on September 11 at 10:00am Pacific time. Register now!
Orchestrate – database as a service
Orchestrate is a managed service that exposes the querying capabilities of NoSQL databases like ElasticSearch, HBase and Hadoop, allowing developers to add full-text search, events, graph, and key/value to applications with a simple REST API. Orchestrate handles security, monitoring, and daily backups with no licenses, no software, and no lock-in.
Appery.io – mobile development as a service
Appery.io is a cloud-based platform with visual development tools and integrated backend services. Appery.io provides a drag and drop visual app builder for creating app UI, connecting and visually binding to any REST APIs, testing the app, and packing the app for native (iOS, Android, and Windows Phone).
What we are going to build
In this tutorial we will show you how to build a cross-platform mobile app for a food truck that sells burgers. We will call our truck Burgerio. The app allows to place a burger order ahead of time, and when the truck arrives, you’ll simply pick up the order.
What you will learn
After completing this tutorial you will learn:
- Building mobile app in Appery.io
- Creating and using Orchestrate database
- Connecting for Orchestrate database from Appery.io app using REST APIs
- Publishing the app as HTML5, or PhoneGap
Before you begin
Before you begin, you need to have an Appery.io account and an Orchestrate account. That’s pretty simple to do; just follow the links below to sign up:
Sign up for an Appery.io Starter (free) plan
Sign up for an Orchestrate (free) plan
Building the mobile app
You will perform the following steps to build the app:
- Create a new app
- Build app UI
- Orders page
- AddOrder page
- DeleteConfirmation popup
- Test the UI
- Create a database (in Orchestrate)
- Define and bind REST API services
- Test
- Deployment options
- Appery.io HTML5 hosting
- Package as binary
Creating a new app
To begin, you are going to create a new app. Click the “Create new app” button, name the app: Burgerio, and click “Create.”
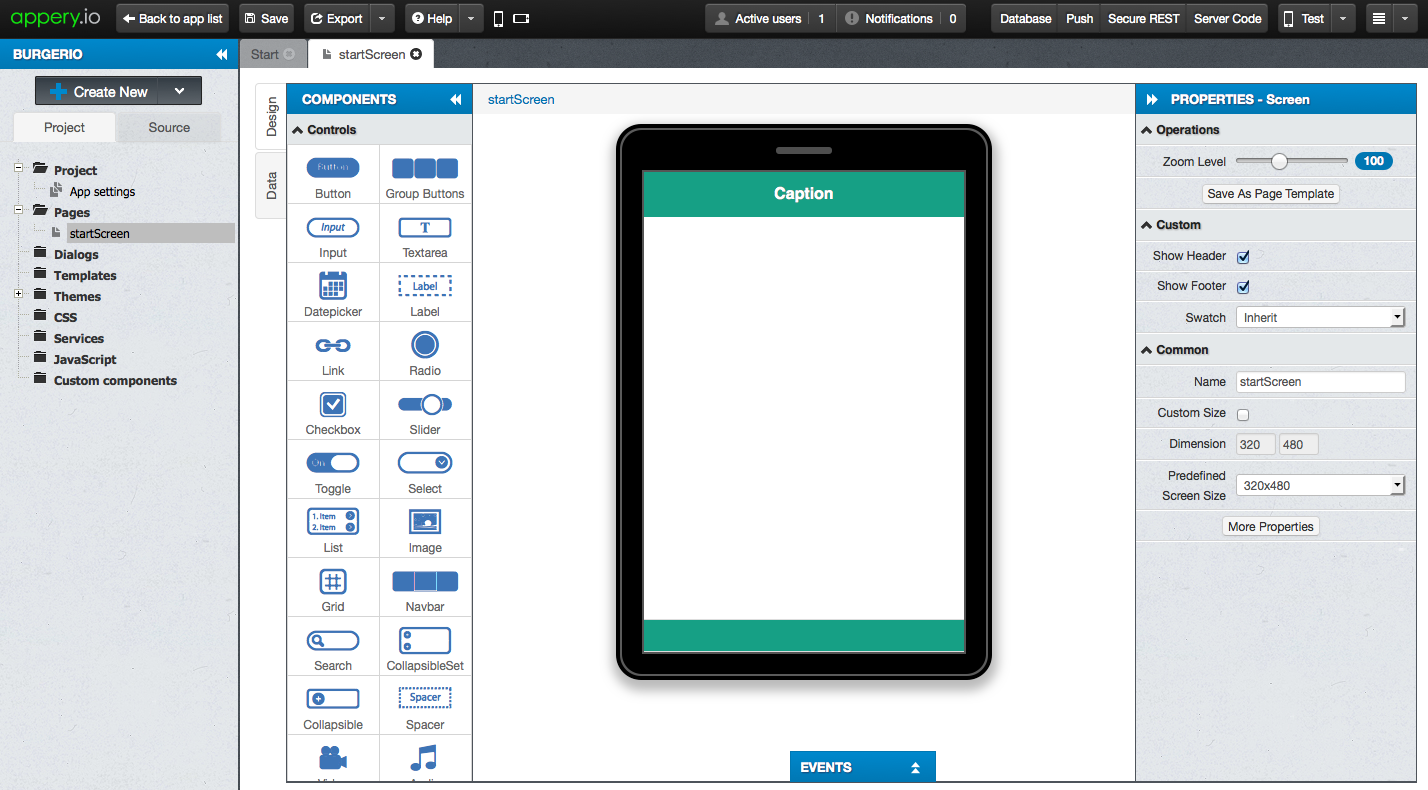
When the new app loads, you will see the Start page (this page has links to documentation, tutorials, events, etc).
Open the first page: Pages > startScreen.
Let’s quickly pick a different theme for our app. Go to Project > App settings > General, for Theme, select flat-ui.
Go back to the startScreen page, and you will see this:
Building the Orders page
Okay, lets build the UI for the Orders page:
1. The first step is to rename the page. With the page name selected (use breadcrumbs to select startScreen), rename the page to Orders in Properties.
2. Select the Header and change its Text property in the Properties panel to Burgerio.
3. By using the drag and drop place the Button component on the page (drag it on the Header component right to the Burgerio title). Change its Text property to New order and its Name to navigate_to_add_order_button. Also choose the “plus” icon by clicking “Icon” in Properties panel:
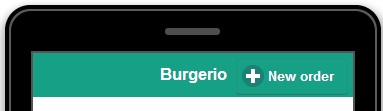
This button will navigate the user to a page where a food order can be made.
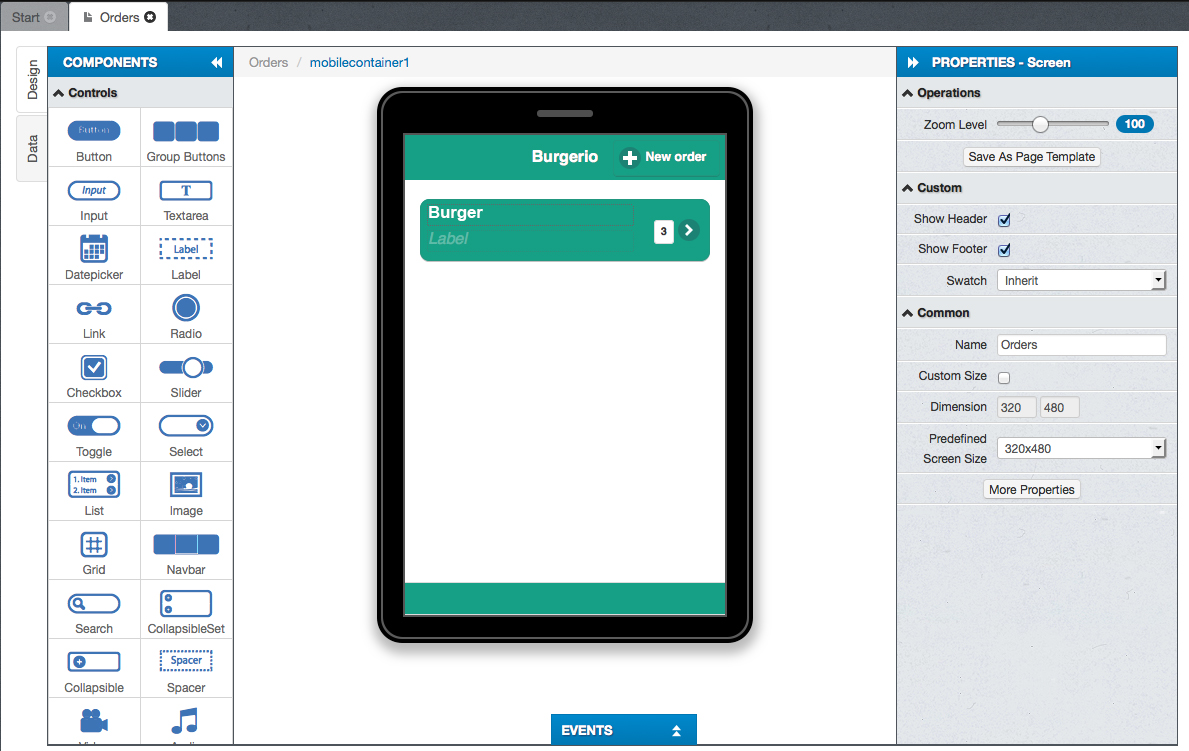
4. Now place the List component on the page. This list will display all the orders. Change its Name to records_list. Because the List items will be generated dynamically based on the retrieved data, you should leave only one item. Change the Items property to 1 and click “Apply”.
5. We will use Counter property of the List item to show how many burgers of each type were ordered. Select the List item (use breadcrumbs for simpler navigation) and check the “Counter Visible” property in the Properties panel. Also change its Name to records_item.
6. We’re almost done with this List– we just need to place two labels inside of it. Drag two Label components directly into the List item.
7. Select the first label and change its Text property to Burger and its Name to burger_label. Burger name will be displayed using this label.
8. The second label will be used to keep the ID of the current order (retrieved from Orchestrate backend, we will come back to this later). Select it and change its Name to order_number. Uncheck the “Visible” checkbox.
The final Orders page looks like this:
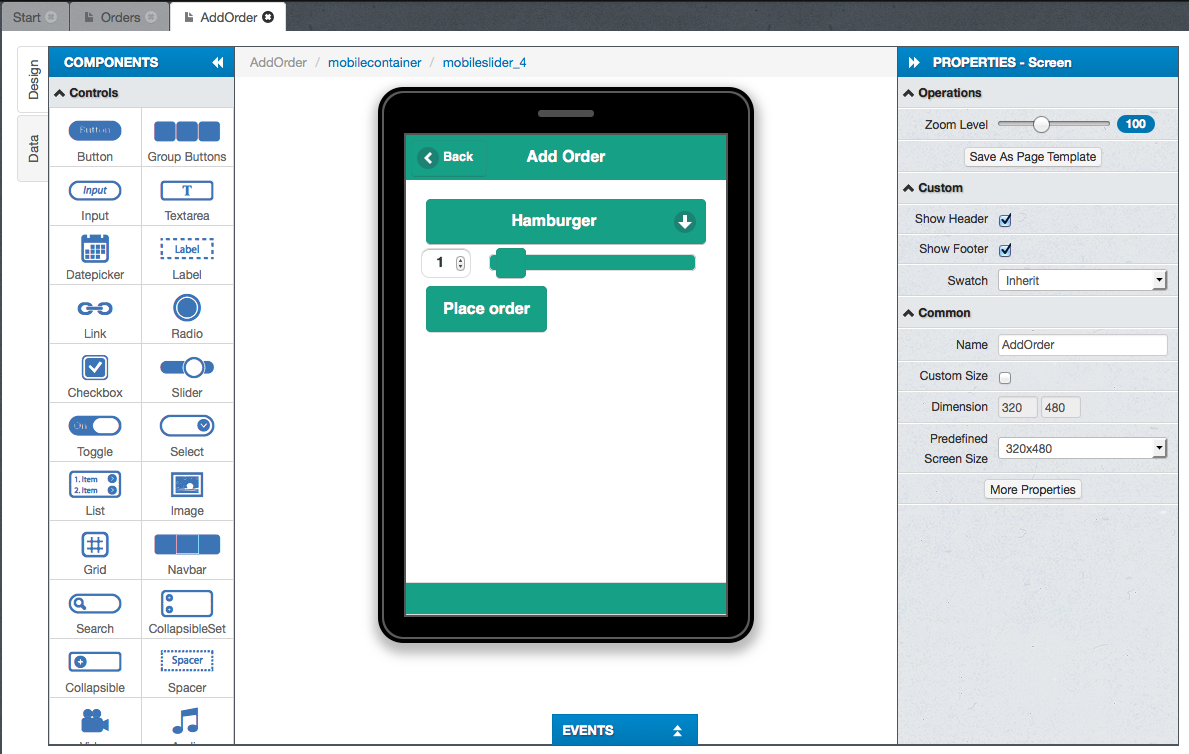
Building the AddOrder page
The second page will allow you to place an order.
1. To create a new page select Create New > Page. Type AddOrder and click “Create Page.”
2. Select the Header and change its Text property in the Properties panel to Add Order. Check the “Back Button” checkbox.
3. Place a Select component into the AddOrder page. This component will be used to select the burger that you want to order. Change its Name property to hamburger_select. In the Properties panel, click “Change” to the right of the Options label. Configure the Select component Options as following:
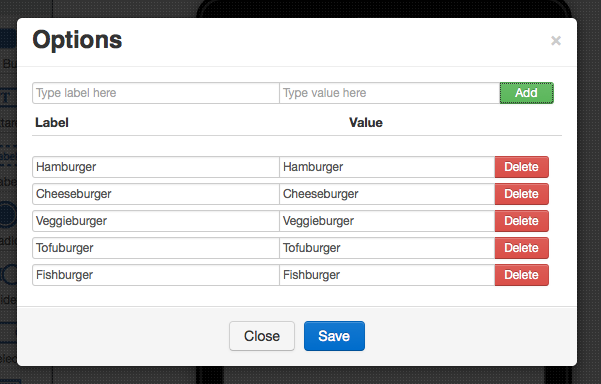
To add new values, enter new label/value pairs and click the “Add” button.
4. Now lets add a Slider component to a page and configure it. By using this component, the user will choose the amount of ordered burgers. Drag the Slider component to a page below the Select. Change its Value (default value) to 1, Min value to 1 and Max value to 10. Also, change its Name property to qty_slider.
5. You just need to place a Button component that will save the order into the Orchestrate backend. Add a Button component to the page and change its Text property to Place order. Also, change its Name to place_order_button, and check the “Inline” option.
The final AddOrder page looks like this:
Okay, you are almost done with the UI. The last page (dialog) you need to create is when deleting an order.
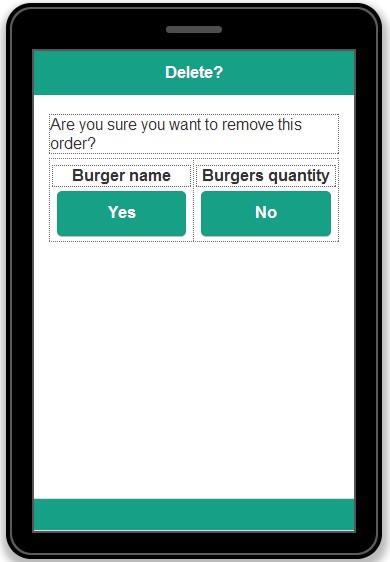
Building the DeleteConfirmation dialog
- Click Create New > Dialog. TypeDeleteConfirmation and click “Create Dialog.” The dialog similar to the classic page, but it can be opened as dialog (like a popup).
- Select the Header and change its Text property in the Properties panel to Delete?
- Next, add the Label component and change its Text property to Are you sure you want to remove this order?
- Add the Grid component. The Grid will serve as convenient container to place other components. Change its Rows count to 1 in the Properties panel:
- Place the Label component in the first Grid column. Change its Text property to Burger name and its Name to burger_name.
- Place a Button below the Label and change its Text property to Yes. Also change its Name property to yes_button.
- Place the Label component in the second Grid column. Change its Text property to Burgers quantity and its Name to burgers_qty.
- And place the last Button below the burgers_qty label and change its Text property to No. Also change its Name property to no_button.
The final DeleteConfirmation dialog looks like this:
Adding navigation
Now, when the greater part of the UI is ready, we need the ability to navigate between the pages. By adding a single event, the user will be able to navigate from the Orders to AddOrder page. Go to the Orders page and select “New order.” Expand the Events tab and add the following event:
navigate_to_add_order_button > Click > Navigate to page > AddOrder. Click “Add event”:

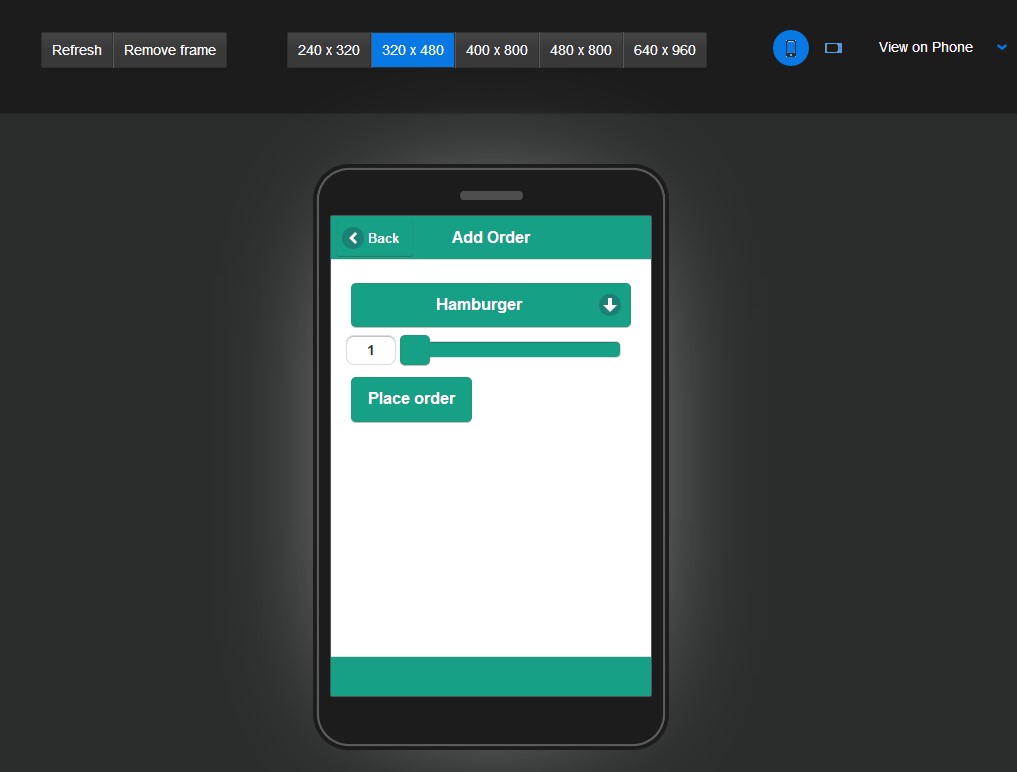
Testing the UI
Burgerio doesn’t have all the functionality now, but you can test the UI and see how it looks. Click “Test” in the top right corner of the screen. Once the page loads, you will see your app in mobile frame.
For instance, here is how the AddOrder page looks:
Creating a database
Now that we are done with the app UI, you are going to create the app backend in Orchestrate.
- Sign in with your Orchestrate credentials at http://orchestrate.io/. Click “+ NEW APPLICATION” to create a new application. Name application as you want and then click the green icon to create it.
- Once the application is created, you will see the dashboard and your API key. Let’s create a new collection by clicking “+NEW COLLECTION.” Name the collection: Orders, and click the green icon to create it.
We will upload all data from the app side, for now just copy the API key.
This is how the Orchestrate dashboard with the database you just created should look:

Everything created in Orchestrate is instantly exposed via REST APIs. Connecting to any RESTful API in an Appery.io app is super easy- and that’s exactly what we are going to do next.
Defining and binding REST API services
When you have more than one API service, it’s a good idea to keep the API key (and other common properties) in a single place and then simply reference it from the services.
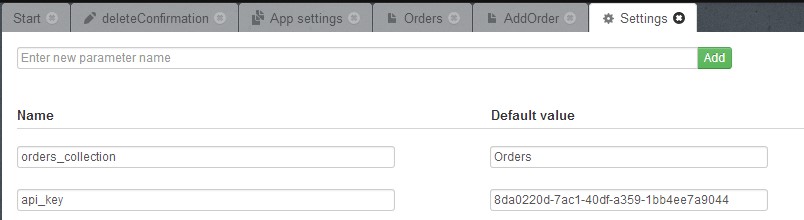
1. Switch to the Appery.io app builder and select Create New > Service. Choose Settings (REST settings) and click “Create Service”:
2. Add two parameters and their values:
- orders_collection – Orders.
- api_key – paste your API key from the Orchestrate dashboard:
Adding the PlaceOrder service
Now lets add a PlaceOrder service that will send the order to Orchestrate.
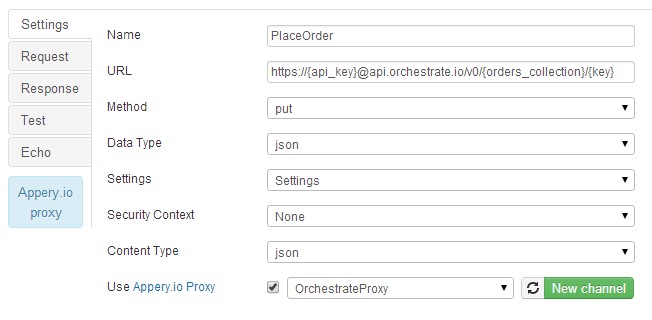
1. Select Create New > Service > REST. Type PlaceOrder and click “Create Service.” Configure the REST service as following:
- Type the following string for the URL field:
https://{api_key}@api.orchestrate.io/v0/{orders_collection}/{key}As you can see, the URL contains values in braces – those values will be taken from the specified Settings file.
- Choose put as Method.
- Select Settings (that was created in a previous step) for Settings.
- Click “New channel” to create a new Appery.io Proxy channel, type OrchestrateProxy and click “Create.” This Proxy channel will be used with all further REST Services.
Here is how PlaceOrder REST Service Settings should look:
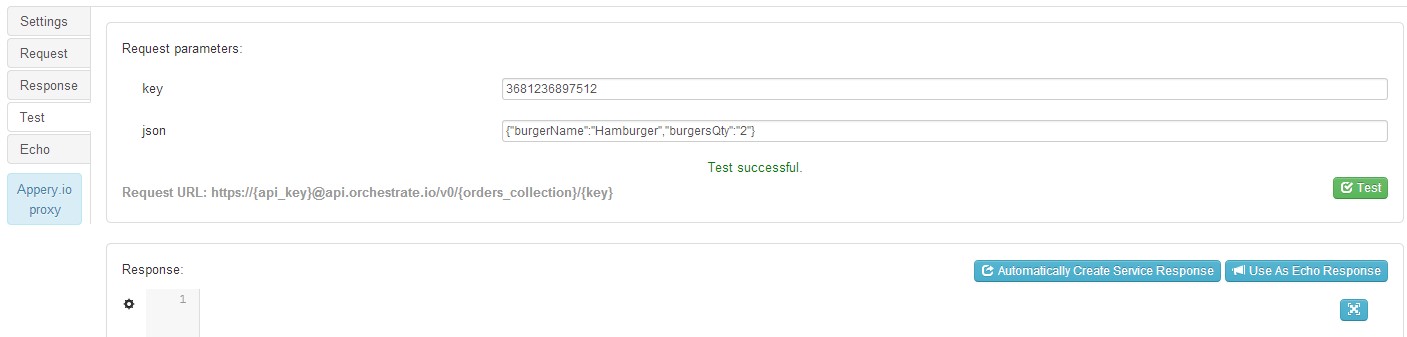
3. Open the Request tab and add two parameters – key and json.
4. Open the Test tab. Specify a key value as number sequence. For example – 3681236897512. And value for json as:
{"burgerName":"Hamburger","burgersQty":"2"}
5. Click “Test.” If you’ll see the Test successful message then order was placed.
Congratulations, you just ordered 2 hamburgers!
6. You can also ensure that order was placed by checking the collection on the Orchestrate side. Go to Orchestrate.io, select the Burgerio_db app and then the Orders collection. The Key/Value tab will open. You shouldn’t type anything here, just click the red square button with small white arrow to make a GET request:
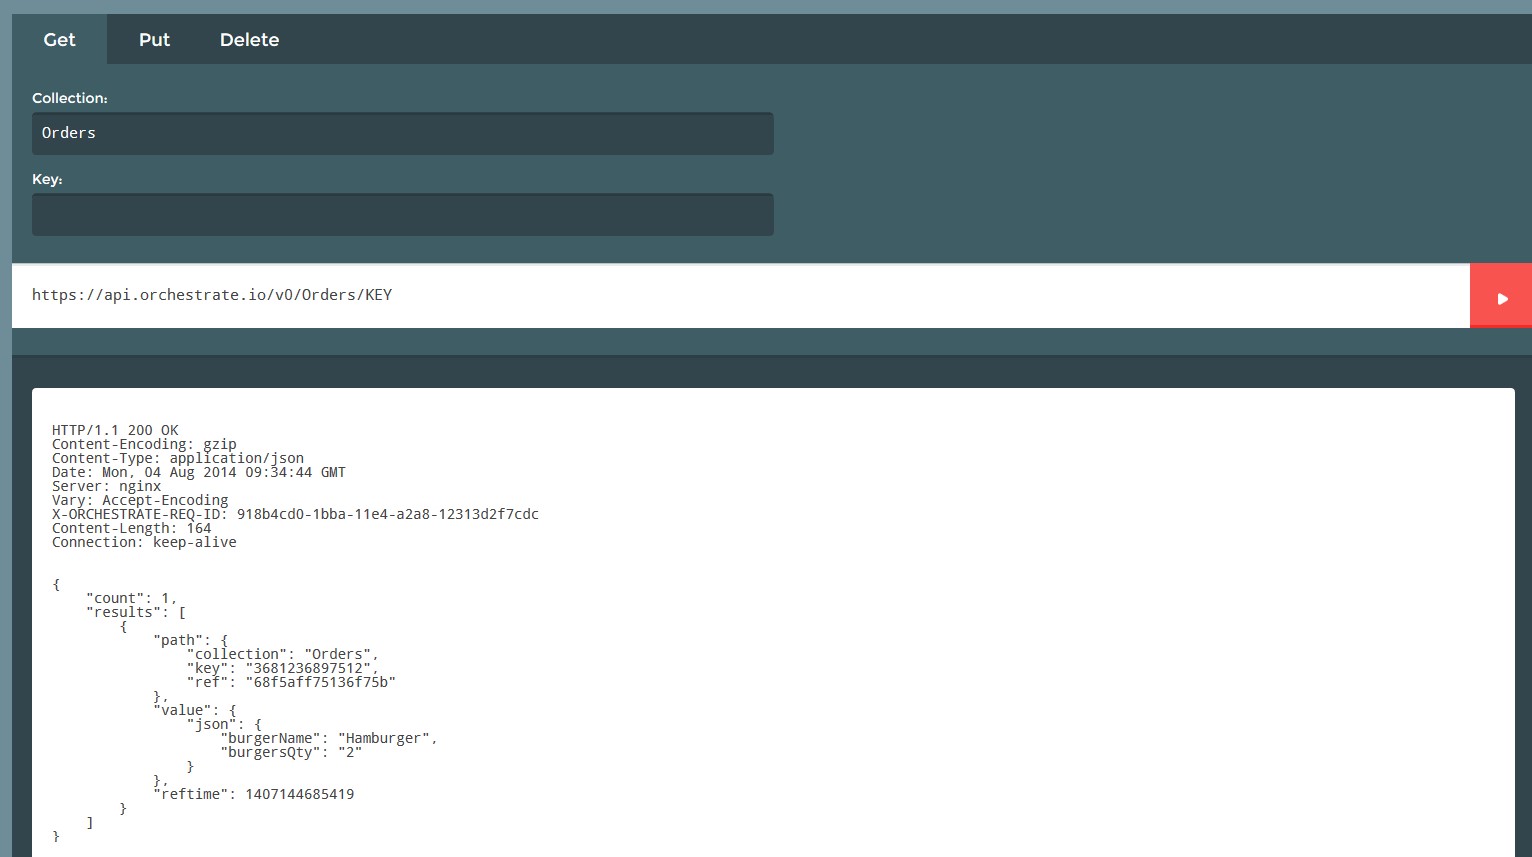
As you can see, 2 hamburgers are there.
Next you are going to add the service to the page:
1. Open the AddOrder page and switch to Data view. Choose Service as datasource, select PlaceOrder and click “Add.” Rename the service instance to place_order:
2. Click “Edit Mapping” to bind the service to the page. Mapping (binding) allows you to take values from the page and use them as values for service input parameters, and take data from the service and map it to the page for display.
3. Request mapping for PlaceOrder service requires a unique value for the key. Click the “Add JS” button for the key parameter. Instead of mapping a value from the page (usually entered by the user), we are going to generate the unique value in JavaScript. Orchestrate stores values under a unique key. This key can used further to retrieve or delete data that was stored under this key. We will show you how to use a simple UUID generator to automatically generate a key.
Add the following JavaScript and click “Save & Return”:
return 'xxxxxxxx-xxxx-4xxx-yxxx-xxxxxxxxxxxx'.replace(/[xy]/g, function(c) {
    var r = Math.random()*16|0, v = c == 'x' ? r : (r&0x3|0x8);
    return v.toString(16);
});
Any time the PlaceOrder service triggers, this code will be executed and will generate a unique key.
4. As the actual data needs to be in JSON format, the actual order payload also needs to be created in JavaScript. Click “Add JS” to the right of the JSON parameter. Add the following JavaScript code and click “Save & Return”:
return JSON.parse('{"burgerName":"' + Apperyio("hamburger_select").val() + '","burgersQty":"' + Apperyio("qty_slider").val() + '"}');
This code will take values from UI components and wrap it in JSON format.
Switch to Design view, select the place_order_button and expand the Events tab. Add the following event:
place_order_button > Click > Invoke Service > place_order.
Adding the GetAllOrders service
Let’s create a service that will retrieve all the orders.
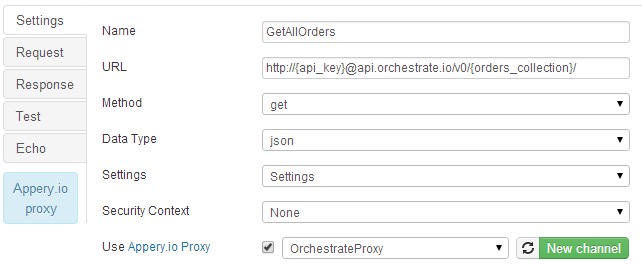
1. Go to the Orders page and select Create New > Service > REST. Type GetAllOrders and click “Create Service.” Configure the REST service as following:
- Type the following string as URL:
http://{api_key}@api.orchestrate.io/v0/{orders_collection}/ - Select the Settings and Proxy:
2. Open the Test tab and click “Test.” You should see one order that you created. Click “Automatically Create Service Response.” This automatically creates the service response structure based on the test data.
3. Open the Orders page and switch to Data view. Add the GetAllOrders service instance. Name it get_records.
4. Click “Edit Mapping.” There is nothing to map for the input. Open the Response tab and create the following mapping:
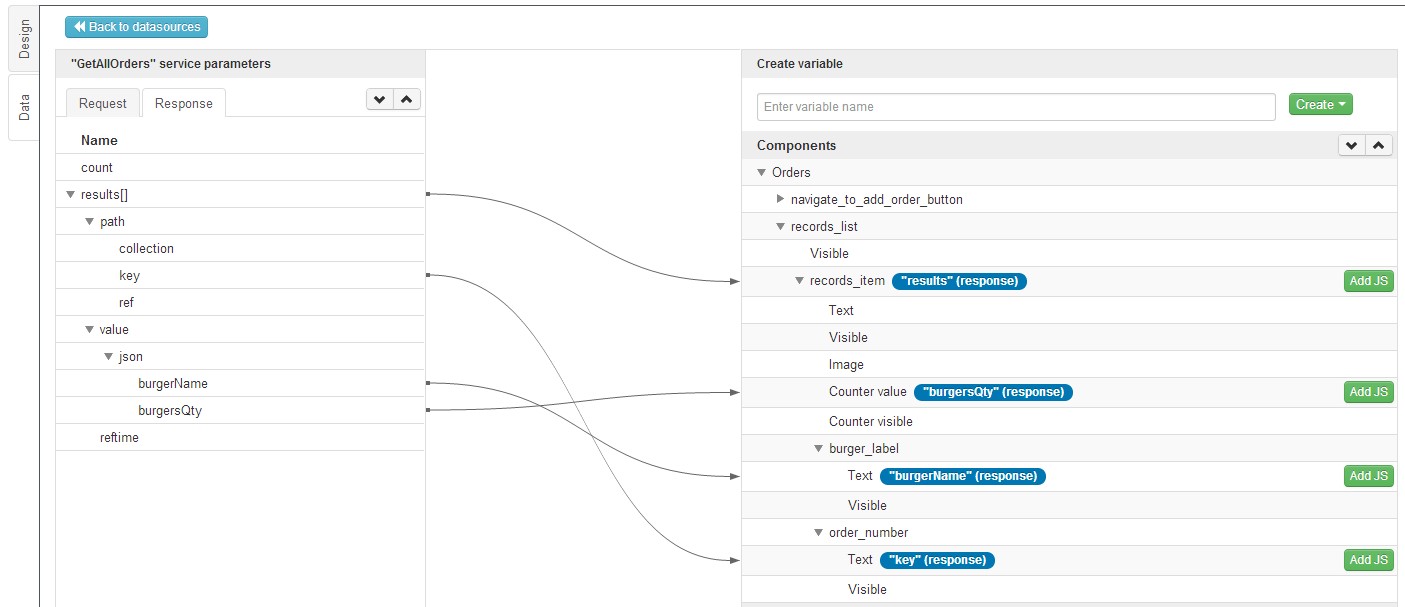
Note: Read more about Appery.io mapping here.
Okay, now switch to Design view and add the event that will trigger the get_records service when page loads. Open the Events tab and add the following event:
Orders > Page show > Invoke Service > get_records.
Now you can test the app! Click “Test” button in top right of the screen and you’ll see your orders when the page loads:

Try to add some orders by navigating to the AddOrder page. Cool, isn’t it?
Setting an event to open the delete dialog
Do you remember that we created a DeleteConfirmation dialog? The user should have the ability to cancel an order, so let’s work on that.
Select the records_item and add the following events:
- records_item > Click > Set local storage variable > selected_order. Check “Bind to component” select the Target component – order_number and Property name – Text. Click “Add event”.
- records_item > Click > Open dialog > deleteConfirmation. Click “Add event”.
This will open up the delete confirmation dialog.
Adding the GetOrder service
Go to to the deleteConfirmation dialog and follow the steps to add a GetOrder service. It needs to retrieve information about the selected order (on which the user clicked):
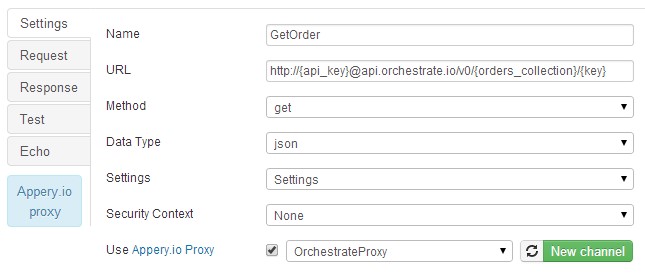
1. Select Create New > Service > REST. Type GetOrder and click “Create Service.” Configure the REST service as following:
- Type the following string as URL:
http://{api_key}@api.orchestrate.io/v0/{orders_collection}/{key} - Select the Settings and Proxy:
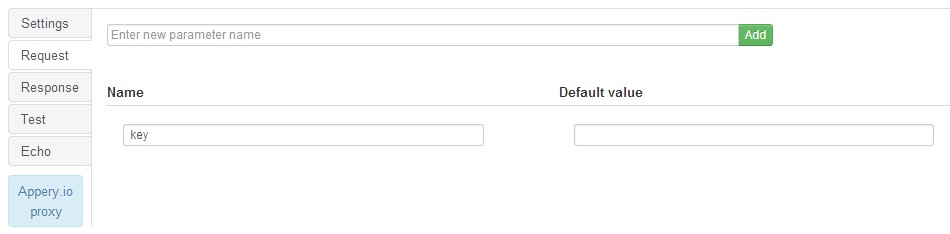
2. Open the Request tab and add the key parameter:
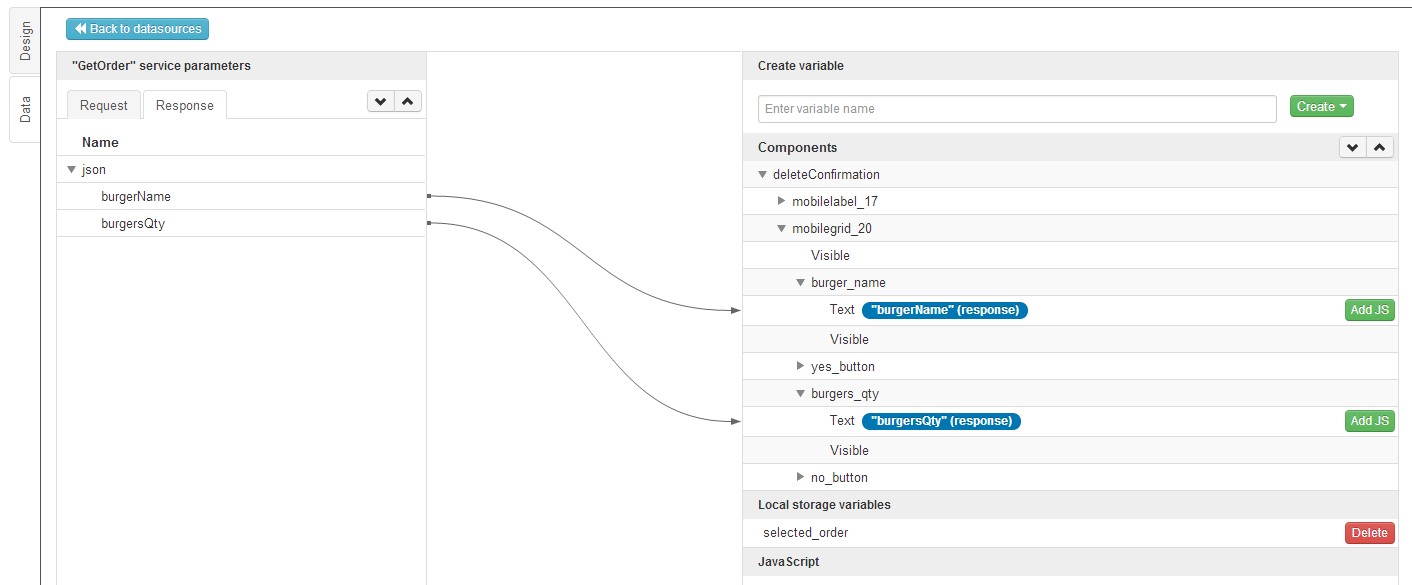
3. Open the Response tab and add the JSON parameter with two nested parameters – burgerName and burgersQty:

4. Add the service instance to the page at the Data tab, and name it get_order.
5. Click “Edit Mapping” for the get_order service and create the following mapping for Request:
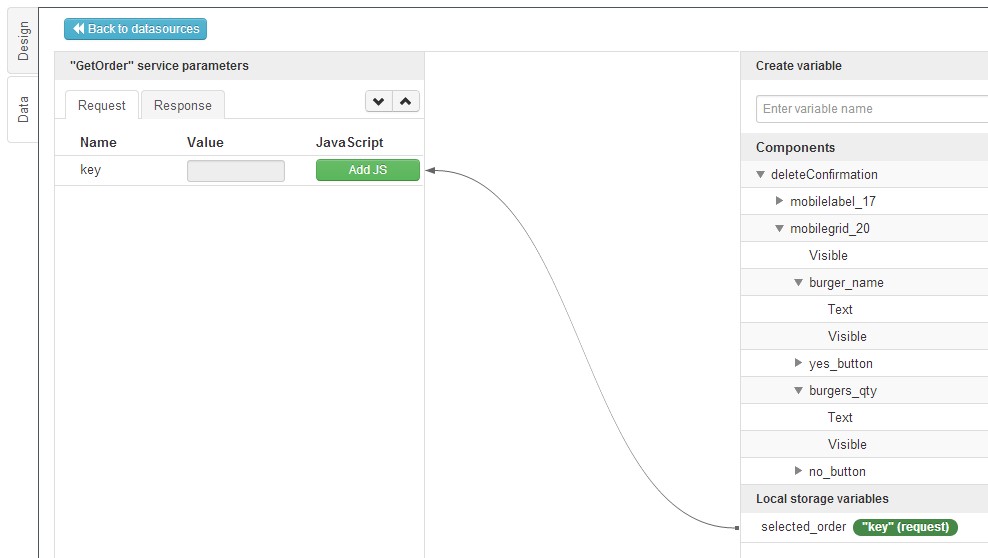
6. Switch to Response tab and create following mapping:
Now we need an event that will invoke GetOrder service on page Load event. Switch to Design view and open Events tab. Add the following event:
deleteConfirmation > Load > Invoke Service > get_order. Click “Add event”.
Adding the DeleteOrder service
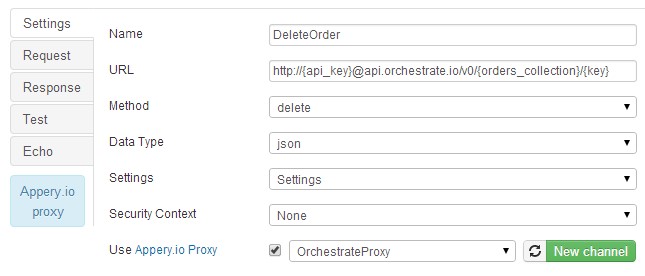
1. Select Create New > Service > REST. Type DeleteOrder and click “Create Service.” Configure the REST service as following:
- Type the following string as URL:
http://{api_key}@api.orchestrate.io/v0/{orders_collection}/{key} - Select get for Method.
- Select the Settings and Proxy.
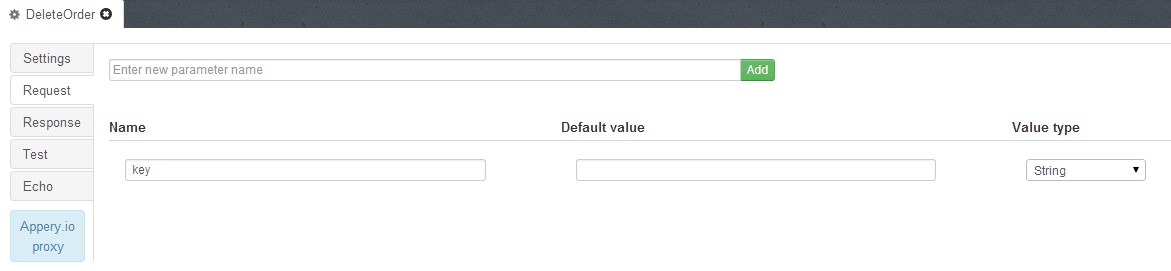
2. Open the Request tab and add the key parameter:
3. Open the deleteConfirmation dialog and switch to Data view.
4. Add the service instance to the page and name it delete_order.
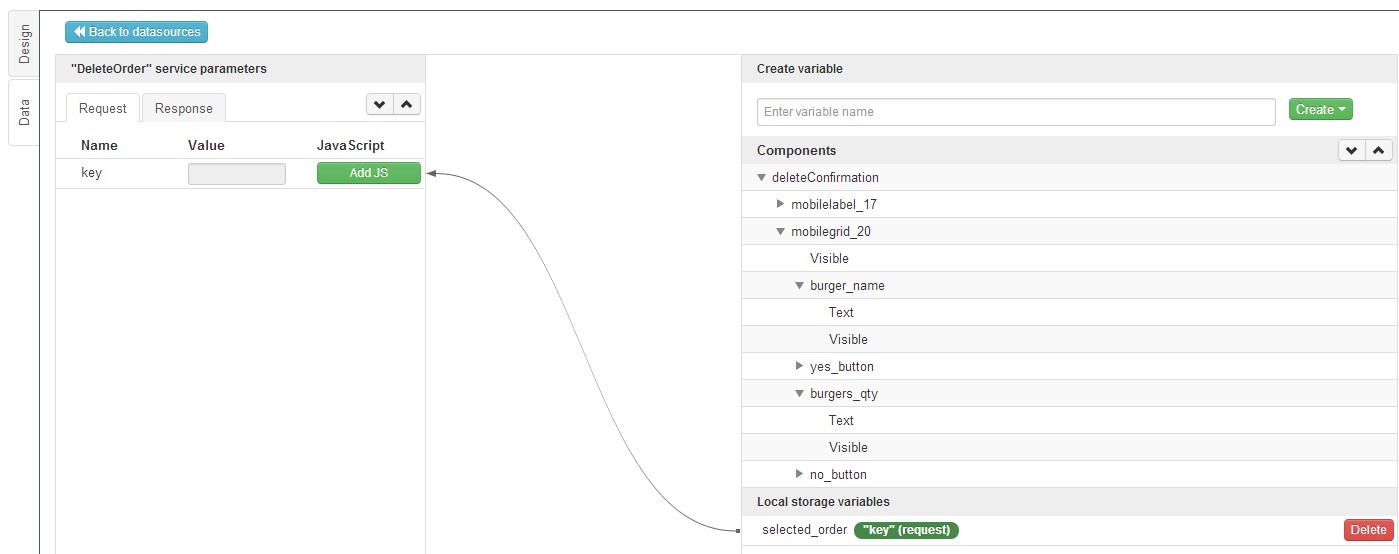
5. Click “Edit Mapping” for the delete_order service.
Create the following mapping for the Request tab:
Now we just need to add events to invoke the services. Switch to Design view and select the yes_button. Add the following events:
- yes_button > Click > Invoke service > delete_order.
- yes_button > Click > Close dialog > DeleteConfirmation:
Select the no_button. Add the following events:
- no_button > Click > Set local storage variable. Type selected_order as Variable name and leave the Value field empty.
- no_button > Click > Close dialog > DeleteConfirmation:
Test the app again and try to remove an order by clicking on it. Here you go- now users can order some tasty burgers and cancel the order if they change their mind.
Publishing the app
Once the app is done, you can publish the app as an HTML5 mobile app, or package it as binary for iOS, Android, or a Windows Phone.
Publishing as an HTML5 app
For instance, you can try our hosting to publish your app. Go to the Appery.io dashboard, select your app (don’t open, just select) and scroll down the page to see the Hosting section. Type burgerio in Appery.io domain (or type another name if burgerio already exists) and click “Publish.” Once the app will published you’ll see its publishing date:
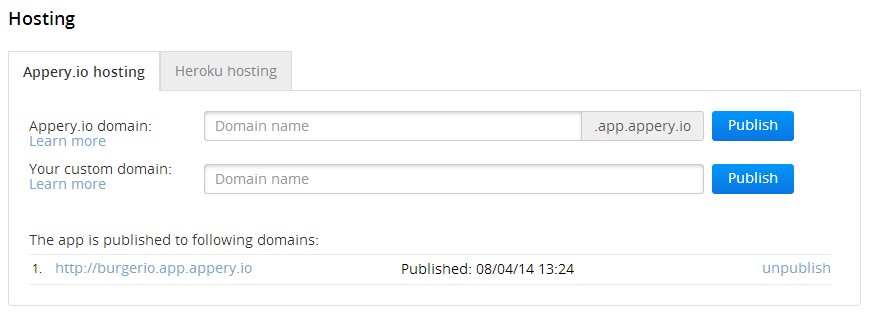
You can now access your app via the following URL:
http://burgerio.app.appery.io/
Packaging for native
You can build a binary to install this app on real devices.
Here is how you can do that for Google Play and iOS AppStore:
To export the app for a specific platform, click “Export”:

Sometimes it’s much faster to use the Appery.io Mobile Tester instead of building and installing the binary each time you need to test your app on the device.